About the 

bosswrench posted:

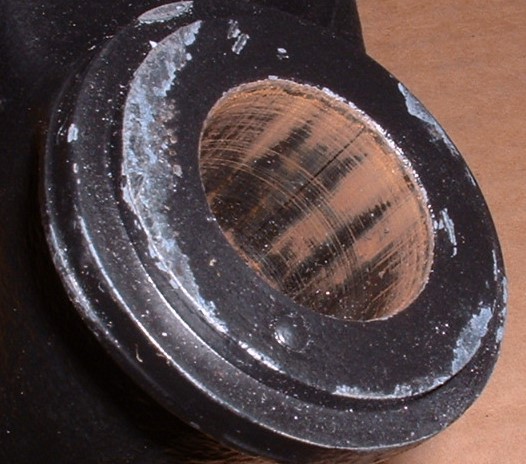
It's also incredibly easy to have the short locating dowel slip out of its hole in the thrust washer; if your washer(s) have a series of small dents in the bronze surface near the pin hole, they came from the washer being mis-registered during assembly. 

Regarding the locating dowel bosswrench mentions, these are the thrust washers I removed during my rebuild. Obviously, the gorilla previously owned/worked on my Pantera only got one installed correctly. Anyway, the dowels that caused the damage were worn down to nubs and had to be replaced. So, I was VERY careful to locate the dowels in the thrust washer during assembly--grease and a big clamp for sure.

Thrust WashersLocating dowel

Attachments

Images (2)
  • Thrust Washers
  • Locating dowel
bosswrench posted:

The design of the rear upright pivot is such that to seal off weather, both o-rings in the stack must be compressed. ...

Those rather stiff outer o-rings must be squeezed a bit to get the assembly in between the lower legs but still keep water out. You do NOT want the system to just slip together! If they do, water can get in.

. . it takes pry bars and a 12" c-clamp to force the parts back together. ******* grease helps.

I really appreciate sharing your experience and knowledge.   Please don't take my comments as a challenge or disagreement, they are just my thoughts actually just more of a rambling.

Over the years I worked devices requiring o-rings.  I have observed there are actually significant considerations to achieve a proper seal.   Over compression was a common failure mode that sometimes was caused directly be the designer.  The groove geometry, oring cross section and durometer not being totally compatible.

I recall one investigation into a "it is suppose too hard to assembly" where choosing a smaller cross section made assembly "normal" AND increased the operational time before leaks reoccurred

Me not being able to observe what seems to be the smallest component of the assembly causes me anxiety.   Just another of the details I wish I could put my hands on.  

Guess I need to take a benzodiazepine and try not to think about things so much


No problems here, JFB. I've idly wondered if those 40-yr-old o-rings have hardened up over time, but no one checked durometer on such things back in the day so we have no baseline. Modern repros may or may not be identical. They 'seal' by being squashed a bit between two flat, greasy surfaces- not exactly the best system.

I honestly don't know how they "seal" at all.

Water can get in through the center of the "cups", and It's not obvious to me that the O-Rings seamlessly mate to the machined surfaces on the bottom of the uprights.


BUT...  My problem was not due to water intrusion, it was due to the inability to get grease into the bushing / sleeve interface for 4 years - even though I thought I was...


Rocky


My system is a bit different. I gun-drilled the lower studs about 4" deep x 1/8" ID on both ends and put in zerks ala Hall. To grease both sides of the central spacer from this point to keep condensation & corrosion at bay, I drilled holes thru the spacer, grooved it and filed notches on both its flat ends so grease has a path to both sides of the spacer, the bushings and the long pivot stud.

Otherwise with this setup, grease has no clear path to both sides of the spacer, as it's ends ride hard against the end caps due to nut torque. The OEM spacer is the actual bearing surface riding in the bushings for the rear suspension, while the long stud is only a tie-bar for the assembly and doesn't move once tightened.

 OEM spacers are hardened high-carbon steel which is very sensitive to rust/corrosion, while the long shaft is low-carbon steel but still rusts every chance it gets. I have a couple of stock spacers that are so badly pitted, they would tear up any bushings I installed. The 'grease' was like brick dust.

So I made grooved, drilled spacers of 316 stainless to cure the condensation problem that corrosion-locks the ID of the spacer to the OD of the pivot stud. There also seems to be a lot of dead space inside the assembly- it takes quite a few slow pumps of grease to purge all the air out past those o-rings; pumping too fast might rupture the rubber.  So far it all seems to work fine- everything is nice 'n greasy on disassembly.

Here's some pictures….

Pantera Performance Kit and instructions.

Pantera_Performance_Kit

Picture showing upright drilled and grease transmission groove in the sleeve.  I verified that my hole in the uprights intersects the groove when the sleeve is in the proper orientation.

Upright_Update_Aug_2019 [2)

Picture showing the "stack-up" I used for assembly.

Drivers_Side_09_Aug_2019 [5)

Harbor Freight 8" bar clamp and floor jack.


Drivers_Side_09_Aug_2019 [7) [Large)

Viola!  Upper ball joint dust boot also replaced.

Drivers_Side_09_Aug_2019 [10) [Large)

On to the other side.

Attachments

Images (5)
  • Pantera_Performance_Kit
  • Upright_Update_Aug_2019 (2)
  • Drivers_Side_09_Aug_2019 (5)
  • Drivers_Side_09_Aug_2019 (7) (Large)
  • Drivers_Side_09_Aug_2019 (10) (Large)
Last edited by rocky

Add Reply

Post
×
×
×
×
Link copied to your clipboard.
×