Well I know many of you purists are not going to like this.
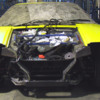
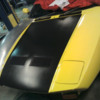
But I bit the bullet a couple of days ago & chopped off the Pantera’s nose.
I was gutting out the front lights, radiator etc ready for new fenders to be fitted.
When I had removed most of the surplus parts I found the front of the car at some time had taken a bang & has been straightened.
This section of the car does bugger all except support the lights & radiator as well as make the car look pretty.
So it was not the fact that the car was structurally un-sound, just that with crumpled & then hammered straight steel it was a bit messy & did not meet my standard of being acceptable. (someone had covered a great deal of the creases with bog, (bondo) )
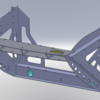
SO……….I took measurements, created a jig that supports the inner fenders from moving during cutting, (the blue structure) as well as another bolt on jig that gives a reference point for the hood hinges.
Then went onto Solidworks & created a new nose structure that supports the bodywork, integrates the hood hinges etc.
This new structure tags together like a jig saw puzzle & laser cut from 2, 3 & 4mm steel plate.
Solidworks tells me I will have a slight weight increase in the region of 4 to 5 kg.
But the alloy radiator has easily saved that amount.
Plus the new nose is a great deal stronger.
Then we cut off the old nose.
This was cut off whilst the car was up on the chassis hoist, not on its wheels which could create chassis flex.
We have added a 65x35x2 RHS crossmember inbetween the the lower chassis rails as well as triangular cut RHS gussets behind this new crossmember.
Also plates to the upper rails that blank them off & give a point to weld the new nose to.
Upon cutting nothing moved at all as 95% of all of the chassis strength is from the front of the suspension arms rear wards.
I was surprised to find no rust at all within any of the structure we opened up.

The old fenders will be completley removed back to the doors & replaced with new items.

Regards,
Tony

Attachments

Images (1)
  • front_cut_copy
Original Post

Replies sorted oldest to newest

And a Solidworks picture of the new nose structure.
Should receive this in a couple of days time from the laser cutters & we will weld it up.
The green tubes you see in the lower crossmember are for access to the lower suspension arm bolts/nuts, so a socket can be passed through the hole.
The hole in the centre of this cross member will have a tube welded through & will become a towing point.
The plates where the hood hinges are located have the same curve as the hoods nose.
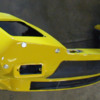
We will make all of the front body work on the english wheel, (with a few detail changes such as removal of the indicator pods, removal of that horizontal box that juts down below the grill & intergrate a new spoiler).
Ahhh the work I create for myself !!

regards,
Tony

Attachments

Images (1)
  • pantera_nose
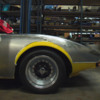
This is a photo of the previously formed fenders we made on the English wheel.
We made a buck out of steel that dropped on top of the original fender as a guide.
These fenders you can see have more of an arch over the wheel, as well as have more of a humped rounded shape as they curve back toward the hood.
Its subtle, but thats what I wanted to do, just a slight tweek on the original shape to take the flatness out of the top of the fender.
Flares have not been created yet as I have yet to finish making the wheels.
regards,
Tony.

Attachments

Images (1)
  • Front_right_side_copy
Reason for doing so?
Well it started with the previous owner’s love of bondo, (body filler).
I personally don't like the stuff being used on nice cars.
A few of the body panels have too much body filler for my liking, as well as rust starting to come through on some of the body work, (no rust in the chassis).
So I set a project to replace some of the panels with new steel items, to rid the car of its last traces of rust & to have a perfectly straight 100% steel body.
So that’s what we are doing.
We are also going slightly thicker on the panels, using 1.2mm sheet.
As I stated at the beginning of this thread, upon removing some of the components in the nose I found traces of the frontal chassis having been damaged at some stage.
So that’s why the nose structure is being replaced.
Pantera nose sections are not easy to find so creating my own seemed the most obvious solution.
At the same time I am changing the contours of the body skin a little to suit my interpretation of the Pantera’s great shape.

Yesterday we removed the doors, gutted them out, cut off the outer skins & we have sent the door frames out for sand blasting.
Once we have new door skins we will then carry on with the front fenders so we can line up the fender lines with the door line.

regards,
Tony.
Gary.
I have had my fibreglass guy make a mould for a RHD dash based on the 73' shape.
He first pulled a lightweight mould from a LHD dash.
Then made a lightweight part out of this new mould.
Cut the part into sections & cut holes in the mould to re-fit the gauge sections back in the mould, but on the opposite side.
Then glass these parts together, lift out, finish the surface of this new created plug & make a new more sturdy mould.
Very cunning as this method retains all of the critical mount points & dimensions so it will be as the original, just mirror image.
Interior wise at the moment will be focused around the RHD conversion.
We tried to make a carbon dash out of the new mould, but as it's a really deep mould its very difficult unless you go to the effort of vacuum bagging.
So I will likely end up with the original trimmed style.

LIV1S
I like your idea of the wall mount mural, that would be a great idea combined with a large background photo of the actual car.
I bet there are very few Pantera front cuts around.

regards,
Tony.

Attachments

Images (1)
  • RHD_dash_copy
quote:
Originally posted by Edge:
Damn Gary you have a lot of Gauges in there.
I love the Tacho, very simple & clear.
Tell me, what are all the small gauges?
You have provision for 9!!

regards,
Tony.


I thought that too. Actually I am missing missing one.

Dash is:
Fuel Level
O2 Gauge

Center Panel:
Oil PSI
Vac
Trans Temp
Air Ride PSI
Volts
Oil Temp
Water Temp

The small switches under the Oil and Water temp are to switch to 2 different locations to check temp.

The PSI is for the front Air shocks but I still need the tank pressure. I need to either add another gauge or use a valve to swap pressure source. I may place a hidden gauge inside the console for tank pressure.

Of course, if you look through the rear view window you also have Fuel Pressure.

Large switch on the right is a momentary toggle up/down to raise and lower front of car using the air.

Add Reply

Post
×
×
×
×
Link copied to your clipboard.
×