
Replies sorted oldest to newest

The reason I ask, is that my OEM rad lasted 24 years. I never had cooling problems so when it sprung a leak I had it repaired for $50.

But instead of putting it back installed a Fluidyne. Can't say it cooled any better but it looked cooler. Anyhow, less than 3 years later it's leaking from 3 or 4 spots. It costs more to repair than buy another one. But I'm not anxious to install another short term aluminum rad.

Yes it was installed properly and sits on nice rubber grommets and rubber fitted ears. I have a fine cooling system, two good pushers and 1 sucker. Neither touch the rad. I rarely need more than one fan on at any time. Cool engine. Good systems. Well maintained.

People say iron blocks and aluminum rads don't work. I'm thinking of going with Hall's 6 row brass rad this time. It's more expensive than a Fluidyne, but not if it lasts more than 3 years.

David I'm throwing this in mostly for the new guys reading your thread, but I've made comments regarding radiators that apply to your question. It helps to review why we do the things we do.


Cooling system description

The Pantera's cooling system consists of a short list of components:

  • A high flow thermostat and controlled bypass system integral to the 351C engine block.
  • A centrifugal coolant pump integral to the 351C engine block and driven by the crankshaft. The crankshaft and water pump pulleys are unique to the Pantera, they are smaller than those employed in other 351C equipped Ford and Mercury vehicles. The pulleys are both 5.5" in diameter; the pulley ratio is therefore 1:1 meaning the coolant pump operates at the same speed as the engine (note: the coolant pumps in Ford and Mercury vehicles without a/c were 4% under-driven and they were 10% over-driven when the vehicles were equipped with a/c).
  • A twin pass cross-flow radiator mounted in the front of the car
  • Dual electric cooling fans mounted in front of the radiator; one cooling fan was thermostatically controlled and the other manually controlled in the earliest Panteras, and both fans became thermostatically controlled in 1972. The fan controls consist of a pair of relays controlled by a pair of thermostatic switches mounted in the right hand radiator tank.
  • Two tanks located in the engine compartment. The first tank, referred to as the system tank (also referred to as a pressure tank or a supply tank) is configured as a functional de-gas tank except it has the cooling system’s pressure cap mounted on top instead of a vent. The second tank is plumbed to function as an expansion tank (a pressurized recovery tank).
  • The cooling system plumbing consists of 1-3/8" OD metal tubing which runs below the car to connect the radiator to the rest of the cooling system located in the engine bay behind the passenger compartment.


The 351C controlled bypass high flow cooling system

The 351C was designed to employ a Robertshaw high-flow thermostat as standard equipment and it incorporates a unique high-flow warm-up system Ford called a controlled by-pass system. A high volume of coolant was recirculated within the block (bypassing the radiator) during warm-up. This high flow bypass system prevented the formation of hot spots in the cylinder heads while warming the motor to operating temperature more quickly and more evenly.

Diverting a high volume of coolant away from the radiator would lead to over-heating during normal vehicle operation, so coolant recirculation was controlled (shut-off) once the motor reached operating temperature. This was accomplished via a unique 11/16” OD copper “button” on the bottom of the Robertshaw thermostat which extended downward as the thermostat opened and plugged an orifice in a brass plate mounted inside the block immediately below the thermostat. The addition of the 11/16” OD button to the Robertshaw thermostat makes that particular thermostat unique to the Cleveland engine series. The high flow warm-up and controlled bypass aspects of the cooling system built into the 351C were advanced designs for their day, and cannot be improved upon even today but this unique design makes it imperative to locate and use the proper thermostat. The cooling systems of modern motors have similar functionality, but it is accomplished with a "divorced" thermostat, one that is mounted externally from the engine block. The 351C was unique in accomplishing this functionality internally ... and it was accomplished with only a small modification of the standard Robertshaw thermostat. Unfortunately that small modification has been a major stumbling block.


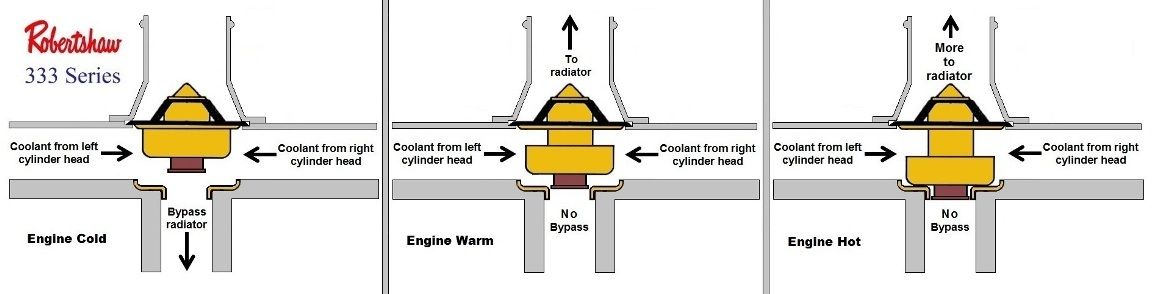
The Pantera's cooling system woes

The cooling system built into the 351C performs admirably if the proper thermostat is installed. Unfortunately the same cannot be said for the remainder of the Pantera's cooling system. Here's a list of the cooling system's many issues:

  • A Veglia coolant temperature gage was used in conjunction with an incompatible Ford temperature sending unit. The gage had a maximum scale reading of 230°F even though the cooling system wouldn't boil over until 250°F. Temperature readings often hovered at full scale causing owners concern! In regards to the high temperature readings Ford's technical service bulletin #8 had the audacity to state that readings of 230°F were not abnormal! The 230°F gage was replaced with a gage having a maximum scale reading of 260°F in July 1973. Ford also recommended operating either gage with a 10 ohm - 1/2 watt resistor in series with the sending unit in order to provide a mid-scale reading under normal operating conditions, even though mid-scale was 160°F on the original gage and 190°F on the replacement gage.

  • The ignition controls were augmented by DeTomaso with an electric ported vacuum switch (aka the PVS valve) to contend with the overheating issues Pantera owners were experiencing. The vacuum switch was designed to retard the ignition thereby reducing the engine’s idle speed by 100 to 400 rpm when a predetermined high temperature limit was reached. Retarding the ignition increases the cooling system's heat load, while reducing idle speed also reduces the speed of the coolant pump. This response to high coolant temperature was opposite to the way in which Ford’s ignition controls were normally designed to react to high coolant temperature. The electric ported vacuum switch did not alleviate the Pantera's propensity to operate hot during stop and go driving.

  • The radiator was located in the front of the Pantera, remotely from the engine which was located behind the passenger compartment. The plumbing between the engine and radiator ran below the vehicle, therefore any air in the cooling system was trapped in the top of the radiator without any means of venting. The effective surface area of the radiator decreased as air collected in the radiator; in fact enough air could collect in the radiator to restrict the circulation of coolant in the cooling system. Ford was aware there was a problem with air collecting in the radiator, they made a few different revisions to the radiator vent system, connecting the top of one tank or the other to various locations in the cooling system, including connection to an air removal "venturi" located downstream of the radiator's outlet, but none of the revisions were successful; therefore the Pantera's cooling system has never had a functional air venting system.

  • For any given engine speed the pumping rate of the coolant pump is lower in the Pantera than it was in a 351C equipped Ford or Mercury; not because of the pulley ratio but because the Pantera's cooling system plumbing between the engine and the radiator was more restrictive. The Pantera's plumbing is smaller in diameter (especially between the radiator outlet and coolant pump inlet), it is greater in length, and it has a greater number of bends (especially 90° bends).

  • The coolant pump inlet was originally connected to the under-car tubing via a 90° metal tubing elbow and a 90° rubber hose elbow. This arrangement interfered with the shift linkage in some cases, and the rubber elbow was known to collapse at low engine speeds which severely restricted coolant flow. This plumbing arrangement was replaced in May 1972 by a "double-bend" metal tube which only used a short-straight rubber hose to connect to the pump inlet. The new arrangement created more clearance for the shift linkage and made it impossible for the rubber hose to collapse.

  • The twin pass radiator was originally designed with a vertical baffle in the right hand tank which divided the radiator into a rear pass and a front pass; it was determined the vertical baffle was responsible for some of the Pantera’s overheating problems because too much coolant flowed around the baffle thereby bypassing the radiator. The design of the Pantera’s radiator was revised beginning April 1973; the new design effectively eliminated excessive coolant flow around the baffle by replacing the vertical baffle with a horizontal baffle which divided the radiator into a lower pass and an upper pass.


  • The electric power for the cooling fans was supplied to the fans through the ignition switch even though there were relays in the fan circuit; in other words a high current load was routed through the ignition switch contacts unnecessarily. This problem is exacerbated when high output fans are installed having motors which draw more current than the OEM fan motors.

  • Power for the fan circuit and the engine's ignition circuit was supplied to both circuits "downstream" of the ignition switch, configured in such a way that the two circuits remained electrically connected even when the ignition switch was in the "off" position. This allowed the "back emf" generated by the spinning fan motors to supply voltage to the ignition system and keep the motor running even though the ignition switch was turned "off". This problem is exacerbated when high output fans are installed having motors which are larger than the OEM fan motors.

  • The oem fan switches operated in conjunction with a 192°F (89°C) thermostat. Both fan switches were installed on the right hand side of the radiator, one above the outlet nipple and one below the inlet nipple. Both fan switches were originally installed in the same tank (the outlet tank) because the radiator was originally equipped with a vertical baffle. One fan switch was set at 158°F (70°C); the other fan switch was set at 185°F (85°C); these settings seemed appropriate based on the original design of the radiator. The switches became located in different tanks however as a result of replacing the radiator's vertical baffle with a horizontal baffle (April 1973). The upper switch remained in the outlet tank but the lower switch sensed the temperature of the coolant in the inlet tank as a result of the revision. Strangely, Ford did not revise either of the fan switch settings in conjunction with the radiator baffle revision, and the fans ran constantly instead of cycling on and off as they normally do in other cars.


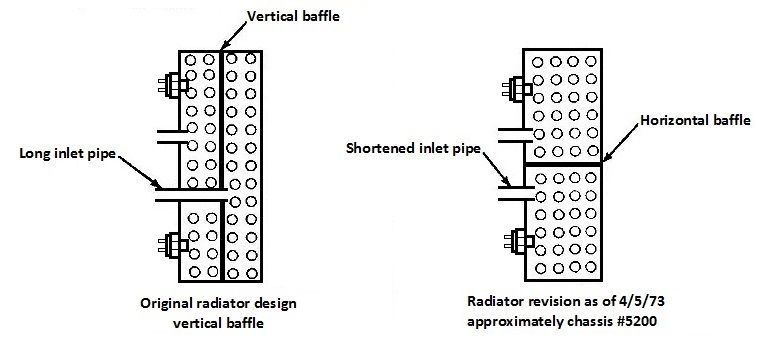
The Pantera is notorious for overheating during stop and go driving. The engine running-on after the key is turned "off" was a secondary problem that annoyed owners. The overheating problem was resolved to a degree by two of the changes mentioned above: (1) revision of the coolant pump inlet plumbing and (2) replacement of the vertical radiator tank baffle with the horizontal baffle. The 1974 L model Panteras could idle all day long without overheating, with the the air conditioning operating, on a summer day ... even with the oem 4 blade radiator fans! Most owners would agree however even the 1974 Pantera's cooling system performance during stop and go driving is perhaps best described as "fragile".

To summarize what ARE the primary causes of overheating:

  • Air trapped in the radiator, no functional air removal system.
  • Coolant leakage around the OEM radiator’s (pre-April 1973) vertical baffle.
  • Insufficient coolant flow rate resulting from length, diameter, and number of bends in the coolant system plumbing
  • Lengths of rubber hose in the plumbing between the radiator outlet and coolant pump inlet collapse at idle and low rpm, severely restricting coolant flow.


Subsequent contributors to overheating:

  • The electric ported vacuum switch
  • Insufficient ignition advance at idle (retarding the ignition made the motor less efficient, therefore the wasted heat raised the exhaust temperature and increased the cooling system’s load)
  • Insufficient engine speed at idle (slowing the engine reduces the coolant flow rate!)
  • The carburetor was calibrated lean for emissions


Contemporary causes of overheating

  • Use of the wrong thermostat (number 1)
  • The accumulation of air in the radiator or engine block
  • The coolant flow rate remains too low!
  • Lengths of rubber hose in the plumbing between the radiator outlet and coolant pump inlet collapse at idle and low rpm, severely restricting coolant flow.
  • The radiator with a vertical baffle was never replaced
  • The electric ported vacuum switch is still in service
  • Installation of the wrong pressure cap (insufficient cooling system pressure)
  • A poorly operating thermostat
  • The engine is in a poor state of tune (ignition or carburetor)
  • One or both head gaskets have been installed with improper orientation
  • The brass orifice below the thermostat is missing
  • The coolant recirculation passage in a Wieand or Milodon coolant pump has not been drilled open
  • The radiator is fouled internally by scale
  • The under car coolant pipes are plugged with rust
  • The anti-freeze is too old (should be replaced every two years)
  • Bad wiring connection to the fans causing one or both to operate at a slower speed
  • Reversed wiring polarity causing one or both fans to blow air in the wrong direction


Cooling system specs

  • Coolant capacity: 6-3/8 US gallons (24 liters)
  • Coolant mixture: 50/50 mix of water and ethylene glycol
  • Boiling point: 250°F at 13 psi
  • Thermostat rating: 192°F (89°C)
  • Pressure cap rating: 13 psi


Cooling system parts circa 1975

Replacement thermostat

  • OEM-temp (192°F): Motorcraft RT-139 or Robertshaw 333-192
  • Lower-temp (180°F): Motorcraft RT-310 or Robertshaw 333-180


Note: The Robertshaw thermostats have been sold in the past by Stant, Interstate and Prestone using the 333-192 and 333-180 part numbers. The thermostats were also sold by Flow Kooler. The 333-180 thermostat was sold in Australia by Dayco under part number DT66A, and it was sold by Summit Racing under part number BRA-333-180. You should check, but it may not be available from any of those sources any longer. The thermostats have been hoarded by certain businesses specializing in Mustangs, 351C engines, etc. Whenever they become available they are sold out immediately.


Robertshaw 333 series thermostat and the brass plate
that presses into the block below the thermostat

The correct thermostats AND brass plates are available from Marlin Jack.
Marlin is a Pantera owner and a machinist. He manufactured the brass plate
in the picture above. Marlin on eBay
Marlin's email: pantera1974@verizon.net

I do not recommend 160 degree thermostats due to the increase in engine wear. see the chart below.


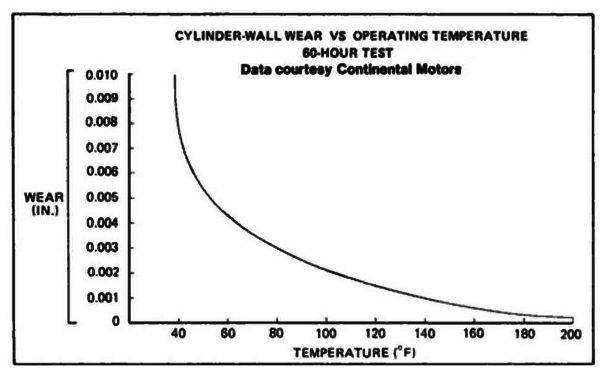
Replacement pressure cap

The pressure cap "neck" of the OEM system tank is designed for European pressure caps, it is taller than a pressure cap neck designed for US pressure caps. Therefore the spring of a US pressure cap is insufficiently compressed and it will not hold the pressure it is rated for. In some cases it will not even seat tightly against the seat. If you cannot find a pressure cap equivalent to the Motorcraft #RS-40 don't despair. You can have a radiator shop replace the European pressure cap neck with a pressure cap neck designed for US pressure caps; or you can purchase an aftermarket tank equipped with the US pressure cap neck out-of-the-box.

  • OEM system tank (metric cap): Motorcraft RS-40
  • Aftermarket system tank (US cap): Motorcraft RS-50A (standard)
  • Aftermarket system tank (US cap): Motorcraft RL-44 (pressure release lever style)


Note: The modern replacement for a Motorcraft RS-50A radiator cap is Motorcraft part number RS-62 or Stant part number 10229. The modern replacement for a Motorcraft RL-44 radiator cap is Stant part number 10329.


Refurbishing the OEM Cooling System:

If you follow the steps below your Pantera will have a cooling system that is in May 1973 show-room condition, with one helpful change (elimination of the electric ported vacuum switch) and one helpful addition (a drain cock installed in the top of a radiator tank to make it possible to manually vent the radiator). Don't be concerned about disabling the vent line in order to install the drain cock, because the vent system never worked anyway; this is why it is necessary to manually vent the radiator in the first place. If you do nothing else to the cooling system one mechanical problem shall still exist, i.e. the coolant flow rate shall still be too low. The three electrical problems of the radiator fans are also left unresolved: (1) the fan controls supply the fan motors with power routed through the ignition switch, (2) the fan motors can back feed power to the ignition when the key is turned off, and (3) the fans are always "on" instead of cycling "off" and "on".

Make sure your Pantera's cooling system incorporates these factory revisions:

  • If the coolant pump inlet connects to the under-car tubing via a combination of a 90° metal tube elbow and a 90° rubber hose elbow replace that arrangement with the upgraded "double-bend" metal tube which only uses a short-straight rubber hose to connect to the pump inlet.
  • If the radiator is still equipped with a vertical baffle replace it with a horizontal baffle, or replace the entire radiator


Helpful changes:

  • Remove the electric ported vacuum switch if it is still in service, it does more harm than good. The only vacuum control recommended for your ignition is one hose connecting the distributor’s vacuum advance directly to the carburetor’s ported vacuum connection or the intake manifold's vacuum connection.
  • Install a drain-cock in the top of one of the radiator's tanks where the fitting for the vent would normally be installed, thus making it possible to periodically vent air from the top of the radiator manually. This also helps purging air from the radiator when filling the system with coolant. Remember to plug the fitting where the other end of the vent hose connects to the cooling system. This drain-cock is not necessary if the tanks are modified to automatically vent air from the cooling system as described further below.
  • Any length of hose between the radiator outlet and the coolant pump inlet MUST be internally supported to prevent it from collapsing. The OEMs often accomplish this with a coiled wire. You would have to buy a 1-3/8 diameter suction hose and remove its coiled wire for use in your Pantera. You could also insert a length of 1-3/8 OD stainless tubing inside the hose. OR … you can use hose that is so thick and so stiff that it resists collapsing (Gates).


Refurbish:

  • Install a new Robertshaw 333 series thermostat (most Panteras have the wrong thermostat installed)
  • Replace the radiator core or replace the entire radiator
  • Service the fan motors (new brushes and bearings) or upgrade the fans with fans rated for increased air flow
  • Replace the coolant pump if the shaft bearing has play or if the pump is decades old
  • Replace the rubber hoses throughout the cooling system (see the warning below)
  • Replace the coolant tubes if needed
  • Replace the tanks if needed
  • Replace the pressure caps


The Hall Pantera Phoenix radiator makes a practical replacement for the oem radiator for 3 reasons: (1) its less finicky about coolant chemistry because its made of copper, (2) it looks and functions like the oem radiator, and (3) it has an "open" core design that offers low restriction to air flow, making it ideal for use with oem style pusher fans.

The Hall Pantera Mirriah fans were practical replacements for the oem fans. They were equipped with 10 blade Flex-a-Lite fan blades, Hall claimed they moved four times more air than the oem fans. Hall also claimed they drew only 7 amps per motor even though they moved more air than the OEM fans, which draw 8.8 amps per motor. That's 14 amps total compared to the OEM fans which draw 17.6 amps total or the Flex-a-lite model 220 fan assembly which was also equipped with 10 blade fans but was rated at 19.5 amps.

Unfortunately the Mirriah fans are no longer available. Similar fans ARE available from Cool Cat Corp however. And Flex-A-Lite fan blades can be drill-out to fit the larger diameter shafts of the Cool Cat fan motors. https://www.coolcatcorp.com/product/CoolCatFan38.html

Warning The plumbing for the heater core is routed through the center console and up under the dash board. That plumbing includes some rubber hoses. If one of those hoses should burst while you are driving your Pantera it will fill the interior with steam and you won't be able to see where you are going. There is one particular little hose adjacent to the accelerator pedal, if that one should burst it will scald your right foot with 180 degree coolant, you won't be able to keep your foot on the accelerator OR use the brake pedal. This happened to me, which is why I am emphasizing do not neglect to replace the heater hoses within the passenger cabin as you refurbish the cooling system.


Parts Choices

RADIATOR:

I'm not going to be too adamant about radiators. Regardless if you choose to recore your OEM radiator or purchase an aftermarket replacement, all Pantera radiators seem to be capable of performing the job they were designed to do. Here's some radiator info I've learned along the way.

The extra cooling capacity of an aftermarket radiator will be most beneficial for high load driving (high speed, uphill) and driving in very hot climates. Unless your Pantera is equipped with an early radiator having a vertical baffle, or unless the radiator core is fouled by scale, or unless you drive your Pantera in a very hot climate the radiator is not the problem when the engine overheats during stop and go driving. That problem is most likely a combination of the wrong thermostat, air in the system, hose collapse between the radiator outlet and pump inlet, and insufficient coolant flow. For instance, an aftermarket radiator full of air is no more effective at cooling than the OEM radiator full of air. This is not to say the extra cooling capacity of an aftermarket radiator combined with the higher air flow of aftermarket fans may not help a cooling system that is marginal during stop and go driving ... it may ... but it does not address the primary source of the problem.

The choice between copper or aluminum for a radiator should not be a point of argument. Race car builders like aluminum mainly because it is lighter, although there are choices in core design available in aluminum that aren't available in copper. Aluminum radiators can withstand a bit more cooling system pressure than copper radiators because the way in which they are assembled is sturdier than the tin-lead solder used to assemble copper radiators. Today's new car manufacturers have turned to aluminum because it is less expensive than copper. Both metals radiate heat well and both are suitable for use in building radiators. Copper radiators are less prone to being damaged by the condition and chemistry of the coolant, but they are heavier than aluminum radiators and usually more expensive.

The extra cooling capacity of an aftermarket radiator having a thicker core than the OEM radiator will make the cooling system more rugged for high heat load applications, such as driving uphill over a mountain pass on a hot summer day. It is also beneficial for racing or continuous high speed driving. The usual choices in aftermarket radiators include the Phoenix radiator sold by Hall Pantera (copper), the Ron Davis radiator sold by Pantera Performance Center (aluminum) or the Fluidyne #FHP35-PAN radiator sold by everyone else (also aluminum). I must emphasize however the extra cooling capacity of these radiators may not improve cooling problems which occur during stop and go driving.


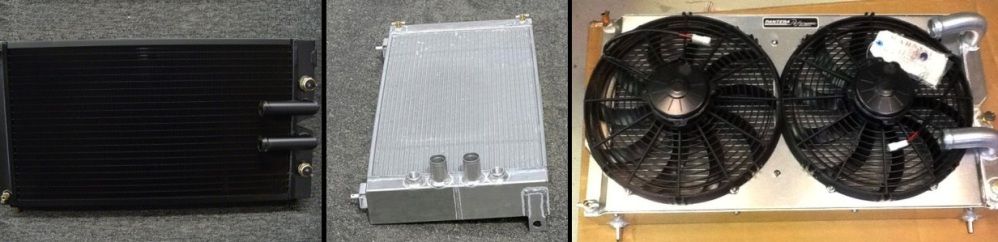
Left Picture: The Hall Pantera Phoenix radiator;
Middle Picture: The Fluidyne radiator (older FHP30-PAN version);
Right Picture: The Ron Davis radiator

According to Evan's Cooling a radiator the size of the Pantera's radiator with about a 3" to 3-1/2" thick core (i.e. the core thickness of the aftermarket radiators) is good for up to 500 BHP under racing conditions; that should be all the cooling capacity a street operated Pantera shall ever need. As a radiator's core becomes thicker the more it impedes the flow of air. Making the radiator core of a Pantera thicker than 3-1/2" "may" actually hurt the cooling system's performance during stop and go driving by reducing air flow. A custom radiator equipped with a thicker core should pose no problem however for a Pantera race car.

Radiators must be mounted loosely in rubber. There must not be any solid attachment to the chassis, they must be independent of the chassis so any twisting or flexing of the chassis is not transferred into the structure of the radiator.

TANKS AND PIPES:


Stainless steel tanks and a stainless steel coolant pipe kit (1-3/8" OD or 35mm tubes).
If your Pantera needs new tanks or pipes, these should be a life time investment.


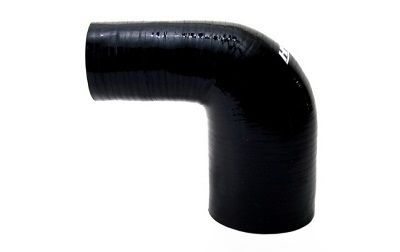
This is a 35mm x 38mm silicone hose reducing elbow for connecting the 1-3/8"
coolant tubes to the 1-1/2" radiator nipples of the older FHP30-PAN Fluidyne
radiator. The new FHP35-PAN Fluidyne radiator has 1-3/8" nipples.

FANS:

The small 4 blade oem fans move a reasonable amount of air, if you increase the coolant system's coolant flow rate you may find the oem fans are adequate for your application. This is not to say there isn't room for improvement; higher capacity fans will obviously push (or pull) more air through the radiator during stop and go driving and thus improve the performance of the cooling system when its needed most. There are 4 ways to install replacement fans in a Pantera.

  • Attached to the original mounts in front of the radiator
  • Affixed to the front of the radiator
  • Affixed to the back of the radiator without a shroud
  • Affixed to the back of the radiator with a shroud


Although fans mounted to the front of the radiator are not as common as fans mounted to the rear, the front mounted fans offer four benefits: (1) oem appearance (2) the radiator can remain up-right (3) no shroud is necessary (4) the fans and the radiator plumbing do not interfere with one another.

Spal is an Italian manufacturer of electric fans that are commonly used and respected throughout the automotive industry (OEM applications, professional racing, motorsports and the aftermarket). Spal fans are available in a wide variety of sizes, configurations and air flow ratings. Flex-a-lite is another reputable manufacturer of electric fans based in the USA.

Always mount the fans in such a way that there is a gap of approximately 1" between the fan blades and the radiator core. Mounting the fans too close to the core will reduce the air moving capacity of the fans. Fans should never be mounted directly to the radiator core. The black plastic ties supplied by fan manufacturers for mounting in that fashion will wear against the tubes in the radiator core and eventually create leaks.


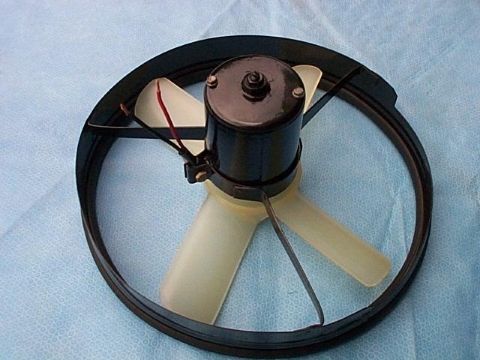
The Hall Pantera Mirriah fans mount in the oem brackets

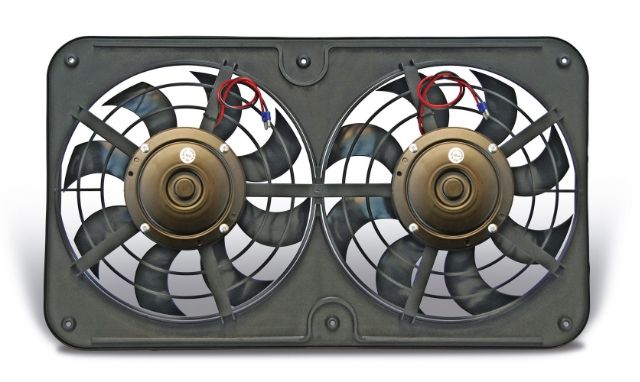
Mounting one or two high volume fans behind the radiator with a fan shroud will optimize the Pantera's cooling system for street use, the shroud spaces the fans properly away from the radiator core to maximize air flow and it assists the fans in drawing air through the entire surface of the radiator; but a shroud should not be used for a race car or a car driven at sustained high speeds, as it will impede air flow through the radiator at high speeds. The most popular option for mounting fans behind the radiator on a shrowd has been the Flex-a-lite model 220 fan assembly mounted behind the Fluidyne radiator. The Fluidyne radiator has straight nipples (hose connections) instead of angled nipples like the oem radiator making installation of the shrouded fan assembly possible. The two 12 inch fans move air at 2500 cfm (combined) and draw 19.5 amps total. The model 220 fan assembly is no longer available from Flex-a-lite however, it has been replaced by the model 420. As far as I can tell the only difference between the two fan assemblies is the model 420 fans have 8 blades each instead of 10, and current draw has increased to 22 amps total. The air flow rating of the fans is unchanged.

PUMP:

I'm not going to be too adamant about coolant pumps other than to say the pump speed needs to be increased! Here's some coolant pump info I've learned along the way:

A coolant pump that flows more coolant at low engine speed should help alleviate over-heating in stop and go traffic. For the best high-flow at low rpm performance the Flow Kooler pump is the way to go, according to several Pantera owners. Flow Kooler coolant pumps have a unique impeller specifically designed to improve low rpm flow. Their 351C pump is p.n. 1648. Stewart components is another pump manufacturer that is highly recommended. Their stage 1 pump for the 351C, p.n. 16143 is advertised to be "high flow" without any further explanation.

The pump for those seeking the highest flow rate possible is the Stewart Components stage 4 pump. The Stewart Components stage 4 water pump flows 160 GPM! If high flow is what you need, that's the pump. Pantera Parts Connection modifies the Stewart Components 351W pump for Clevelands and sells them ready to bolt on (I believe modification involves removal of the back plate and drilling two holes).

If you're going to use the car in applications where it will be run continuously at high rpm consider the Edelbrock #8844 pump, which is equipped with a cast-curved blade impellar. The forte' of pumps with curved blade impellars is high rpm, they don't cavitate until about 7000 rpm, whereas the pumps with stamped steel impellers are cavitating by 5000 rpm. The pumps with stamped impellers still pump coolant when they cavitate, but they consume about twice as much power. The Edelbrock pump saves about 5 bhp at 6000 rpm. Edelbrock makes no published claims of super high flow rates.

If you're going to use the Weiand #8209 coolant pump, the Milodon #16235 (hi vol) coolant pump, or the Milodon #16335 (std vol) coolant pump I recommend drilling out the recirc passages to at least 5/8"; the passages are plugged as the pumps come out of the box. Drilling out the passages will allow the 351C recirc system to function as designed, it will allow you to use the proper thermostat, and your motor will warm up properly.


The Laws of Physics Governing the Performance and Behavior of Cooling Systems

  • The cooling system is a closed loop fluid system. In order for coolant OR air to flow from one place to another within this system it MUST flow to a zone of lower pressure. It is impossible for it to do otherwise.

  • Gases (such as air) are compressible. If the volume of a gas remains constant when it is heated or cooled the gas pressure shall simply increase or decrease.

  • Fluids (such as a 50/50 coolant mixture) are not compressible. As fluids are heated or cooled their volume shall expand and/or contract. A closed loop fluid system must make allowance for the expansion and contraction of the fluid.


Drawing Detailing the Pressure Zones Within the OEM Cooling System
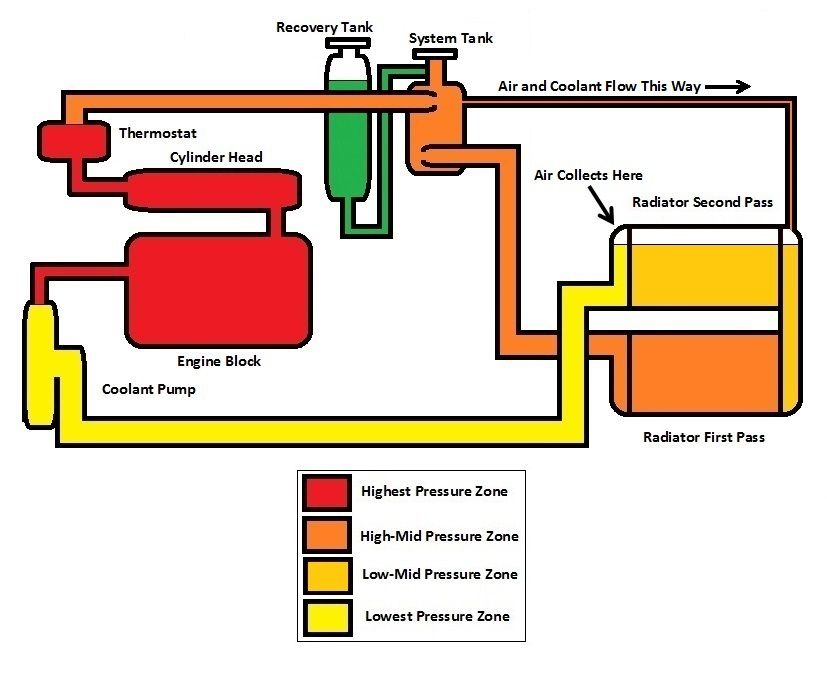


Observations:

  • It is contrary to the laws of physics for air to flow from the radiator to the system tank (swirl tank). Observe the picture above; the tanks at the top of the radiator are in lower pressure zones.

  • In order to prevent air from having an impact upon system performance it must be isolated from the system. Air removed from the radiator and inserted back into the system elsewhere (at the system tank, in the downstream plumbing, etc) shall simply circulate through the system and end up back in the radiator again.

  • Fluids are not compressible. With the system bled completely of air as it should be, there is no allowance for the expansion or contraction of the coolant within the closed loop system other than via the pressure relief design of the radiator cap. The coolant MUST flow between the pressurized closed loop system and recovery tank (in and out via the radiator cap) to allow for the expansion and contraction of the coolant.


Modifying the OEM Cooling System (fixing the problems):

The modifications I am about to suggest compliment the factory revisions mentioned in the refurbishing section; make sure your Pantera's cooling system incorporates those factory revisions. These additional modifications are aimed at two things: (1) correcting the mechanical problems I identified as primary problems with the goal of making the Pantera's cooling system rugged and dependable with the least amount of modification to the car, especially visible modification; and (2) correcting the electrical issues of the fan controls.

(1) Increasing the COOLANT FLOW RATE improves the cooling systems performance during stop and go driving. There are four methods I shall share with you.

(1A) A simple bolt-on way to increase coolant flow is to install a smaller diameter coolant pump pulley to “overdrive” the pump by 10% to 25%. A high quality 4.9" pulley which over-drives the pump by 10% is available from SACC Restorations. Over-driving the coolant pump by 10% is not excessive, there is nothing to fear. The coolant pumps of 351C equipped Ford and Mercury vehicles were also over-driven by 10% when the vehicles were equipped with air conditioning. Feedback from owners who have installed the pulley has so far reported 5°F and 7°F reductions in coolant temperature at idle.


(1B) The second method to increase coolant flow is to install a coolant pump designed to pump more coolant. Some Pantera owners speak highly of the pump manufactured by Flow Kooler (p.n. 1648) which is designed to improve coolant flow at low rpm. Another option for consideration is the Stewart Components pump (p.n. 16143).

(1C) The third method to increase coolant flow involves increasing the size of the plumbing from the radiator outlet to the coolant pump inlet. There is no kit you can buy to do this, you'll have to fabricate the parts yourself using 1-3/4" OD metal tubing. The radiator's outlet nipple should also be replaced with a corresponding 1-3/4" OD outlet nipple.

(1D) The fourth and final method for increasing coolant flow is to install an electric booster pump at the radiator outlet. Stewart Components sells two such pumps for this application, model E558A and model E389A. These pumps are compact and lightweight. They are designed in such a way that if they fail they will not block the flow of coolant in the cooling system; this is a very important feature. Both are rated for 10,000+ hours of operation. I know several owners who have installed booster pumps, and all are happy with the results.


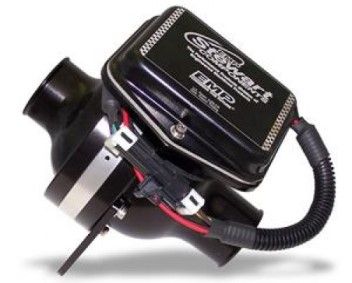
(2) If you would like the VENTING SYSYEM in your Pantera to function automatically (so you don't have to vent it manually) convert the expansion tank to a header tank and plumb the system vents to the header tank. Very little modification is required to make the vent system functional, the tanks appear to have been originally intended for this purpose. The revised plumbing mimics the standard vent system installed in racing cars, and in modern passenger cars too. Feedback from owners who have performed this vent system modification has ALL been positive. Here's a diagram displaying what to do:


  • Use 1/4" hose for the radiator vent and swirl tank vent
  • Use 1/2" hose to connect the "header tank" to the water pump suction
  • The Edelbrock and Flow Kooler coolant pumps have two 3/8" NPT ports that can serve as the connection to the header tank
  • The header tank, should be clamped in the mounting strap at a height making its mid-point approximately the same height as the highest point in the coolant system. I assume the highest point is the top of the "system tank" aka "swirl tank". Cutting a hole in the cover above the header tank, the same as the OEM hole found in the 1974 models, makes this easier to live with, because the pressure cap on top of the header tank will be accessible through the hole. Cutting the hole in older Panteras is covered in TSB 11, page 3.
  • When filling the coolant system, it is best to "top-off" the cooling system when it is hot but with the pressure cap removed (zero pressure on the pump suction), under those conditions the coolant level in the header tank should be no more than half full.


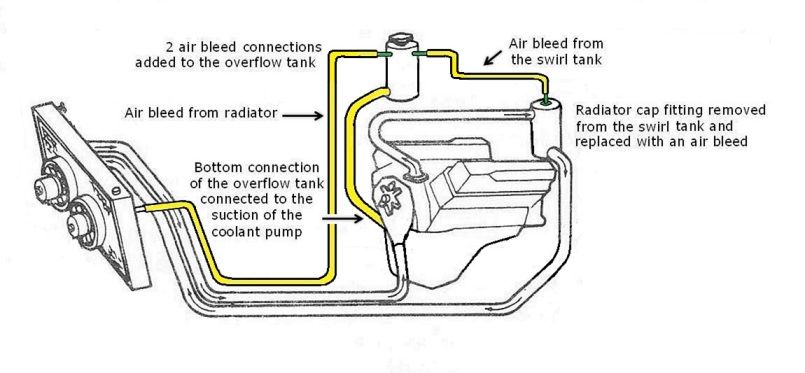
If the tanks are not modified to make the vent system functional, a drain-cock should be installed in the top of one of the radiator's tanks where the fitting for the vent would normally be installed, thus making it possible to periodically vent air from the top of the radiator manually.

Behavior of the Re-Designed System

  • The header tank provides a low pressure "dead spot" where air from other pressure zones can be collected and remain trapped (i.e. isolated), preventing the air from making its way back into the cooling system. This keeps the air out of the radiator where it would otherwise naturally tend to collect. This is why the top portion of the header tank should be physically higher than the highest part of the closed loop cooling system. Basically a big air bubble collects in the top of the header tank and has nowhere to go. Air is compressible, fluids are not; therefore the air space in the top of the header tank doesn't change significantly as air collects.

  • Besides providing a place to collect air the header tank serves a second purpose, it allows for the expansion and contraction of the coolant as it heats up and cools down. It replaces the recovery tank. A recovery tank is not necessary because air is compressible, the air space in the header tank allows for the coolant to expand and contract as it heats and cools. The Pantera's converted recovery tank (i.e. the new header tank) does not have a large surface area, but it is very tall, this compensates for the lack of surface area. When used as a header tank the level within the tank shall change a bit as the coolant heats-up and cools-off, but the change in level is not drastic.


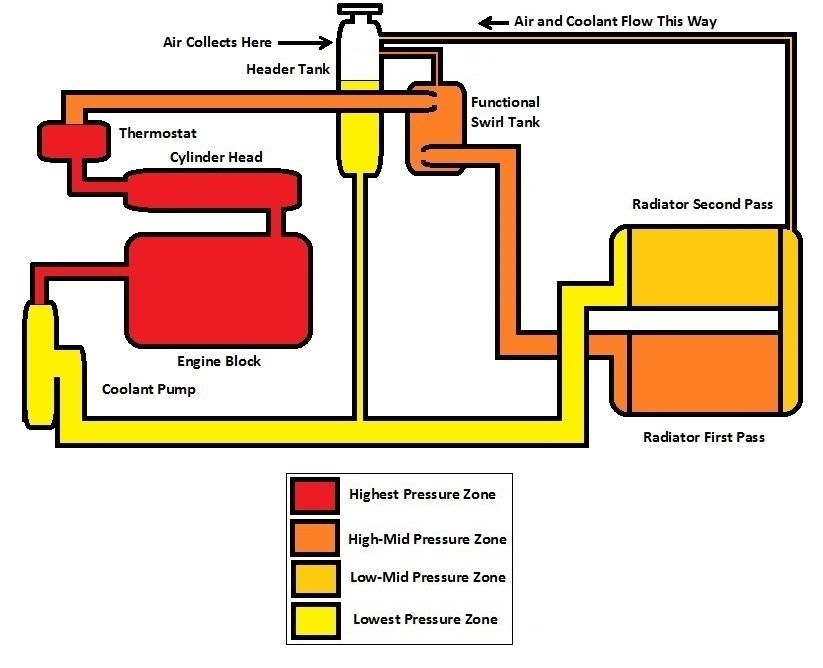
(3) A WIRING REVISION for the fans and their controls, should accomplish 3 things:

  • Remove the load of the fan motors from the ignition switch
  • Eliminate the possibility of motor run-on caused by the fan motors
  • Enable the fans to cycle off and on as needed instead of running continuously


It appears the Pantera's radiator fans have always run continuously in the factory installation and in the typical aftermarket installation as well. There is no purpose for this however. If radiator fans run constantly this indicates the coolant never becomes cool enough to reset the fan switches. This could be caused by a cooling system with mechanical issues causing the thermostat to operate wide-open, or this could be caused by fan switches with reset settings which are too low for the thermostat. Assuming the cooling system has no mechanical issues which cause the thermostat to operate wide-open, the fans should turn-off completely when the vehicle cruises non-stop at typical cruising speeds. If the reset settings of the fan switches are too low to allow this then fan switches with higher settings are obviously needed to cycle the fans.

My solution to resolve the issue of the Pantera's constantly running fans is to control both fans with one fan switch so the fans will turn off and on simultaneously; the fan switch shall have a very specific temperature setting allowing it to start and stop the fans in the middle of the operating range of the thermostat. The mid-point of the fan switch operating range should therefore compliment the mid-point of the thermostat's operating range as closely as possible. The fan switch should be located in the radiator's inlet tank (the lower tank) so as to sense the coolant temperature regulated by the thermostat. This solution, as well as solutions for the other two fan circuit problems are reflected in the wiring diagram below.


The mid-point in the operating range of a 192°F (89°C) thermostat is 94°C (fan switches are rated in degrees C). Therefore a fan switch rated at 97°/92° shall best compliment a 192°F thermostat.

The mid-point in the operating range of a 180°F (82°C) thermostat is 87°C. Therefore a fan switch rated at 90°/85° shall best compliment a 180°F thermostat. I have been unable to source a fan switch with M22 threads rated at 90°/85° however, switches with a rating of 92°/87° are the closest I've found.

These considerations are reflected in the switches I've recommended below. Here's the part numbers for name brand fan switches with M22 threads:

Manufacturer...Part Number.........Switch Setting........Thermostat
Intermotor......50190..................100°/95° ..............195°F (91°C)
Intermotor......50104..................97°/92° ................192°F (89°C)
Intermotor......50200..................92°/87° ................180°F (82°C)
Wahler...........823.959.481.F ......92°/87° ................180°F (82°C)


Maintenance:

If you do not perform the vent system modification explained earlier, then you shall need to manually vent air from the top of the radiator as a regular step in maintaining your Pantera. To make this possible a drain-cock should be installed in the top of the raidator's tank where the fitting for the vent would normally be installed.

Fill the cooling system with a 50/50 mix of green Anti-Freeze and water that has had the calcium and magnesium removed. Calcium and magnesium are the minerals that make water "hard" and create mineral deposits and scale. You don't want mineral deposits or scale in your cooling system. If your tap water is naturally low in mineral content you are lucky, go ahead and use your tap water. If not, you'll find several types of water on the market; softened water, carbon filtered water, reverse osmosis water, distilled water, deionized water, double distilled water, high purity water and ultrapure water. Unfortunately the information regarding what type of water to use in a radiator is confusing and contradictory. The ionic state of water is manipulated by any water treatment process; water with an imbalance or depletion of ions can possibly corrode or pit the metal in your cooling system, resulting in pinhole leaks in the radiator core or heater core, so you want to avoid using water with an imbalance or depletion of ions. The chemicals in anti-freeze and coolant treatments are formulated to control some of these problems, but those chemicals are depleted with age and use, so I believe it is wise to fill the system with the best water possible to begin with, the best water being water that will not leave deposits or scale in the cooling system and will not corrode or pit the metal in the cooling system either. Norosion claims softened water is the safest to use, as the calcium and magnesium are removed via an ion exchange process, so the water is not left in an ion depleted condition as it is with other processes. For this reason I place softened water at the top of my list. Reverse osmosis water and distilled water (single distilled) would be the second best choices. Reverse osmosis water and distilled water are normally fed into a deionizing resin bed to produce water labeled deionized, demineralized or high purity. Double distillation is another process used to produce high purity (aka ultrapure) water. Until I learn otherwise I have decided to avoid water labeled deionized, demineralized, double distilled, high purity or ultrapure.

Ron Davis recommends using pre-mixed coolant, i.e. the coolant you buy by the gallon that is already mixed with water. That way which type of water to use (and other chemistry issues) become non-issues.

Other cooling system details include making sure the engine to chassis grounds are clean and tight, and using a coolant treatment like RMI-25, Red Line Water Wetter or Norosion HyperKuhl Super Coolant (blue). The coolant will become corrosive with age and use, this is why the cooling system should be drained and refilled with new coolant every 18 to 24 months unless your coolant treatment specifies otherwise. For instance, Norosion claims if you add their treatment every 12 months you can extend the coolant service interval to 5 years.

The speed of a DC motor is dependent upon the voltage applied to the motor, if full voltage is not applied to the cooling fans they will not run at full speed or move air at their rated capacity. It is imperative to keep the wiring connections to the cooling fans clean and tight to prevent voltage drops across high resistance connections.


Reading: If you want to read more about the design of cooling systems like the Pantera's, refer to Carroll Smith's three books: Prepare to Win (page 122), Engineer to Win (page 170) and Tune to Win (page 97).

-G

Last edited by George P
quote:
OEM rad lasted 24 years. I never had cooling problems so when it sprung a leak I had it repaired for $50.

But instead of putting it back installed a Fluidyne. Can't say it cooled any better but it looked cooler. Anyhow, less than 3 years later it's leaking from 3 or 4 spots. It costs more to repair than buy another one.

And THAT'S why I went with an OEM style copper/brass radiator. They're proven effective, and can be fixed in short order by any radiator shop or full 'service' gas station anywhere in the country. I've heard too many stories of those nice purdy aluminum radiators developing leaks within 1-3 years. Granted, the earlier versions supposedly had the tanks or tubes bonded on with an epoxy rather than being welded - I believe that's now been corrected, but no need to spend the extra money to test if it lasts as long. Of course, your mileage may vary!
Anyone use Evans NPG+ coolant? The stuff is expensive, but it is a waterless coolant that is compatible to everything imaginable from iron to aluminum to brass and electrolysis is not a problem, because water is needed to have this happen and it is not present. The web link that describes the electrolysis portion is here:


Evans NPG+ Electrolysis Link

Expensive, but it is long lasting, proven, and not snake oil.

Mark
I played with Evans coolant for some time. It is interesting stuff.

First, a normal water/antifreeze mix cools better. I got a 15 drop in temps when swapping back from Evans. This is only a real factor in a car where you are at you cooling limits. If your not at your cooling limits it's not a factor.

The limitation of water/antifreeze is it's boiling temp. Ideally you want engine temps warm (not hot). Gas vaporizes better, oil functions better and it helps keep moisture evaporated.

The problem comes in if you run a car with a temperature of around 190-200 (as displayed on your water temp gauge) you ill have spots in your engine hotter then that. Hot spots in the engine can boil away the water leaving a vapor pocket. This grows leaving a larger vapor pocket. Yo may never know this is happening or it may rear it's ugly head after a heated run.

With Evans, the boiling temp is much much higher. You can run 210 degrees all day long with no risk to hot spots. And you can run a zero pressure cooling system.

Draw backs are slightly less overall cooling, replacement coolant (on the road) and flammability. There has been a couple wrecks where the spattered Evans coolant ignited burning the driver.

If you have maintenance on the rod and you need to replace some coolant, your options are very limited. There is a coolant you can buy from autozone to mix in limited amounts (I forget which one). Your only other option is to drain the coolant and replace it entirely because you can't mix it.

This also means if you drain the radiator, Evans is expensive enough that you need to collect it; which is fun.

I still think a lot about having a coolant that is flammable.
quote:
Originally posted by garth66:
quote:
OEM rad lasted 24 years. I never had cooling problems so when it sprung a leak I had it repaired for $50.

But instead of putting it back installed a Fluidyne. Can't say it cooled any better but it looked cooler. Anyhow, less than 3 years later it's leaking from 3 or 4 spots. It costs more to repair than buy another one.

And THAT'S why I went with an OEM style copper/brass radiator. They're proven effective, and can be fixed in short order by any radiator shop or full 'service' gas station anywhere in the country.


I've taken my OEM rad out 3 times I think, for various small leaks. Last time the guy said it was getting too thin in spots and repairs are very fragile.

Someone had mentioned recently about having the original recored and putting the 'body' of the orginal radiator around it to look and fit like OEM.

Garth, is this what you mean by OEM style?

I'm in a small town, nothing exotic can be fixed here, making the Pantera a dream come true. So, I'd hate to willingly give up serviceability, which makes me lean toward brass and copper. Any input?
quote:
Someone had mentioned recently about having the original recored and putting the 'body' of the orginal radiator around it to look and fit like OEM.

Garth, is this what you mean by OEM style?

By "OEM style" I mean a stock style copper/brass radiator. Any small town radiator shop can order appropriate core material for your radiator and rebuild yours with a new core and even a more efficient core.

My original factory stock radiator developed a small leak years ago because the core was finally rotting after 30+ years and 87,000 miles of driving. I pulled the radiator and took it to a local radiator shop and had it 'rodded out' and the leaks soldered for $75. Drove it another 3-4 years before the core began to develop another small drip when hot. At that point I decided it was time to fix it properly or replace it. I checked prices with several shops on completely rebuilding my radiator vs ordering one from a vendor, and decided to go the vendor route and get a new copper/brass stock-style radiator. Not a problem since. And I've never had cooling problems, even in 100-degree weather stop-n-go traffic.

As a side note, I still have my original radiator. I can't bring myself to throw out any Pantera part if it's remotely rebuildable. It's a disease. Razzer
FWIW a lot of tracks don't permit running glycol coolant as its slippery and bitch to clean off asphalt when spills occur. Consequently many guys that track a lot run just a water system with a corrosion inhibitor.

Aluminum radiators are prone to galvanic corrosion and Fluidyne recommend 'No Rossion' which is what I'm using. There are also 'water wetter's' that aid water to metal contact through surface tension modification that can help lower your coolant temps.

I have my '74 original kicking around, good condition if anyone needs one at a fair price.

Julian
I replaced my original with a Hall unit about 12 years ago. My original was fine I just thought Hall’s would give better cooling. The Hall unit has needed a small leak repair twice.

As a reference Dick Koch’s twin turbo is using the original radiator with NO cooling issues! He even had the original fans, bought I think he now has Meriah’s.
Jeff
Last edited by Pantera 3rd&Last
I have the fluidyne radiator mounted in the stock position and the dual Flex-a-Lite sucker fans. I made short brackets that attached to the top and bottom Fluidyne support channels. I carefully drilled and taped the channels for 6-32 flat head (or oval head) screws and installed the screws with red loctite. When drilling the channels, I put a piece of sheet metal under the channel lip (between the radiator core and the lip) to prevent drilling into the core. Then I placed the sucker fans on the radiator and marked the brackets for the holes in the fan shroud. I removed the fans and the brackets, drilled and countersunk the brackets for #8 screws. I installed one 8-32 screw through each bracket and secured with a nut. Next, I assembled the brackets to the radiator and the fans to the brackets and placed the assembly into the car. Red circles and arrows are the brackets.

Once the radiator and fans were in the car, I discovered that the top shroud mounting screws were too long and that I could not use the acorn nuts that I had purchased. Seems they hit the headlight connecting tube. I removed and disassembled the radiator and fans and replaced the top screws with shorter ones (1"??) and used reduced hex aircraft nuts.

The next problem was that the center fan shroud and mounting boss hit the headlight connecting bar center support. The '71 cars have a center support for the light bar but the later ones do not. I cut the front of this support rearward as much as possible, and tried the fit again. I found that I could not use a top center mounting bracket, so I removed it. I decided that the five other mounting points would be sufficient.

Another test fit revealed that I need to trim some of the center mounting boss and some of the stiffener rib near the light bar bracket. This solved that problem.

Next problem was that the Fluidyne installed upper drain valve wouldn't clear the light bar. After some thought, I dug through my pipe fittings and found a 1/4"NPT x -4 AN 90* elbow and an AN -4 cap. Perfect!
This gave me the clearance that I need at the light bar and I also provided an air bleed! When bleeding the system, I place a paper towel or shop rag around and under the fitting and loosen the cap slightly until coolant arrives. Makes it quick with no mess.

Another thing that I did was to remove the lower Fluidyne drain valve, add a pipe nipple and coupling, and reinstalled the drain valve into the new pipe coupling. This allowed the drain valve to be more accessible from the wheel well and helps prevent coolant from draining onto the radiator support cross member.

Next problem was that there wasn't very much clearance between the hose tubes on the radiator and the car's sheet metal. I searched NAPA's radiator hose catalog and checked their stock, but I couldn't find a hose with a really tight 90* end (that they had in stock) so I went the copper tubing route. Also note that the Fluidyne hose ends are are 1 1/2" and the stock Pantera cooling tubes are 1 3/8". The solution here is to soak a piece of 1 3/8" straight radiator hose in hot water for a minute or so and, while still hot, force the hose onto the radiator. Let cool and remove. You have just made a perfect transition hose! If you have a piece of 1 1/2" o.d. tubing, pipe, or stock of some sort, this is a little easier to use than the radiator.

The end result is that I have driven the car on 100* days with the A/C on in heavy stop and crawl traffic and have never seen temps above 208*F. I have a mechanical water temp gauge, a 180* t-stat (correct for the cleveland), and an Edelbrock high volume water pump.

John

Attachments

Images (1)
  • P1010001a
Last edited by jb1490
Here is a shot of the Ron Davis radiator in my Group 4 car. Not a good shot, but too lazy to get the car out of the stacker right now to get a good photo. Dude I got the car from said he had it custom made with Ron, but who knows if that is right or not. It is thicker than the Fluidline I have in my red 5S and has a hose at the top too. Will take photos & measure thickness later when I am sober.

Attachments

Images (1)
  • DX-10ALoRes2
Does 200,

I just pulled the radiator on my 74 a few days ago to either replace it or have it rebuilt. I noticed in your picture that the top radiator hose is on the driver’s side of the car where both of mine are on the passenger side.

Is your lower radiator hose also on the driver’s side or do you know if different years of Panteras have different hose routings?

Thanks.
quote:
I noticed in your picture that the top radiator hose is on the driver’s side of the car where both of mine are on the passenger side.

That is likely a triple pass radiator.

Quella sold those back in the mid-90's, made by Ron Davis.

Here is a shot of mine I just took out and sent to Davis so they can build me a new one.

Larry

Attachments

Images (1)
  • Picture_13
Hello
I'm on the way to restore my '72 Pantera, then I have some questions for you ...

Here are the Pressure tank and expansion tank in the car (?)
I've noticed that the caps are from BMW cars ??
Yes, I have to clean and improve that, but the car was running rather cool ...
Did you ever see this setup ?
thanks a lot
regards from France
Philippe


The radiators that Pantera Performance/Ron Davis sell now are single pass radiators. Many years ago, Pantera Performance sold a triple pass radiator (that was made by Ron Davis to PPC's specs) but soon discovered the single pass version works better, due to increased flow/lower resistance to flow. I don't believe Ron Davis ever sold a triple pass radiator for any application.
Last edited by davidnunn
quote:
Originally posted by DOES 200:
Here is a shot of the Ron Davis radiator in my Group 4 car. Not a good shot, but too lazy to get the car out of the stacker right now to get a good photo. Dude I got the car from said he had it custom made with Ron, but who knows if that is right or not. It is thicker than the Fluidline I have in my red 5S and has a hose at the top too. Will take photos & measure thickness later when I am sober.


I have one just like yours. Pantera Performance was selling the triple pass ones years ago. Ron Davis in Phoenix was building them for Dennis. It is a very good radiator.
On the subject of radiators and cooling for a daily driver 420HP Pantera... I have done the swirl tank mods as shown in this thread ( VENTING SYSTEM ), below is my old post after I unwrapped my new radiator,single 16" spal sucker, I have the flow kooler anti cavitation pump, no heater, and SS tubes. I can report my car runs about 175 and even on the hottest day in central Florida, with my A/C blowing ice cold, it still runs under 188, I seldom if ever see temps above 185. In short, these mods will resolve all cooling issues.

Photo of my radiator
http://pantera.infopop.cc/eve/...360079675#9360079675
FWIW, Ron Davis himself gave a nice talk on radiators at the POCA Fun Rally Tech Session. One of the questions regarded single pass vs double pass radiators. Mr. Davis said a double- pass rad as used on Panteras usually gave a 17 degree F temp drop relative to a single-pass. This is what Team manager Carroll Smith also found with road racing GT-40s back in the day. Stating the obvious, Panteras cannot afford to give away 17 degrees of cooling, so always use at least a double pass! A triple pass gains a little more over a double pass, but not another 17 degrees- diminishing returns lowers any further temp drop to more like 5 or 6 degrees.
The main advantage of aluminum rads is 'as good' cooling as a copper/brass rad and about 1/4 the weight. My stock rad (probably with some hard water scale buildup inside) weighed 64 lbs, while a custom core copper/brass weighed 45 lbs. The Fluidyne (from PIM 10 years ago) weighed 17 lbs.
All three cooled adequately but the Fluidyne, because of it's much larger internal passages and the fact that it holds a little more coolant, dropped my cruising temps by 15 degrees with no other changes; YMMD.
Ron Davis's remark that you reduce cooling temps by 17 degrees with a double pass over a single pass is inaccurate. I have installed, helped install and observed many Pantera cooling systems in hot and humid Texas. In these applications we have run both double pass and single pass radiators. While both work well, back to back testing gives the nod to single pass. In our applications utilyzing by-pass thermostats, both types of radiators will cool adequately at highway speeds to hold temps at the opening temps of the thermostat. If you sensor for your fans trigger them at a temp above your thermostat opening temp, the fans will not engage. Certainly no 17 degree temperature difference there.

The nod goes to single pass on around town driving due to the shorter recovery time for fans to switch off after bringing down coolant temps. The same situation at idle.

The 17 degree difference statement is about as accurate as, another I hear, stating Watter Wetter will reduce coolant temps by 15 degrees. I don't think so.

For more info on employing a bypass thermostat, try this website: http://www.spacecitypanteras.c...Cooling-JTaphorn.pdf The article deserves updating as our latest testing proves that a single degas bottle that is large enough works great; there is no need for a separate expansion tank. This simplifies the desiagn and reduces space utilization in the engine compartment.
John, I also thought it was odd that Ron Davis would say that, since the "ultimate" Pantera rad. he helped Dennis Q. develop is a single pass. I bought my rad from Ron Davis and when the question of "passes" came up, they completely dismissed any thought I had with regard to a multi-pass rad.

That being said, I believe Jack when he says Ron Davis said a two pass rad would lower coolant temps by 17 degrees. Perhaps he was referring to rows of coolant tubes in the core and said "passes" by mistake.

This is taken from the Stewart Components web site:

Radiators:

The most important criteria for any radiator is it's surface area. The thickness of the core is increased only after the surface area is maximized. Adding thickness to a radiator does not increase it's efficiency the same extent as surface area, but in no case will additional thickness alone decrease the efficiency.

The radiator becomes less efficient as the coolant outlet temperature approaches ambient. Therefore, a low flow rate keeps the coolant in the radiator longer. The longer the coolant stays in the radiator the lower the efficiency of the radiator.

When baffles are inserted in the tanks to force the water to go through the radiator twice, the water spends the same amount of time in the radiator but must go twice the distance.
I have the "Hall " radiator and have had it since 1997, I had it boiled out and re-brazed a year ago, my car has never overheated, I recently replaced the monster German fans ( 6lbs ea.)with high speed be cool fans that were easily fabricated to fit, the weigh about 2lbs the new fans cool better, draw less amps and have a net weight savings of 8 lbs.
quote:
Originally posted by David B:
Okay, let's hear some experienced voices.

If you had to change your rad now, what would you go with - and why?

1 - OEM
2 - Fluidyne
3 - Hall
4 - other?
The Fluidyne is a lighter radiator. That is it's only advantage.
The Hall "phoenix" is brass and is thicker then the OEM and also heavier.
The OEM dual pass is a good radiator.

The brass radiators are repairable almost infinitely. The Aluminum is not.

From what I am hearing there are more then a few of the Fluidyne's that need repair within a few years?

For most people the stock OEM is the way to go. That's what I am using, and it works fine.
I'm still running the stock radiator; it's never been removed from the car since it was installed at the factory 40 years ago. Try that with an aluminum one. My system is stock except for a better dual pusher fan set up. Never any overheating problems at all.

I'm meticulous about changing all fluids every year. My Brake Master Cylinder, Clutch Master Cylinder and Clutch Slave Cylinder all made it 39 years. I'm still running the original 40 year old Brake Calipers and Water Pump.

Change your fluids annually!! Smiler
Last edited by 1973pantera
quote:
Originally posted by 1973 Pantera:
I'm still running the stock radiator; it's never been removed from the car since it was installed at the factory 40 years ago. Try that with an aluminum one. My system is stock except for a better dual pusher fan set up. Never any overheating problems at all.

I'm meticulous about changing all fluids every year. My Brake Master Cylinder, Clutch Master Cylinder and Clutch Slave Cylinder all made it 39 years. I'm still running the original 40 year old Brake Calipers and Water Pump.

Change your fluids annually!! Smiler


What type of fan did you upgrade to? I'm considering rebuilding my OEM rad that I just pulled out of my 1974 Pantera. I've heard too many stories about the Fluidyne leaking after only a few years...anxious to hear about yours...

John in Fort Erie Canada
quote:
What type of fan did you upgrade to? I'm considering rebuilding my OEM rad that I just pulled out of my 1974 Pantera. I've heard too many stories about the Fluidyne leaking after only a few years...anxious to hear about yours...

John in Fort Erie Canada


I used a Flex-A-Lite FLX-240. It's a pusher fan setup that installs in front of the radiator. I believe the new part # is FLX-440; but double check to make sure. They blow a total of 2500 CFM.


The stock Pantera fans blow a total of just 600 CFM; it's quite an improvement.

The fans sit in a nice shroud with a rubber gasket that cushions the shroud against the radiator. Just remove your stock fans and it slips in like it was made for it. No need to fasten it to anything, just slide it in and it wedges nicely into place. The very top of the shroud will be about 3/16 of an inch above the radiator when it's in place, but it's fine & the metal cover that covers the fans (the one with the 2 Phillips head screws that covers the top front of the radiator) fits with no problem. The bullet end wire connectors even plug into the factory connectors. Cool
Last edited by 1973pantera
quote:
Is there a way to recognise from a picture a pre-74 radiator with vertical baffle from a later design with newer horizontal divider?

-Sami


No, but sticking a piece of wire in the right side bleeder valve will tell you. If the wire goes in all the way to the back of the tank, the rad has a horizontal baffle. If the wire only goes in about halfway, it has the earlier vertical baffle and should be changed. DeTomaso TSB Bulletin 2, article 35 shows the factory modification.
Corvettes, Z-28 Camaros and many other road cars have had stock aluminum radiators from the factory since the late '60s. The technology is 'mature'. Alloy rads remove a huge amount of front end weight: a stock '72 Pantera brass radiator weighs 64 lbs. A custom-built brass replacement weighed 45 lbs and a Fluidyne aluminum rad weighs 16 lbs. The Fluidyne cooled our engine much better than either of the brass ones (15F lower on long fast highway runs with no other changes).
The water you dump in the radiator will determine the assembly's life. Some areas have such corrosive water that an unprotected alloy rad has an operating life of a year or less. Most vendors now supply a bottle of 'No-Rosion' anti-corrosion fluid with all their aluminum radiators and there are others. They also suggest changing all the coolant yearly. Corvette shops stock anti-corrosion sacrificial anodes (Mag or zinc)to be put in the coolant tanks. The anodes dissolve rather than the radiator, cylinder heads or block.
Finally, home-handymen(?) tend to wind bleeder valves and other threaded parts into aluminum alloy with far too much teflon tape and force: I've seen NEW aluminum radiators with pipe-threaded aluminum bosses split wide open, returned under warranty as 'defective'. Cooling systems seldom see 20 psi; we are NOT sealing high pressures or explosive fuel here!
Last edited by George P
quote:
Originally posted by Bosswrench:
quote:
Is there a way to recognise from a picture a pre-74 radiator with vertical baffle from a later design with newer horizontal divider?

-Sami


No, but sticking a piece of wire in the right side bleeder valve will tell you. If the wire goes in all the way to the back of the tank, the rad has a horizontal baffle. If the wire only goes in about halfway, it has the earlier vertical baffle and should be changed. DeTomaso TSB Bulletin 2, article 35 shows the factory modification.
Corvettes, Z-28 Camaros and many other road cars have had stock aluminum radiators from the factory since the late '60s. The technology is 'mature'. Alloy rads remove a huge amount of front end weight: a stock '72 Pantera brass radiator weighs 64 lbs. A custom-built brass replacement weighed 45 lbs and a Fluidyne aluminum rad weighs 16 lbs. The Fluidyne cooled our engine much better than either of the brass ones (15F lower on long fast highway runs with no other changes).
The water you dump in the radiator will determine the assembly's life. Some areas have such corrosive water that an unprotected alloy rad has an operating life of a year or less. Most vendors now supply a bottle of 'No-Rosion' anti-corrosion fluid with all their aluminum radiators and there are others. They also suggest changing all the coolant yearly. Corvette shops stock anti-corrosion sacrificial anodes (Mag or zinc)to be put in the coolant tanks. The anodes dissolve rather than the radiator, cylinder heads or block.
Finally, home-handymen(?) tend to wind bleeder valves and other threaded parts into aluminum alloy with far too much teflon tape and force: I've seen NEW aluminum radiators with pipe-threaded aluminum bosses split wide open, returned under warranty as 'defective'. Cooling systems seldom see 20 psi; we are NOT sealing high pressures or explosive fuel here!


BW. What was in your car?

Curious since our cars are close in production.

I've seen Hall modify the tanks and leave a V in the middle of the right tank.
That would split the upper and lower sections of the radiator and make it a dual pass.

I'm not criticizing the use of aluminum radiators in the Pantera but I have heard of about a half dozen that failed around the one year old mark and were not repairable.

I would think that just about everyone buys their anti-freeze pre-mixed at 50/50 now and as such why would there be an issue with electrolysis with factory water?

I do remember a discussion I had with Gary Hall about this and as he said, "I can sell you any radiator you want, I have them all, BUT the only advantage the aluminum has is it is lighter and unless you are going racing and need to lighten the car as much as possible, use the brass radiator, it is repairable".

Still running the original stock unit. I'm sure it will need something some day?
Last edited by George P
Years ago, I had a long conversation with Gary Hall. We discussed different cooling setups. The aluminum radiators while lighter but that advantage isn't worth much, the front of the Pantera is too light anyway, taking weight out of the front isn't a big help. He also recommended the use of a 160 degree thermostat. The 160 degree thermostat is what the '71 Pantera's had from the factory, the use of the 180 degree thermostat was used because of the smog requirements in later models. I have used the 160 degree thermostats, but finding them is very difficult.

My pantera is modified to 435hp, while the stock setup worked for the original it failed at the added horse power. I tried several setups with little improvements. Then I converted the AC condenser core into an aux cooler by rerouting the water from the heater core. This dropped the temperature 5-10 degrees. For the most part, the car runs at 160-165, going up hills it will reach 185 degrees. (That is when the first set of fans come on.)
quote:
Originally posted by Yakone:
Years ago, I had a long conversation with Gary Hall. We discussed different cooling setups. The aluminum radiators while lighter but that advantage isn't worth much, the front of the Pantera is too light anyway, taking weight out of the front isn't a big help. He also recommended the use of a 160 degree thermostat. The 160 degree thermostat is what the '71 Pantera's had from the factory, the use of the 180 degree thermostat was used because of the smog requirements in later models. I have used the 160 degree thermostats, but finding them is very difficult.

My pantera is modified to 435hp, while the stock setup worked for the original it failed at the added horse power. I tried several setups with little improvements. Then I converted the AC condenser core into an aux cooler by rerouting the water from the heater core. This dropped the temperature 5-10 degrees. For the most part, the car runs at 160-165, going up hills it will reach 185 degrees. (That is when the first set of fans come on.)


I had the exact same discussion with him. I had to check to see that it was you that was writing this and not me.

I run a 160 also with the stock radiator. Runs fine. Never goes above about 210-220.

Consider though that if you are running a 16 psi system, you are not over heating the car until about 250 degrees farenheit.

The 16 psi cap is in there for a reason.

Personally I think you NEED to run 235 to 240. All modern cars do by design. If you don't you will build up too much sludge in the oiling system which is detrimental to longevity also.

I am actually over cooling at them moment. You are too.
How does my cooling system function? While running at the cooler temperatures my gas mileage was 17.3 mpg. When the car's temperature ran high (185 or above) the gas milage dropped by 2mpg.

Physics backs this up, Boyles law states that the higher temperature reduces the amount of fuel that will enter the engine.

The big problem is that the cooling system is marginal at keeping the temperature at 160. I am always looking for cooling ideas.
Hey George,

With regard to your self-bleeding cooling system mods, I have a few questions: why doesn't the suction line on the bottom of the header tank (formerly the overflow tank) drain the tank in seconds? Is it because it's a totally sealed system and the suction line can only draw out as much as the bleed lines can feed in?

If you reduced the size of the line from the bottom of the header tank to the water pump, from -8AN to -6AN, what effect would it have, if any?

Also, since I have bleed fittings in the back of my cylinder heads, should I connect those fittings to the header tank as well? If so, what size hose would you recommend? Perhaps -3AN or -4AN?

I just want to make sure I have a complete understanding of the theory behind the mods, before taking the plunge!

Thanks,

Dave
Two dynamic laws to keep in mind: (1) Fluids (such as coolant) are not compressible ... only gases (such as air) are compressible. (2) Both fluids and gases will flow from a zone of higher pressure to a zone of lower pressure. Never the other way around.

The air space above the coolant in the header tank cannot exist at a pressure lower than pressure of the coolant pump suction. If it did, it would draw coolant away from the coolant pump and into the header tank! So .... the air can collect in the header tank because it is compressible, but the coolant in the header tank cannot be drawn out of the header tank any faster than coolant is flowing into the header tank.

The cooling system is a closed hydraulic system. Every ounce of coolant drawn from the header tank is replaced by the same amount of coolant entering the header tank. So, what is happening, the coolant in the header tank is constantly "turning-over" but the level in the tank remains the same. If you don't believe this, open the hood of your daily driver and observe the coolant level in that car's header tank while the engine is running. Most header tanks are manufactured from opaque plastic these days. If the cooling system's pressure cap (radiator cap) is not located on the radiator, but on a tank, that tank is a header tank. You can verify this by tracing the large hose connected to the bottom of the header tank. It should connect or "tee" into to a portion of the plumbing that connects to the cooling pump's suction. The cooling pump's suction is the lowest pressure zone of a cooling system. There should also be one or more smaller air vent hoses connecting to the header tank, attached at the other end to various points where air may collect in the cooling system ... such as the top of one of the radiator's tanks.

The header tank is a feature found in the cooling systems of most (if not all) modern cars and it has been used in racing cars as far back as I can remember. There's a lot of experience there. Every Pantera owner who has "admitted" to making the mod has reported good results. All I have done is explained how easy it is, using existing components, to modify the Pantera's cooling system to duplicate such a system. I believe its easy to convert the Pantera's cooling system because the Pantera's system was originally designed to be configured in that way.

Why do I believe this ... well the "system tank" was obviously manufactured to be a "de-gas tank", aka a swirl tank, due to the way in which the inlet and outlet nipples are configured. Here's the part where the light bulb should turn-on for the typical enthusiast ... a de-gas tank (such as the Pantera's "system tank") cannot function without a header tank! The header tank is needed because it is the low-pressure point of the cooling system where air can be plumbed and collected successfully. The Pantera's "expansion tank" was obviously intended to be a header tank! That explains why the connection on the bottom of the expansion tank is so large!
Wow, thanks Professor P.

Now, I get it!

Two more questions:

1.) If you reduced the size of the line from the bottom of the header tank to the water pump, from 1/2" to 3/8", what effect would it have, if any?

2.) Since I have bleed fittings in the back of my C302B cylinder heads, should I connect those fittings to the header tank as well? If so, what size hose would you recommend? Perhaps 1/4" or 3/16"?

Thanks George!

Dave
I specify 1/2" hose for the connection between the header tank and the coolant pump to accommodate "surge" in the cooling system, which occurs when the speed of the engine rapidly accelerates or decelerates. I don't know if anything would happen if you decreased the size of the hose, other than the fact the level in the tank "may" be a little less responsive to surge. I was just being safe.

3/16" ID hose (or 3/16" OD metal tubing) should be fine for the air bleeds in the cylinder heads.
quote:
I run a 160 also with the stock radiator. Runs fine. Never goes above about 210-220.

I run a 180 stat. Quella triple-pass (Ron Davis) aluminum radiator. Weiand pump. Block bypass circuit is plugged. Hi-flow stat. Stock system otherwise.

And yes I know all about the "issue" with the lack of a bypass circuit, but in over 50K miles I have yet to notice a problem because of it.

YMMV. Wink

I'll run 180-190 on a cool winter day at cruise.

Heavy summer city traffic runs 200-220.

Like Doug said, oil needs to be hot to boil off moisture. 180 is the generally accepted low for oil temp, and oil temp generally runs less than coolant temp.

If your cooling system, stock or modified, never boils over after shut-off or when stuck in traffic, everything is fine.

Just like the Wizard of OZ said - "Pay no attention to (that temp gauge in the console".) It will just make you nervous.

Attachments

Images (1)
  • Screen_shot_2014-12-10_at_10.52.24_PM
quote:

Originally posted by HayDude:

... Is the connection to the suction of the water pump the same one the goes to the heater core ...


Yes. The two aftermarket coolant pumps I am familiar with (Flow Kooler and Edelbrock) both have TWO threaded ports for the pump suction, one is needed for the heater core, the second port makes a ideal place to plumb the header tank.
George(or anyone), I have a question about the continous radiator venting.
your illustration shows the vent on the far common tank, thus there will be a slighly higher pressure here than if it was on the exit tank. Is that intentional?

on my increasing getting longer list of things to do, I was planning on having a local radiator shop inspect/rebuild my original radiator and possibly reuse it. another question I am having is the use of the original bolt on fan switches. Is there an adaptor to use the more common threaded switches.

with all due respect Smiler to your experiance...I question a statment you made concerning placment of the fan switch.
"The fan switch should be located in the radiator's inlet tank (the lower tank) so as to sense the coolant temperature regulated by the thermostat."
I was thinking if the switch was located in the outlet tank, it could determine if there was air flow causing the exiting fluid to be cooler than the thermostat regulated radiator inlet temp and thus start and stop the fan based upon car speed. it appears the original design's intent was to do this (with a 10c and 20c drop for a 192F thermostat), but the horizonal tank baffle modification defeated that for one of the switches. Is there experance to indicate this does not work?
quote:

Originally posted by JFB #05177:

... your illustration shows the vent on the far common tank, thus there will be a slighly higher pressure here than if it was on the exit tank. Is that intentional? ...


Yes

quote:

Originally posted by JFB #05177:

... Is there an adaptor to use the more common threaded switches ...


Since the radiator is being rebuilt, I would personally have the OEM temp switch "bungs" removed from the radiator and replaced with M22 threaded "bungs" rather than to use an adapter. I'm sure the M22 threaded bungs are available.

quote:

Originally posted by JFB #05177:

... I was thinking if the switch was located in the outlet tank, it could determine if there was air flow causing the exiting fluid to be cooler than the thermostat regulated radiator inlet temp and thus start and stop the fan based upon car speed. it appears the original design's intent was to do this (with a 10c and 20c drop for a 192F thermostat), but the horizonal tank baffle modification defeated that for one of the switches. Is there experance to indicate this does not work? ...


I pondered this question myself. I have no experience with the temp switch installed in the outlet tank, other than Panteras. And that was a bad example Smiler . But I know for certain that mounting the temp switch in the inlet tank works.

I checked-out various older European cars (with emphasis given to the way the Germans do it) and found they installed the temp switch in the inlet tank. It occurred to me the thermostat and the fan switch comprise a closed loop control system, and from that perspective mounting the temp switch in the inlet tank makes more sense. In that configurations there is less time lag between the action of the thermostat and the fan control, and they are working together to control the same variable, i.e. the temp of the coolant exiting the engine block. The fans won't turn on until the thermostat has opened fairly wide, and that alone has proven insufficient to control the engine outlet temp. I can't say if that's why the OEMs chose to do it that way, but it would be my best guess.

Installing the switch in the outlet tank may sense the temp rise sooner, but now the fan control and the thermostat are attempting to control two different variables; i.e. one the radiator outlet temp and the other the engine outlet temp. You could get into a situation where the dog is chasing its own tail (control oscillation).

Best wishes for success what ever direction you decide to take.
Sick Cat,
Thanks for the link and all the specific information you provided

I googled the "WAHLER THERMO FAN SWITCH 823-959-481F75-M5002" in an attempt to determine its settings, but not sure I was getting proper info (I found 75C)
Do you recall and if yours is sensing the radiator inlet or outlet?

Has any one ever measured the radiator outlet temperture for a stock radiator with the car at cruise speed (please state thermostat also)?
I looked those up on those web site's with pelican and that is a different part now as mine have regular spade connectors, interesting,.
As I recall one of the connections, lets say inlet is a certain temp to turn on the flexalite fans and the one on the outlet will turn on the Meriah's up front if the flexalite's quit or are not cooling enough, meriahs rarely come on but when they do between the two sets it's a lot of air. I'll try and dig the info up, I was suprised as it's been a while.

Mark
I am going to do the modification as George has suggested, my tanks appear to be original and in good shape. The cap on the expansion tank is a Motorcraft RS-77 which I would like to replace but I do not see a replacement or cross reference available. Were the expansion tanks a European style fitting as well as the swirl tank? Is there a recommended replacement for the cap?
If your Pantera's coolant tanks are equipped with the original necks, the way I see it you have two choices. These have been the choices for decades. Keep in mind that the original pressure limit was 13 psi, because the radiator (and heater core) were assembled with solder joints.

(1) You can have the pressure tank's European radiator cap neck replaced by a radiator shop with an American pressure cap neck, and then use an American 13 psi cap (Stant 10329 which has the release lever).

(2) Leave the tank neck "as-is" and use a higher pressure 16 psi cap, which shall operate at a lower pressure (about 2 psi lower) when used with the European neck. I don't have the correct number, but I'll bet it is either 10330 or 10331 (both are 16 psi caps).

Keep in mind that in converting the recovery tank into a head tank that it will operate under a lower pressure, therefore 13 psi shall be serious overkill for its new application as a head tank. There is a good possibility that the standard American radiator cap (Stant 10329), which shall operate at about 11 psi when screwed onto a European neck, would be more than adequate for this job, so long as the cap is in good condition and seals against the radiator neck as it is supposed to do.

What this community of owners needs is for people who have already performed these experiments to chime-in and share their experiences.
When I first bought my car it was a factory system with hood vents and it ran at about 195 and suffered from temp creep. It would continue to creep up one degree at a time until it would boil over at the lights and then boil over at low speed etc... I have incrementally changed my system and can report on each change. At that time I was running the car back and forth to Tampa about an hour from here, the car ran very well and was right at home OTR, it seemed like it didn't even know it was running other than the temp creep. The first thing I did was stolen from David Archabalds Sebring car, I took the vent screen off my hood and left the hole wide open, I then put a ramp in front of the vent hole and it created a low pressure vacuum which pulled out more air. That one mod got a good five degrees which I really, really needed at the time. That single first mod would allow me to run to Tampa for an hour and then make it light to light to the property before it creeped up over 210 and boiled over. After that I built the motor, bought a radiator, did all the tricks, and my car runs cold and happy. I run in the low 180's and even in the summer I seldom need my fan on short trips... My car has not seen 190 in years (shorter trips when it's 1000 degrees in summer) and I have ice cold a/c with the condenser up front, and she's a daily driver ( 3, 4, 5 times week). 425/450 HP

Parts List:
Mccullough Fabricating Radiator (sp)
Spal 16" fan (sucker)
Hood vents w/ramp
SS cooling tubes
Flow cooler anti cavitation water pump, double gaskets
The correct thermostat
and the Head tank mod

This combo is the answer, at least for me. I have not turned my spal fan on since last september...

Attachments

Images (1)
  • CatRad
Last edited by plt-1
A system that has no leaks and holds pressure will not boil over to OVER 240 F.

An engine boiling over at 213 indicates the system is open to the atmosphere, the cap is not sealing and the system has zero pressure in it.

It is imperative that the Pantera be pressure tested and holds pressure AND THE CAP IS TESTED TO HOLD as well.

This car is one of the first "high pressure" systems like we have in todays cars.

It's normal operating temperature is right around 230 F not 195 F.

IT WAS DESIGNED to run hot NORMALLY.


The fluid level in the pressure tank will normally settle to several inches below the top of the neck.

That is correct function for this car


The most likely scenario in a Pantera running like this is that the wrong cap is on the pressure tank,and there is no pressure in the system.

The description of the temperature steadily increasing and then boiling over is exactly the symptoms of no pressure in the system at all.

Many US made caps will not seal properly to the Panteras European made tank neck.

No one needs to re-invent the wheel here. You need a cap that seals at 13-15 psi and holds that into the system.

50/50 anti-freeze will technically boil over at 252F under those conditions.

You CAN stuff it by running 75/25. That will give you about 10 more degrees on top.


My car even with a 15 psi cap will only hold 13 psi in the system.

The Veglia temperature gauge at some point in the '73 model year was changed from a top reading of 230 to 260 degrees to stop the service complaints that the gauge is pegged on maximum high and is going to boil over.
Last edited by panteradoug
Most informative sticky! I purchased my 73, #5936 a little over a year ago and am just now figuring out the mods. Before I get to my overheating problem let me describe the engine setup. Most notably I have the Magnuson Dual Screw SC with a couple of Weber carbs, jacking the HP up to the mid 500's, I suspect. When this was installed in late 80's, I believe the cooling fans were modified. I have two Perma-kool Blower fans and a third sucker fan on the downstream side of the radiator. The Perma-kools run simultaneously and appear to run all the time. The third sucker fan runs off of temp, as best I can tell.
The balance of the cooling system is in original configuration, radiator (stock), piping, hoses, etc. I have a 16lb pressure cap, seems to be in good shape and holds pressure.
Now for the symptoms. I go for a 30 mile drive on a cool day, temp hovers right at 190 by the gauge and stays there. The next day i go for the same drive and it creeps up to the red line, 235-250F, but has not pegged or boiled over. this doesn't matter if i'm stop and go or if i'm cruising at highway speed, although at stop-and-go it does move a little higher.
Based on this thread, I'm thinking Air in the radiator and/or bad thermostat? Would much appreciate input on what steps to take in order to sort this out.
Thanks - Mike

Ok, there is a ton of great info in this Topic and I appreciate all who have contributed.  Here's where I am on this issue:

1.  I want to go with a brass/copper radiator like the Hall.

2.  My car has older Flex-a-lite sucker style fans installed now.

3.  The radiator from Hall only has about 1/4-3/8th" clearance between the back of the radiator and the bends in the inlet/outlet tubes which is not enough to fit the sucker fans/shroud within.

So what have others done?  Do I have to have the inlet/outlet tubes extended?  Do I have to forget sucker fans and only use pusher style fans?  Do I use the Brassworks total system?  Does anyone else here have this Brassworks radiator/fan system installed?  It's a bit expensive compared to buying a Hall and even new Flex-a-lite fans but appears to be a quality unit.  Steve Wilkinson indicated that the Hall was so much thicker that it would need to be laid down at an angle rather than in the exact same place as the original - I'd rather not if possible.  

Trying to follow all the expert advice and great information here from George and others I have ordered the Flowkooler 1648 water pump, the SACC water pump pulley and a new Holley/QuickFuel HR-735-VS carb with annular booster venturis to help.  I have already installed the Hall SS pipes underneath, SS bottles in the rear and Gates green line hoses and belts everywhere.  I've also added the cut-off valves to the cabin heater.  I have installed the correct Robert Shaw 330-180 thermostat (with the hat) and have the brass plate installed, but I'm still getting gurgling and almost regurgitation after even only short drives so I want to complete the replacement of the entire cooling system.  I realize there are still more areas to cover, but I wanted to start with what I have done plus the new items mentioned above.  I also realize that a very thorough burping of the system after the installation of these parts is a requirement.

Steve W. also suggested that I not install Scott Bell's billet water pump pulley because it would help circulate the coolant too fast through the radiator and not allow the radiator to get the chance to cool the coolant.  Sounds reasonable, but others here recommended the pulley so I bought it and it showed up yesterday - thanks Scott for the quick turn around!!

So please weigh in, flame if you must, and tell me what you think.

Merry Christmas and Happy Holidays to all!!!!

If you are going brass, I have the Hall Phoenix big boy in my black car although it had to be laid foreword. Works great. I used to own an orange stock L and it had one in there too & worked real nice till it sprung a leak after many years. I recall my wife assisting to get it out of the car and the thing was pretty heavy (that's what she said lifting it out).

https://www.flickr.com/photos/102810426@N07/12241128314/in/album-72157635769607434/

Does200, thx!  Steve W. has a kit to lay forward the Hall radiator without having to weld any new tabs or anything - is that what you used?  Also, what about the inlet/outlet tubes on the Hall being too close to the back of the radiator to mount a sucker fan/shroud unit like I have now?  My original radiator has been recored at least once and it appears the tubes were extended about 1"+ to accommodate the fans/shroud.

Most aftermarket rads have 1-1/2" straight stubs coming out of the core. Insert short pieces of 1-3/8" Gates Green stripe hose connected to 90 degree adapters with regular hose clamps. 90 degree sweat-solder copper tube fittings in the proper size work well. This allows you to space the 90 degrees out far enough to fit sucker fans. If your rad has formed stubs with 90 degree turns and you want to use the more efficient sucker fans in a shroud, cut the formed 90s off and insert short pieces of hose between the stubs and the 90s.  Note- 1-3/8" rubber hose will expand enough with hot water to fit onto 1-1/2" stubs without much effort.

Part of the problem is, due to the body's low nose, the 16" tall Pantera radiator is shorter than- for instance- a 19" tall Corvette rad, both being 26" wide and both engines having similar power dumping about the same heat into their rads. If ANYTHING is off in your combination, many Panteras cannot cope with the smaller stock rad, at least at walking speeds. Once you're moving over about 30 mph, things work as DeTomaso planned. So we increase the water flow rate thru the system with a rad that has much larger tubes inside its core (1"-1-1/2" wide vs stock 3/8" wide), and use 2X or 3X bigger fans that suck 30mph air thru the entire core via a shroud, not just blow (less) air at two circles of the core.

You were asking about the backside on my black car and the water tubes. I have a ton of space back there as shown in the photo. The radiator has brackets welded on it to allow it to lay forward (sorry for the dust - proves I actually drive em haha). As far as brass vs aluminum, maybe you had a bad experience with the aluminum but I have the fluidine in my red 5S and a Ron Davis in my Group 4 for years with no issues (although I don’t do a lot of miles, but do drive in the excessive slow traffic Southern CA heat).

33A517D8-2E88-47B7-A53F-7D1099AEBC35

64EA4FDC-2887-4CD8-91B0-BA698A097936

Attachments

Images (2)
  • 33A517D8-2E88-47B7-A53F-7D1099AEBC35
  • 64EA4FDC-2887-4CD8-91B0-BA698A097936
Last edited by George P

Ok, thanks guys.  I have chosen to go with a brass/copper radiator because I'm not concerned about lowering weight and I like the ability to repair and recore in the future like the original.  So it appears that no one makes one with inlets/outlets bent 90 degrees with enough clearance for sucker fans behind?  I can see from the excellent photos that laying the rad forward isn't an issue, but I would still have to have the Hall rad inlet/outlets extended to fit sucker fans/shroud.  If I decide to do the reverse and install new higher volume, more efficient pusher fans/shroud instead of the sucker fans/shroud can anyone vouch for the Hall being able to fit in place just like the original - without laying it forward?  Same mounting points etc?  Has anyone used the Brassworks radiator?   If so, can you chime in on how it mounted etc?  Thx

Garth posted an excellent reply about pusher fans in your previous cooling system topic (radiator looks like it might blow) on January 2, 2018. Good reading.

https://pantera.infopop.cc/top...988#1598208419964988

Install 2 new pusher fans with new high volume blades as per Garth's post, install the Hall radiator sitting straight-up as designed. You can't buy a better radiator.

Last edited by George P

I have had a Ron Davis triple pass aluminum radiator in my Pantera for over 20 years. It has shrouded sucker fans on the back and although the outlet is on the driver's side of the car and some modifications to the coolant pipes had to be made, it has done very well. Better than the two pass aluminum radiator that it replaced. Arizona desert tested with an accurate water temperature gauge!

Thanks to each of you!  You are right George, I have talked to Garth live recently but had forgotten what a fine and informative post he wrote almost exactly a year ago.  It's been a difficult and stressful year, but I think I can look forward to getting things off to a more progressive new year and I wish the same to all here!  Thx.

The Flowkooler water pump arrived today and the SACC billet pulley arrived the other day - so now just need the new radiator, grommets and ? to disconnect the originals and replace.  I got the bolt kit from Summit with the water pump and it came with two different gaskets (why?).  When I installed the correct thermostat I installed it and the gasket using Permatex water pump & thermostat gasket maker #22071 per info from two mechanics and NAPA.  I plan to use the same again for the water pump installation.

The first pic shows the water pump and the pulley together with the two gaskets. The gasket on the left looks like it fits correctly, not sure about the one on the right.  The water pump has some scratches on the attachment face (see second pic for close up) but the pulley is a work of art!  Nice job Scott!

Do I need to do anything with those scratches or will the gasket + gasket sealer be enough to not worry about them?

As I mentioned above, Steve W. told me not to install a pulley to move coolant faster through the radiator, but others here and Georges' excellent article on cooling suggest doing so and my inclination is to go with that advice.  I have the pulley, but I don't have to install it - what do you say?

A paddle-wheel water pump will cavitate- generate bubbles- and stop pumping much water at some engine speed; street engines usually do so around 5000 rpm. Changing pulley ratios is common; smaller ones lead to 'overdrive'- pumping more at low engine speeds and not pumping enough (due to cavitation) at higher engine speeds. The old trick of clipping every other impeller blade off a stock pump moves cavitation to higher engine speeds, as does a larger pulley (underdrive). I've made a few pump pullies in several ratios for street machines that worked for their owner's purposes.

As for your small pulley, it's not much trouble to try it- only 4 bolts and maybe a vee belt;  with your driving style and the roads around your area, it might improve cooling... or not. If it gets hot earlier than you can live with, just remove the custom pulley before you get boil-over. No one can really predict what will happen with any given car combination, but I wouldn't intentionally use a small pulley at long WOT Silver State events or at Bonneville.

Minor face scratches in a pump won't hurt anything; use non-hardening sealer like Permatex #2. Pressures are only on the order of 15-20 psi or less. Just be VERY sure the new pump is NOT designed to run on a late engine with a serpentine belt. Serpentine-belt water pumps are designed to run BACKWARDS compared to vee-belt pumps. Massive overheating will result from mixing this up regardless of your pulley ratio.

Thanks Bosswrench.  The water pump is the Flowkooler 1648 mentioned in George's cooling system analysis sticky thread and by others so I believe it to be correct non-serpentine model:

https://www.summitracing.com/parts/bra-1648

and the Permatex is this one in the pic.

Gasket maker

Summit sent the wrong bolt kit with the pump (for a Chevy with only 4 same length bolts) and are now sending the correct kit with 11 different length bolts.

I had a chance to talk with Tara at Hall Pantera today and they will be back in the shop on the 2nd if anyone is interested, and I also got a nice call back from Dennis Quella.  If I change my mind and go aluminum I'll be ordering directly from him.  I am hoping to follow up with Brassworks when they reopen to find out more info about their radiator which there is a link to elsewhere but I'll put here again for general purposes:

http://www.thebrassworks.net/s...rs/product_info.html

I'm not sure what:

"Its made with tellurium copper and highly elliptical staggerred tube design and serves as the mid engines primary heat exchanger."

means, but I intend to find out.

Attachments

Images (1)
  • Gasket maker
Last edited by George P
rrs1 posted:

Does anybody have any experience with the brassworks radiator? All I care about is that it doesn't leak, and looks pretty stock, since it's getting impossible to find good radiator re-builders. The Phoenix radiators are good at cooling, but both of mine leaked quickly, after a fix they still leaked! 

Hey RRS1, can you provide any more info about your where/how your two radiators leaked/failed?  Did you buy these new, direct from Hall?  If so, how long ago?  Any other information?

FWIW, many owners solve the 90 degree bend problem on their radiator in & out spigots with a pair of big sweat-solder copper fittings (that never rust) and two short straight sections of 1-3/8" or 1-1/2" rubber hose per bend. Using them also extends the crossover hose away from the core for sucker fan & shroud clearance.

The main advantage of aluminum rads (besides 1/2 the wt) is the 3-4X larger core tubes that hold more coolant and flow so much more- not possible with copper rads. The Pantera needs all the cooling help it can get since its stock engine produces as much power as a 350 'Vette but the stock rad is 20% smaller and 6 ft away from the heat source. Then we modify them for more power & torque....

Earlycat, the Blue and Red Owners Manuals show the water pipes plumbed both ways in successive factory manuals. It makes engineering sense to plumb cooled water to the bottom of a radiator so the rising flow can help chase air bubbles up & out instead of fighting gravity, but who knows what logic Ford/DeTomaso followed?

I once tried both styles on a 600 mile round trip, changing configurations mid-trip at a friends garage. I found zero difference + or - in terms of stabilized running engine temp, on our car at least. YMMV.

I judged them by weight. The heavy Hall lasts forever and makes  turning better. Cools just fine. Replaced with a new Hall rad to utilize the original thermo switches for fans. Previous H had snap switches blocked off and manual fan switch firing both pushers. New Hall has larger fans but same crappy right angle fabbed hose necks. Nothing like a beautifully engineered part with two steps backward . Every 90 deg bend is detrimental to flow. Two 45's are better. Three 30's even better. A variable radius sweep, now you're back to beautiful. Besides, copper and brass are the MOST malleable metals and sexy as hell when hand finished. That's how I'd build it. Supplied with a nice clear finish. Make you paint it crappy black.

How much money you got?

Add Reply

Post
×
×
×
×
Link copied to your clipboard.
×