

Day 7.
Thanks guys!!!
I had forgotten how much fun it is to climb in and out of a Mangusta chassis.... Now that the hatches are off, it is the only way to do things, if you don't want to lay on your back and work, although some of that is required too whether you want or not! Kicked one blade of my AC condensor fan with my timberline and sent half of it flying.....ugh. Put it on the list...
Was going to start washing down the frame rails with solvent tonite, but it got to late to be stinking up the place....so settled for popping off the motor mount brackets (the 57 Chevy fix..) and the LH shock and wheel so that I can get at stuff. Also pulled the axle shafts for cleaning and inspection again.
Motor mount brackets: When you drill and tap 1/2" steel for threads, be sure to used anti-seize or something on the threads. If you don't, PB Blaster (or similar) is your friend!
Axle shafts: Said this before, if you haven't checked your nuts for proper tightness.......do it! Found a couple that were....not exactly tight. May have one u-joint going south, saw just a little play in a cup. Need to check clocking on shaft too. Was 90 degrees out, which I think is ok. Run them at 90 or 180 out, but not anything in between....
Shocks: Pleased to report that the QA1 shocks and springs I used out back are holding up nicely. They have a nice thin coating of road dirt and engine oil/gas film on them that has yellowed the finish a tad....a nice patina! I've told others that I am not a fan of chrome on springs. Great on a hot rod where they are out in the open and you can get to them....not so much on a street car where they are buried. The powdercoated silver is a better surface. It won't rust. Not sure how much chrome polish I want to invest here..... Have cracks to weld!! One good thing is that the ball ends on these shocks seem to be holding up well! Upper on the one shock I removed is just a tad loose, bottom one still feels tight. (Non-lube versions. I think I have 17-18K on them.
Will hope to clean these parts up real quick Tues and take some pictures! Start washing down the grime, and get ready to strip some paint near the cracked area.
Here is something I need feedback on. Not sure if this is a factory modification or an owner mod. Here are pictures of the ladder bar (upper shock mount frame brace/spreader for lack of better description!) and the RH upper mount from car #1134, also getting an engine-dectomy at this time.
Note that it has 4 thru holes for bolts. On mine, you will find only two mounting holes. (See two pics up into days 5/6 to see mine.) Note the inboard holes on the one above, and the absense in my bracket. They correspond with the extra "tube" welded on to the top of the mount as seen in this pic.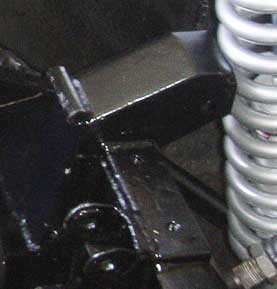
Compare this pic above to the 3rd pic of mine, in day 2 way back up top!
I'm gonna guess that all four holes in the ladder bar are not just thru holes, but have inserts welded into them for support. Then it was chromed, similar to mine, but not from the factory. My car is #878 (March-April 69 build-window dates) so did the factory have problems with cracking mounts in late 69??? I do know that much later cars had yet different upper shock mounts that tied into the rear sheetmetal.... Have an old photo somewhere of a Goose that showed up my first year in Vegas. I think it was #1254 or so, and this area of the chassis was markedly different in design!
How many of you have a four bolt ladder design or something different??? Would be nice to know! Perhaps there is a fix or mod that more of us can use?
Attachments
Images (2)

