

Mark,
First let me say that no, I was hoping to see the top of that piece with the hole punched in it, top left in your last pic! To see how it attaches to the body and provides any support for the shock and frame, to keep it from flexing.
Secondly, that is one god awful job of welding on the bottom of that piece, where it joins the shock mount!!! (look just above the top of the shock) I hope it is grease and not welding!
Third, check out the top of the shock mount where it meets that welded piece. Is that a crack going horizontally about an inch??????? You need to check that out!
Day Eight.
Not much major today. Received two samples of window channel weatherstripping, #21 and #22 from JC Whitney to try out. They are not a good fit IMO, so am going to ask for a sample of #24. It is the last hope of what they offer, to work. The #24 is 1/2" wide but the channel is .650" wide, yet the wider stuff was too tall and stuck out of the channel too much.... IT is also a little shorter, so I hope that it will work out. Worst case, some adhesive should hold it in place nicely. Their listed dimensions are more like estimates.... or suggestions! We'll see....
I cleaned up the parts that I removed yesterday and tweeked on the half shafts since I found one of them clocked out 90. BossWrench confirmed that they should be in phase with each other and NOT 90 degrees out.
So, I took them apart and cleaned everything up real nice, then realized that I need new cork seals in them. Anyone??
Here are the bits I removed yesterday. This is after a bath in parts solvent. Got the greasy stuff off, but left a fine yellow tint...of burned dino oil....? I'm not going to get into polishing stuff to a bright sheen only to have it garpy the first puddle I hit, or the first long drive behind a bunch of Panteras....oozing unburned hydrocarbons all over the place... ![]()
Clean is good. It will match the rest of the car better! I just want to be able to tell when something is leaking or amiss easily without wondering if it was from last years disaster..or the year before...or...!
The shock is a Carerra (Now QA1) chrome economy model, fixed 60/40 valving with 400# spring. (I would do a painted shock body and silver powder coated springs in the future, paint the shock green to sorta mimmick the original deCarbon....
Motor mounts are 57 Chevy rubber biscuits with a thru bolt and a custom "non-rotating" overkillmaximus nut thingy.... I may shave some weight and substitute a washer and a nylock here.... ![]()
On the half shafts, notice where the one on the right does not have both center shaft u-joint cups facing up at you like the LH one does!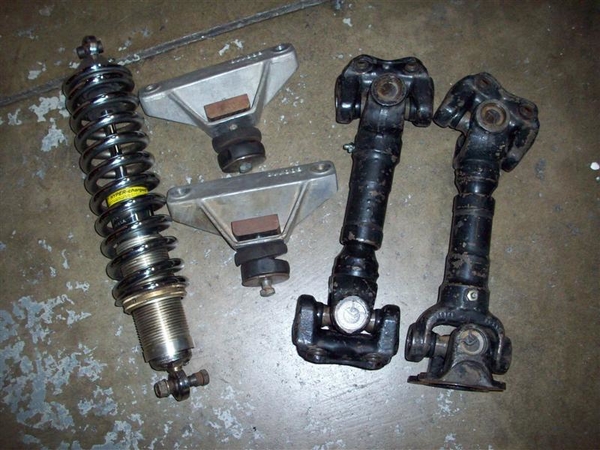
NOTE: I now have PROPER MANGUSTA replacement motor mounts available for your cars!!! I did not show them at the time I was doing this portion of the swap... they might show up towards the end of this thread!! So what you are seeing here is simply historical stuff from my car! If not, I have them posted over in the For Sale section of this site. Steve
Here is a shot of the motor insulator affair. It is a design that came with the car and I simply carried it forward since it was working. Once I lower my frame mount brackets, I can afford to use the correct style mounts that were located recently by another Gooser. If I need more clearance still, I can put something like these back in easily.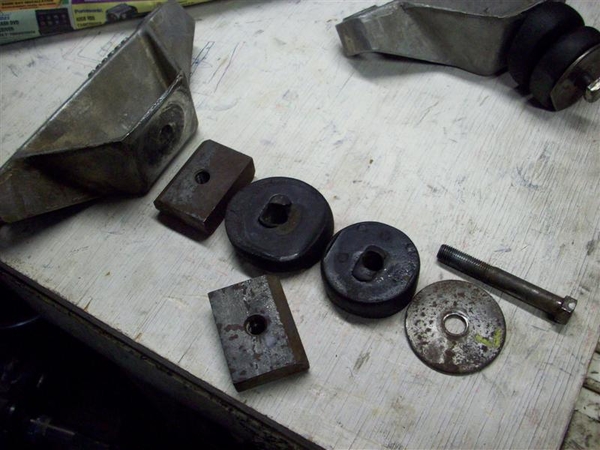
Closeup of my maximusantirotating nut thingy.... big chunk-o-steel shaped to fit the recess of the aluminum mount, drilled and threaded! It works. I didn't realize that you can't pull the motor out with these mounts affixed to the motor. You need to install these first to the frame, then you can drop the engine down on top of them. My idea was that with these things, you could swap the biscuits without much effort! Good thinking, but not needed!
Here is an exploded half shaft. Made by Spicer Hardy. Pretty simple. I marked the u-joint cups with a grease pencil so that I could get them back together the same orientation. Threaded round cover on the RH side has a tin retainer and a cork seal. Loosening this threaded cover allows you to slide the two pieces apart.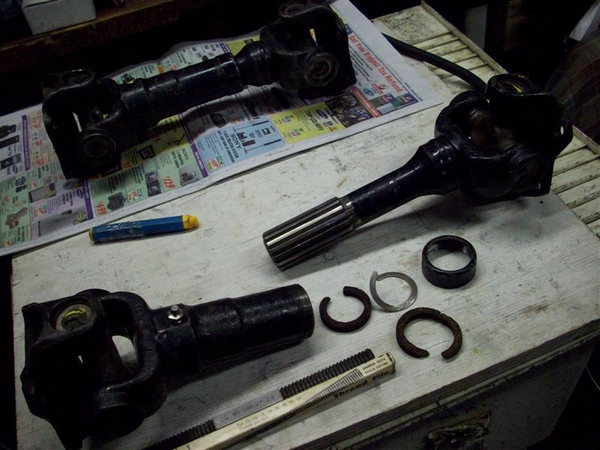
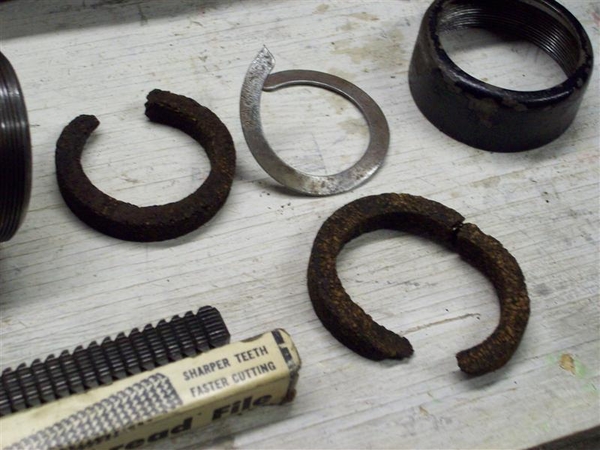
Here is a closeup of the cork gaskets. Gonna see if I can find them locally tomorrow or Thurs at Motion Industries.
(3-18-09 OK, MI doesn't carry these Spicer Parts. The cork seal part number is #3-16-53. Now to find a dealer that will sell a small qty! (2))
The bent tin piece (washer is what they call it) is actually deformed from taking it off of the shaft. It is soft metal and forms back in shape easily. The ends of the cork piece are actually tapered so that they nest in each other once installed! Nice detail! One of the threaded caps was not going on very far, and the threads are very fine. I show my "thread file" (#1) that is an extremely handy tool! Seems that these threads are a standard thread and are a 24 per inch type! Lo and behold, the thread file had a #24 section on it, so I sat and cleaned and reshaped threads until I could get the cap threaded on far enough so that it would compress the cork ever so slightly. There was paint in the threads and a couple of tiny dings. These files serve to realign material and will not remove much at all if you take your time and get the "feel" of when you are in the groove....and not cutting new threads!! ![]()
Took these pics, and then gave the rear of my chassis a towel bath with a solvent soaked wash rag, and a clean light colored towel. Clean with the rag, and then polish with the light color rag! IF you get dirt, you missed..... re-solvent, re-towel.... At least next time, I can climb into the rear with a solvent pan and I can wash down the rear lower (greasy!) cross member and the front frame rails, without getting all full of crap! Maybe a little, but not a grimy disaster! Work clean weedhopper!
Steve


