

Day 11
When things get worser....should be the title, or perhaps day 13.....or I stopped cutting because I ran out of Dremel wheels!!!
....actually I didn't run out of Dremel wheels, but my balloon got seriously deflated by what I discovered tonite!
I cut off the LH upper shock mount and part of the piece that the sway bar attaches to, in order to expose the top piece of the boxed frame rail, thinking that this was the extent of my problem. Wrongo! Once I got the piece out of the way, I discovered that the crack extended all the way down the outside of the frame rail, and wrapped around underneath! It hadn't gone 360 degrees around, but it was well on it's way to 270!
I used a variable speed Dremel with 1" cut off wheels. I started with a 1/16" wheel and when I got thru the steel in some spots a thinner wheel (.035" or so) worked to get at the welds that were deeper inside the outer cut. It allowed also for some movement of the Dremel....or unsteady hands....before the wheel shattered....! I only used a hacksaw on the last cut across the sway bar mount, as I couldn't get in there real good with the Dremel, and it was a straight cut...
In the following picture, the stainless rule is sticking in the crack as it heads down the outer side....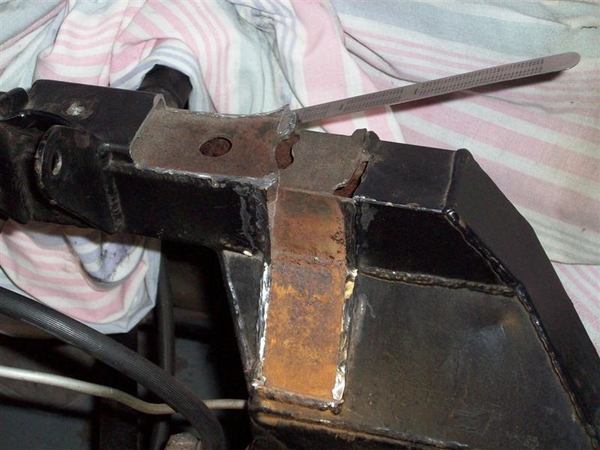
Note the lack of a drain hole in this area. I would have thought that a hole or notch at the bottom of the shock mount would have been in order, similar to what was done for the engine frame mounts. At this point, that wouldn't sacrifice any strength.
Here are the pieces that I cut off today....sorta feel like Jeff Goldblum in "The Fly" with this collection of parts....! Check out the piece that I removed from the sway bar mount. I thought perhaps it was a solid piece welded on to the top of the frame rail...nope! Piece of boxed or bent steel, with two nuts welded on underneath!!!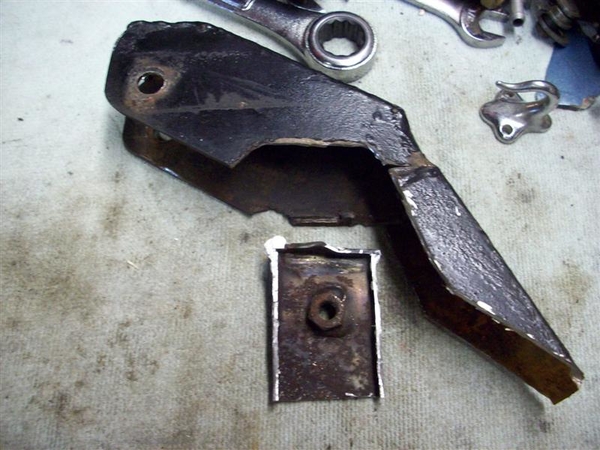
Time to consult some experts in the club and see if a chassis shop is in order....or just more cutting and more welding.....!
Next, take measurements and pictures of where things go...then grind some of the excess weld material down a bit to facilitate fabbing new parts. All of the mounts are made from flat pieces welded together! No shaped box tubing here!
After that, I'll tackle shortening the engine frame mounts back to stock height. I was thinking about it today, and if you wanted to lift your motor quickly, why not put spacers in your engine mounts where they attach to the block? Use longer bolts, and 1.25" round spacers and you would have plenty of support...make them as thick as you need. Would negate the need to doink around with raising the frame mounts! Am I missing something here...could it be that simple? (MIne was raised 1-9/16"....which is a LOT, but if you wanted to come up 1/2" or so, I think it would be fine.....)
Ciao!
Steve
Attachments
Images (2)

