

Tonight I was determined to start porting on the new intake manifold...but which intake??? Dug back into my pile of notes, and found my measurements with various intakes and stock air cleaner, measured from the front and rear deck surfaces of the block to a line thru the top center surface of the air cleaner (center is taller than the edges by a bit due to the shape).
I have a choice of the Performer or the Performer RPM. Last night, I determined that the taller (+5/8") carb flange of the RPM would be desired as less cutting on the center bearing support of the jackshaft bracket would be needed to allow me to run an automatic choke! Something I have been sorely missing! If I had to run the shorter Performer, I would be required to run a manual choke and a cable...not too big a deal....but I like automatic....! Have grown fond of the feature you may say....
From my old notes, I determined that the RPM will fit, as it is within 1/4" of the height when using the original cast iron intake manifold and stock 1" spacer! I reasoned that I have dropped my engine mounts (chassis side) by 1 5/8"), increased my rubber mount thickness by about 3/4", so it should leave me in the neighborhood of 7/8" to allow a 1/4" phenolic carb spacer and proper gaskets. AND, I may even get REAL lucky and be able to put in 1/2" shims to raise the engine back up a tad to give my expensive oil pan some room to get out of the driveway!! Hey, at this point, if I can get away with 3/8" shims, I will still be a happy man!
Previously, I had already scribed marks on the intake ports to use as a guide.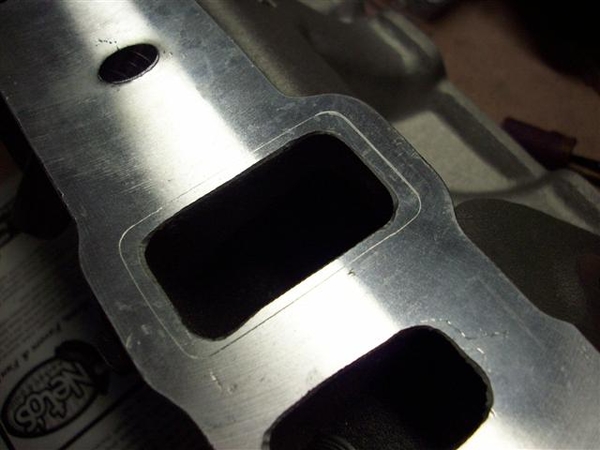
These marks are out to the extreme of the gaskets, which were made to fit a number of Ford small block aluminum heads. They are Felpro gaskets, but nothing you can buy over the counter...go figure! OEM (Ford Motorsports) only! So, I've been buying up a few sets when they pop up on ebay when dealers are closing them out! There are other gaskets made that will now work, Edelbrock and others have similar that will do the trick. In my case, I do not want to take out all the material to the lines. I need to leave about 3/32-1/8" as the ports are almost right...but the tops and bottoms of the ports can use some work, and then straightening on the sides a bit.
SO, out to the garage to start porting....dug out the porting kit I bought from Standard Abrasives, and scanned the directions.... "go easy on aluminum" seems to be the mantra....AND you need a 1/4" die-grinder, air or electric..........something I failed to purchase! Hmm, too late to hit Home Depot tools....so on to something else....
Here are some other manifold mods....did most of the measuring last night but didn't mention it.
Last year or so I was checking this all out and I removed some casting material from the first and second bolt holes on the RH side to allow the jackshaft bracket to sit properly. I will be lowering the bracket by .200" also..more in a few! Will probably now need to remove even more material!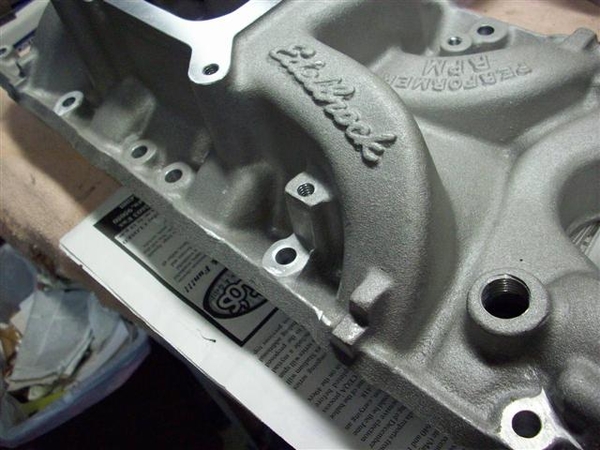
At the rear of the stock intake, there was a boss about 3" in from the RH side of the intake. The original jackshaft bracket bolted to a hole here for additional support. I hope to make up a piece and have it heliarced in place to allow this support to be utilized.
My jackshaft bracket is a new unit that I picked up in Italy on a business trip that allowed me the opportunity to visit the factory! This was back in about 96. So far, very few of my NOS pieces that I picked up from the factory have actually fit with out some sort of needed tweeking or major difference from the old part! Testament to the fact that these cars are "moving targets" when you are trying to get parts to fit properly, from the vendors!!! ...or anywhere else!
In comparing my original bracket to the new one, the new stands are aprox .200" too tall.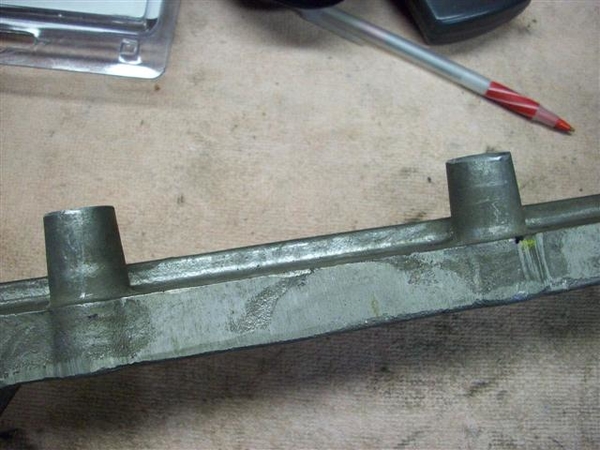
Lowering it this much will allow the front support bolt holes to line up properly. The front surface of the jackshaft bracket was originally fly cut straight across where the front bracket attaches. The new one has been spot faced...and now has material in the way of the two pieces mating properly.....so that will need to be addressed also.
In addition to these differences, the size of the rear shaft bearing is also larger!!! Already purchased new bearing in the proper size...now have extras of the old ones!
I also bought both idler pulley brackets new from DeTomaso. The original RH unit I have looks like someone went after it with a hammer, shattered it in three pieces, and someone welded it all back together with large pieces of gum! Makes me wonder if I shouldn't have this new one reinforced too!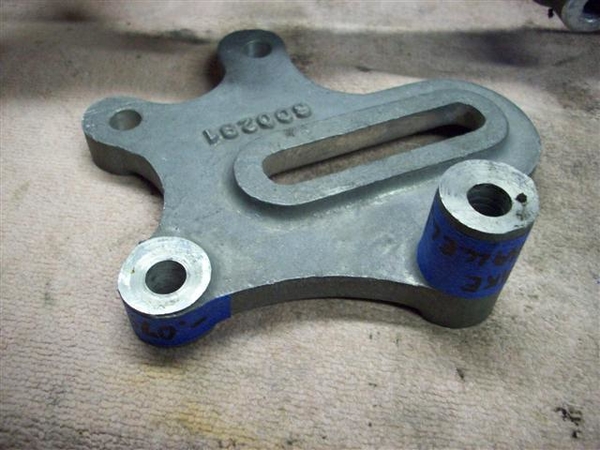
While the jackshaft bracket machining seemed straight, the work on this piece was anything but! These two nearest bosses are not flat and are not at the same height relationship to fit properly on the water pump bosses to allow it to sit properly to meet up with the jackshaft bracket front two support bolts. It's totally a Goose thing, if you are a Pantera owner scratching your head....
I will have .070" taken off of the small boss, and the long one "flattened" or made parallel to the front bosses....all of which appear to be level with each other when placed on a super flat surface!
My original LH idler bracket is in great shape for some reason, so I will re-use it. The new one I picked up seems like it will do the job as well but could need some machining.... I will test everything with the Edelbrock water pump that I swap off of my old engine before passing final judgement. I am using a 1973 water pump (D3TE Ford casting)for mockup, and found some slight fitment issues when I dug out an original 1968-69 Ford pump casting! The idler bracket fits that older casting very well!!! The early pump was still on a family car driving around.....last time I worked on all of this, so wasn't readily available for test fits!!! ![]()
Now I know it is a good part to have around! I had been wondering what to do with it...scrap pile or.....?
Maybe that will be a good thing for this weekend.....swap remaining parts off of the old engine....pulleys, install fuel pump and water pump, align at least the LH idler pulley properly. RH will need to be done after the machining is complete.
It probably took me longer to describe all of this than it took for me to get to the point this evening where I needed more power tools to go further. In order to move the entire project forward, I dug out the halfshafts and got them ready to roll!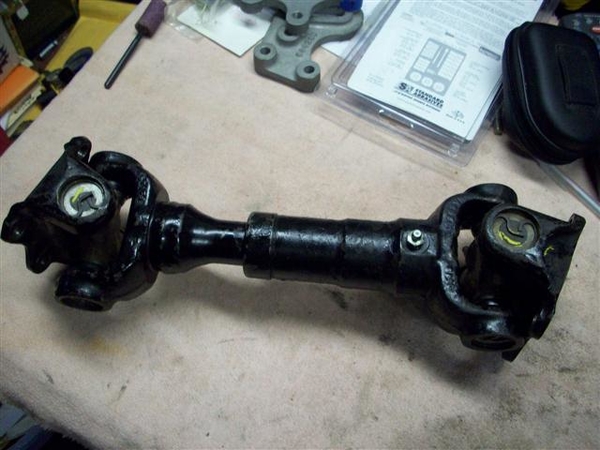
I installed a new cork seal in each and greased up the splines. I also lubed the u-joints. They took a rather disturbing amount of grease....which makes me wonder if they were ever greased ?! I must have given them a few shots the first time this was all apart, as I remember shooting grease out the air hole of the splined inner half shaft...and having to clean it off of everything after a drive..... The splined slip joint portion of the shaft does not hold much grease to keep the splines happy!!! As for the u-joints...maybe I missed it! All 4 of them??????
Tomorrow: shop for new air tool and grind away!
Out!
Steve


