

quote:Originally posted by mzwern:
... Obviously the original car had some problems. I would assume that there is a list of must change improvements ...
With customizing so prevalent in the Pantera hobby it can be difficult for first-time shoppers to differentiate between the necessary improvements and those that are merely optional. Even owners intending to make only the essential improvements end up becoming side-tracked by the “customizing” bug. Here’s a list of Pantera upgrades which I consider essential; they correct its short-comings, they make it more reliable, they modernize its performance and they improve the ownership and driving experience. These upgrades are minimally intrusive to the original design.
This guide was written predominantly for buyers and owners of the narrow body Ford specification Panteras sold between 1971 and 1974. However many of the considerations listed here apply to later model GTS and wide body Panteras too.
54 Pantera Upgrades / A Check List for Pantera Shoppers and Owners
___________________________________________
Cooling System
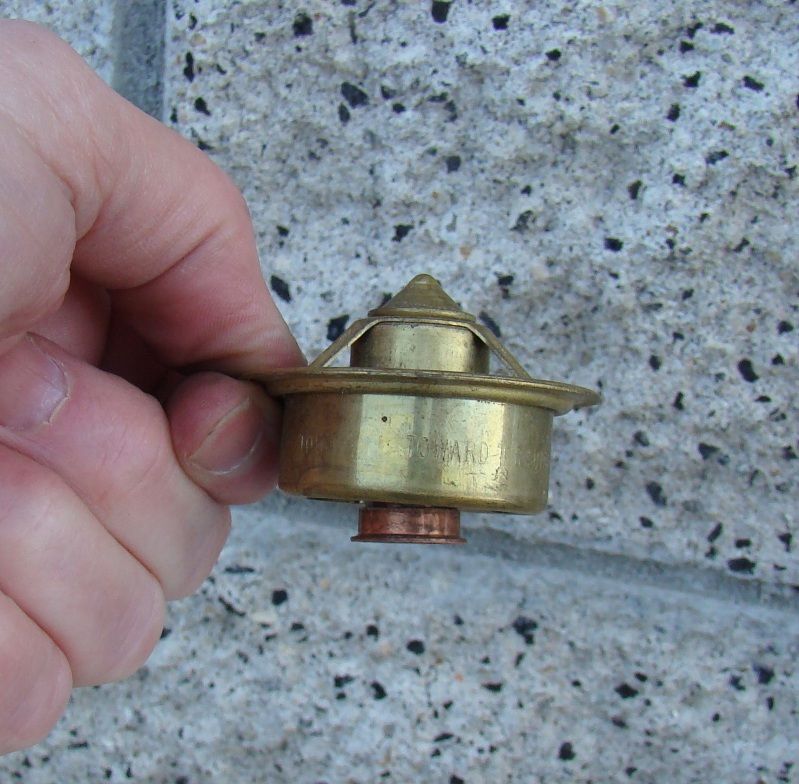
(1) A Flow Kooler (formerly Robertshaw) 333-180 thermostat (Summit #BRA-333-180) – this is the OEM thermostat
The 351C was equipped with a unique high-flow thermostat and a unique high-flow warm-up system. But almost all parts houses, including the parts counter at Ford dealerships, dispense the wrong thermostat for the 351C, they sell the Windsor themostat for Cleveland applications. Use of the wrong thermostat is by far the biggest source of Pantera cooling system trouble. Using the correct thermostat allows the warm-up system to operate properly and alleviates over-heating.
(2) Meriah Fans - mounted in stock location
The stock fans simply don't blow enough air for every situation or climate. Mounting larger blades on the oem motors
is not helpful because it takes a more powerful motor to move substantial quantities of additional air.
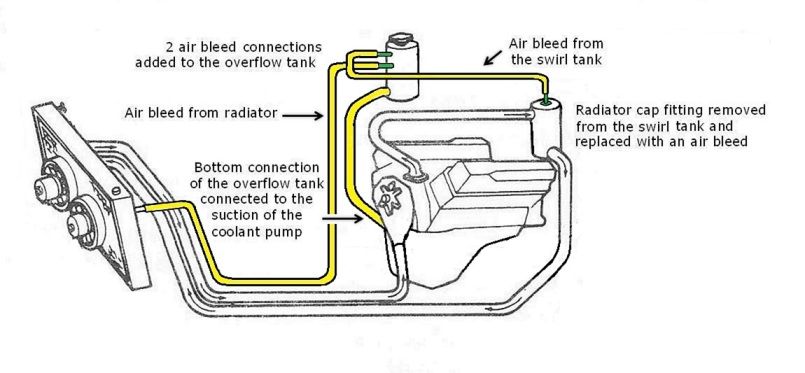
(3) Tanks Revised to make the venting system functional
The oem radiator vent system is non-functional. Air that collects in the radiator has no way to vent and remains trapped in the radiator. This reduces the effective surface area of the radiator and leads to over-heating. However, the Pantera's cooling system has the proper tanks for a functional race car style vent system; it is obvious that during the early stages of the Pantera's genesis the application of the tanks was revised leaving the Pantera without the vent system intended for the radiator. A couple of simple modifications is all it takes to make the vent system functional as I believe the designer originally intended.
(4) Phoenix radiator (copper - sold by Hall Pantera) or Fluidyne radiator (aluminum)
(5) Stainless Steel Tube Kit
(6) Stainless Steel Tanks
(7) Edelbrock #8844 Coolant Pump
The curved vane impeller of the Edelbrock pump eliminates cavitation which begins at 5000 rpm with the stock pump. This is worth about 5 extra BHP at 6000 rpm. But most importantly, the Edelbrock pump has a spare port connected to the pump suction that will allow plumbing the overflow tank to the pump suction as detailed in the picture above.
___________________________________________
Electrical
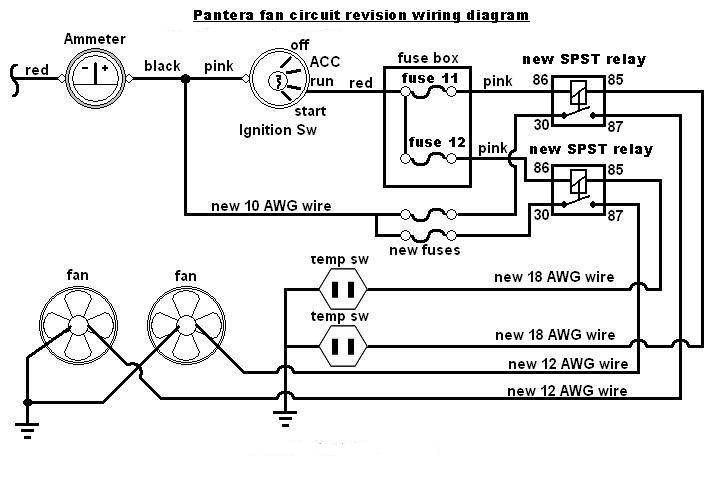
(8) Two Relays and Fuses added for control of the Electric Radiator Fans
This takes the load of the cooling fans off the ignition switch.
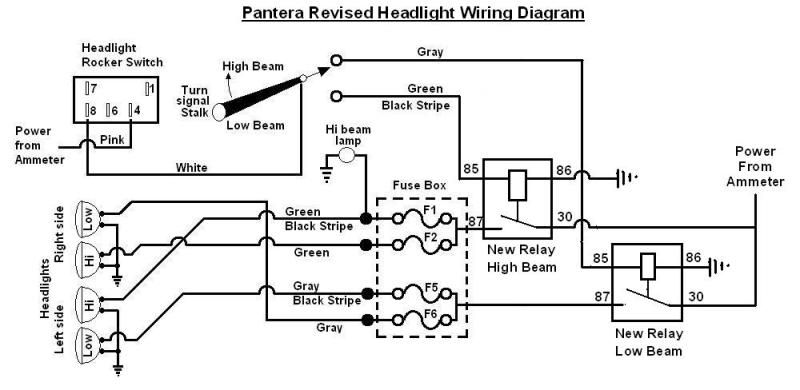
(9) Two Relays added for the Headlights
This takes the load of the head lights off the ignition switch.
(10) Relay and Fuse added to supply the Ignition System
This takes the load of the ignition off the ignition switch & supplies full voltage to the ignition.
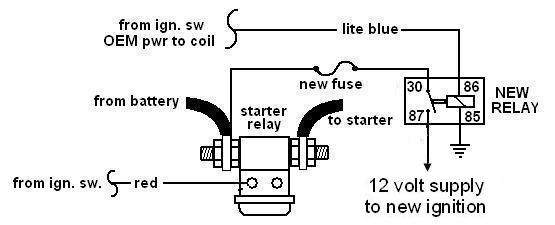
There is too much electrical current flowing through the contacts of the ignition switch, this was true even when the vehicle was new. Over the years those contacts have become dirty or worse, burned and pitted. But as we upgrade the Pantera with high air-flow cooling fans, brighter headlights, and electronic ignitions ... all these improvements draw even more electrical current, and severely overload the ignition switch contacts. Its imperative to install the relays and remove those loads from the ignition switch.
(11) Fuse Box Upgrade (OEM fuse box modified for modern fuses by Pantera Parts Connection)
The oem fuses are difficult if not impossible to find today. The connection of the oem fuses in the oem fuse hoders is also a source of electrical gremlins. Upgrading the fuse box to modern fuses simplifies fuse replacement, and eliminates the electrical gremlins that are created by bad fuse connections.
(12) Brighter Head Lamps (better visibility for night time driving)
The OEM headlamp is a 7” diameter, incandescent, sealed beam lamp with dual high and low beam elements, equivalent to a GE model 6012 lamp. Several brighter sealed beam headlamps have been manufactured over the years to replace the GE model 6012. The first replacement was the model 6014, which was a higher wattage incandescent lamp. The second replacement was the model H6014, a halogen version of the 6014. The model H6024 was another halogen replacement for the 6012, the H6024 evolved into the model H6024XV, a halogen lamp advertised to be both brighter and to have a longer life. The best option today however is manufactured by both Bosch & Hella. They each manufacture a 7” reflector to replace the model 6012 sealed beam headlamp. The reflector employs a modern H4 cartridge style halogen bulb. These reflector and cartridge bulb systems offer both brighter lighting and an improved light pattern.
The headlamp wiring revision (#9) suggested above should be performed before installing the brighter headlamps since all of these brighter headlamps draw more current than the OEM headlamp.
(13) 80 amp 1G Ford alternator
(14) Solid State Voltage Regulator
The OEM alternator is an externally regulated (i.e. rear terminal) Ford 1G small case alternator. Ford originally manufactured this alternator with outputs rated between 35 and 65 amps. I have seen specs rating the Pantera's alternator anywhere from 44 amps to 61 amps. Remanufactured 1G small case alternators are available today with enhanced outputs boasting 80, 100 even 130 amps. The charging needs of a Pantera will hinge upon how much current draw the various upgrades have increased the load upon the electrical system (fans, headlights, ignition). An 80 amp 1G alternator combined with a solid state voltage regulator will provide more than enough charging capacity to handle the upgrades mentioned in this guide. There is no reason to convert to a 1 wire or 3 wire style alternator, and no reason to upgrade to an ultra-high-output alternator.
___________________________________________
Interior
(15) Leather Wrapped Steering Wheel
(16) Modified OEM seats or aftermarket GT style seats (Sparco, Momo, Recaro, Corvette, etc)
The Pantera was originally equipped with a wonderful leather wrapped two spoke steering wheel manufactured by Ferrero. That steering wheel was the type of equipment you expected to find in the most expensive car sitting on a Lincoln dealer's lot. Tom Tjaarda had also designed some contoured and reclining seats that were forward thinking and ergonomically headed in the right direction. The seats provided generous head room and leg room for a wider range of driver heights (including taller drivers), and provided side support to keep the driver in his place during high speed cornering. The seats also had the appearance of seats designed for an expensive European mid-engine sports car, but they needed more development before they would be ready for production. Tom said the foam blocks became uncomfortable after about 20 minutes of driving, and the sides of the composite "shells" became irritating to the drivers side after a while. Ford replaced the Ferrero steering wheel with a cheap plastic steering wheel that was original equipment in one of Ford's least expensive imports ... the Capri. The seat design was abandoned for an upright, thinly padded, non-adjustable conventional seat that looked like it came out of a 1965 Mustang. The Pantera's ergonomics were compromised by these decisions, and people who log a lot of miles on their Panteras will appreciate improvements to the ergonomics.
By the way, the composite shells for Tom Tjaardas seats were later employed as the shells for the racing seats installed in the Gp4 Panteras.
(17) The Amerisport Bulkhead Reduction Kit
This is not a necessity for every Pantera, but the bulkhead reduction kit is often needed to make room for an aftermarket passenger seat, and it improves passenger comfort if you plan to travel with an adult passenger.
____________________________________________
Drivetrain
(18) Heavy Duty Half Shafts and U-Joints
(19) Rear Wheel Bearing upgrade (wider bearings, narrowed spacer)
The axis of the transaxle output shafts is located behind the axis of the rear wheel stub axles, therefore the half shafts operate at a constant angle. This angle creates an angular side-thrusting force at the u-joints and the rear wheel bearings which they are not designed to sustain; thereby causing them to wear rapidly. The only thing that can be done is to use heavy duty parts that will slow down the rate of wear.
(20) Possible Rear Axle Repair or Replacement
The rear axles are supposed to have an interference fit within the rear wheel bearings, but many Panteras were equipped with slightly undersized axles. If the axles fit loosly within their bearings there is a chance the axle will spin within the inner bearing race, this will possibly wear away the axle making the axle's OD even smaller, it may wear stress rising grooves in the axle or gall the axle; in other words damage leading to axle failure may occur if this problem is not resolved. If the axle is undersized this problem should have been addressed the first time the rear wheel bearings were repaired. If the axle damage is minimal it can be repaired and steps can be taken to restore the proper OD in the bearing area. If axle damage is severe enough to weaken the axle the only recourse shall be to replace the axles.
(21) Remove the shift lever detent springs
(22) Widen the slots in the shifter gate to prevent the lever from rubbing the gate
Combined with a properly adjusted and greased shift linkage, these are two improvements which can help the ZF shift buttery smooth.
(23) Replace the ZF transaxle ring gear bolts and safety wire the replacements
The oem ZF transaxle ring gear bolts were defective, the bolt heads tend to break off
(24) McLeod or Hayes Long Style Clutch
This is recommended because the oem clutch is shot by now. The long style clutch is compatible with the OEM bolt pattern flywheel and standard travel slave cylinder
_____________________________________________
Wheels and Tires (narrow body Panteras)
(25) Front Wheel and Tire Options:
- 17” x 9” front wheels, 5.75” back space, shod with 245/40R17 tires
- 18” x 9” front wheels, 5.75” back space, shod with 245/35R18 tires
(26) Rear Wheel and Tire Options:
- 17” x 11” rear wheels, 6.5” back space, shod with 285/40R17 tires
- 18” x 11” rear wheels, 6.5” back space, shod with 275/40R18 tires
- 19” x 11” rear wheels, 6.5” back space, shod with 285/35R19 tires
- 20” x 10.5” rear wheels, 6.25” back space, shod with 285/30R20 tires
Every sports car or race car enthusiast must come to grips with the truth that the performance of any sports car or race car is limited in every way by the performance of the tires it is equipped with. Using the best tires possible should always be the desire of any sports car or race car owner.
Acquiring 15" tires that have a V or Z speed rating, or that are capable of providing adhesion that is compatible with the capabilities the Pantera's chassis, is a difficult if not impossible task. Modern high performance tires exceed the performance of older tires in every aspect, but this modern technology has never been applied to 15" tires. Tire manufacturers have abandoned owners of sports cars equipped with 15" performance tires. The best a Pantera owner can expect from a tire manufacturer is to reproduce a tire design that is 30 to 40 years old. An upgrade to modern wheel and tire sizes is needed in order to modernize the performance of any Pantera, and to make state-of-the-art tires readily available to Pantera owners.
Some owners desire to maintain the oem appearance of the original wheels and tires. My advice to those owners is to upgrade the wheels and tires they use for normal driving duty, and to keep their set of oem tires and wheels stacked in the corner of the garage for concours type car shows, and to pass-on to future owners. If they prefer the oem Campagnolo appearance for the wheels they use for normal driving, they should equip their Panteras with "Campy Clone" type wheels in modern wheel sizes and have them powder coated in the oem silver color.
If you want Campy Clone wheels but the Pantera vendors can’t supply them in the sizes you want, take your business to Genuine Boyds, they will make Campy Clone wheels to your specification.
Staggering the diameter of the front wheels and rear wheels by 1 inch or 2 inches compliments the looks of the narrow body Pantera very well. The recommended 275/285 cross-section rear tires mounted on 18 inch, 19 inch and 20 inch wheels are the correct outside diameter for a narrow body Pantera, therefore the gearing is slightly higher and the gear spacing is slightly wider than with the 17 inch rear tires. The outside diameter of the 18 inch, 19 inch and 20 inch rear tires also compliment the radius of the rear wheel well, and they provide the proper revs per mile for speedometer and odometer accuracy.
The narrower 275/285 cross-section tires have several advantages over 335 cross-section tires, including: (1) there are more choices in tire makers and models, (2) obsolescence is not an issue, and (3) they are significantly less expensive. Although not a selling point for every Pantera owner, the narrower 275/285 cross-section tires are also available in all season rubber compounds; owners who drive in conditions where such tires would be beneficial may find that another valid reason for selecting the narrower tires.
______________________________________________
Brakes
(27) Remove the proportioning valve from the brake system front circuit.
(28) Replace the front rotors (disks) with ventillated rotors.
Warning: removal of the proportioning valve from the front brake circuit will worsen the front brake overheating problem, therefore replacement of the front solid rotors with ventillated rotors should be performed in conjunction with removal of the proportioning valve.
(29) Rear brake upgrade kit (available from SACC Restorations)
The Pantera is equipped with good Girling 4 piston fixed calipers in the front, but small Girling floating calipers with only a single piston are installed at the rear, the brakes are significantly under-powered in the rear and rear braking force is unbalanced with front braking force. The 11” (280 mm) diameter rotors are only ¾” thick, and they lack ventilation (they are solid disks). When subjected to repeat hard braking the Pantera’s braking performance quickly fades due to heat. Instead of installing ventillated rotors and more powerful rear brake calipers Ford specified installation of a proportioning valve in the front circuit to reduce front braking force and therefore reduce the heat generated by the front brakes. The proportioning valve in the front circuit prevents the “good” calipers from gripping the front disks with full force during hard braking, when full force is needed most.
_______________________________________________
Suspension
(30) 7/8” rear anti-sway bar
Ford believed the neutral steer built into Pantera chassis was dangerous for the average driver, they believed the mid-engine Pantera was too easy to transition into a condition of oversteer. Therefore Ford decreased the size of the rear anti-sway-bar from about 7/8" to 3/4" to give the chassis a bit of understeer thereby lessening the chances of over-steer. Unfortunately this had a negative impact on the Pantera chassis' ultimate cornering capabilities.
(31) Billet anti-sway bar mounts and poly bushings
(32) Spherical anti-sway bar ends
The oem suspension used rubber bushings in the anti-sway-bar mounting system for both the chassis mounting points and the lower control arm attachment points. The method in which the anti-sway bars attached to control arms demanded a lot of "give" in the design, which was provided by the rubber bushings. When an owner replaces the rubber anti-sway bar bushings with poly-urethane bushings the "give" in the design is eliminated, a degree of binding is introduced into the suspension, the anti-sway bar mountng straps and the anti-sway bars themselves begin to snap in two. To give the anti-sway bars more control over the chassis while preventing the parts from being snapped in two requires an upgrade to the anti-sway bar attachment parts.
(33) Gas shocks with spring pre-load adjusters (steel body Koni #30-1301 are a recommended minimum)
(34) Chassis lowered
(35) Front end lowered in relation to the back end
(36) Front coil springs: 300 – 400 lbs./in. spring rate
(37) Rear coil springs : 400 – 550 lbs./in. spring rate (i.e. 100 – 150 lbs./in. more than the front)
Ford raised the ride height of the Pantera to enable it to negotiate severely poor road conditions and large road hazards; raising the ride height also raised the bumpers to better match with the bumper height of other cars on the road. But raising the Pantera negatively impacted the handling. Lowering the Pantera's chassis improves its handling tremendously, and also improves its appearance. Lowering the nose of the Pantera in relation to the rear modernizes its apperance and improves the aerodynamics. But as a chassis is lowered it has less suspension travel, therefore it is important to increase the compression rate of the springs (rated in pounds per inch) in order to prevent the chassis or suspension from bottoming out when encountering high speed bumps.
The rear end of a Pantera should be lowered until the half shafts are parallel to the ground. This optimizes the angle at which the u-joints operate, to minimize the load on the u-joints and rear wheel bearings. The front end of the Pantera should then be lowered to level the door sills, or to give the front end a visible "nose down" appearance. Lowering the front of the Pantera is limited by the ability to get a floor jack under the front jacking points, or by the Pantera's ability to clear road obstacles, deep rain gutters, steep driveways, etc.
The oem shock absorbers were not the best choice available at the time, red-body Koni shocks were the common upgrade 40 years ago. Of course there are even better shocks available today than the red-body Konis that were available in the 1970s. If replacement shocks are purchased having spring pre-load adjusters the ride height of the chassis can be improved in conjunction with an improvement to the shock absorbers.
(38) Upper front A-Arm modified to increase caster
The Pantera was designed with 2.6° of positive caster built into the chassis. The caster is fixed, its not adjustable. The caster however is not consistent from car to car, or even from side to side of the same car; it varies by a surprising amount. The caster is also dependent upon the relationship between the front ride height and rear ride height of the chassis. The more the front of the car is lowered in relation to the rear, the less caster there is. Lowering the front end of the car as suggested above will eliminate any positive caster in the front suspension geometry and make the the car handle very "twitchy".
It is the consensus that 4° to 5° of positive caster is about the right amount for a narrow body Pantera, however to achieve this much front caster requires modification of the upper front control arms to allow moving the upper ball joint further back, and to allow shimming the ball joint to achieve the proper setting.
(39) Install upper front A-Arm camber adjusters/locks
These adjusters make it easier to adjust and maintain camber
(40) Steering rack mounts modified to reduce bump-steer
This is a necessity when ever the ride height of the chassis is altered
________________________________________________
Chassis – Body
(41) Rear chassis stiffener
The box-section sub-frame that supports the engine and rear suspension is not braced to resist verticle or twisting forces very well. The result is paint chipping and body panel cracking in the rear section of the car, and even cracking where the A-pillars attach to the front cowl. Race cars require substantial bracing to fix this, but street cars are greatly aided by the bolt-on braces (stiffeners) sold by the Pantera vendors.
(42) Hall Pantera fuel filler neck #G8-21 or G8-23
To re-fuel the earliest Panteras (predominantly Push-button and Pre-L models) it was necessary to open the engine compartment hood and wrestle the fuel pump nozzle into the short verticle fuel filler mounted atop the fuel tank. Hall Pantera sells an extended and angled fuel filler neck that makes the chore of refueling much easier.
(43) Rear Deck Lid Struts replaced
Recommended because the oem struts are "shot" by now
(44) Rotary Air Conditioning Compressor
Recommended because the oem compressor is "shot" by now
(45) R134A air conditioning system upgrade
Recommended because this is an inevitable conversion
_________________________________________________
Engine Necessities
(46) Replace the valves with Manley #11800-8 & 11805-8 severe duty valves
The OEM valve heads have a reputation for separating from the stems. A loose valve head rattling around inside a running motor does catastrophic damage to the motor. Replacement of the valves is a way to insure this doesn't happen to your Pantera's motor. Valve replacement should be accompanied by:
- A three angle valve job
- Installation of bronze valve guides
- New valve stem seals (such as Ford Perf Racing Parts #M-6571-A50)
- New high performance valve springs (such as Lunati #73815)
- Valve spring seats
- New spring retainers
- New Manley single groove 7° valve spring locks
(47) Replace the connecting rod nuts with ARP #300-8371 nuts
The threads pull out of the OEM rod nuts. The rod nuts can be replaced without a complete tear-down of the motor. The big-ends of the connecting rods do not have to be resized if the connecting rod bolts are not removed.
(48) Replace the crankshaft damper with a Romac #0203 damper
M code and Q code dampers were always considered inadequate for high performance applications. But the concern today is the damper ring may fly off the hub due to the damper's age.
(49) Replace the flywheel with a lightened steel flywheel, Yella Terra #YT9902 (26.4 pounds)
The 40 year old cast iron flywheel could be a ticking time bomb. A lightened steel flywheel is tougher than the oem iron flywheel, and the lighter weight will give the motor a little more pep. As far as I know the Yella Terra flywheel is the lightest 11 inch, 164 tooth ring gear, SFI approved billet steel flywheel on the market. It is drilled for long style pressure plates, which is the type of clutch I recommend. And it is configured for external balance applications (28 oz. imbalance).
(50) Breakerless or distributorless ignition upgrade
The engine runs smoother, makes more power, revs to higher rpm, and there are no more points to adjust.
One possible parts list:
- Distributor, magnetic trigger & vacuum advance, MSD #8477
- Duraspark I Coil, MSD #8205
- Duraspark II Wiring Harness, Painless Wiring #30812
- Duraspark I module, red wiring strain relief, Ford #D7AE-12A199-A1B, DY204, or Standard Motor Products #LX210
- Ignition wires, Ford Racing Perf Parts FMS-M-12259-M302 universal 9mm wire kit
- Spark plugs, Autolite Racing AR24 (iron 4V heads)
(51) Replace the camshaft timing set with a Roll Master #CS 3091 timing set.
The plastic teeth on the oem camshaft timing gear have to be shot by now, and the chain stretched. The multi-groove timing sprocket will allow you to advance the camshaft timing of your 1972 - 1974 Q code motor to 1971 specs (4°).
___________________________________________________
Engine Performance Improvements
(52) Induction System Upgrade
- Shelby/Blue Thunder Intake Manifold
- Quick Fuel Technology #SS-780-VS carburetor
- Robb Mc Performance mechanical fuel pump #1020
(53) Exhaust System Upgrade
Hall Pantera (GTS exhaust system) or PI Motorsport (Big Throat exhaust system) can sell you an entire exhaust system. Precision Proformance, Pantera Parts Connection and Performance Automotive Technology can also sell you headers, but to my knowledge they don't offer entire exhaust sytems. Panteras By Wilkinson has a new exhaust system, but I've been keeping it out of my lists until I hear feedback. (I'm waiting Steve)
(54) Compression Ratio Upgrade (10.0:1)
- Replace open chamber 4V heads with 1970 or 1971 quench chamber 4V heads
- Replaced dished pistons with Sealed Power L2379F forged flat top pistons
_____________________________________________________
-G