mystery pipe

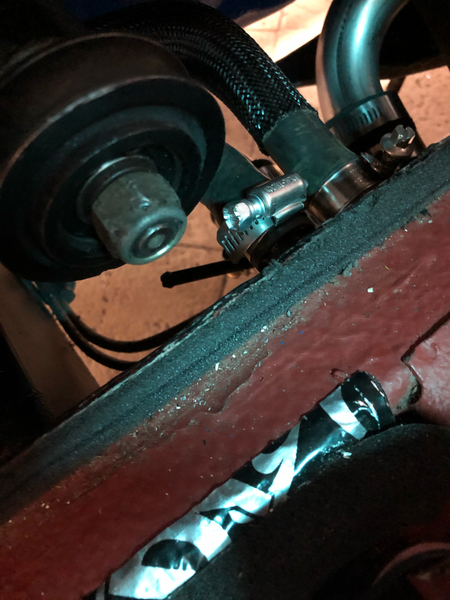
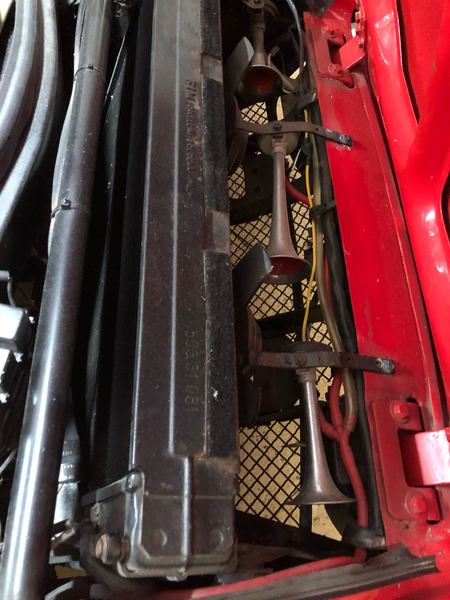
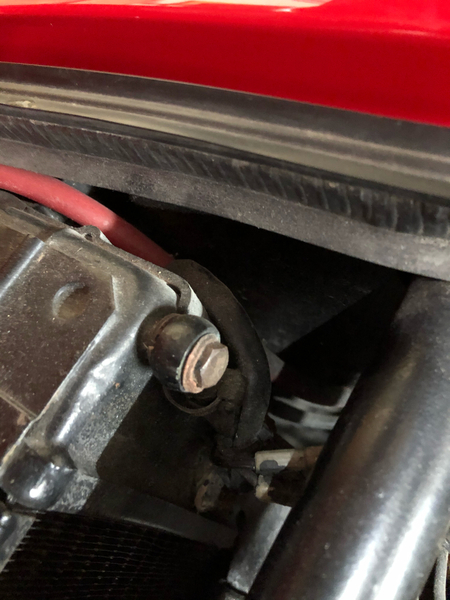
Can anyone tell me what the small flanged tube is directly below the idler pulley - you can see it here in profile in the picture.  I am now chasing down the rats and mice in the hookup game and this one has me stumped. Is it a vacuum tube , an bleed tube for the radiator or what ?? Trolling through the manual has revealed nothing and  I have tried to chase it through the center console and for the life of me cannot see what it is for. 

If you know please tell me what  it is supposed to connect to.

Thanks for any suggestions.

Attachments

Images (1)
  • Mystery Tube
Original Post

Replies sorted oldest to newest

Dear Percy,

          I believe that you have found the remains of a later factory improvement to the cooling system, which originates from point near the top of the factory radiator and was supposed to efficiently vent trapped air.  The air ended up at a point on one of the two tanks ( I can't recall specifically--it has been a long time).  

          As I understand things, it didn't work all that well, which jives with the my experience.  I suspect that most of them are disconnected due to their poor function and the use of more modern radiators without the fitting. 

         Warmest regards, Chuck Engles

I concur with what Chuck has shared.

when purchased 2511 had this air bleed piping. I have generally experienced no dire air pocket problems with 2511 and so I retained the system during reconstruction after my collision damage.

I can’t really say that it performs as intended but I can say that I have not noticed any problems with it installed. 

Larry

Gentlemen

Thanks so much for all of the responses. I checked and the old swirl tank did have the remains of mid  stub where this would have connected to. The original tanks have seen far better days so cannot be reused. I will delve into the radiator tonight to see if I can spot if its still tied into the top of the radiator and will blank it off if its an issue, as I think the radiator is the original unit .

While this appears in serviceable condition, all will  be revealed on that when the coolant goes in!!

If past experience is anything to go by, better have some trays ready to collect the leaks...! 

Any recommendations on the best coolant to use - we don't get any freezing weather here. 


Thanks Larry - actually a very good suggestion .

I have no idea if the radiator is still sound after sitting for 30 years.

I have pretty well replaced all of the other rubber , stainless tubes and clips on the entire system, so this will be the point of weakness.

The previous owner told me he had the radiator pulled cleaned and pressure checked just before the strip down in 91, so I am hoping it will prove to be OK. Once again the triumph of optimism over experience ! 


If you decide not to use the Ford "auto-bleed" - keeping the tube in place would still be good for any possible future upgrades of the cooling system.

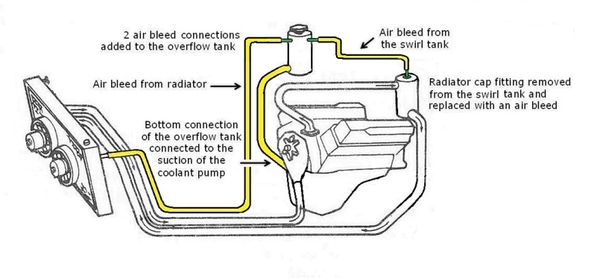
I run a configuration like this:

Updated_Cooling_System

But the changes above (which require sealing off the top of the swirl tank, and installing bungs in the expansion tank) may be more than you want to take on right now.

Anyway - the upper left corner (looking from the rear of the car) of the radiator is where the port for either a petcock, or the tube is - at least it was on my car.

On my car, I had a petcock for the "manual" air bleed before I did the mod.


And of course Larry's suggestion on just using water until you are confident in your cooling system is the right one - you will probably save yourself money in anti-freeze, it may be easier if there is a mess to clean up, and if you have a squeejee, you can get some of the grime of your garage floor!

(In a worst case scenario - which I hope you don't encounter).


Rocky

PS>  I'm not used to be refered to as "Dear Rocky", but that's nice!


I am only Rocky because that is the name of my Land Cruiser, and I am "Rocky" on all the internet forums I join.  My real name is Chuck - but not the distinguished Dr. Chuck Engles.


Attachments

Images (1)
  • Updated_Cooling_System
Last edited by rocky

radiator bleed 1radiator bleed 2

Gentlemen 

The Connection was on the front RHS looking from the rear - a small banjo fitting on the top of the radiator. I could not believe I had not noticed it previously but  now I do, and I see the seals , hose and clip looks alarmingly original !!!??  (Remind me to  sing happy birthday 47 times .......). I think I had mentally tagged it as an  overflow tube which it plainly is not. 

Another little job to attend to.

Rocky

In the cooling system mod diagram above the swirl tank looks like it could remain largely unmolested if you could just add a fixed rigid cap that had the air bleed point braised into the cap center. All the rest is the same . 

I had a look at my old overflow tank ( its not pretty ) and could likely braise in the two smaller air bleed nipples and a lower connection spigot.

Could the hose connecting the bottom of the overflow tank  be a smaller diameter than 5/8" ? Say 1/2" or less ? Is it just a bleed  hose ? Its getting awfully congested around the suction on the water pump and space ( as you undoubtedly know )  is non existent.

I have one 5/8" plugged connection point remaining next to the cast spigot on the water pump that I might be able to squeeze a 1/2 " barbed spigot ( or hopefully smaller )  onto. It will look like a bunch of death adders at a wedding but it could be done .

I am thinking in the interim I will link the existing vent tube onto the small diameter balance line between the overflow and swirl tank just for the time being. It should still be able to vent OK that way. 

I will run it before I start changing it  and see what the cooling performance is like as I would like to keep it pretty stock. 

The water here is pretty high in minerals so I will use demin water to give everything a fighting chance on the first fill. 

 I intend to use a vacuum fill unit for the first  fill which I will do in the stock system configuration. Hopefully that will  pull out any air pesky pockets. 


Attachments

Images (2)
  • radiator bleed  1
  • radiator bleed  2

I have never thought about a non-pressure, fixed cap with a nipple for the swirl tank, don’t see why it wouldn’t work, especially for an interim solution, but I guess I’d want to be sure it sealed 100%....

The neck on the original stock swirl tanks is euro....  but if you can fit a cap that seals on the lip, that might not be an issue.

Brazing in the bungs ought to be easy if you have the overflow tank out.


While I haven’t done any engineering on this mod, it would seem a smaller hose out of the bottom of the overflow tank ought to work....  IN MY OPINION....  this whole mod is to bleed trapped air, and once the bleed process is done, and the system is stabilized, you should be OK.


Hi Percy -

What generation (Pushbutton / Pre-L, L) is your car?  Maybe you posted it, but I skimmed through, and didn't see it...  Sorry, merely asking because it would be interesting to know where the "Ford Rad Bleed" fits into the vehicle progression....

Here's why I ask about your car....

https://pantera.infopop.cc/top...mmer-1980-vol-7-no-1


Thanks -

Chu... I mean Rocky

Last edited by rocky

Hi Percy -

* * * UPDATE:  IF RUNNING THE MODIFICATION SHOWN ABOVE * * *

Yes - that is correct.  The Overflow (expansion) tank gets a regular pressure cap.

I install a "temporary" catch bottle when I first fill my system, and run it for a few hundred miles.

What I find is the system spits out water until it finds an equilibrium (about half way up the expansion tank) and then stabilizes.  At that point I remove the catch bottle.

* * * If running a stock system, see LarryW's suggestion, below * * *


Rocky

Last edited by rocky

Add Reply

Post
×
×
×
×
Link copied to your clipboard.
×