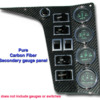
I have bought this panel from PI, and I'm looking after front bumpers like they sell. So, starting to go the carbon-road, I was wondering if anyone can help me with breaking down the numbers on carbon cloth/fabric, and make me understand how to seek out some fabric I can use to make my own parts that will have the correct weave and so on so the parts will match the part I have. Will not be able to autoclave it, just use carbon instead of fiberglass.

Or just tell me exactly wich one I need from eBay: http://shop.ebay.com/?_from=R4...t=See-All-Categories

Attachments

Images (1)
  • carbfiberpanel4102
Original Post

Replies sorted oldest to newest

Carbon fiber cloth can be had in several varieties from Aircraft Spruce in Corona, CA and Griffen, GA. They supply materal for home-built aircraft. Aircraft Spruce's catalogue is in most real race car shops. They also supply kevlar cloth and resins. Note: cutting Kevlar cloth is the biggest single problem in using this stuff. Carbide-blade scissors only last a few days. One very important thing about carbon-fiber cloth: its only as strong as the resin that encapsulates it. So using garden-variety polystrene resin with this materal will make a pretty part little stronger than the same thing in fiberglas but maybe 8X the cost. Second fact; if you use a high-strength heat-cured epoxy resin (preferably under 150-or-so psi pressure to shrink any voids), and use unidirectional cloth plies laid-up in various directions to make a very stiff part, the design of the mountings should take at least as much time as the design of the part itself. At Lockheed Missles & Space, mounting lug design by people experienced in structural carbon-fiber parts averaged three failures before a success. But if you're making nice decorative panels such as the console gauge panel or 'air scoops', no problem- about any resin & fasteners will work. Should be an interesting project and you'll learn a lot. Its simple to build vacuum bag cure systems, and even a small-part autoclave in your garage isn't impossible.
Created a barrier with plastic (actually the bottom piece in the photo is an old aircraft window), putty in the corners to seal the edge and then mold release agent.

It was then built with a layer of resin first, (helps too keep bubbles out of the mold surface; kind of like a gellcoat) let it sit for a bit in between layers, then lay in wet cloth, glass matt, more cloth, more glass matt. Let it sit between layers long enough to gel but not too dry. As fiberglass dries a waxy coating rises to the surface. If it has mostly cured before the next layer the wax can cause it to de-laminate. I just give it enough time to gel some for rigidity.

The mold surface must be smooth as glass. The grey mold was not the end product. The mold in primer had some imperfections and I had to go back, fill, sand and paint it again.

This is a great video:
A Step-by-Step Guide to Molding Fiberglass:
http://www.fibreglast.com/show...nd%20Videos-118.html

For the part itself vacuum bagging will help get bubbles out but you can be bubble free with some technique.


Post
×
×
×
×
Link copied to your clipboard.
×