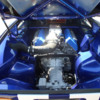
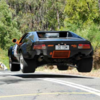
I am just about finished with my cars recent upgrade and I wanted to show it to you guys. I put in a Sean Hyland 4.6 DOHC supercharged engine. I just had it on the dyno a couple of weeks ago and it has 572rwhp @ 6500 rpm and a max torque of 532. I did the work myself so it took me about a year. I saw Dave Doddeks website and used some of his ideas to help guide me thru the conversion. Like most of my Pantera projects once I got into it I managed to redo ALOT more than first planned. But I'm driving it now and it's amazing.

Attachments

Images (1)
  • 19.21_Engine_bay_
Original Post

Replies sorted oldest to newest

quote:
Can anyone tell me how to make my picture 200 kb?

Well, my tips work for me on my Mac, not sure about PC world.

I do a screen capture first. I have the option of cropping the picture, getting just the part I want to share, and that alone will start to downsize the file. That gives me a PRG file on the desktop.

That needs to be changed to JPEG for posting to the forum. So I hit FILE, SAVE AS and use the drop down menu to get JPEG. I select lowest quality and click SAVE.

That gives me a new copy of the initial photo, in JPEG format.

Usually small enough then to post.

I just recently asked Moderator Mark about increasing the allowable photo size and he replied he was unable to alter that setting.

Larry

Just got this photo off a posting on the POCA email forum...

Attachments

Images (1)
  • Picture_1
Beautiful. I would love to see photos of the air filter as well -- great solution. The tanks on either side of the motor behind the passenger compartment are good looking too. Can you describe these as well?

More photos and descriptions of what you have done to this ride would be appreciated. I would like to know what you did as far as engine control management in particular. What a beautiful car -- you've done a great job and I hope that you enjoy all of your hard work -- it has definitely paid off.
quote:
Originally posted by LF - TP 2511:
quote:
Can anyone tell me how to make my picture 200 kb?

... I just recently asked Moderator Mark about increasing the allowable photo size and he replied he was unable to alter that setting ...


Make sure the pic size is no more than 800 pixels wide, I normally size my pics for about 700 pixels width.

JPEG is a data compressing file system. When you convert a pic to JPEG format, or when you save a JPEG as a JPEG, your computer is normally set-up to reduce the pixels per inch setting of the picture to 72, which is all you need for a computer monitor.

As an example, I have two versions of the same picture sitting on my desktop at the moment; one is a JPEG, the other a TIFF; both are 1024 pixels wide by 768 pixels high. The JPEG version of that picture is only 122 KB; the TIFF version of that picture is 2.18 MB. (A TIFF file saves the original pixel per inch density of the picture as it came out of the camera). The TIFF file is 17.8 times bigger than the JPEG of the same dimensions.

If a 1024 x 768 JPEG is only 122 KB, then the 200 KB limit is more than enough allowance for any picture.

A few years ago we ran into a situation where the Forum crashed because our usage exceeded the bandwidth we were purchasing from Groupee. This was a direct result of all the photos we "upload" here. I did 2 things to resolve the problem. We upgraded the bandwidth of the Forums to the maximum offered by Groupee and I limited the size of photos to 200 KB.

Any of you involved on other Forums have probably found that most forums do not allow directly uploaded pictures, to post a picture on most forums members must paste the URL address of their pictures into the body of their post that links to an image hosting web site like Photobucket, Flikr, etc. This is another way of managing the bandwidth required by a forum. Image hosting sites normally reduce the size of the images as they are uploaded; Photobucket limits the size of pictures to 800 pixels in width or height.

Cowboy from hell
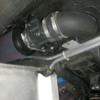
I just put some other pictures of my car in the photo gallery. Under the cover panels at the back on each side is the fill opening for the new gas tanks. Just in front of the tank cap on the right side is the cap for the engine coolant. On the left side in front of the gas cap is the fill cap for the supercharger coolant tank. I had to mount the supercharger heat exchanger in the back where the old AC condencer was. I mounted a new vintage air condencer under it.

Attachments

Images (1)
  • Air_intake_under_fender_well
Post
×
×
×
×
Link copied to your clipboard.
×