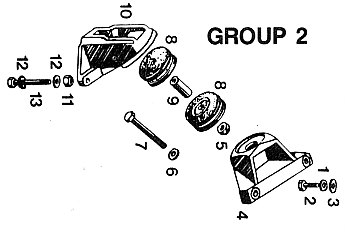
What is the correct torque for bolt #7 and nut #5 below.  Both are M12.  I am concerned about over torquing the new motor mounts #8.  But under torquing would let the motor and transaxle wobble.

Looking at the diagram below some more, perhaps spacer #9 takes most of the torque and offloads the insulators #8.

ill14c

Attachments

Images (1)
  • ill14c
Original Post

Replies sorted oldest to newest

The location of the two rubber spacers is NOT the same between the diagram and the photograph  

I believe the diagram is incorrect.

The diagram has the two rubber insulators stacked together, which makes no sense when one could have just used a thicker single rubber insulator.

additionally, stacking the two insulators together raises the engine the thickness of an insulator.

I cannot find a clear photo in my photo archives, but when I received 2511 the insulators were installed as shown in the photograph. At that time, 2511 had less than 5000 miles after leaving a 3 1/2 year restoration at Dennis Quella’s shop.

Larry

Last edited by lf-tp2511

IMHO the bolt torque is less important than the very common practice of sticking the long bolt in from the bottom because someone forgot to install it before fastening the assembly to the block. With the bolt upside down, vibrations will loosen the nut and the bolt will fall out on the pavement! Adding a lock pin to the threaded end is nearly as difficult as re-assembling the motor mounts correctly. Can't tell you how many Panteras I've seen missing one or both those long bolts. Without the bolt(s), substantial powertrain movement will occur. Take a look at your pride and joy!

"Torque is used to create tension. Bolts are used to affix two components so that they can resist tensile (pulling apart) and shearing (sliding apart) forces. After the nut has been turned onto the bolt, additional torque causes the nut to turn and stretch the bolt.

When the bolt stretches it becomes a solid spring that clamps the components together. As long as the clamp load is not exceeded by the tensile load, the components won’t be pulled apart. Under shear loads, the increased friction prevents relative motion of the components, preventing material failure.

Proper torque is determined by many factors including but not limited to bolt size, bolt grade or class, thread type, lubed or dry threads, etc."

In the subject application most of the above doesn't apply. The subject bolt is used to pinch the two washers to the spacer tube. It's very likely the washers and spacer tube are "softer" than the bolt. Unless you are using harden washers and spacer tube you will likely deform them trying to achieve bolt stretch. If the bolt is like new (threads) and you use a NEW nylon locking nut and it's assembled clean and dry it will stay together with modest tightening assuming no heat issues. I don't know if the factory used nylon locking nuts but I strongly suggest that you do.

...The Drawing is a 'Parts Diagram', it is NOT a 'Assembly Blueprint'. The Assembly in the Photo Is Correct!

I took out parts 9, 7, 6, and 5, The Sleeve and 12mm Bolt, and replaced it with a 3/4" Grade 8 Bolt, Eliminating the Sleeve/Spacer*. New Nyloc Nuts and the Largest, Thickest Washers I could come up with, as 'Load Spreaders', Under the Bolt Head and the Nuts, (4) Washers. I deemed the 'Stand-Off' from the Sleeve, Not Necessary. Torque? Tighten Until (I) Feel it's Right.

* The 'Sleeve/Spacer', does Not prevent 'Over-Torqueing' of the Nut/Bolt! What the Sleeve DOES, is Prevent Over-CLAMPING of the Entire Assembly. So in use as the Rubber Biskets get 'Mashed', the Assembly becomes Loosened and No Adjustment to Re-tighten! Then Your Engine WILL Wobble!! With the 3/4" Bolt, I tighten the entire clamping assembly, Very 'Snug' plus a Little Tighter. And this can be Re-Tightened, as needed, into the Future.

...A Tip: If One Plans to re-use their Rubbers, they will find the Bisket that was on the Bottom, with the Engines Weight, for Decades, has become Much Thinner than the Top Piece. Causing the Engine to Angle Downward in Front. Upon Reassembly, switch them with the thickest on the Bottom, thinnest on the top and You will see the Engine is sitting perfectly Level, in it's Bay. It Worked for Me.

MJ

...I do have the Original PAIR of Bolts and Sleeves, parts #9, #7 and #5 two nyloc nuts. (6) Six Pieces. for sale to anyone who may need them. Used and Rusty. PM Me

Last edited by marlinjack

As an addendum to much of what's in this post:

1)- Make sure you install the long bolts with the threads DOWN.

2)- torque the nuts 'adequately' for what it is- an assembly with lots of rubber in the mix.

3)- if you have any doubts, double-nut the bolts after tightening.

4)- for the paranoid, drill a small hole in the threaded end below the nuts and after tightening, install cotter pins or hairpin clips.

Marlin's suggestion is good; the lower insulator crushes from the engine's constant weight over decades, and the off-angle strain will eventually break the small bolts torqued into the engine block. Drilling out broken threaded end(s) is a real chore on the left side due to the gearshift rod's presence in the same area.  If a casual inspection shows a lower insulator is smushed on one side, either swap it for the identical top insulator which will not be smushed, or at least rotate the smushed insulator 180 degrees so the thin side is not next to the block. Either way, you can then take your time ordering replacements.

Note when reassembling that the center bolt hole in the lower aluminum part is off-center due to cylinder bank offset, so the completed L & Rt assemblies are NOT interchangeable. True,  some lower motor mounts have two holes about 5/8" apart (a guess) so they can be assembled on either side. My mounts have been severely altered so they're not good photo examples.

If you interchange the motor mount assemblies side to side, it shifts the whole powertrain backwards by that amount, but you must also adjust the ZF rear mount tabs accordingly. This rear powertrain shift often allows such cars to run a desirable large OD distributor cap without contact, as it increases firewall clearance. It slightly increases the amount of halfshaft offset all Panteras already have, but not enough to cause any concern. I did this 30 yrs ago to our '72; no problems yet with Spicer u-joints.... All of this stuff is in various illustrated Newsletter articles, 568 of which of which are in the POCA Archives on the Web.

Add Reply

Post
×
×
×
×
Link copied to your clipboard.
×