FWIW, here’s a summary of how to adjust the clutch on the Pantera. Being used to automatic transmissions for decades, it was a new and complicated world that opened up to me when I bought a Pantera with a hydraulic clutch and especially how to adjust it. Having bought all the literature I soon found inconsistencies. I’ve read many sources including the Instruction Manual, the TSB, PanteraPlace and others. And they were quite different. I think now I finally understand how to do it, and if it can help others, below is the short simple (?) method I’ve used

First, the basics have to be right: A good master, slave, pipe and line. And a proper Pantera clutch, not just a Mustang clutch. Some recommends a long-throw slave, and that will make getting the right adjustment easier. But it’ll also increase clutch pedal effort, something you don’t want (except if you want to discourage the wife from driving Wink). And the fluid has to be free of air.

1. Master: pedal should be adjusted so at rest it’s between 0-½” closer to the driver than the brake pedal. Then test with a friend that with the pedal fully pressed down, there should be at least ½” gap to the firewall/carpet
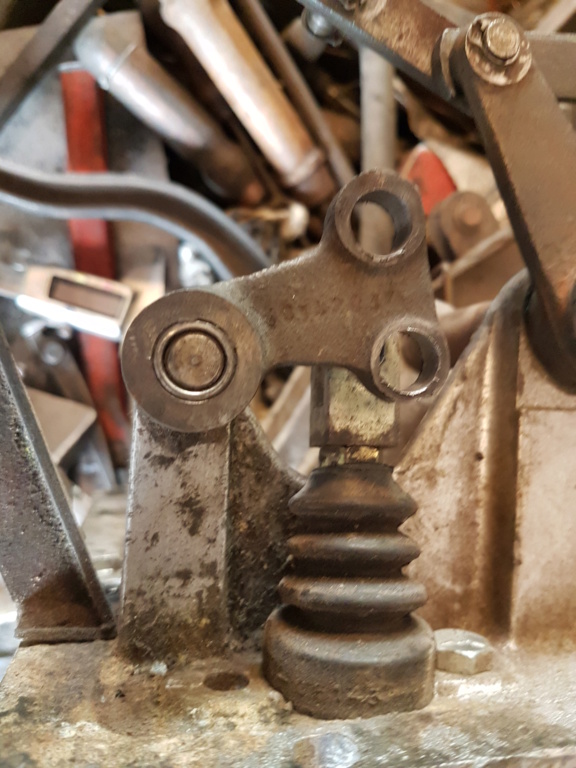
2. Clutch axle arm: the almost vertical arm from the ZF to the slave rod end. Imagine a straight line from the clutch axle on the ZF up to where the clevis pin is. That line should be 90 degrees towards the slave. Ideally it should be 90 degrees when the clutch pedal is half pressed down. Any other angle will result in that the slave rod movement translates into less movement of the clutch axle. Maybe you should move it a notch? Also check that there’s free movement, when the clutch pedal is fully depressed, does the arm or the bolt/nut perhaps rub on the ZF? And get a proper size clevis pin, previous owner had just used a bolt that was 0.3mm less in diameter
3. Slave return bolt: Temporarily remove the spring. Use your hands or a tool to move the clutch axle arm rearwards, and feel for when it hits the resistance of the clutch. Should be easy to feel. While holding the arm in that position, turn the screw so that it almost touches the bracket, leaving a 2mm gap. This will ensure that a. there’s no wear on the clutch release bearing when the pedal is not pressed down, and b. that you get as much movement of the clutch as possible. Reinstall the spring
4. Slave rod: Some suggest that the rod is used to position the resting position of the clutch axle arm and that the return bolt should be thrown away. And some say this is not good, because the slave should not bottom out. I think the best is to use the return bolt as described in 3., and then adjust for almost maximum slave piston travel on the rod. Almost, so with no bottoming out. With the system at rest, take out the clevis pin and by hand press the slave rod all the way up in the slave. And then release 1mm. Do the holes now align so the clevis can be put back in? If not, adjust the length of the slave rod, so that they do

With all this done, you should have a clutch that neither slips nor grinds teeth. And of course you must press the clutch pedal all the way down every time. Happy shifting!
burn rubber
Original Post

Replies sorted oldest to newest

quote:
What will happen if the stop bolt is removed?

The spring will force the slave's piston to continue to withdraw into the slave cyl (probably bottoming the piston in the bore). This will pull the TO bearing farther away from the pressure plate fingers, resulting in a huge amount of free play. The next time that the clutch pedal is depressed, the slave piston will have to travel a lot further before the TO bearing contacts the pressure plate fingers, and will run out of travel (movement) before fully releasing the clutch disc.

Bottom line is the clutch disc won't be fully released, if at all.

John
quote:
WRONG!!! That adjustment is made at the Slave Cylinder Piston! You WANT That Spring to return the Piston to the BOTTOM of it's Bore Everytime!

That is another way to do it.

quote:
(This also keeps a Slight 'Residual' Pressure in the Line, all the way to the Master Cyl.)

There is always a slight residual pressure in the line due to the elevation differences between the master and the slave (aka head pressure). As long as the slave piston is at rest, the head pressure will be the same weather or not the piston is bottomed in its bore.

quote:
I threw the 'Stop Bolt' in the Trash, Years Ago; IT Does Absolutely NOTHING!!

You are correct IF the piston is bottomed in the slave cylinder bore AND you make the free play adjustment with the slave pushrod length.

quote:
First of All Your Not Allowing for 'Everything' Heating-Up! Among Other Factors!...

NOT TRUE! The allowance is factored into the amount of free play that is set with either method. However, with the piston bottomed in its bore, when it expands (due to heating), it can only expand towards the clutch arm, which reduces the free play (a very small change). With the piston not bottomed, it is free to expand away from the clutch arm, resulting in no change to the free play.

quote:
You Better learn how a Clutch works! Before You Burn-Up Your T.O. Bearing!

I pulled my clutch (and TO bearing) after 108K miles during a ZF dash 1 to dash 2 swap. The clutch disc still had plenty of meat on it and could probably have gone another 50K miles. The TO bearing rotated smoothly and quietly. This is not luck, it is from maintaining the proper free play by making the adjustment(s) with the stop screw.

Either method works.

John
Hey Merlin, YOUR RIGHT
quote:
Originally posted by Marlin Jack:
quote:
Originally posted by jb1490:
quote:
What will happen if the stop bolt is removed?

The spring will force the slave's piston to continue to withdraw into the slave cyl (probably bottoming the piston in the bore). This will pull the TO bearing farther away from the pressure plate fingers, resulting in a huge amount of free play. The next time that the clutch pedal is depressed, the slave piston will have to travel a lot further before the TO bearing contacts the pressure plate fingers, and will run out of travel (movement) before fully releasing the clutch disc.

Bottom line is the clutch disc won't be fully released, if at all.

John


WRONG!!! That adjustment is made at the Slave Cylinder Piston! You WANT That Spring to return the Piston to the BOTTOM of it's Bore Everytime!(This also keeps a Slight 'Residual' Pressure in the Line, all the way to the Master Cyl.) The 'Length of Throw', and T.O. Bearing Clearance, to the P. Plate Fingers; are Adjusted at the Clevis Threads and then Locked-In with the Jam Nut. I threw the 'Stop Bolt' in the Trash, Years Ago; IT Does Absolutely NOTHING!! You Better learn how a Clutch works! Before You Burn-Up Your T.O. Bearing! First of All Your Not Allowing for 'Everything' Heating-Up! Among Other Factors!...
quote:
Originally posted by No Quarter:
FWIW, here’s a summary of how to adjust the clutch on the Pantera. Being used to automatic transmissions for decades, it was a new and complicated world that opened up to me when I bought a Pantera with a hydraulic clutch and especially how to adjust it. Having bought all the literature I soon found inconsistencies. I’ve read many sources including the Instruction Manual, the TSB, PanteraPlace and others. And they were quite different. I think now I finally understand how to do it, and if it can help others, below is the short simple (?) method I’ve used

First, the basics have to be right: A good master, slave, pipe and line. And a proper Pantera clutch, not just a Mustang clutch. Some recommends a long-throw slave, and that will make getting the right adjustment easier. But it’ll also increase clutch pedal effort, something you don’t want (except if you want to discourage the wife from driving Wink). And the fluid has to be free of air.

1. Master: pedal should be adjusted so at rest it’s between 0-½” closer to the driver than the brake pedal. Then test with a friend that with the pedal fully pressed down, there should be at least ½” gap to the firewall/carpet
2. Clutch axle arm: the almost vertical arm from the ZF to the slave rod end. Imagine a straight line from the clutch axle on the ZF up to where the clevis pin is. That line should be 90 degrees towards the slave. Ideally it should be 90 degrees when the clutch pedal is half pressed down. Any other angle will result in that the slave rod movement translates into less movement of the clutch axle. Maybe you should move it a notch? Also check that there’s free movement, when the clutch pedal is fully depressed, does the arm or the bolt/nut perhaps rub on the ZF? And get a proper size clevis pin, previous owner had just used a bolt that was 0.3mm less in diameter
3. Slave return bolt: Temporarily remove the spring. Use your hands or a tool to move the clutch axle arm rearwards, and feel for when it hits the resistance of the clutch. Should be easy to feel. While holding the arm in that position, turn the screw so that it almost touches the bracket, leaving a 2mm gap. This will ensure that a. there’s no wear on the clutch release bearing when the pedal is not pressed down, and b. that you get as much movement of the clutch as possible. Reinstall the spring
4. Slave rod: Some suggest that the rod is used to position the resting position of the clutch axle arm and that the return bolt should be thrown away. And some say this is not good, because the slave should not bottom out. I think the best is to use the return bolt as described in 3., and then adjust for almost maximum slave piston travel on the rod. Almost, so with no bottoming out. With the system at rest, take out the clevis pin and by hand press the slave rod all the way up in the slave. And then release 1mm. Do the holes now align so the clevis can be put back in? If not, adjust the length of the slave rod, so that they do

With all this done, you should have a clutch that neither slips nor grinds teeth. And of course you must press the clutch pedal all the way down every time. Happy shifting!


Hi all,
bringing this up again to say thank you to Mikael for this write up. Step 1 solved my clutch problems.
About 3 years ago I installed a new clutch master and all was well. Now I have just had a new clutch installed as an extra in connection with having a new release bearing installed and according to the philosophy of 'while I'm in there let's also do...' and was having problems with grinding going into reverse, first and second. Seemed like the new clutch, being unworn and thus considerably thicker than the old one wasn't getting enough throw. So after reading Mikaels write up, I climbed under the dash and could see the clutch pedal was lower than described as optimal, and there was considerable free play. Screwing out the clevis on the push rod for the clutch master gave me the throw I was needing and all is now hunky dory :-)

Thanks again Mikael for saving my bacon Smiler

Cheers, Tim.

I've read through this post, and several others, but can't find an answer to my issue.

My car changes gears perfectly apart from when it gets warm, at which time it grinds going into reverse. I have tried all the basic things like, changing the gearbox fluid to ensure it's correct and fresh - Dropped it into 2nd or 4th then into reverse to slow the gear rotation - checked free play, etc. But nothing is working.

I could go into adjusting the linkages from shifter to transaxle, however, I just think this is not the answer. It is definitely affected by heat. Can anyone help?

Consider temporarily removing the chrome shift gate.  Then see if you can get reverse.  The console get very warm on many cars and the plate may be expanding enough to block adequate rotation of the shift rod to the left for reverse. 

Should that be the cause, the question to consider is why is that now a problem when it wasn't before.  Likely, slop has developed somewhere in the shift linkage.  Shouldn't be hard to find it.

@jtpantera posted:

Consider temporarily removing the chrome shift gate.  Then see if you can get reverse.  The console get very warm on many cars and the plate may be expanding enough to block adequate rotation of the shift rod to the left for reverse.

Should that be the cause, the question to consider is why is that now a problem when it wasn't before.  Likely, slop has developed somewhere in the shift linkage.  Shouldn't be hard to find it.

Hi jt,

Thanks for the suggestion. I did try this early on in my investigations, and even with the gate removed the same problem occurs.

@forestg posted:

If it is grinding then it has enough rotation but the gears are not stopping when the clutch is released. The likely reason is that there is not enough free travel in the clutch and it needs to be adjusted to a lesser gap at the slave cylinder stop.

Thanks for the suggestion. I will give this a go. Many thanks.

Hi guys, me again. I have been investigating further and have measured only 0.020" between the flywheel and clutch plate when the clutch is fully depressed. I suspect this is likely to be the issue, as everything else looks as it should do.

I have read loads about this subject, however, can't see anywhere about how best to increase this gap to 0.040". Do I adjust the slave, the master, or where?? Could anyone provide step by step instruction to finally fix my clutch clearance issues.

Thanks in advance of any advice.

The adjustment stop bolt in the clutch slave cylinder bracket is there for a reason in the stock set up design.  Use the stop bolt to achieve a minimal clearance between the throwout bearing and the clutch pressure plate release fingers.  Once this is done, adjust the rod length so the slave cylinder is not quite bottomed out.  This will give you a maximum clutch release situation (slave cylinder rod max travel) when the clutch pedal is depressed, but also allow for the release bearing not touching the pressure plate release fingers when the clutch pedal is fully released.  You will have to use the original slave cylinder assembly release spring for everything to work in concert.   If the clutch assembly is ever replaced after these adjustments are made with the old clutch, they will have to be redone upon installation of a new pressure plate and disc assembly.

If you change the design to an an internal hydraulic release mechanism, not sure how you can maintain the throwout bearing not touching the pressure plate fingers in the fully released position.  Design of the spacer(s) when the hydraulic release mechanism and what type of clutch pressure plate and disc setup you are using?  Sorta complicates things?

Add Reply

Post
×
×
×
×
Link copied to your clipboard.
×