Looks like I'm replacing the axle stubs on my drivers side when I do my wheel bearings because they have a ton of play in them but first I have to deal with removing the completely butchered rear axle nut. Good thing it's only torqued to 350-400 ft/lbs....

Consider this a PSA for using the proper tools when working on our cars so you don't leave a present for the next person to work on it like someone did for me.

I bought this car in the Fall and while completely going over it I noticed there was excess play in the drivers side axle stub that goes thru the upright. It seems like the splines might be worn out inside the hub as the play is rotational and doesn't seem to be wheel bearings. Maybe from all the power from my 351C (haha).

Please don't ever be the guy that worked on my rear axle stub before I got my Pantera.

Thought some of you might enjoy this video.

https://www.youtube.com/watch?v=8UkTrEDnCmc&t=13s

I'll let you know what is going on with my axle stubs after I deal with this disaster of an axle nut.

Original Post

Replies sorted oldest to newest

Thankfully I have all the tools to get it off.  Just a matter of how far into the "Not again" drawer I have to go before I get it off. I've got torches, welders, air tools, you name it. I always try to start as minimal as possible and escalate until it's fixed.

Those of us that work on our cars don't have all these tools for when things go well, we have them for moments like this.

I still absolutely love how these cars are made. So simple and actually relatively easy to work on. Plus the vendors supporting them have been beyond awesome!

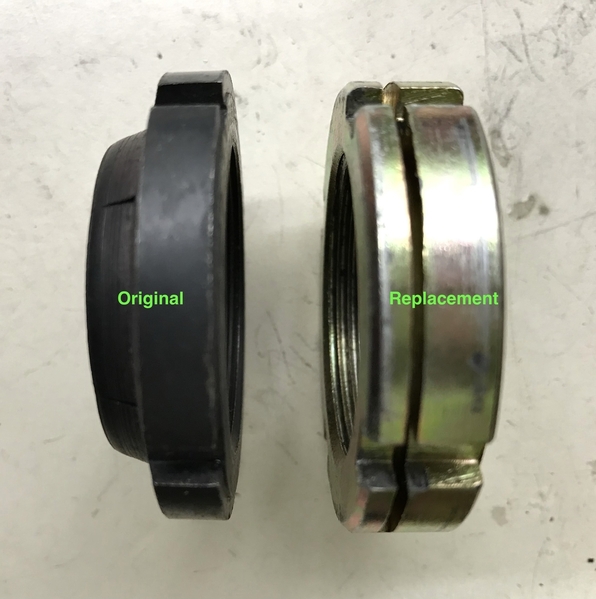
The axle nut that is on your axle is an original style, and the new one that you have is an aftermarket replacement.  

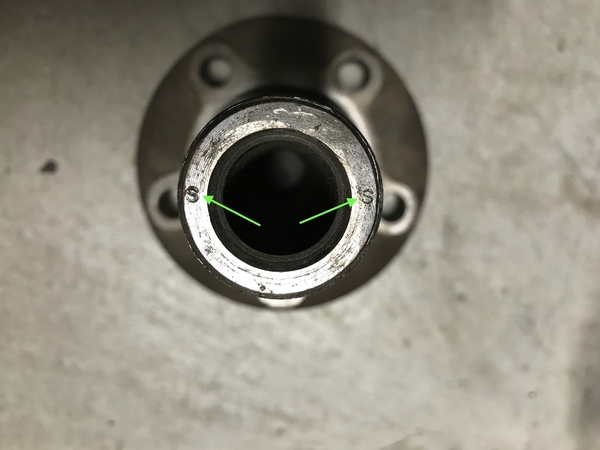
Hopefully, you are aware that there are lefthand threaded axles and righthand threaded axles. Originally, they were lefthand on the left (driver) side, and righthand on the right (passenger) side. There are stampings on the threaded end of the axles to indicate which thread you have..."D" for righthand..."S" for lefthand.  See pic.

John


Axle MarkingsAxle Nuts

Attachments

Images (2)
  • Axle Markings
  • Axle Nuts
Last edited by jb1490

Oakster, at my age, I don't screw around with stuff like that. Use a small tip on a CUTTING TORCH and carefully blow a piece off the old half-height nut.  The stub axle threads will be unharmed. Using the factory pin-socket wrench on half-height nuts will do this. The enveloping socket the vendors sell works fine on both types of nut. Don't worry about stripping the axle threads. They strip at around 1100 ft-lbs!

Note that once you do get the upright apart, there are two areas to check. You can radically reduce the amount of hydraulic force needed by knocking the lug bolts loose from their hub splines before pressing.  If it takes too much hydraulic pressure to push the stub axle out, the mild steel outer bearing retainer may go conical. If it's not flat, carefully hammer it flat or the new bearing set can shift enough in the upright to act just like another 'loose bearing'.

Second, most "rear wheel bearing problems" are really stub axle problems. Wear on the stub-axle shaft where the bearings contact, in the order of 0.0010" will produce the same problem and you need a five-place 1-1/2" micrometer to see it. Reproduction stub axles are relatively cheap, are several time stronger- real racers successfully use them- and are made of better steel than NOS axles. They have no central hole. Mic'  ALL replacement stub axles- there have been a very few undersized aftermarket axles.   

Drag racing starts combined with never greasing the halfshaft splines can wear or twist the splines. This can be seen visually once the parts are separated. There is no possible repair except replacing the felt lube ring inside the threaded nut. Spicer halfshafts may still be available, are lighter & stronger than OEM and are better balanced. They also take a one-size-smaller u-joint (F-500 Ford truck u-joint) than stock

Finally, when reinstalling a halfshaft, there are 8 bolts & nuts holding the ends. If even ONE nut is only slightly loose, a mysterious shake can show up under hard acceleration. Tighten all those fasteners to spec! This is easier if the bolts are installed with the threads pointing INWARD. It takes some fiddling but it IS possible to do on both ends. Then the bolt heads can be held with an open-end wrench while a real torque wrench fits on the nuts. And many of us install both halfshafts with the small end outboard, for more exhaust pipe clearance.

Thanks everyone for all the great info. I already knew the driver's side uses left hand threads but really appreciate it being brought up.

I got lucky and was able to get to nut off with my air chisel.

I'm replacing the bearings, axle stubs, axle flanges, threaded pivot rod (and hardware) and axle nuts on both sides.

Got my driver's side all apart today and I'm just waiting for parts.

Also putting in all new sway arm bushings, wilwood brakes, and new coil overs.

Oh yeah- it's quite possible to break a rotor in half while pressing, if your home=-made press stand-off doesn't contact the hat section of the rotor, and instead sets the rotor face on your stand-off. One friend thought he knew what he was doing and broke a rotor while pressing. He thought it was a fluke of luck, tried with the other rotor and broke that one, too!

Add Reply

Post
×
×
×
×
Link copied to your clipboard.
×