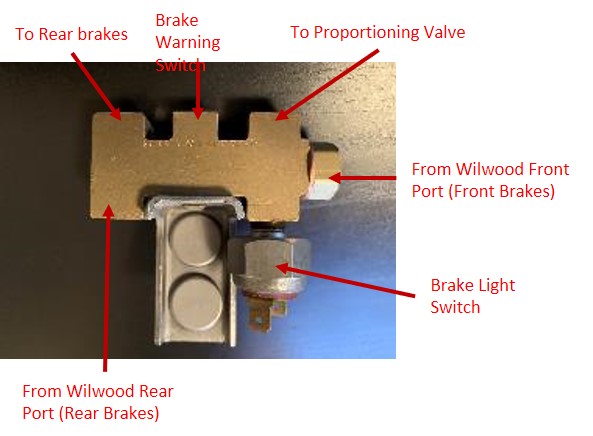
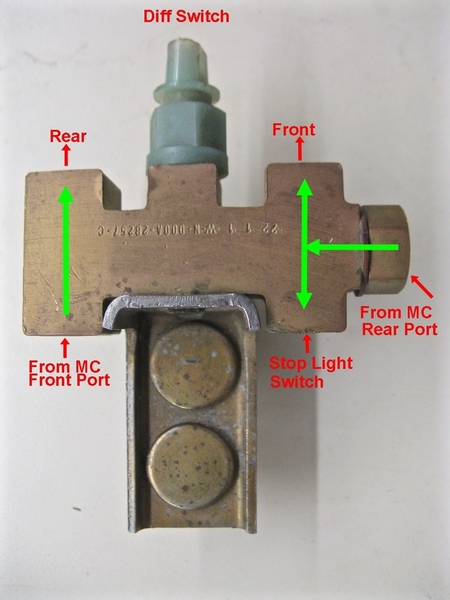
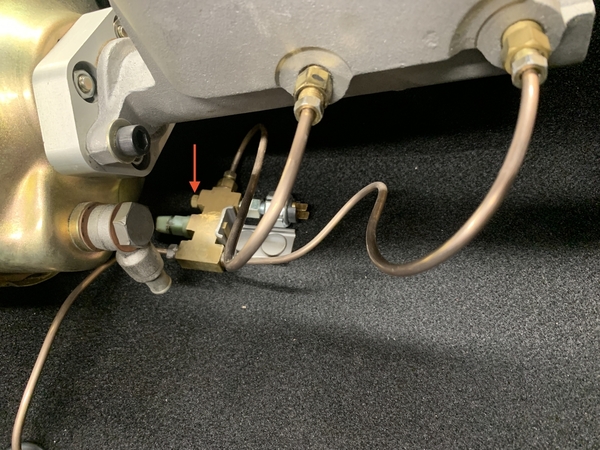
Any one have a pic of where the front and rear brake lines and the front and rear master lines connect to the shuttle and the tee? My service manual illustration is vague and when I tore it apart my photography was horrible. If this forum didn't exist I would be up the creek without a paddle. Thanks.
Replies sorted oldest to newest
Use John's diagram. The other shows the wrong bowl connections.
@forestg posted:Use John's diagram. The other shows the wrong bowl connections.
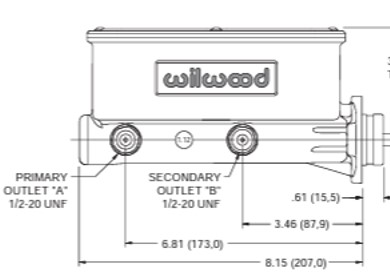
Not wrong for a Wilwood Tandem Master Cylinder as noted in my diagram.
"Connect one of the primary outlet ports (A) to the brakes at the end of the vehicle with the greatest total effective piston bore area. On most vehicles, this will be the front brake line. "
The Volume Output Ratio (A/B) is 2:1. The Primary Outlet "A" port is also associated with the larger of the two reservoirs.
Attachments
Note- you should not mess around with your ONLY means of stopping this 160-mph-land-missle unless you know exactly what you're doing! People have been killed doing unskillful brake mods! Test thoroughly before driving hard! But the Pantera's brake system CAN be much improved. The following are some suggestions (not all mine)--
The front brakes should really be hooked up to the port closest to the firewall. I do NOT recommend plumbing Pantera brakes like the factory did, either. Plumbed their way, there's a delay in turning on the brake stop lights when stepping on the brake pedal, due to the non-adjustable proportioning valve's action on the otherwise excellent front brakes. Given the attention typical among your neighboring drivers on any road, any delays in turning on your brake warning lights can be critical.
Plus, about all known performance cars or racers ever made EXCEPT the Pantera has its proportioning valve plumbed into smaller REAR calipers. I believe this was due to Ford's fear of turning a high powered mid-engine car loose to 'unfamiliar, untrained' American drivers. That's why I entirely delete the multiport shuttle valve & re- plumb a more useful proportioning valve into the rear brakes. Then the brakes will function like other high performance machines, and can be balanced for modern wheels, tires and brakes. The stock proportioning valve is designed to work with stock brakes and 215-70 x 15" belted-bias tires. It cannot be readjusted to balance brake action or other components.
Over time, the shuttle inside the valve often sticks due to varnish build up A stuck valve can disconnect the brakes at that end of the car. In addition, some aftermarket master cylinders have different sized bores front and back, with the direct-acting front port nearest to the firewall being larger. All the stock valve does is to turn on a red warning light in the dash- as do several other switches. So you really don't know why the light came on except that "something is wrong".
The primary port in aftermarket master cylinders may have a 2-lb 'keep-alive' valve built-in. If it's there, it will be behind the brass ferrule inside the threaded port. To service (or remove) this valve, lightly screw a threading tap a few turns into the brass ferrule and pull the light-press-fit ferrule out. Behind it will be a ball- check assembly meant to keep about 2 psi in the front brakes for quicker stopping (and slight pad drag). Return the ferrule to its position and reassemble the system. Scratches inside the ferrule from the tap will not harm anything.
With these types of replacement master cylinders, don't add a second after- market keep-alive valve in-line on your brakes- it may be dangerous to attempt to use use two of these valves in the same system.
Note- you do all the foregoing at your own risk. As I said, brake mods are serious business! But all this has worked just fine for me, for decades. Good luck.


