Hi all:
I’m still in the silly questions phase as I try to figure out/debug #2814. I appreciate any help the group can offer.

I ran the car a dozen times this summer with no cooling issues, but it has overheated (maxxed at 230 degrees on the gauge) and spewed coolant on my driveway the last three drives. On the last one of these occasions steam was coming out of the top of the swirl tank for the last 5 minutes of a 20 minute local drive, with outside temp around 60 degrees. Each time this happened there was a very noticeable boiling sound coming from the swirl tank area.

I may have a fan/electrical problem of some sort as I haven't seen the "fan" light come on for at least the last couple of drives, and on the last drive I checked the fans on my Fluidyne when I got home and they weren’t spinning. I did make a change to the car late this summer, upgrading the alternator from 40 amps to 70 in an attempt to improve a charging/hot start issue. Could that have affected the fan operation? I definitely had at least a couple of trouble-free runs after that.

Here’s the note from my mechanic’s invoice, advising me to run a new cable directly from the battery to the fans (haven’t done this yet—is it a good idea??).

“Diagnose charging system issue - charging is adequate when cold but gauge reads not charging when warm; Test battery, starting, and charging system with diagnostic tool - Battery output is "low", starting system load is acceptable, and charging system is "low output"; Remove and replace alternator with higher output variant (70A), compromised voltage regulator, and battery; Test - charging system output is improved when warm, however radiator fans are determined to place too large
of a load on factory charging system and wiring. Factory wiring cannot handle a higher-output alternator. Only solution is to install heavy-gauge wiring directly from fans to battery and a higher output alternator.”

I’m am planning to install Jon Haas’s Pantera Electronics fusebox—is there a chance that might have a positive impact on this issue?

In the meantime, I thought I’d refill the coolant and get the air out of the system per the instructions on this forum. I filled the swirl tank to the top, and opened the radiator petcock to vent air, but did not add any coolant to the overflow tank, which was about 1/3 full. As I did this, I noticed my system doesn't look quite like either the stock or modified diagrams on the "sticky", but it does look like the standard parts diagram on Wilkinson’s site. The big difference from the “OEM” diagram on the sticky is that the upper tube from the overflow tank just empties out under the car. Is that correct? How does the system stay pressurized with an open hose coming out of it?

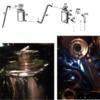
I’m also wondering about the pressure cap on my swirl tank, as I noticed a section of the “sticky” on that topic. When I brought the car in to my mechanic right after it arrived here, it spewed coolant on the floor of his shop. Their assessment of the problem was that I had an improper European pressure cap and they replaced it with a standard 16 psi one. That seemed to work fine for most of the summer but I wonder if it’s now part of the problem. Can someone tell by the photo if I have a European or US neck?

Thanks for any thoughts on these issues.

Tim

Attachments

Images (1)
  • cooling_post
Original Post

Replies sorted oldest to newest

HI...at least adressing to some of your points...
quote:
Here’s the note from my mechanic’s invoice, advising me to run a new cable directly from the battery to the fans (haven’t done this yet—is it a good idea??)


Yes you want to provide a DIRECT Bat plus cable form the battery to the the front for Fans (..and lights). There is a note from George P on this topic, incl. drawing and text. Each Fan draws app. 10..15 Amps in action, if voltage drops by say 2 volt power goes down you loose 12% power at the fan. .. and the drop might be more..

On that rework I did also change the headlight supply via relays in the front as well. This takes the current off the ignition switch.
Have only a hand drawing for all that so far as work still in progress. At least a foto of the front with the mods, using modern relays with fuse attached. (this frees up some fuses (F3 and F4 at the fuse box, which I after some mods/cuts use now for the Power window motors)).

Attachments

Images (1)
  • Front_Relay_set_up_1
quote:
“Diagnose charging system issue - charging is adequate when cold but gauge reads not charging when warm; Test battery, starting, and charging system with diagnostic tool - Battery output is "low", starting system load is acceptable, and charging system is "low output"; Remove and replace alternator with higher output variant (70A), compromised voltage regulator, and battery; Test - charging system output is improved when warm, however radiator fans are determined to place too large
of a load on factory charging system and wiring. Factory wiring cannot handle a higher-output alternator. Only solution is to install heavy-gauge wiring directly from fans to battery and a higher output alternator.”


You want to do a mod on the wiring from/to the Alternator and a cut (See Drawing picture). It is simple to do as all the wiring to be done is right in the back at the Starter Solenoid. And the Amp should go out and replaced by Volt meter (I did this).

Attachments

Images (1)
  • Power_Bus_mod_1
Try the simple stuff first. When you get home after a ride, fans do not run, is it the fan(s) that's faulty, or don't they get current. Is your system able to hold pressure? Buy tool that can check that on both system and cap, should be able to hold pressure 90% for an hour. It's rare that coolant boils at 15 lbs, engine will have melted before almost, but if there's a leak, then it boils. BTW, all my coolant lines are double clamped
Before we can fix your problem, a couple of questions, 1.) Your radiator is after market and should have direct thermostats that do not require relays, 2.) Do you know how to solder? Your problem is obvious if your fans do not come on, the Pantera will overheat at low speed or air flow ( stop and go traffic )through your radiator. Your alternator is not the problem. Your piping is correct and should vent to the outside from the overflow tank. I can walk you through the fix but you need a 12 volt test light ( $10.00 )12 gauge and 10 gauge wire, wire trimmer and a flash light. Pictures of the right back side of your radiator ( thermostats)would be helpful. I would NOT drive your car until you fix the fan problem as you risk damaging your engine. On the positive side, the spade connectors on the thermostats can become lose and just blow or fall off, the fans don.t come on and you overheat. Finally, if you rely on your mechanic to fix your car you will spend alote of money, you can fix it yourself.
Tim H; By your VIN number, you have a Pre-L. On some of the late '71's and early '72's, a single red wire from the ignition switch triggers fuse #11, and a single pink wire goes to one fan relay and then a jumper wire to the second relay. Therefore, your fans are powered by one single circuit. You mentioned you have a Fluidyne radiator and are considering a new fuse panel. AN ASSUMPTION: If you have newer fans with the Fluidyne and the original fuse panel, you are overloading the circuit. I would start at the fuse panel, check fuses and work your way through the circuit to the relays, then to the fans. If you have the original fuse panel and powered only by fuse #11, its overloaded. Some models have both #11 and #12 fuses powering the fan relays. Once again, you may still be overloading the circuits.
When you mentioned your fan light is not coming on, the light is being fed by a yellow wire from the fan relays. Sounds as if the relays are not receiving any power.
As mentioned in a previous post, George P. has published a number of articles to address the fans. Also, there is an article by Mike Drew that addresses the fan issue.
quote:
Originally posted by Tim H:
,,,it does look like the standard parts diagram on Wilkinson’s site. The big difference from the “OEM” diagram on the sticky is that the upper tube from the overflow tank just empties out under the car. Is that correct? How does the system stay pressurized with an open hose coming out of it?

Tim


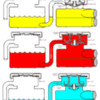
In the ORIGINAL configuration (like the Wilkinson diagram), the swirl tank will have a pressure cap where the overflow tank is just a flat cap.

as shown in illustration
Yellow is filling the swirl and the overflow about half full
Red is the car hot. the coolant expands with heat and lifts the swirl's cap lower seal and forces the little bit of air and extra coolant volume into the overflow tank
Blue is the car cooling down. as the coolant contracts it pulls a vacuum and sucks coolant through the inner valve from the overflow tank and now no air is in the main coolant.

Attachments

Images (1)
  • coolant_small
The pressure cap is (or should be) only on the surge (small) tank. The stock cap on the overflow (lg tank) is simply a vented splash-guard, as that tank is outside the pressurized circuit. You can run without it in most cases without damage.

Your trouble may not be entirely electrical. The rubber overflow/return line joining the two tanks often splits where it can't be seen. A split line may not leak and I've seen cracked metal spigots where the line is soldered to the small tank neck. Then as the engine heats up, water expands and goes into the overflow tank. As the engine cools down the theory is, a vacuum will be produced which sucks the excess water in the overflow tank, back into the small tank to resupply the engine. What often happens is, a cracked line connecting the tanks will not hold vacuum so excess water is never sucked back to replenish the engine. The NEXT time you run the engine, the water level is low, so the engine gets warmer and more expanded water is forced out to the overflow tank. By the 3rd time, you are so low on coolant- often with no external sign of a water leak- the engine overheats.

Next thing: if the pressure cap will not hold pressure, expanded hot water may also be forced out around the small-tank neck. From there it runs down the tank side, down the inner fender panel and right into a large oval hole in the right frame rail. There is no drain as-stock for this area, so the water sits there rusting the frame, until either it's all used up or finally evaporates. Driving in rain will also throw water from the rear wheels into this area. I've seen Panteras in which the right frame rail was FULL of rusty water! Fix: drill 3 recommended 1/2" dia. drain holes equally spaced in the bottom of the frame rails, on both sides. I also drill a 3/8" hole in the bottom of both legs forming the 'horse-shoe' shaped rear suspension mounts in the wheel wells.

The base of the small tank neck is well known for roughness from an unskillful factory solder job, so only a cap with a fresh, soft rubber washer will seal. Some new caps are 'fresh' enough to seal only for a month or so. The OEM Euro cap was a 0.9-bar (12 psi) assembly. We use a 16 lb U.S. cap which is slightly shorter than the Euro caps. But because it's shorter, a U.S cap will often not hold 16 psi. The fix there is to use a replacement pressure tank neck that matches the cap you will be using, and do a better job of making the soldered seal base smooth.

There are other well known problems relating to engine overheating. For instance, the Pantera radiator is 16% smaller than a '71 Corvette with the same power rating; the Pantera has poorer airflow thru the assembly, longer more restrictive water lines etc, etc. And these cars are the most messed-with-by-well-meaning-amateurs sports cars ever built. You really need a shop familiar with the car to fully solve this problem.
Guys, thanks for all of the responses--what a great community! You've given me a lot to think about when I work on the car this weekend. In the meantime, a few comments back:

Mat_G – thank you I will look at doing this after I get the new fuse box in.

Mikael - I will try the pressure test if I’m still having trouble after I get the fans running. I think someone in the forums mentioned a decent kit at Harbor Freight.

Pantera Chris – I will attach a photo of the radiator in a couple of days. I can solder though it has been a long time. Agreed on paying the mechanic—part of the reason I bought the car was to learn how to work on it, but I’ll admit I didn’t think I’d need to learn so much so soon!

JAG13CAT – Thank you I will take a look at these once I get the new fuse box in.

JFB – Thank you for that diagram/explanation. I will check both of the pressure caps I have to make sure the valve goes down far enough to block the tube to the expansion tank.

Bosswrench – great info. I ended up adding a gallon of coolant yesterday so I will check for cracked lines. I did drill the chassis as soon as I got it the car.
Tim,
I think we met at Lars Anderson earlier in the year, I regretted not taking your number and keeping in touch. I have the black Pantera and live not too far from you. Send me a message I will drop round to you or you can come to me for some assistance / chat.
You should also check out Jon's radiator fan controller. Eliminates the fan relays, uses existing wiring (maybe a larger battery wire to the unit might need to be added) and best of all is PWM. It will turn on the fans as required at a slow speed and ramp the speed as the the temps rise. This results in less amperage when the fans first start with less load on the alternator / battery. It also delays the fans coming on for a short while helping with hot starts. Your dash light is also also hooked up to this unit.
No problem if you do not want to go that route but you should at least ensure your dash light works as expected and your fans work.
Try burping your cooling system with the rear of the car jack up and your heater control on hot, it helps with getting the air out of the system.
Tim, as far as bleeding ALL the air out, it will take awhile. I once changed the thermostat in our '72, and bled the air out. The next morning, I bled the system again and got more air. On the 3rd day, I bled it once again and got a little more air out. Then we left for a 450 mile overnight trip. When we arrived and after a 4 hr cooldown, I bled the system a 4th time in the hotel parking lot and got more air!

On the return home (another 450 miles) and a cool-down, I bled the system a 5th time and got no air- finally. So based on that experience, do NOT expect to bleed all the air out immediately.
....Temp sensors WITHOUT Relais not sure as the Fans suck 10..15 Amps..EACH....just for reliability I would go via Relais..see sticky

and use the LOWER Temp Sensor Switch(thermostat in previous note). That is the HOT part of the radiator. Unless you want to have a 2 stage switch on. Then the question is at what Temp is the upper one set? Both need to match the Real Thermostat installed on the engine. Not sure if you can get a Temp senor switch with an increment of say 10 degree. Take a look a George P's sticky, he explaines the match..I did follow that.

Matthias
quote:
Temp sensors WITHOUT Relais not sure as the Fans suck 10..15 Amps..EACH

The high volume 13 inch Spal fans on my Dennis Quella/Ron Davis radiator each draw up to 23 amps. Jon Haas and Dennis both say they require dedicated number 10 wires directly from the battery and Jon stresses such high amperage fans should not be fed by his ATO fuse panel.

The only current that should be flowing through a radiator thermostat is a grounding connection for the COIL of a properly rated fan power relay.

This is how the original Pantera fan wiring was designed.

Larry
quote:
those thermostats DO NOT require relays

Interesting.......

One can determine what amperage a relay is rated to safely handle. Very easy.

I do NOT know how to determine how much amperage ANY thermostat can safely handle.

Fluidyne offers a radiator thermostat kit.

They include a relay in that kit.

DeTomaso used a relay for the stock fan wring.

Now why would relays be included if they were not needed?

Remember, there are always at least two different approaches to a wiring situation.

The right way.

The wrong way.

The right way will always work, and will continue to do so unless components fail.

The wrong way MIGHT also work, until it doesn't.

Chris, you are free to wire YOUR Pantera in any manner you may choose.

===================================

Once again:

The only current that should be flowing through a radiator thermostat is a grounding connection for the COIL of a properly rated fan power relay.

====================================

Larry

Attachments

Images (1)
  • sob
I am always willing to concede there are things I do not know.

Chris, when you can provide a professionally-sourced wiring diagram showing full amperage current for a radiator fan being connected to ground by traveling through a radiator thermostat I will revisit this issue accordingly.

Until then, for all other owners, wiring full fan current through a radiator thermostat is wrong and should not be done.

Larry
quote:
You know nothing about wiring.

I was waiting to see if you would turn this personal, rather than keeping it an informed, documented discussion.

If all - YOUR WORDS - modern fans/themostats are wired according to YOUR hand-drawn diagram, it should be VERY easy for you to supply what I asked you to provide:

a professionally-sourced wiring diagram.

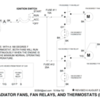
Here's one supporting MY beliefs.

Larry - retired IBEW Inside Wireman

Attachments

Images (1)
  • Screen_Shot_2017-11-11_at_4.51.09_PM
quote:
make the right decision

My approach will work with:

ANY radiator

ANY thermostat

ANY fan

ANY amperage draw

Your approach will not.

Your approach can very likely mislead fellow owners who do not have exactly the same components as you, Chris.

How many hospitals, Army National Guard armories, schools and two-story high school science buildings have you successfully wired? The ones I wired will be forever serviceable by any educated electrician because they adhered to universal (NECA Code) guidelines, something that is very important when dealing with electricity.

Advice given here for Pantera wiring should likewise follow accepted, era-correct approaches so such advice will correctly serve ALL Panteras, not just yours, this year and twenty years from now.

Respectfully,

Larry

P.S. - Still waiting for one, just one, factory wiring diagram from any new car that has radiator fans wired the same as shown in your drawing. An aftermarket, component-specific diagram such as your Derale Performance unit does not fit the bill.

P.P.S - Forum advice needs to be applicable to the OEM build, or noted/acknowledged to be for non-OEM situations. Bad advice is worse than no advice.
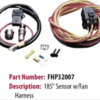
Open those eyes and see the light, hey if your like lots of needless wiring go for it. Durale is a very well known fan and cooler company, hey whats the problem, you just throw away the two relays and run the 20 amp lead to the thermal switch, not that complicated Larry, ease up, I didn't ask for your professional documents. The old school way will work, but the thermal switch has been used by Porsche, Audi, Saab and many others for years, it's cleaner and really theirs not as many electrical components to go wrong, Sorry, this is probably the first time you've been wrong, right? p.s. the diagram is at the bottom of the Durale install instructions, I know it's small just two wires ( Simple ). p.s.s. Glade your not in charge, whew...
Happy to help JFB, keep it simple. I just hope the new to the forum like Jim H don't jump into the overly complicated nonsense of some posts.
Jim your car is very nice, you might slow down, the Pantera is a simple car ( race car ) why your fans are not coming on can be figured out with a 12 volt trouble light, keep it simple and enjoy your ride.

Attachments

Images (1)
  • in_the_weeds
I'm going in and editing the last several posts. Editing always pisses somebody off. I apologize now, but references about a persons intelligence are not allowed, and shall never be allowed.

Please read this: Forum Ettiquette

Each person should be able to offer their advice without others criticizing. It is just as easy to write "I respectfully disagree" or "I have a different approach" as it is to cast aspersions such as half wit, dum and dummer etc. Please guys.
Update: I put in the new PE fuse panel (the bottom couple of fuses on the OEM panel were barely held in) and topped up the cooling system a few times. B_dud also dropped by and helped me finish the fuse panel install and checked the electrical connections. I got the car out for a couple of rides, one of which was about 90 mins. At first I only thought one fan was running, but when it got hot enough both of them came on. Indicated temp on the gauge, which is definitely wrong (it reads 160 right after I crank it), topped out about 210. I used an infrared temp gun around the block and the radiator--readings topped out @ 190-200. At the end of the drives the coolant did not overflow or sound like it was boiling. Bottom line--I think I'm in a much better place! All of your ideas have given me a few more things to work on over the winter. Thanks all!

Add Reply

Post
×
×
×
×
Link copied to your clipboard.
×