
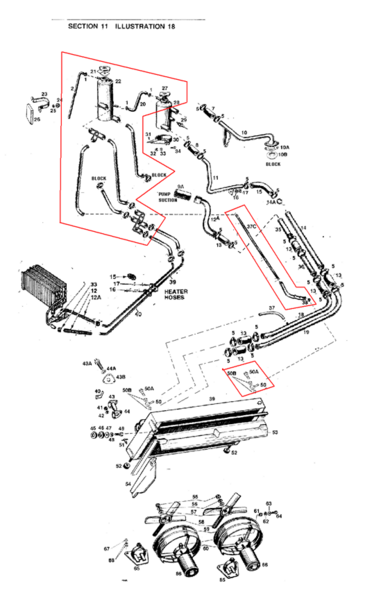
At the fist glance my cooling system looked pretty good… just peeking under the car with the flashlight when I bought the car… nice silver coolant tubes running along the bottom of the car… stainless steel already? - great! Radiator from the front and top.. black.. all straight!! Cool!!   BUT:  starting to tackle my electric issues I unbolted the inner fender off the right front fender facing the front … and what I saw was not pretty: the area on the bottom right of the radiator is green - leakage for sure…! As I was working on my brakes I was under the car and I discovered that the water pipes were painted silver, a bit deceiving for sure! Leak marks around the rubber connections …. Well, oh well… here is the next project !


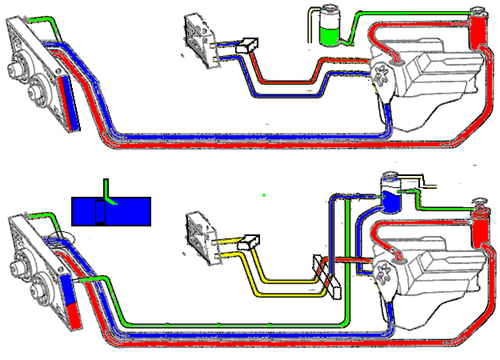
I’m going for the whole 9 yards! Aluminum radiator leaning more forward, sucker fans, stainless steel tubes, new rubber hoses, water pump thermostat…

Because there is another project and thread attached to this one ( “heater core - keeping cozy”) and I would like to have some help with this I send my car to PIM on Friday and I will be there on Monday after dropping the kids of and with the help of Hans it should be not to bad…

IMG_1026

Attachments

Images (1)
  • IMG_1026
Last edited by LeMans850i
Original Post

Replies sorted oldest to newest

Day 1

Hans already drained the coolant and begun assembling the new radiator/fans, I am removing all pipes under the car, in 24” sections ( I love my little air saw)

IMG_1049

IMG_1045

Then undo the bolts for the fans, take fans out…

IMG_1051


IMG_1044

take out head light motor… changing to brass gear, new switches too…

IMG_1042Gear is ready to fall apart…

also one micro switch is internally broken… I replace both!

IMG_1047
IMG_1043
it’s getting some cleaning and painting

while Hans is working on the motor I cut the old support out

IMG_1039

IMG_1050

IMG_1040

undo the 2 bolts for the radiator, one left and one right and lift it out..

As you can see… leaking….


IMG_1048

IMG_1044

Attachments

Images (12)
  • IMG_1049
  • IMG_1049
  • IMG_1050
  • IMG_1048
  • IMG_1039
  • IMG_1045
  • IMG_1051
  • IMG_1044
  • IMG_1042
  • IMG_1047
  • IMG_1040
  • IMG_1043
Last edited by LeMans850i

Then removing the seats… and on each side, the rear inboard bolts on both seat rails  do not corporate, and I had to use my little trusty saw! Then remove the rear cover.. and the smaller engine cover underneath… AC compressor, alternator and water pump look like new, but I know there aren’t so I am going for new water pump. Can’t be trusted!!

and now, 3 pm, I’m off to pick up children from school…

Last edited by LeMans850i

Installed headlight motor, new micro switches, adjusted

IMG_1070

took out all water hoses in the engine compartment, shut off valves where closed for years because of the blown water hose at the heater core… perfect for rusting the tube to shit

IMG_1073

IMG_1075

we also lifted the new aluminum radiator in it, leaning forward, made aluminum brackets and bolted in! Definitely a 2 person job!

And in my case there was a little massaging of the side mounting brackets necessary!

Attachments

Images (4)
  • IMG_1070
  • IMG_1073
  • IMG_1073
  • IMG_1075
Last edited by LeMans850i

Just in case you haven't looked at all of the dash connection pipes , definitely check the water hose connections to the internal pipes under the center tunnel hard piping where it connects from into your water heater.

You should be able to check those easily without pulling the dash. If either of those let go you will have boiling water sprayed out over your feet, while having the windscreen obscured by steam. Unpleasant.

The under central tunnel heater hard pipes are a slightly larger diameter than the  standard airbox inlet pipe spigots . In my instance a previous person had decided one size fits all and a smaller connecting pipe had been forced over the larger tunnel hard line and had split and was at the point of rupture when I found it.

Well worth a quick visual check if you have not already done it. I would be replacing every hose and clip.

One other thing You might have done but worth a mention. Is there a top point vent tube from the RH top side of the radiator running back to swirl tank  ? Not sure when they brought this change in. The earlier cars did not have it.

If your still using it it would have been  connected with a banjo fitting on the upper RHS of the original radiator.

The steel connection tube under the car will be totally absolutely and permanently blocked with crud. I replaced mine with 6mm 316 stainless.

Now it works.

@Percy posted:

One other thing You might have done but worth a mention. Is there a top point vent tube from the RH top side of the radiator running back to swirl tank  ? Not sure when they brought this change in. The earlier cars did not have it.

If your still using it it would have been  connected with a banjo fitting on the upper RHS of the original radiator.

The steel connection tube under the car will be totally absolutely and permanently blocked with crud. I replaced mine with 6mm 316 stainless.

Now it works.

No, didn’t have that but I had a small tube connected to right side radiator tank top going 12 inches down into the big upper metal water pipe .. not sure what’s that for…

as for built time.. my car is 10/72.. dual instrument pods big L-bumper

a mix…

Last edited by LeMans850i

here is an excerpt from instructions to shop concerning coolant system.

(I converted reservoir tank to pressure tank with continous venting)

Factory Mod (TSB A-19) added an upper radiator outlet tank vent (hose 37) down to the return tube (18). To enhance the venting capability, I would like to install a thin sleeve in the return tube, just up stream of the vent hose connection to create a slight venture suction.


A second factory mod (TSB A-61) recomended was to vent the radiator’s end tank back to the engine bay. This design was flawed as it connected to the swirl tank (higher pressure than radiator). I didn’t have this mod, so the tube 37c was not under the car.
The shown desired has radiator left end tank’s vent going to the pressure tank (water pump suction pressure). An ~3/8 SS tube will need to be fitted under the car with barbed ends for hose connections

here is illustration showing original configuration upper with lower showing converstion to continous venting.  PLUS, moving pressure setting cap from pump discharge to suction (midigates flashing/cavitation)

Attachments

Images (3)
  • mceclip0
  • mceclip0
  • mceclip1
Last edited by jfb05177

the other cooling concerns would be a pump that devolps head (pressure) along with flow.   I can't recall or find in notes make/model I went with.

the other was to "overdrive" the pump with reduced diameter pulley.

the connecting "hose" to pump suction for mine is a metal elbow, expanded end for transition diameter AND a "X" flow straightener internal, Again to reduce chance of flashing/cavitation

I bought my Pantera in 1979 and regularly upgrade, replace and repair anything that has not seen a wrench in a while. It's the fun of owning a mechanical beast that's so simple compared to the new equivalents. I enjoy seeing the process you are going through. Once done, actually you're never done, you can truly take ownership of that car and enjoy it more than if that 'hazing' wasn't a ritual of getting into the club.

Attachments

Images (1)
  • IMG_6792: last week
@tomkuester posted:

I bought my Pantera in 1979 and regularly upgrade, replace and repair anything that has not seen a wrench in a while. It's the fun of owning a mechanical beast that's so simple compared to the new equivalents. I enjoy seeing the process you are going through. Once done, actually you're never done, you can truly take ownership of that car and enjoy it more than if that 'hazing' wasn't a ritual of getting into the club.

There are many owners out there… The car parked in the garage never used… I consider myself a steward of a classic fantastic marvelous relic - 50 years old that has to be exercised and maintained! And I do enjoy the process as well! I did the same thing to my Alpina (got stolen) and to my 911 (drove it for 18 years) And for me it is so satisfying to know pretty much every nut and bolt on the whole car! Like the girl you’re with,  for the last 10 years, 20 years, 30 years, you just know her…

I do get to know her…. 😌

Any other rituals I have ahead of me?

IMG_0100

IMG_0078

here are 20+ years of my life…

and now trying to get this

IMG_0447

Attachments

Images (3)
  • IMG_0078
  • IMG_0100
  • IMG_0447
Last edited by LeMans850i

Great input here. At a risk of being monstered, I will add one more comment on the suggested modified arrangement which I have also mainly adopted for my car .  I am running the original factory radiator.

Because of the tube diameter , distances and various pressure drops within the system I found that a 15pSI cap on the red swirl tank complemented by a 13 PSI cap on the blue makeup tank was  a balanced combination that saw little in the way of any coolant vent discharge and resulted in a really well balanced self venting system.  The pressure drop from the radiator vent back to the makeup tank circuit on startup  is the full 15PSI which ensures the scavenging of any vapour pocket developed in the radiator. Subsequently when its lined out at full operating temperature the system settles at full pressure in balance internally with little or no venting.

No overheating, strange gurgling noises, puddles of shame on the floor,  no dieseling on shutdown , no coolant loss - just a well behaved cooling system.

Great solution.

@larryw posted:

Your a/c belt seems to sit in the sheave properly but the alternator belt looks a little wide. When the belts  don't sit down in the sheave right they develop shoulders that mess with future adjustments.

You are correct… I missed that! Thank you very much for pointing it out… I will get the right belt.. this belt was on it and had no cracks.. I checked that … 🤪

Add Reply

Post
×
×
×
×
Link copied to your clipboard.
×