Hey Rocky,
Looks fantastic man. Really first rate.
Rocky;
Like the engine "bubble" cover. Was trying to figure how I wanted to do the same. See you left the upper horizontal upholstered section intact.
I like that.
Like the engine "bubble" cover. Was trying to figure how I wanted to do the same. See you left the upper horizontal upholstered section intact.
I like that.
Thanks, Jag -
If you look at page 24, you can (sort of) see how I cut the hump off the big panel.
I was able to do the upholstery on the big panel myself, but the removable "bubble part", with the curved seam was too much for me. That part cost me $150.
I did use the two vertical metal "attachment strips" (with nuts) on the edges of the bubble to hold the material down. Don't throw those away!
Rocky
Jag, cutting the firewall bubble loose is something racers did in the '70s. The Gr-3s came that way, I'm told as running a factory 4-point roll cage meant the panel could never be removed unless the cage was first removed. Its quite simple: the leatherette upholstery is done separately on the bubble and the main panel. By unbolting the two metal strips and pulling on the bubble-upholstery, it comes off.
To cut the thin fiberglas, use a fine- tooth wood saw. Leave about 1" across the top. When the bubble is cut free, trim it until there's about a 1/2" clearance all around, and re-glue the removed upholstery back onto the cutaway bubble. Stretch & wrap the main upholstery as far as possible around the main fiberglas panel and touch up visible cut edges with semigloss black paint (or even a Magic Marker) so when the two panels are back together, the cuts are invisible. Two strips of velcro will hold the cut-free fiberglas bubble to the underlying steel access panel.
This has been the subject of several illustrated articles in the POCA Newsletter during the past 10 yrs, all done at home. It is also the first step in self-constructing a flat-firewall Pantera.
Thanks Rocky, Seems to close to retail pricing for me.
So just to keep the team up to date....
Fixed my 700 CFM Carb Issues...
Several other minor corrections applied... like wiping off the rear cross bar, and adding an additional hold down screw to my radiator cover panel. Oh, I also cleaned my windows yesterday.
Once these cars are set up, they seem to run pretty well.
Just got back from a run to Mount Lemmon with the Cobras. It was fun.
Only one minor issue - one of the Cobras hit a rock, it kicked up, and whacked into the Tranny, and put a big hole into it. The Cobra pulled in to the parking lot STREAMING tranny fluid.
I just learned the T56 (I think) Trannies use ATF...
Attachments
Chuck, GM started switching their std trannys to ATF (a 0-wt hydraulic oil, not a load-bearing lubricant) over 2 decades ago. I found it full to the brim in an '82 Z-28 4-speed that seized 2nd gear to the mainshaft at an event, even though the gear was submerged in ATF. Most of us suspect the switch was done to gain about 1 mpg in their gov't D.O.T. CAFE rating; too bad about your warranty claims.
Most savvy car owners immediately switched their boxes back to 80 wt gear lube with zero problems from the 'thicker' lube. A few of my autocross friends lost gearboxes in new Corvettes from lack of proper lubrication of the transmission gears.
Most savvy car owners immediately switched their boxes back to 80 wt gear lube with zero problems from the 'thicker' lube. A few of my autocross friends lost gearboxes in new Corvettes from lack of proper lubrication of the transmission gears.
It's been a while since I posted (here)....
I was poking around through an old POCA Profiles, and what do I find....
My Car, second in the '88 Concours in Costa Mesa, CA. Very cool.
Neil bought the car in 1985 (I have his cancelled check). It's nice to know the history.
I was poking around through an old POCA Profiles, and what do I find....
My Car, second in the '88 Concours in Costa Mesa, CA. Very cool.
Neil bought the car in 1985 (I have his cancelled check). It's nice to know the history.
Attachments
So I'll help you, if you help me!
Here's a picture of a really slick little petcock that I got from Ace for $9.99. I am using it as a radiator drain - it threads right into the 1/4" NPT threads in the drivers side front of the radiator.
(I am not so sure about it's classification as a Valvula Recta, though!)
Anyway - It has a solid attachment point for a short piece of hose so your antifreeze doesn't pour all over everything.
It is 100x better than the crappy petcock on the right in which the little "wing nut/hose bib" came loose on me.....
It looks like it will work great.
Attachments
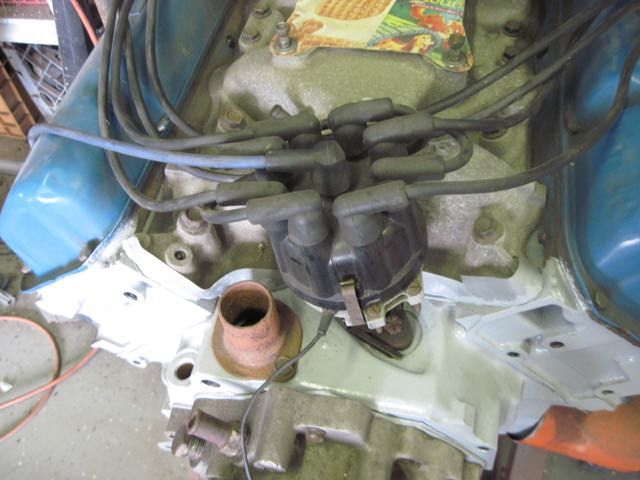
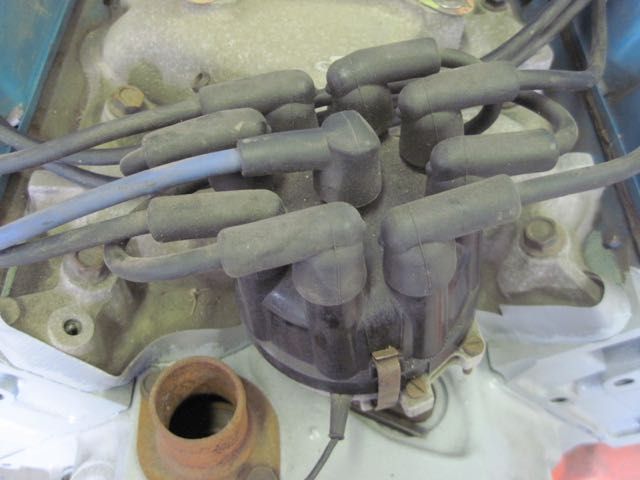
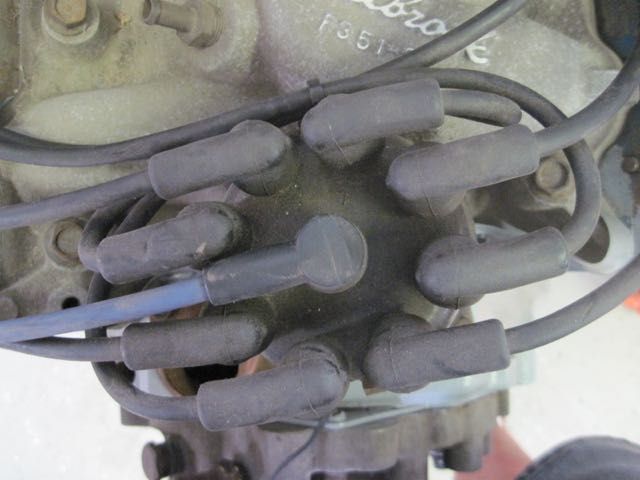
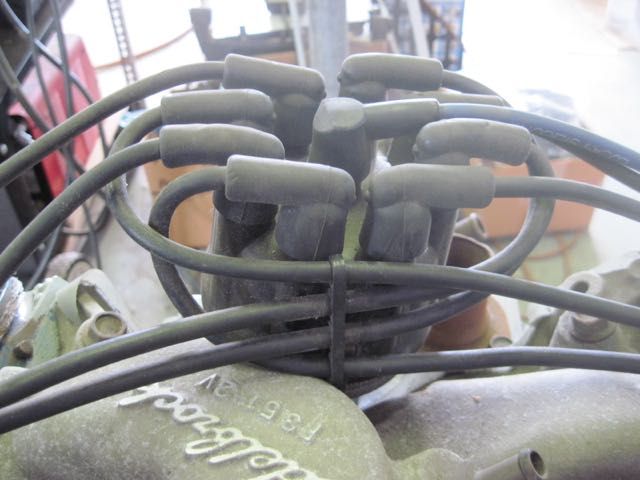
Rocky, when I loom up a set of custom wires, I imagine the distributor cap as 2 halves, split along a front to back line. This would be where your cap clips are in your photo. Route 4 wires to the left and 4 wires to the right. Take the wires (2 from each side) that have to cross over to the opposite bank, and route them behind the cap. I'll see if I can take a pic.
Can't help you with the pump fitting though.
Can't help you with the pump fitting though.
Thanks, Rodney -
A picture would be great.
It's like a puzzle!
A picture would be great.
It's like a puzzle!
A local engine builder did something unusual for spark plug wiring and my buddy Bill helped me really dress it up nice. When I get my car back I'll take a picture or two. Basically with the distributor in 180 degrees OFF, two wires no longer cross. Looks really nice. You just need to remember the OFF part. ;-)
Thanks, Rick -
Bill was talking about this mod. I am assuming you guys are not running vacuum advance?
Of course I'd love pix.
Regards -
Chuck (a.k.a Rocky)
Bill was talking about this mod. I am assuming you guys are not running vacuum advance?
Of course I'd love pix.
Regards -
Chuck (a.k.a Rocky)
Rocky, here are some pics. I kind of mocked this up on the engine stand; took me a bit to find the box with the dizzy in it.


Rick's post reminded me of something; you can put the dizzy in any way you want by just re-assigning which post is #1. The order doesn't change, just the starting point. Doesn't matter if you have vacuum advance or not.
Think of it this way. The body of the dizzy will only fit in certain ways. It is limited by obstructions, the vacuum can, access to the cap clips, and so on. The cap is keyed to the body, and only fits one way. But the dizzy shaft, rotor, reluctor (or points cam) can fit in many ways. I don't remember how many teeth are on the gear, but it will go in that many ways. I don't know if this will really help with looming the wires. I would think it would cross just as many as it would un-cross, but maybe so. I'd have to play with it and see.
Also, don't get carried away with looming the wires really snug; you can make the cap really difficult to get off.
Thanks, Rodney -
The wire holder trick on the back side is a good one. Thanks for the pictures - I will go out and give it a shot!
I see what you are saying about the rotor... That makes sense now too...
Regards -
Chuck
The wire holder trick on the back side is a good one. Thanks for the pictures - I will go out and give it a shot!
I see what you are saying about the rotor... That makes sense now too...
Regards -
Chuck
Add Reply
Sign In To Reply

