
Like you all have experienced, you are working on a specific project and the door panel is off, or the seat is out… you know there is something else that is staring you in the face.. 😳 it’s asking for your attention!  So suck it up and do it… I suck a lot up… today I posted finishing the fresh air intake for the cabin and looking at the post it seems like … well, he puts a hose on today.. but as a working day goes, you come across a lot of things that 😳🤓🥹🥸🫣 look at you and ask to be fixed… some minor, some ugly and some x-file stuff that some alien built….

This thread is mainly for me to keep track of things I did and for your entertainment or for you to check next time you’re in that area…

Door panels off.. we are redoing the 50 year old interior, we’ll hand it to the upholstery guy with some instructions!  oh my… look at the bottom of the doors.. there is a lot of things, metal(bolts,washers, a small pin?), leaves, debris, blocking the drain holes… clean that out.. bolts… hmm I’m sure they had a home and so did the washers - you see where this goes… we ended up taking the window regulators out left and right, opening both gear drives and I found to my delight that it had already bronze gears in it.. solid with hard baked Brown grease … you know what to do.. cleaning regulations, lubricanting everything and put it back together, finding the washers were spacers to make it run smoothly…

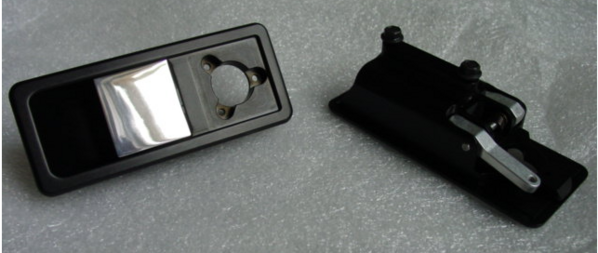
what’s that.. pin… broken spring from the drivers door handle… take the handle out… and the passenger as well..

never tried the key… hmm doesn’t work, not left not right BUT fits the rear lid👍

back to driver door handle… plastic bucket is cracked too.. finding a used spring…. to get it : the pinhead, carefully drilling the head off and carefully driving it down… Getting stuck rust , cutting a bit off driving it backwards, cut again, tapp tap it’s out..  I got a spring.. new bucket came with pin and C-clips..

same again

cleaning the used spring.. ent-rust it , paint black..  well, still no key… I know a guy… he did the ignition lock on my Jensen Interceptor… old guy… on my way home I see him in his little locksmith shed next to .. Lowe’s..

tell him what I got… he’s looking around and after 5 minutes he shows up with 6 keys… says Fiat on them… smile…

the old man says… you know, I had a DeTomaso 40 years ago… got stolen…

yahh a silver Mangusta… 1982 it got stolen… still got the keys and the title and a ticket…IMG_1277

VIN 8MA822

I have to laugh right now where this is going…

anyway, he made me the key...driverside


More to Come


IMG_1244IMG_1280

Attachments

Images (3)
  • IMG_1277
  • IMG_1244
  • IMG_1280
Last edited by LeMans850i
Original Post

Replies sorted oldest to newest

I hear you brother! My CNC slave cylinder, which saw one summer of use 22 years ago, sprung a leak the other day. It was a long throw version along with the matching master cylinder. Despite my best efforts, (probably clumsy) I never did get it to go into reverse and first without a little grind. I called Ron Mccall, who asked what kind of clutch it was. I said I had no idea….

I now have an appointment with Ron and have a new everything on order. I’ll have him safety wire it as well. The leak wasn’t THAT bad…

Along the lines of doing it once, correctly and forever, does anyone have any thoughts on a concentric - Tilton or otherwise - throw out bearing/?

Rather than rebuild the original and cracked door handle, get a set of IPSCO door handles.  They're beautiful, like jewelry.

https://ipsco.org/Pantera_file...20door%20handles.htm

But, if you're going to rebuild yours anyway, you might want to replace the worn, crazed or pitted chrome pulls with polished stainless pulls.  I may have a set available because I was planning to rebuild my door handles when I discovered both plastic cups were faded, one was cracked, and the other door handle had something else inside broken.

Attachments

Images (1)
  • mceclip0
Last edited by garth66
@garth66 posted:

Rather than rebuild the original and cracked door handle, get a set of IPSCO door handles.  They're beautiful, like jewelry.

https://ipsco.org/Pantera_file...20door%20handles.htm

But, if you're going to rebuild yours anyway, you might want to replace the worn, crazed or pitted chrome pulls with polished stainless pulls.  I may have a set available because I was planning to rebuild my door handles when I discovered both plastic cups were faded, one was cracked, and the other door handle had something else inside broken.

Very nice jewelry… but I keep my patina on purpose.. it’s 50 years old and it will be very good mechanically but no beauty queen… 👍.  To really see what my car is you need to dig in.. otherwise it’s just another yellow Pantera..

I saw the handles at the PIM show and I definitely noticed them.. clean straight cut..  very nice!!! I even ask the owner of the car about them…

Last edited by LeMans850i

Ed, I've been running a concentric throwout system for the last 25 yrs. I adapted a Tilton racing unit to the ZF because no one sold such a thing back then. Two common fail-spots: when the mfg says 'establish 0.060" of clutch to throwout free play,' BELIEVE IT! The whole rig uses a single square quad-ring to seal. It seals on the OD of the cylinder bore AND simultaneously on the internal piston ID, and works only in-and-out.

What happens is, guys skimp or error on setting the required free play. When the engine & bellhousing are hot from 15+ minutes of driving, the free play closes up considerably. If it disappears altogether, the concentric piston bottoms and begins spinning with the input shaft. The quad ring will fail in 50 miles if it starts spinning. They are reportedly difficult to replace (I've not had to).

D Quella used to sell such a rig (not a Tilton) and reportedly had massive warranty problems, mostly because of inadequate free play during home installation, I think. Dunno where his system was sourced from.

The second problem is obvious: if ANYTHING goes wrong, the ZF must come out to fix it.

Advantages:

1)- the rig is 12 lbs lighter than stock- you don't need the stock slave or its bracket, nor the cross shaft in the bell housing, its bearings/ bushings, or the cast iron release fork. It all goes on a shelf.

2)- With a std bore clutch master, the concentric throwout will stroke in/out around 0.090"! So one has more than enough in hand for large amounts of free play, and it's self adjusting once set up properly. This is good for saving the usual ZF synchro wear due to stock clutch drag. Its also easier to push in & out: Judy (5'2" & 118 lbs) had no problem street driving it 500 miles to 'Vegas.

My rig adjusts by threading in & out on a special ZF nose piece w/ a stock nose seal. The bleed hose extends out one of the ZF cross-shaft holes while the pressure hose goes in the other. Quella's adjusts by a stack of shims on (I think) a stock ZF nose piece. Both systems work fine. Good luck-

Lousbby- Great to hear you succeeded. I just had a back “repair” that prevents lifting, twisting or bending  for 6-8 weeks,,and I really want to drive the car at that time, so off to McCall it goes,  and I figure I’d just let him use whatever he wants, He suggested a complete clutch kit from Quella, and as I remember, master and slaves from Wilkinson. Will check my notes.

.

Here something unexpected:

I was going to replace the speedo cable on my car and I undid the zip ties of the new cable… unrolled it and laid it on the floor to relax….
as any Young at heart person would do I wanted to Twiddle the cable between my fingers… and to my absolute astonishment it didn’t want to turn…. WTF… 😳 Now i tried it from the other side - same result!!!

it took a  vice-like grip of my fingers to slightly turn the inside cable while holding the outside!! That can’t be right!!!  I pulled the cable out of the shielding and I found that to was packed…. I mean really really packed with graphite grease!!  I’ve wiped the cable off and stuck it back in… slightly better… Pulled it out again wiped more grease off and repeated the procedure five more times…. Now it’s  like a normal easy turning but still well lubricated speedo cable! I did not know that such a thing is possible (or how they got the grease like that in there) but here I am with blobs of grease coming out of this 6 foot cable that would have caused trouble for sure….

there is a thing as to much lube…. 🫣

Last edited by LeMans850i

Working on the wiring inside the cab I reroute and delete and shorten and lengthen quite a few wires!

I noticed on the parking break switch that there are three terminals, two terminals make contact when the handbrake is down and one contact makes ground over there parking brake switch… This is the contact that brake light on… Does anybody know what the other two connections do.. ? One was a single black wire and the other was 2 yellow wires crimped in one connector!

Installed new mechanical fuel pump, (substitute the bolts with studs) ! Also run wires for electric fuel pump ( just for priming / hot start / vapor lock) and fuel pressure sender and temperature sender for cooling fans. Installed fuel filter, working on fuel pump mount! New fuel hose tank to filter… going to be new all the way to carburetor..

Last edited by LeMans850i

When I started this thread , I didn’t know how really really true the title Would hold up!
I usually try to make sure I’m not backing myself into a corner… So in case of the electric part I made plenty of pictures (some got lost when my phone died) but the majority is there… put stuff back together the way it  was… Big mistake!!

I am in reach of firing up the car (and put in the interior and drive off into the sunset)  IF I can get the electric to work… There were a few Things that didn’t work when  I bought the car, but as I an trying to Get everything to work I’ll find more and more things wrong!(if you leave the ignition on for a while, or you turn the instrument lighting up , Or the headlight motor doesn’t wanna shut off…)

The hazard switch wiring in the back was not even remotely what it’s supposed to be and Therefore responsible for a lot of issues - obviously..

also, the back up lighting from the gauges, the headlight switch, cut wires, Crappy fixes…

The stuff I did new,  regarding wiring,  is not even hooked up! At least I can not  blame myself for blowing fuses!

extremely mega enormously frustrating!

I can build things, wiring a whole airplane from scratch… but this is getting down to my bloody bones… to find all those electrical screw ups…. Stuff build to work for one minute and then you better have it turned off again!
I am backed up in the corner, and I try to find a game plan….
IMG_1713

@rocky .. I rather do a pedal box overhaul!!!

Attachments

Images (1)
  • IMG_1713
Last edited by LeMans850i

I like the "I can build things, wiring a whole airplane from scratch… but this is getting down to my bloody bones… to find all those electrical screw ups…. Stuff build to work for one minute and then you better have it turned off again!"

Welcome to our world! We do these electrical messes on a daily basis. In the early years all we ever did was water pumps, fuel pumps, brake pads, belts, hoses, simple stuff. Now-a-days...electrical messes one after another, EVERY car has some electrical mess here or there. But...electrical work is clean, it's easy, and it's thinking work. We'd rather do electrical than change pistons and cranks!

We have a car here now that the last owner cut all the wiring out with a hack saw for restoration. then lost it. Bought a 'painless wiring system' online. Nothing matches anything just bundle of #22 wires. For example, the instructions say the backup lights work off the cruise control box! What a joke. AND no cruise control box is in the kit! lol. That's nothing to us. We do them for breakfast lunch and dinner.

If you're backed into a corner we love electrical & Pantera is a simple car to wire. Unless you're not of the mind to do it, it can be overwhelming. But when you do Pantera 24-7-365 it's a piece of cake because we know these cars. Send the car down if you're at the end of your rope. Wiring is no big deal. Pantera Miami.

It’s just exhausting to trace ALL the little stupid things…  just a sampling:

the spring holding the backup light bulb touching the center lead of the socket!

wire for the brake light cut in the harness footwell/“firewall corner and then nicely taped the harness

headlight relay minor corrosion on one contact (passed 5V)

Original AND New headlight switch faulty

hazard switch incorrect connected

head light switch incorrect connected

Center console instrument lighting incorrect connected

A/c switch partial no contact

door interior lights switches not connected, no wires

turn signal stock switches corroded

and so on and on….

Now all the things you just read are the solutions to a problem or the problem itself but I get

fuse # 4 blows sometimes and right side rear lights not working and no brake lights at all and hazard when turned on stuck in on and light switch pink wire is getting warm and no horn and lights only open

all that in one go….!!! And I ask myself: where is the problem… and that is where I went wrong 😑 the question I should have asked myself should have been - how many problems are there‼️

That’s a lot of neglect and / or neanderthal electricians at work for a long time on one car!  I’m having lunch with my multimeter and a 10 foot wire..

IMG_1712


all the wiring I did for my additional stuff is not hooked up … just run the wires but not connected to power:

Powersteering, electric fuel pump, second headlights, Fuel pressure gauge, ignition switch, starter switch, interior fan, heater hose valve,voltmeter , clock… all that will get there own fuse / relay panel!

when I’m done with this car I know pretty much every nut, bolt , bushing , cable, wire, bulb, connector, hose, tube, hydraulic cylinder, bearing, ball joint, spacer and so on by their first name!! I touched them all!🖕

Attachments

Images (1)
  • IMG_1712
Last edited by LeMans850i
@rocky posted:

I’ve got a big 200 amp knife switch in my storage unit.

It would look good on your center console, and you can turn all that stuff on with one switch action!

I will loan it to you – I haven’t used it in 18 years, but you never know when I might need it!

😎

Funny you said that… I started mounting a battery disconnect switch in the cabin today… 1/4 turn disconnect… center console footwell passenger…

I’m  sick of the little green knob at the battery that when you unscrew may or may not disconnect! (Aside it takes time to get out and do it)IMG_1728

Attachments

Images (1)
  • IMG_1728
Last edited by LeMans850i

That looks like a quality piece. 

I design high power amplifiers for consumer electronics and see many dangerous parts come from China.

Usually, they are marine or UTV type circuit breakers that have high contact resistance or poor terminal engagement.  Takes a while for them to catch fire.

I've seen some very expensive boats and UTVs go up in flames as a result.

Definitely can't hurt to check high current connections every once in a while.

@jwelch68 posted:

That looks like a quality piece.

I design high power amplifiers for consumer electronics and see many dangerous parts come from China.

Usually, they are marine or UTV type circuit breakers that have high contact resistance or poor terminal engagement.  Takes a while for them to catch fire.

I've seen some very expensive boats and UTVs go up in flames as a result.

Definitely can't hurt to check high current connections every once in a while.

Yes!!! Don’t trust ANY parts!!! Verify and check and verify and check again!! AND many plastic and rubber parts do NOT age well!

@panterapatt posted:

I had two "little green knob" things fail and went to this:  

I was thinking doing it the same way, same place as you but when I found a warm/hot wire it was always inside… under the dash area and then I scrambled out of the car to get to the battery to disconnect it…

I think in real live the scenario is playing out about the same but with the add on of driving…

Stopping, popping the hood, getting out, opening the hood, prop rod, going around the front to the battery…. Disconnecting!

it seems to long before the battery is disconnected….

just my worry feeling…😬

that’s why I put the switch inside..

And as a bonus there was already a factory hole (about below on the horizontal sheet metal where your switch is located - next to the clip that holds the brake line down - oval 1”x2”)

Last edited by LeMans850i

There's a large 1/4 turn main switch sold to comply with the long time SCCA mandate for an outside-accessible cut-off switch for some race classes. This is for use by safety personnel, in case of an accident where the driver is knocked unconscious. VERY handy for cars in wrecks with electric fuel pumps! It takes a 1" hole in a fender to mount; some guys use an existing radio antenna fender mount hole.

Right, agree with Pat - the main goals for my setup:

1) Eliminate any parasitic drain on the battery while the car is resting.

2) Allow me to work electrical issues with no risk of shorting out my battery and doing serious damage.

3) Make it “slightly” harder for some bone-head trying to steal it.

4) Emergency shutoff.

Rocky

Last edited by rocky

It's not just that crap that gets me. It's also the fact that the old connectors break but look OK until they come loose and then things don't work anymore. I've had that happen a couple of times and then I chase my tail trying to find out what the heck! it was just working! Good thing I'm on the road to retirement.

Ken

The can of worms bit me in the ass…

when we upgraded the cooling and heating system I did question the heater tubes that run inside the center tunnel..

I cleaned them up, treated them with rust converter, checked them for leaks and it was all good… originally I wanted to run new tubes under the tunnel next to the cool but I guess I got lazy and didn’t suck it up… and it bit me!!!

After we run the engine… ( the video I posted) we pushed the car back in the shop and after 5 minutes it started to open the gates…  lucky me, I did the test run with distilled water …

..putting under the car stainless steel 5/8 tubes with AN fittings front and back….

pics tomorrow… I’m dead..😵

Last edited by LeMans850i

So true!!!

here is my solution

IMG_1860IMG_1870IMG_1869IMG_1864IMG_1863

2 stainless steel tubes, 5/8,  one tube 61”, other 63” to stagger fittings, one tube has 90 degree bend the other two 45 degree bends for additional adjustment.. two straight AN fittings in the back, two 90 degree fittings in the front. I was able to use the original hoses (just a few weeks old) in the back, new hoses  in the front.. (90 degree turn from the Heater Core, straight hose off the shut off valve) The new hoses inside go towards the passenger footwell, Follow the air conditioner hoses and then go through the “firewall”

one dogleg (1/2”) in both tubes to clear the handbrake perfectly!

1 day thinking

2 days work

tomorrow Bleeding the cooling system and check again…✌️


looks like the inside of the belly of the Exxon Valdez… 🤣

Attachments

Images (5)
  • IMG_1860
  • IMG_1870
  • IMG_1864
  • IMG_1869
  • IMG_1863
Last edited by LeMans850i

Filled the cooling system with water And antifreeze today… Opened the heater valve on the dashboard as well as the electric shut-off valves… car jacked up in the air - ass high And going through the motions of opening valves, squeezing and filling up again, but it was unable to fire up the engine because the exit was blocked off the shop so I moved on to the Powersteering…

Tomorrow is my little girl’s birthday, so I’m gonna stay home To witness my little girl, blowing out candles on her cake, which have now double digits in her age 🥲

they grow up so fast…

more on Monday 👍

@LeMans850i posted:

… car jacked up in the air - ass high

You don't need to do that. Use a vacuum filling device instead. There won't be any air bubbles in the system. It's also a good device to use, to check for leaks. Before you put coolant in the system, pull a vacuum and leave it for a few hours or even overnight. If the vacuum drops, you have a leak.

I use an OEMTools 27066 Coolant System Refiller Kit. Less than $100 on Amazon and it works great.

I also endorse the vacuum cooling system tool. I converted last year and will never go back to the old-fashioned gymnastics necessary to remove air.

on a similar note, I am a veteran convert to a pressure bleeder tool, I find the one by Motive to be just fine. It takes longer to lay out the towels and prepare the pressure bleeder then it does to bleed a clutch line. Doing the brakes is equally quickly accomplished.

Larry

Still “playing “ with my electrical things… one problem that popped up is the blue high beam indicator light is on the moment the lights are on … no matter if high or low beam is selected….

what should be the color on the back of the tachometer light bulb for the high beam light and where does it get power from….

it was already late today when I found the problem…. So I have not checked yet 😵‍💫

While checking my wiring, I did another test on my dimmer switch and it seems like it has more resistance when on full brightness as it’s supposed to…. When I bypass dimmer the lights in the center console gauges are quite brighter than before so I ordered a dimmer switch for LEDs and normal lightbulbs and stuck it in… The only difference I had to do was add a ground wire to it! It works fantastic. It feels fantastic, the original plastic surround of the knob I had to add a flat washer on the inside (reduce the size of the hole ) Glued on with polyurethane glue let it dry and then assemble the whole thing and it looks quite stock and it works great ! (Note my digital Voltmeter I built on the bottom of the switches..)IMG_1932IMG_1933IMG_1941


I also added a small fuse panel Next to the battery cut off switch. The fuses will be used for the Powersteering, the electric heater hose shut off valves, the electric fuel pump, The additional yellow headlights, The fuel pressure gauge and it will power the relays as needed…

IMG_1937IMG_1939(Note - little flags on wires telling what they are for)

as you can see I recessed the battery cut off switch To sit flush with tunnel panel.


Obviously, with all the electric work and continuously testing, my battery is going to work quite a bit, and it needs to be recharged quite frequently… Because I already have a lot of battery tenders for the motorcycles, I thought I’m gonna go and use a the battery tender again, but this time install the charger in the car and make a plug for the extension cord on the outside of the car… still working progress, but chipping away

IMG_1935

I also changed back to the M5 thumb screws. Someone previously just used the Velcro to hold the doors shut holding The Electric stuff in the footwell left and right.

IMG_1940

as you can see, the instrument panel is still not attached to the car as i Need to move it around a little bit to get to where I have to get to… It’s going to be interesting Bolting it into place. The “lock” on the glove box what is a bit challenge with the additional leather thickness…

Attachments

Images (7)
  • IMG_1933
  • IMG_1932
  • IMG_1941
  • IMG_1937
  • IMG_1935
  • IMG_1940
  • IMG_1939
Last edited by LeMans850i
@marlinjack posted:

...You're a Very Clever Electrician! I think I'll do the same with My Battery Tender. When I disconnected it, after running all night...the Multi-Meter showed 13.1 Volts!!! I also have one on My Harley. Here in the Valley, with the temps 100F+, without the tender, on it, All the time, the battery will go Dead.

...a Question. With the Tender connected ALL the time, but NOT Plugged into the AC...Can the Battery get Drained??

Thanks, Great Work!

MJ

Same question I had yesterday… And I did not find any drain with it plugged to the battery, but not plugged in the wall!

I also will make it a habit to use the battery disconnect switch when the charger is plugged in! I don’t wanna drive off with the extension cable attached to the car lol

Last edited by LeMans850i
@LeMans850i posted:

Same question I had yesterday… And I did not find any drain with it plugged to the battery, but not plugged in the wall!

I also will make it a habit to use the battery disconnect switch when the charger is plugged in! I don’t wanna drive off with the extension cable attached to the car lol

”clever electrician” … I’m on this electric stuff way too long to be clever… But thank you for your Kind words!

I connected the BatteryTender extension line to my batter and ran it down the front trunk and out underneath the front of the radiator.  The line easily tucks back into the tray in the front valance.  When I want to use it, I simply pull the extension out and plug it into the other end connected to the BT device.  I never leave it plugged into the BT when the BT is not live.  Not sure what the point of doing that is since the BT is supposed to be live all the time.  I have had this BT now for 20 years and it retains a battery for like 10 years.  When the car is not driving, it is plugged into the live BT.  and yes, you must remember to unplug the car and turn the BT off before driving the car.  

And while I’m there, I should label everything!
this is the part where I made everything… No leftovers from somebody else!
I put the center console where the  driver-seat used to be and plugged it all in the connectors, key to the left electric fuel pump started running, fuel pressure gauge goes up to 7 psi,  key  back in the middle everything off,  turn the key to the right ignition on, gen light on, push the button and the engine started! Key in off position, engine off! Checked electric heater valves… Working! Clock ticking (with everything off, key out,)headlights opening and closing (Still depends of how Happy the switch is) ! Dimmer is working on the gauges! Interior light is coming on when they open the door, cigarette lighter pops out, yellow glowing after three seconds,  Powersteering is working the moment you put the ignition on! Red lights in the doors are working!
tomorrow I am going for the new blower fan switch wiring and and and…

I would say Electric is 95% done! 👍

IMG_1999IMG_2001IMG_2002

did I mention I am a  fan of the LabelMaker?😜

Attachments

Images (3)
  • IMG_2001
  • IMG_1999
  • IMG_2002
Last edited by LeMans850i

There seems to be no end With me, asking questions about the electrical stuff on the Pantera….
Pretty much replaced all switches… the last switch that is not new is the thermostat switch for the air conditioner… The switch in the car has three terminals one of them is ground on the outside metal housing and the only replacements I can find have only the two terminals without the ground… Can anybody tell me what is what and why it’s there…

I did look on the wiring diagram I have, but that thing is not very usable… Anti icing switch???? 😬

regardless… Is this a switch that would work?

Thank you so much in advanceIMG_2103

Attachments

Images (1)
  • IMG_2103
Last edited by LeMans850i

The early cars came with a switch that had only 2 connections and switched both the compressor and the condenser fan on and off together. It was determined that the condenser fan should run for some time after the compressor was turned off to prevent a pressure rise in the system that could cause hose ruptures so a switch with 2 contacts was used, one contact to cycle the compressor based on temperature in the evaporator coil and a second contact to control the condenser fan. The second contact would be closed full time whenever the AC control switch was in the on position. There was a tech service bulletin issued by Ford to retrofit this switch to earlier cars but unfortunately those switches seem to no longer be manufactured.

SO Bill provided a diagram to add a delay to the condenser fan that will do essentially the same thing. Another way to provide the same protection is to use a trianary switch to control the condenser fan based solely on head pressure.

Attachments

LeMans850, check the length of that thumbscrew holding your hinged fuse box door closed. Decades ago, one member found the hard way that if a too-long thumbscrew or too much tightness is used, the screw end barely clears the fuse box assembly. Depending on hand tightness or warping of a stock door, the slightest body flex or foot pressure from a passenger can short one of the hot fuse terminals through the door to ground! I published a warning note in the POCA Newsletter at that time.

Some cars arrive at shops with unexplained burn marks in the plastic fuse holder!  Cause is not obvious when the door is open since the thumbscrew moves with the door. The fix is to shorten the thumbscrew enough that it has only 3-4 threads engaged and very little protrudes near the fuse box. The screw is not structural so you don't need many threads or much tightness.  I made a short standoff for my stock thumbscrew, which also allows a better hold on the thumbscrew head that otherwise sinks into the carpeting a varying amount. 

@LeMans850i posted:

It’s just exhausting to trace ALL the little stupid things…  just a sampling:

the spring holding the backup light bulb touching the center lead of the socket!

wire for the brake light cut in the harness footwell/“firewall corner and then nicely taped the harness

headlight relay minor corrosion on one contact (passed 5V)

Original AND New headlight switch faulty

hazard switch incorrect connected

head light switch incorrect connected

Center console instrument lighting incorrect connected

A/c switch partial no contact

door interior lights switches not connected, no wires

turn signal stock switches corroded

and so on and on….

Now all the things you just read are the solutions to a problem or the problem itself but I get

fuse # 4 blows sometimes and right side rear lights not working and no brake lights at all and hazard when turned on stuck in on and light switch pink wire is getting warm and no horn and lights only open

all that in one go….!!! And I ask myself: where is the problem… and that is where I went wrong 😑 the question I should have asked myself should have been - how many problems are there‼️

That’s a lot of neglect and / or neanderthal electricians at work for a long time on one car!  I’m having lunch with my multimeter and a 10 foot wire..

IMG_1712


all the wiring I did for my additional stuff is not hooked up … just run the wires but not connected to power:

Powersteering, electric fuel pump, second headlights, Fuel pressure gauge, ignition switch, starter switch, interior fan, heater hose valve,voltmeter , clock… all that will get there own fuse / relay panel!

when I’m done with this car I know pretty much every nut, bolt , bushing , cable, wire, bulb, connector, hose, tube, hydraulic cylinder, bearing, ball joint, spacer and so on by their first name!! I touched them all!🖕

This was me 9 month ago…

…read the last paragraph…

YES… I know them all by their first name and what they like for breakfast…

what a crazy Journey it is….

Big WOW

AND thank you to everyone here and at PIM.
From my little model sitting in the grass at the SoCal Pantera meeting

IMG_2234

to this and everything working …

imagejpeg_0

but we all know… there is always something to do and I guess I go back to work….

Attachments

Images (2)
  • IMG_2234
  • imagejpeg_0
Last edited by LeMans850i

Add Reply

Post
×
×
×
×
Link copied to your clipboard.
×