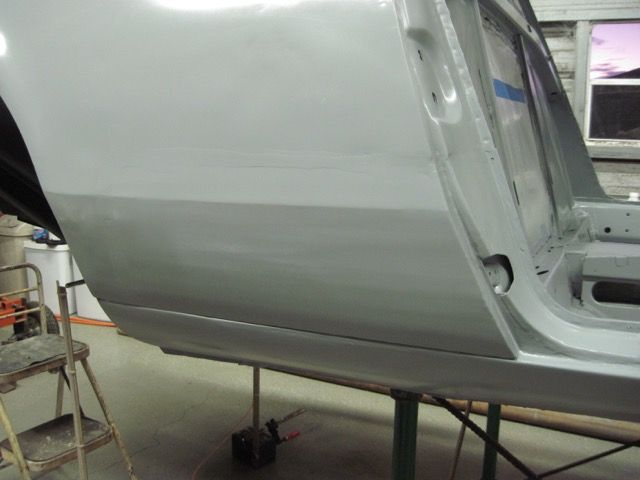
What a lengthy process. Keep up the great work. Cant wait to see it completed
Neither can I.
quote:Originally posted by UFO-LOW:
Neither can I.
Totally understand! You've gone way further down that rabbit hole than I have so far... but the time will eventually come for me to get that deep in. I just want to get mine on the road so I can enjoy for a bit first.
Stunning work though I must say. Truly envious of your skills.
So I kind of got ahead of myself again with the door hinge mod; it was just such a helpful trick for me I thought I should get it out there for others to use. I skipped over the parts that led me to that point. How does that song go … “one thing leads to another”.
Working my way back to front on the right side, I’m going to work next on the rear quarter. The area between the rear wheel arch and the door opening has some bondo there, and the B-pillar and outer rocker panel have rust problems. Hopefully not as bad as on the other side.
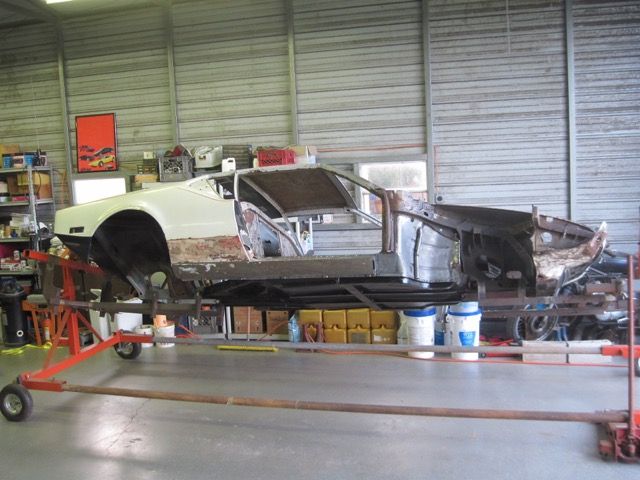
I got some help here - my nephew, daughter, and wife pitched in. They like to destroy stuff:
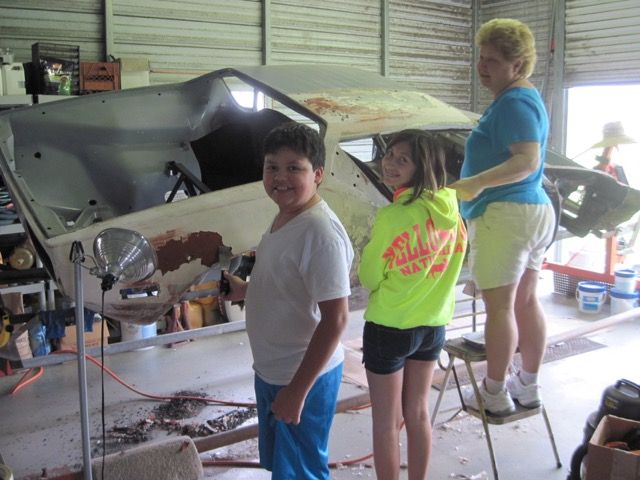
The bondo is thicker here than I anticipated. Once it is off, I can see why:
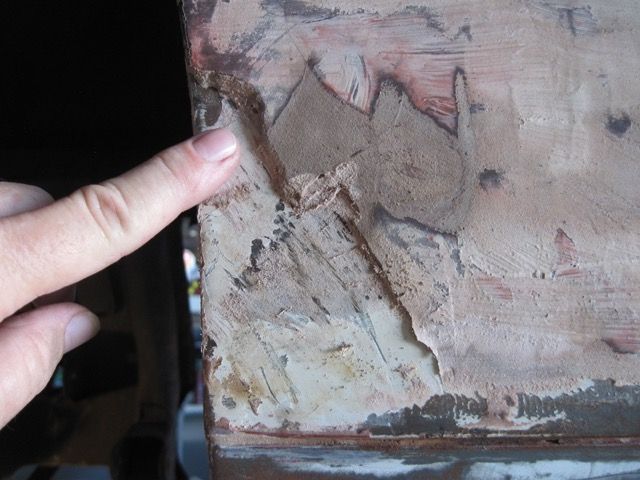
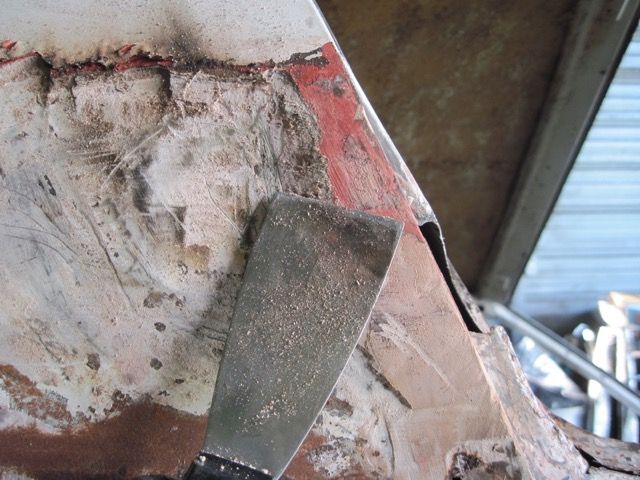
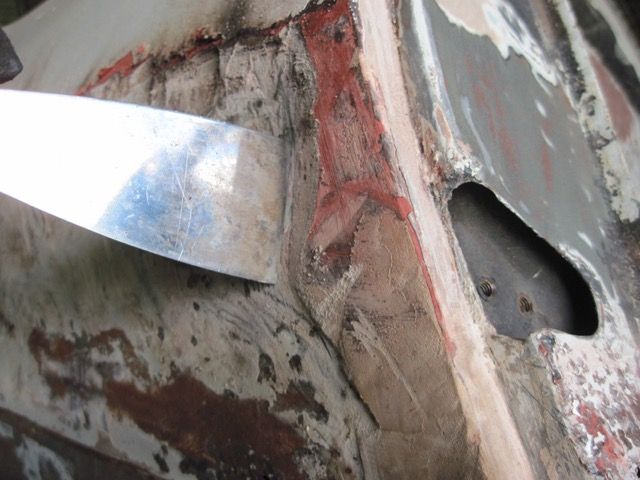
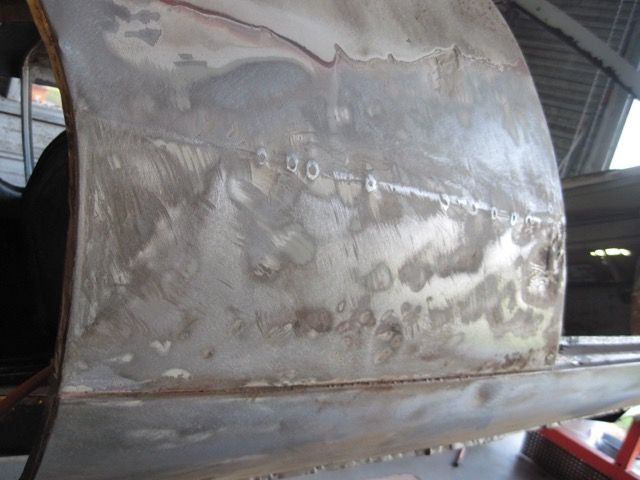
This part of the panel is pretty beat up as you can see. It has some rust through down low where it meets the outer rocker too. Tape guides my cuts to remove it.
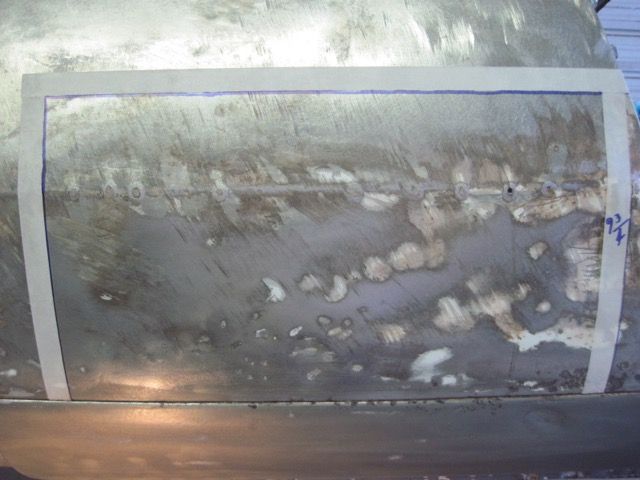
Due to the curvature of the panel, I can’t get my spot weld cutter inside, and I could not see all of the welds anyway. Here I’ve used my panel nibbler to cut across the bottom of the panel.
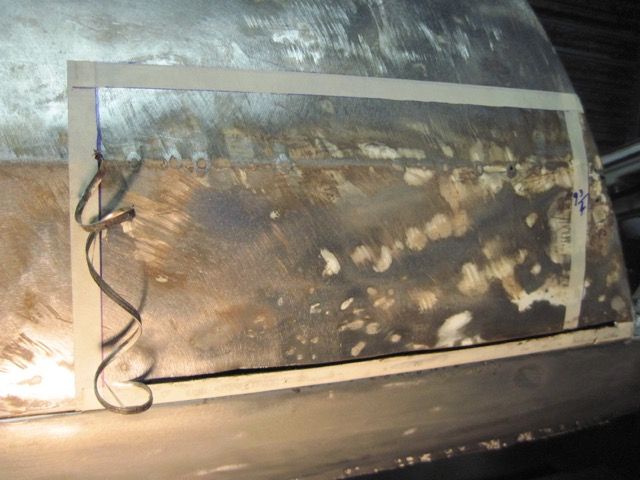
I also have one of Johnny Wood’s B-pillar cosmetic repair panels, so I decided to take these two off together. No need wasting time separating them.
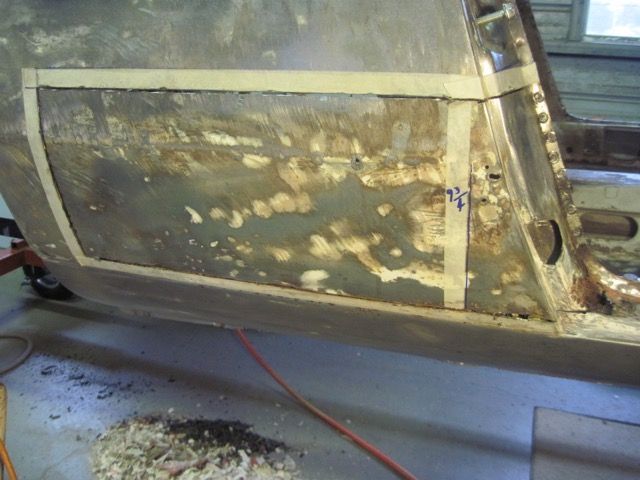
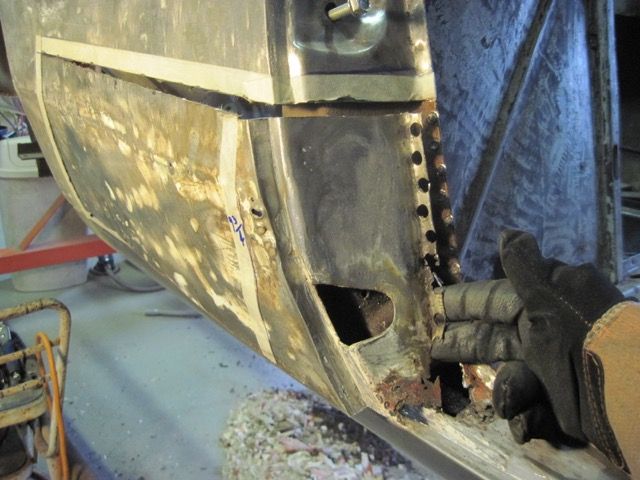
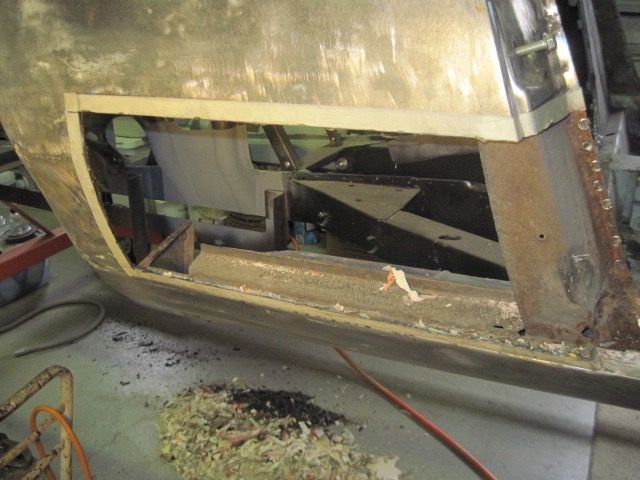
With that out of the way, more rust is exposed:
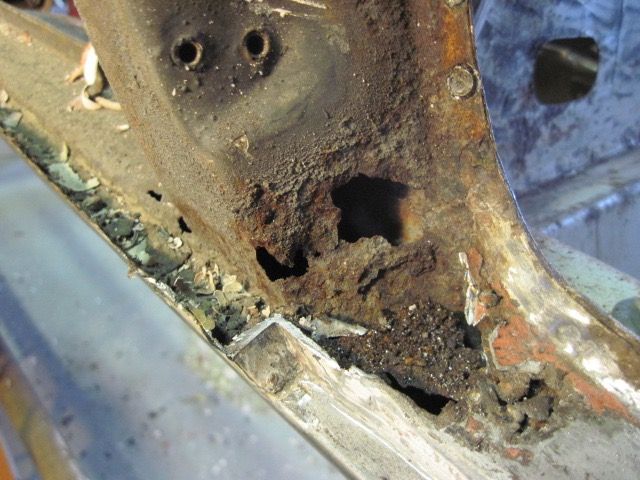
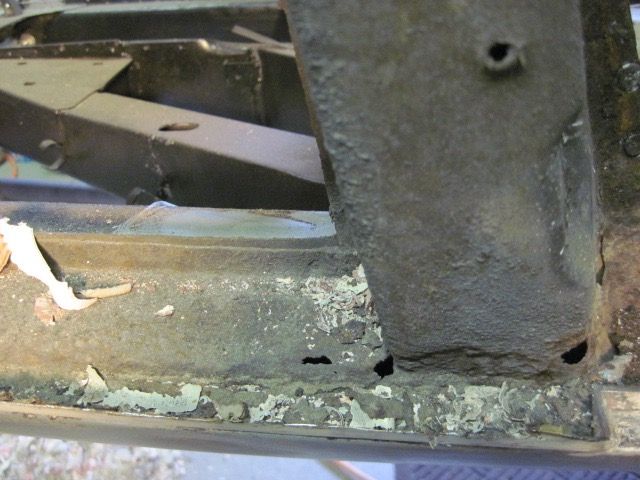
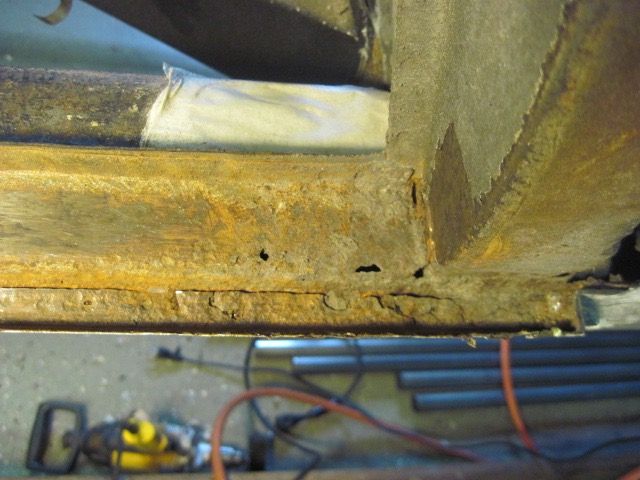
Here I have brushed off the worst of the crud, and can see the flange area. You can see these were not spot welded, but were tacked every 2 to 3 inches:
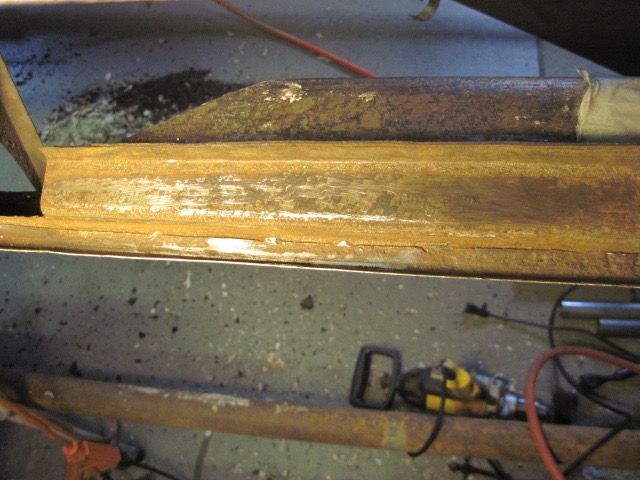
Now it is easy to remove, and reveals more rust between the flange and the outer rocker:
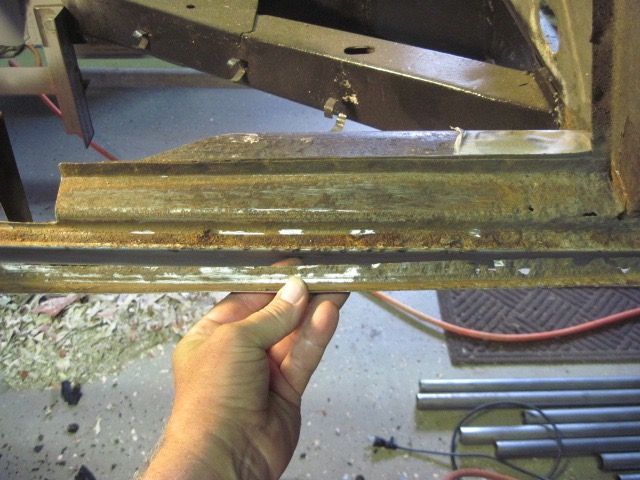
This section of the outer rocker has to be removed to get at the bottom of the B-pillar:
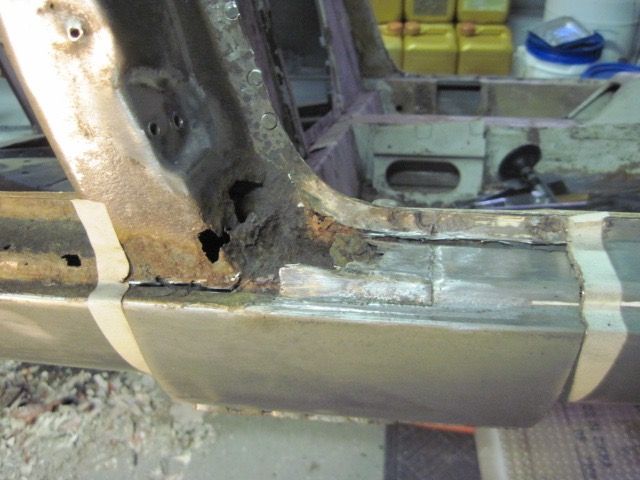
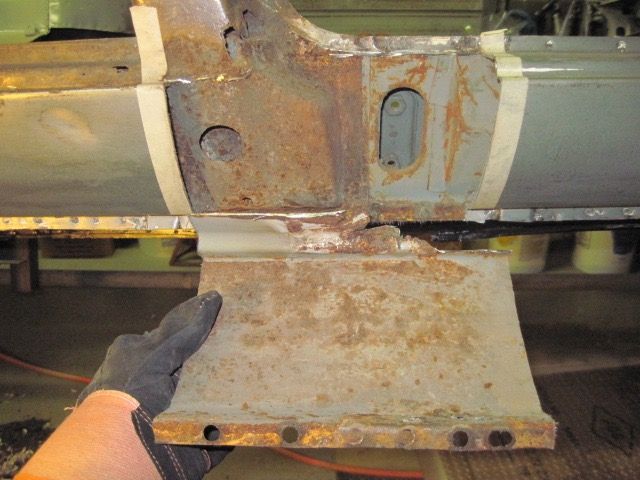
Not quite as bad as the driver’s side, but still bad:
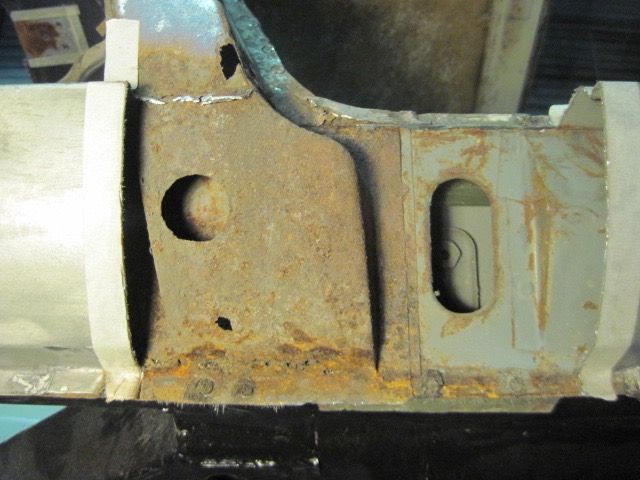
Parts of the outer rocker that were behind the quarter panel here have to be replaced, due to rust:
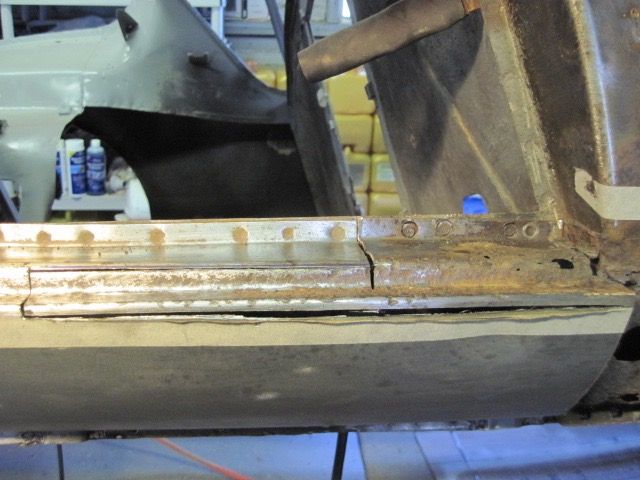
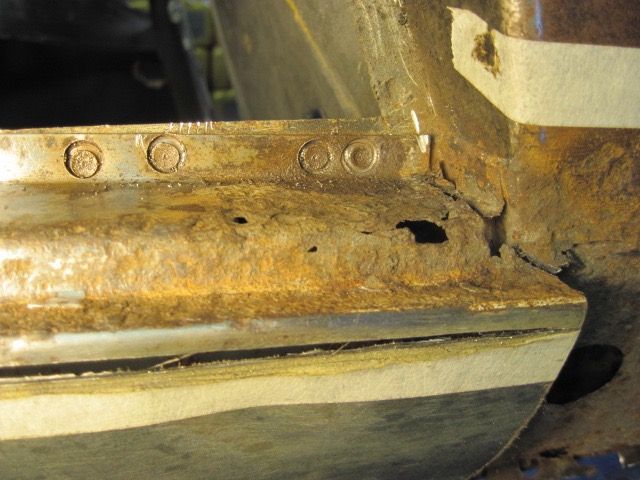
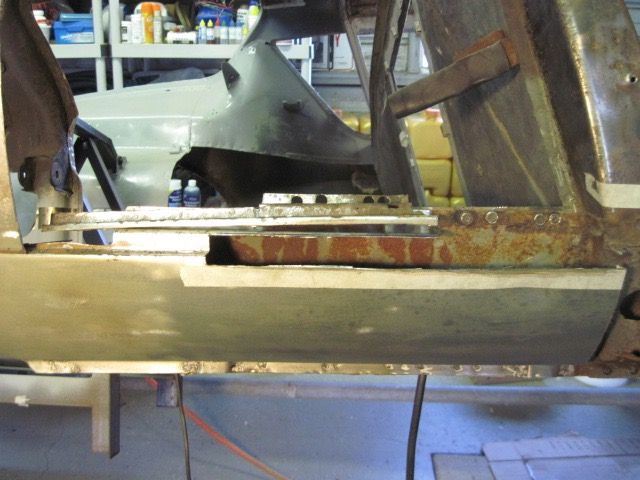
Now to cut away the rusted bottom portion of the B-pillar:
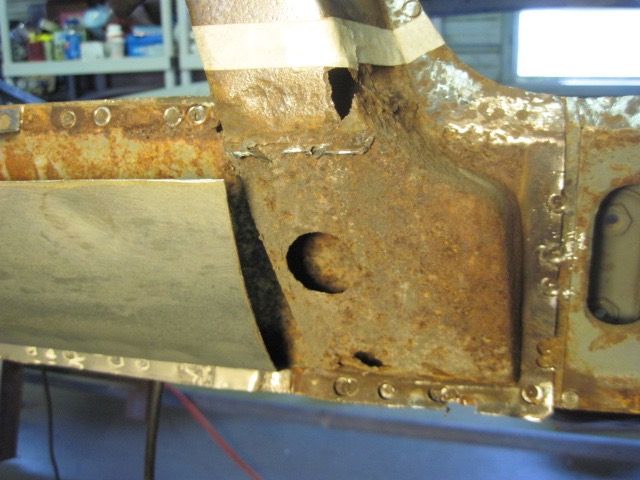
Behind it, part of the mid rocker is rusted too much to weld on, and has to be cut away also:
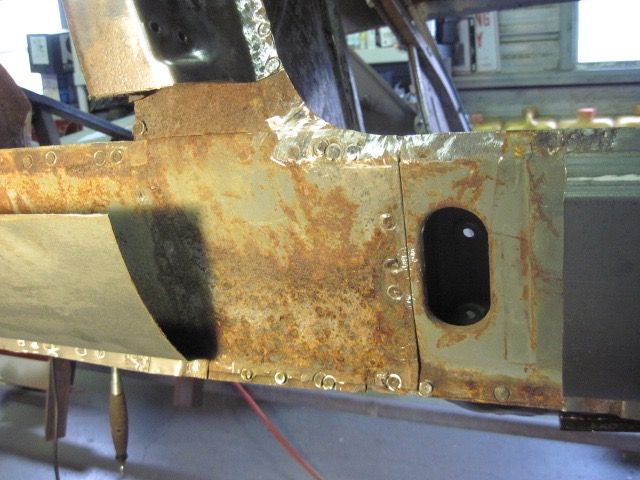
Here you can see that rust has even perforated the inner rocker, near the seat belt reel reinforcement. This will be easier to fix from inside the cockpit:
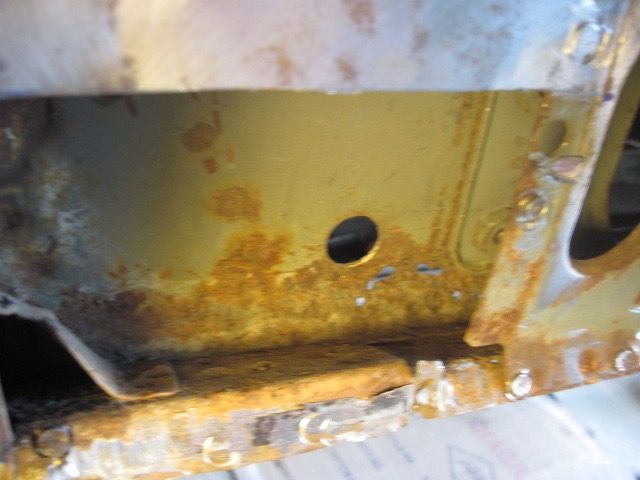
Grinding off the surface rust and spot weld nubs, I am almost done cutting out the bits that can’t be saved.
Next episode, I’ll start shaping new metal and welding it back up. Stay tuned!
Working my way back to front on the right side, I’m going to work next on the rear quarter. The area between the rear wheel arch and the door opening has some bondo there, and the B-pillar and outer rocker panel have rust problems. Hopefully not as bad as on the other side.

I got some help here - my nephew, daughter, and wife pitched in. They like to destroy stuff:

The bondo is thicker here than I anticipated. Once it is off, I can see why:


This part of the panel is pretty beat up as you can see. It has some rust through down low where it meets the outer rocker too. Tape guides my cuts to remove it.

Due to the curvature of the panel, I can’t get my spot weld cutter inside, and I could not see all of the welds anyway. Here I’ve used my panel nibbler to cut across the bottom of the panel.

I also have one of Johnny Wood’s B-pillar cosmetic repair panels, so I decided to take these two off together. No need wasting time separating them.


With that out of the way, more rust is exposed:


Here I have brushed off the worst of the crud, and can see the flange area. You can see these were not spot welded, but were tacked every 2 to 3 inches:

Now it is easy to remove, and reveals more rust between the flange and the outer rocker:

This section of the outer rocker has to be removed to get at the bottom of the B-pillar:


Not quite as bad as the driver’s side, but still bad:

Parts of the outer rocker that were behind the quarter panel here have to be replaced, due to rust:


Now to cut away the rusted bottom portion of the B-pillar:

Behind it, part of the mid rocker is rusted too much to weld on, and has to be cut away also:

Here you can see that rust has even perforated the inner rocker, near the seat belt reel reinforcement. This will be easier to fix from inside the cockpit:

Grinding off the surface rust and spot weld nubs, I am almost done cutting out the bits that can’t be saved.

Next episode, I’ll start shaping new metal and welding it back up. Stay tuned!
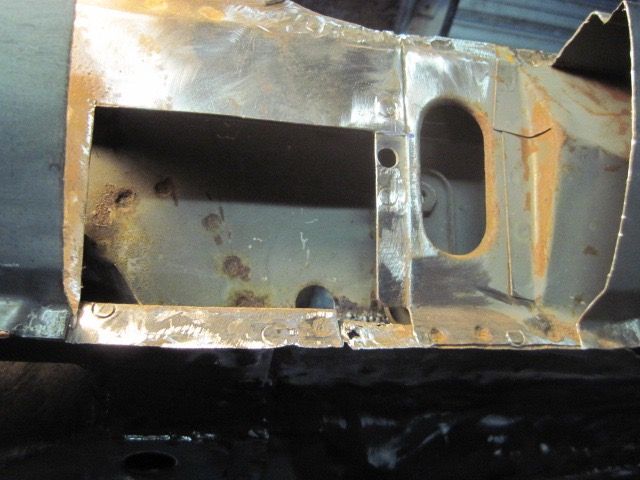
Back to work. There are a couple of spots that need patches, more to give me a new surface to weld on than anything else:
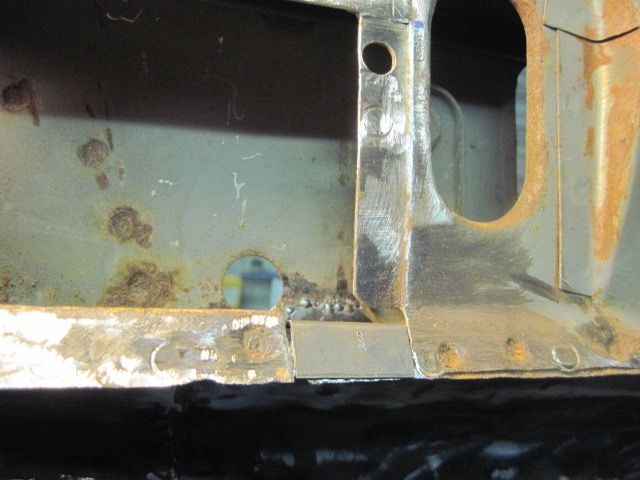
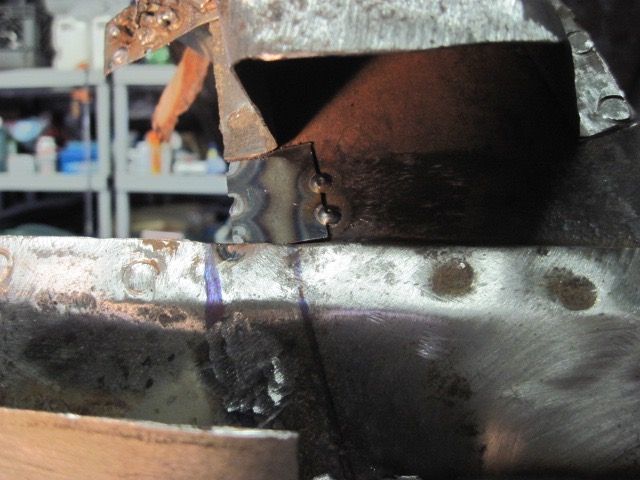
Here I have replaced the rusty part of the mid rocker. I have to grind the welds smooth where the replacement piece flanges will be, and more welding will be done. The marker lines help guide me:
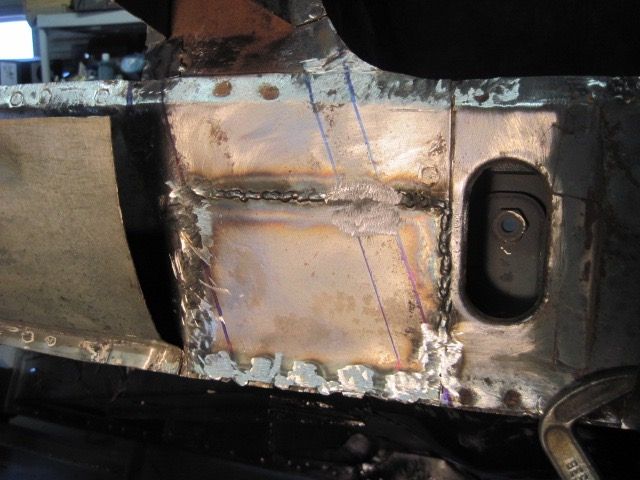
Next I’ll use the heavy aluminum foil to model the repair piece:
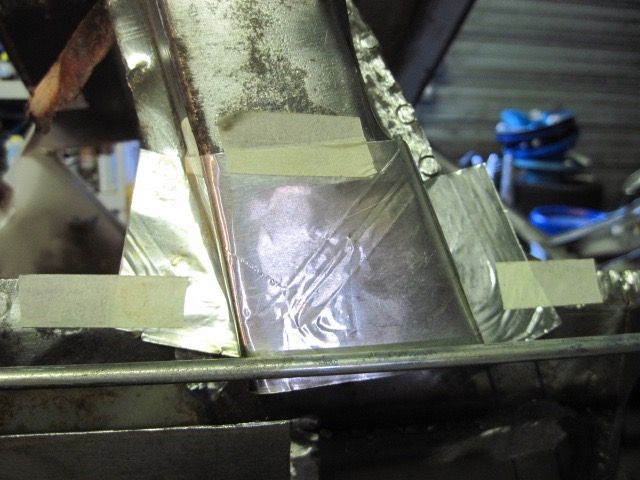
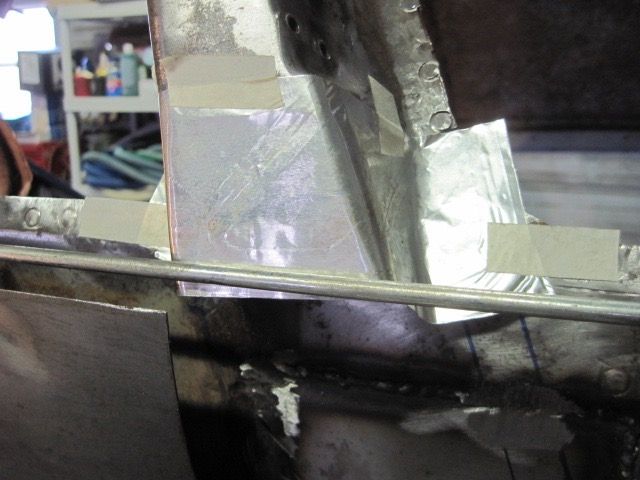
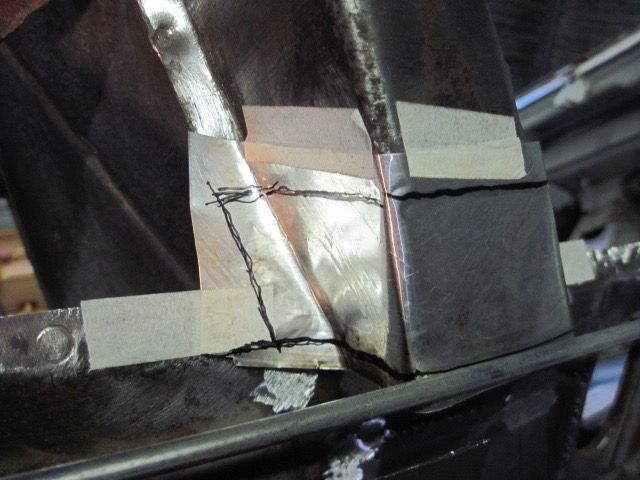
This is what it looks like laid out flat. I use this to cut the steel and get the bends right:
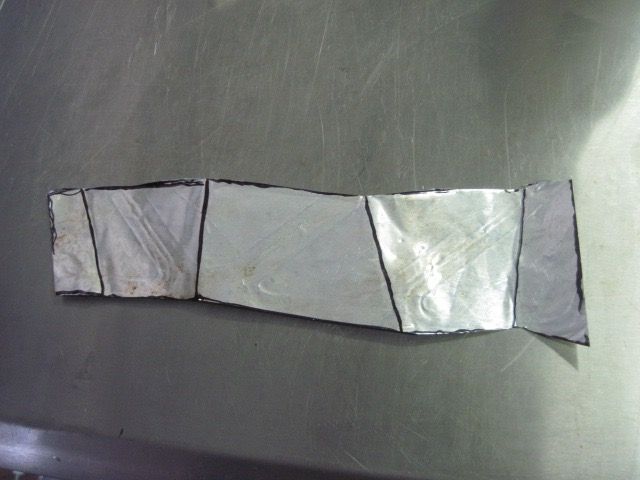
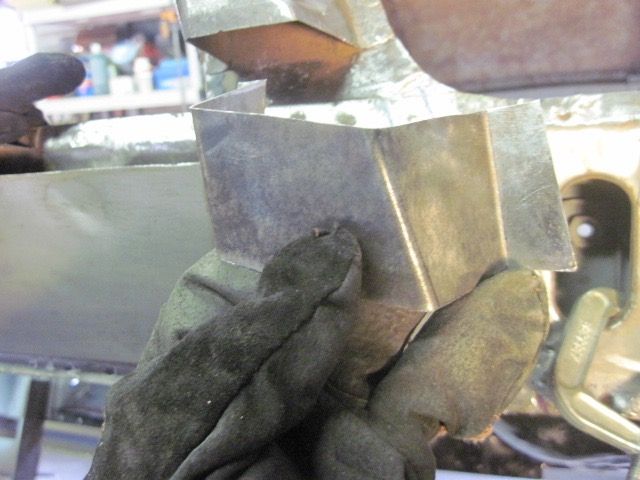
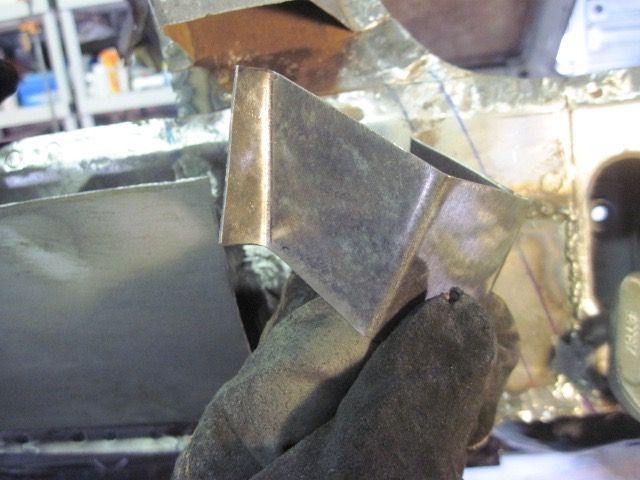
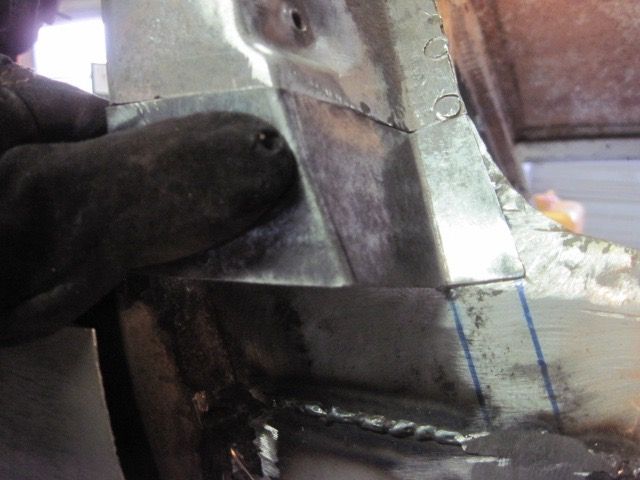
Now in steel, being fitted and trimmed:
OOPS. I tried to weld up a rough spot, and blew a hole in it:
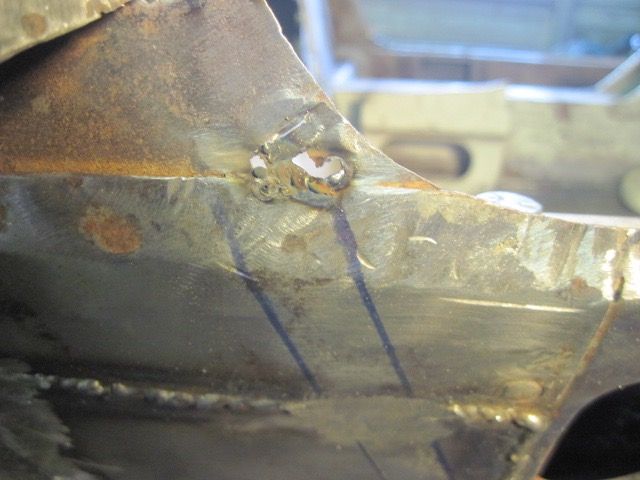
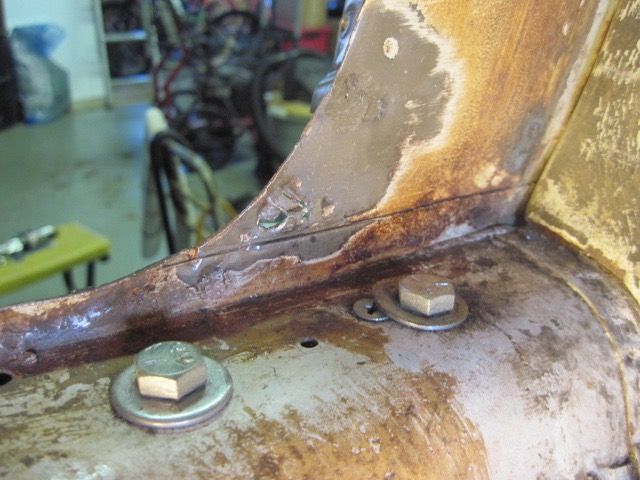
This was just too weak to just weld up, so I made a patch:
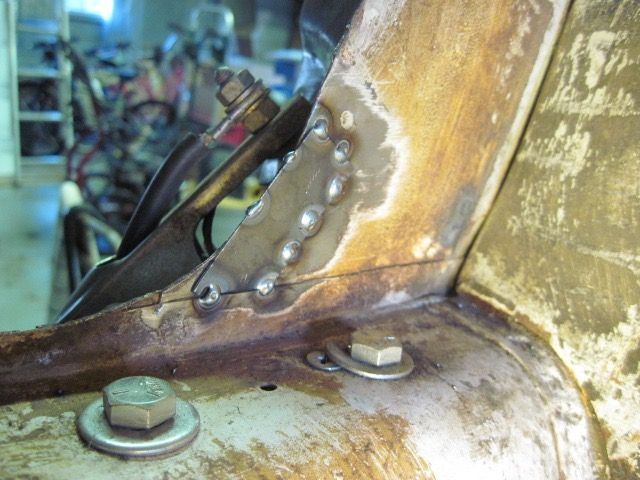
Clamping and welding the repair piece in place:
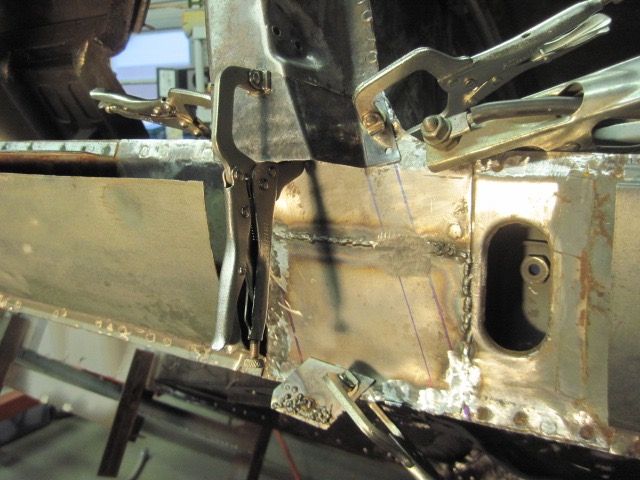
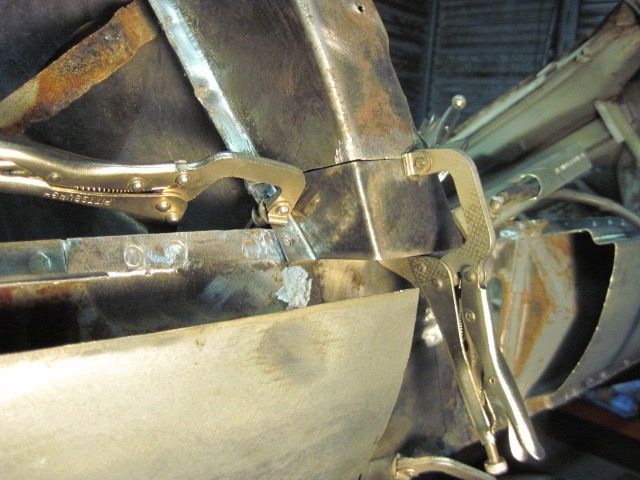
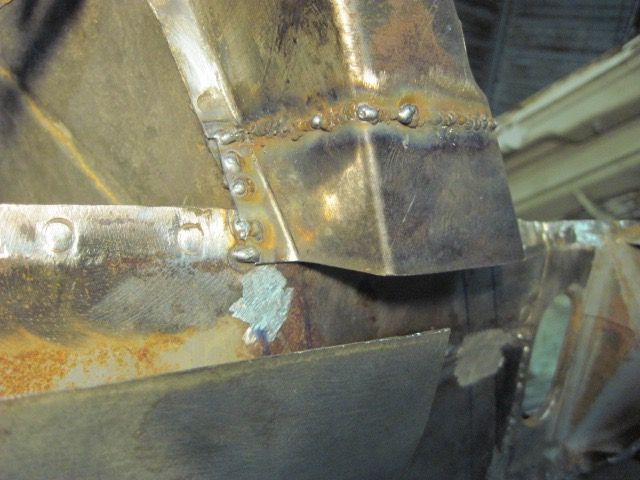
Now for the bottom section of the B-pillar repair. Starting with cardboard and tape:
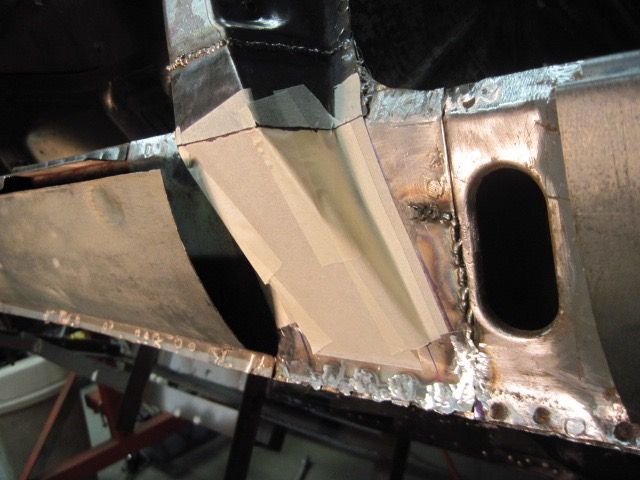
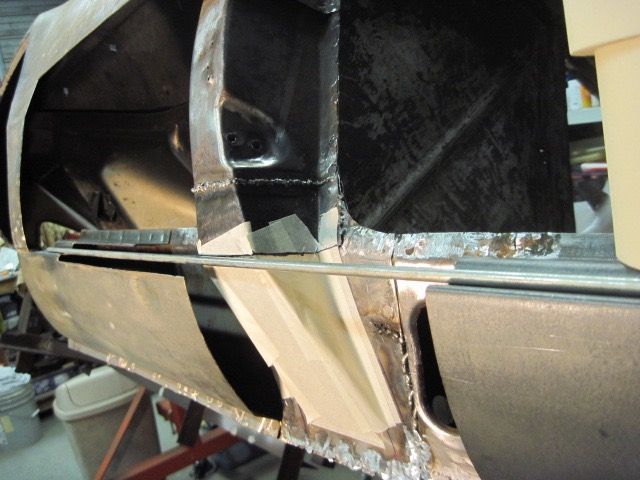
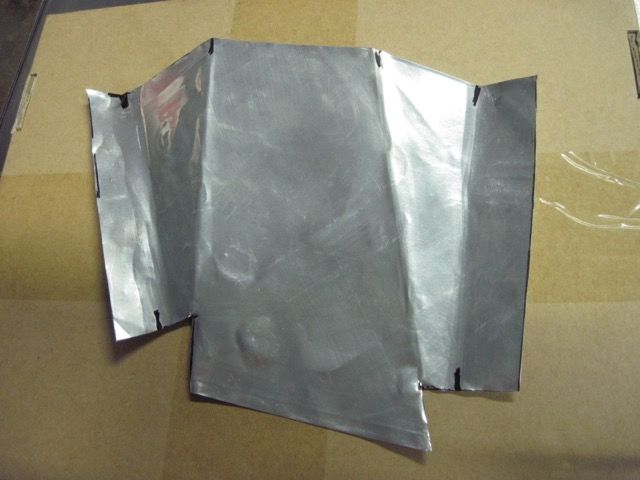
Next model in thick aluminum foil:
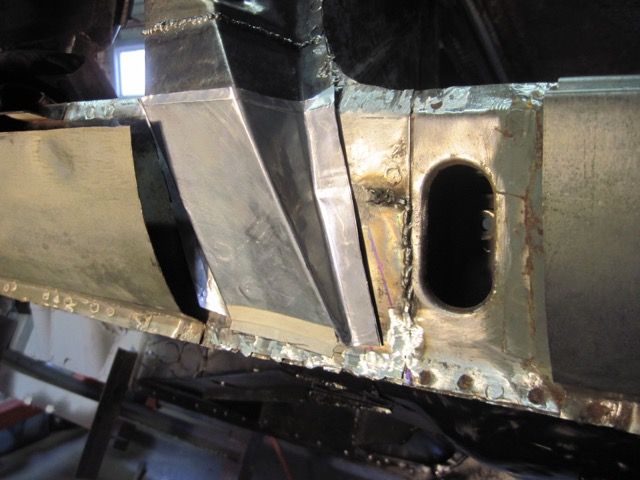
This piece is more complex than it first appears:
The steel piece is ready to be welded in place:
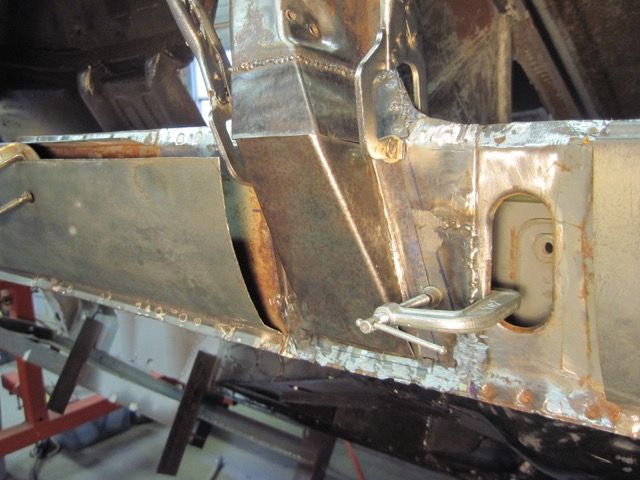
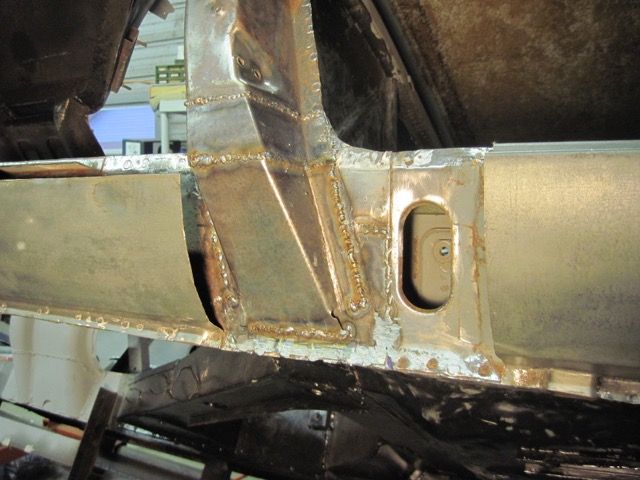
Doing the mock ups in light material seems like a lot of extra work, but it actually saves time and frustration.
Next I will do the upper part of the outer rocker here, where it was rust damaged:
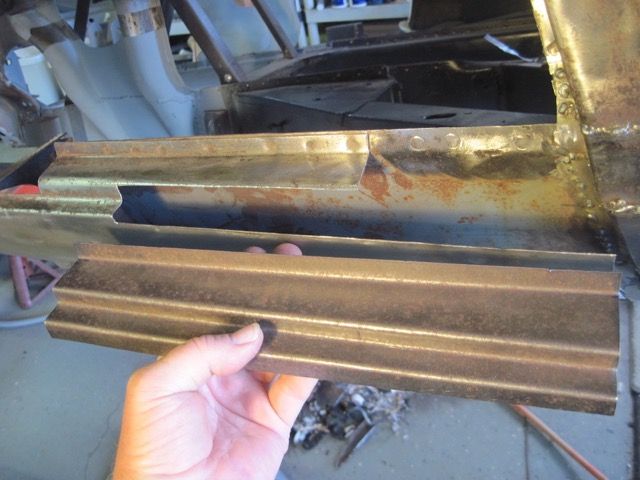
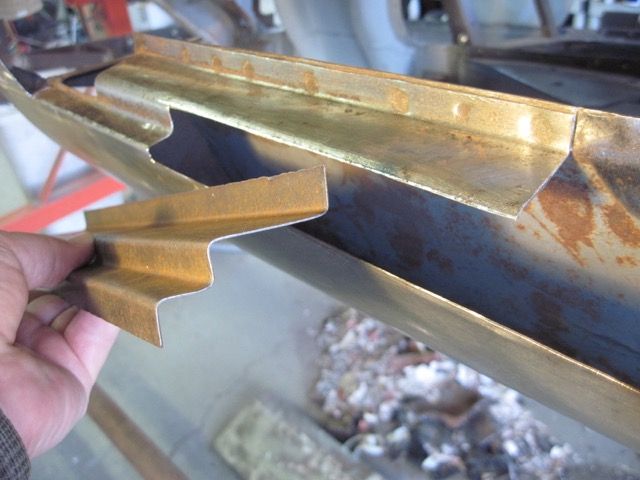
I did not get a photo of this, but I copied the original piece using masking tape, marking the bends with a marker. It is wider at the right than the left, so kind of a tricky piece to make. Took me a couple of tries.
I also decided to cut away more of the original material, even if it was good enough to use. It just made the repair piece more simple. Here fitting and trimming:
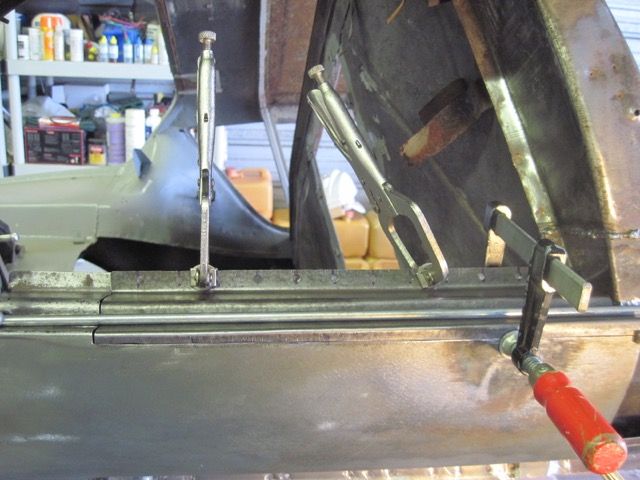
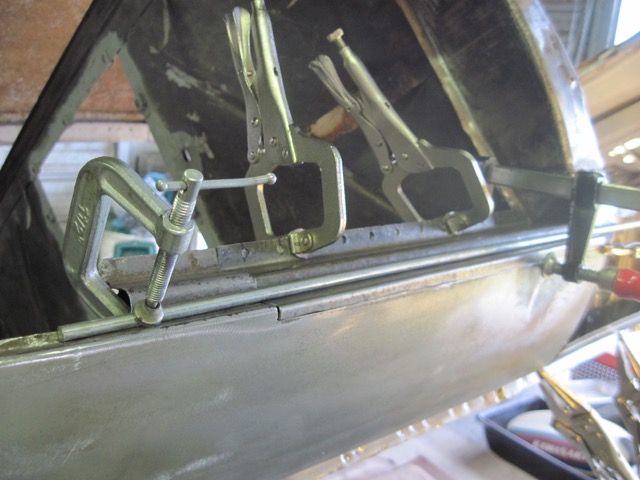
Welding on a backer strip:
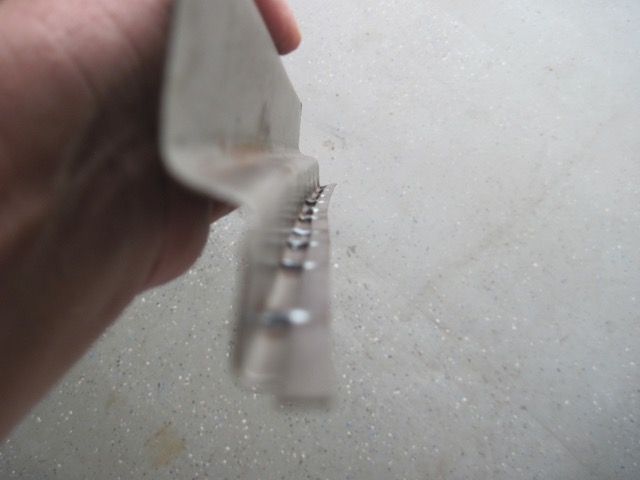
And finally welding the repair in place:
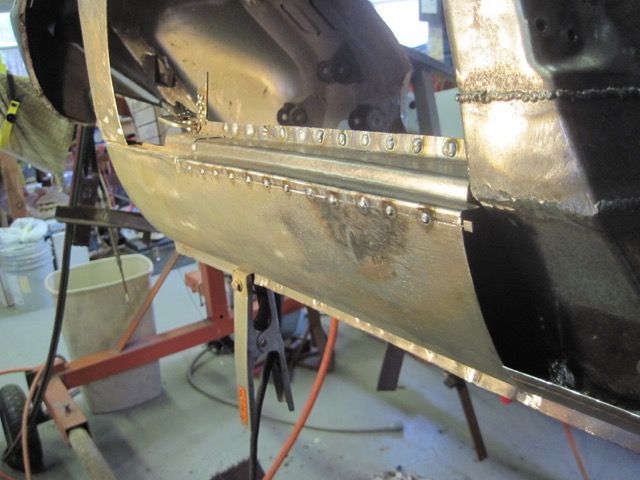
Next step is to clean up the inside and spray some zinc laden primer in there. I take care to mask off any part where I need to weld later on - zinc and welding do not mix.
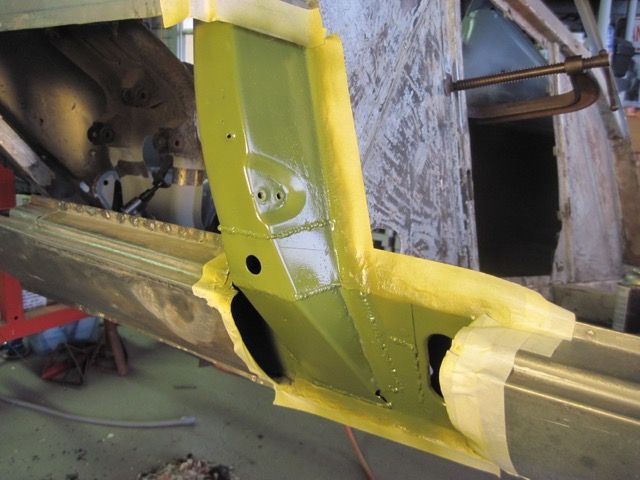
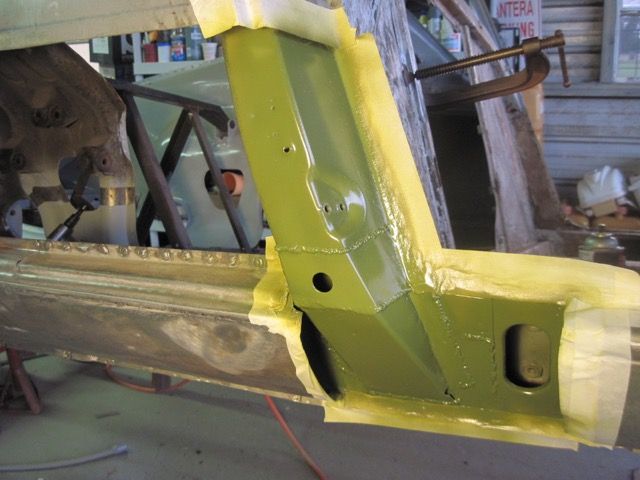
Next episode; finishing the outer rocker repairs and starting to fit up the Johnny Woods repair panel. Stay tuned.


Here I have replaced the rusty part of the mid rocker. I have to grind the welds smooth where the replacement piece flanges will be, and more welding will be done. The marker lines help guide me:

Next I’ll use the heavy aluminum foil to model the repair piece:


This is what it looks like laid out flat. I use this to cut the steel and get the bends right:

Now in steel, being fitted and trimmed:


OOPS. I tried to weld up a rough spot, and blew a hole in it:


This was just too weak to just weld up, so I made a patch:

Clamping and welding the repair piece in place:


Now for the bottom section of the B-pillar repair. Starting with cardboard and tape:


Next model in thick aluminum foil:

This piece is more complex than it first appears:

The steel piece is ready to be welded in place:


Doing the mock ups in light material seems like a lot of extra work, but it actually saves time and frustration.
Next I will do the upper part of the outer rocker here, where it was rust damaged:


I did not get a photo of this, but I copied the original piece using masking tape, marking the bends with a marker. It is wider at the right than the left, so kind of a tricky piece to make. Took me a couple of tries.
I also decided to cut away more of the original material, even if it was good enough to use. It just made the repair piece more simple. Here fitting and trimming:


Welding on a backer strip:

And finally welding the repair in place:

Next step is to clean up the inside and spray some zinc laden primer in there. I take care to mask off any part where I need to weld later on - zinc and welding do not mix.


Next episode; finishing the outer rocker repairs and starting to fit up the Johnny Woods repair panel. Stay tuned.
Really impressive work Rodney.
Everytime I open a new episode of this thread, I want to get a welder, and learn how to do what you do.
Great stuff. Thanks for taking the time to post.
Rocky
Everytime I open a new episode of this thread, I want to get a welder, and learn how to do what you do.
Great stuff. Thanks for taking the time to post.
Rocky
Rod, since the shell is stripped and you've done so much rust repair already, have you considered seam-welding ALL the spot-welded inner body panels? Reportedly, it radically stiffens up the whole chassis to the point that paint cracking simply does not happen any more, and may make proprietary frame stiffeners obsolete.
Yes, I am considering it. You did an article or a post on the subject, as I remember. I am just now getting to the point of checking & straightening my chassis. I built a fixed stand, and took the chassis off of the rotisserie today, in fact. I'm also going to do a 6 point cage.
For what it's worth, if you haven't closed up the rockers yet, you may want to open up the B post bottoms you repaired. Part of the internal rust problem in the post is the dust that collects in the bottom from the openings in the structure running from the back of the car. Once it's finds it's way to the post, it lays there holding moister rotting out the post bottom. This happened quickly when the post is raw but the dust will still lay there.
This was a very clean car and I still got a bag full of dust and crap from the holes drilled into the post bottoms.
This was a very clean car and I still got a bag full of dust and crap from the holes drilled into the post bottoms.
Attachments
Yuuuukkkkkk! Yes, I did add some holes and gaps so that moisture and trash would not get trapped. My photos just don't show them well. You are right though. I found the worst rust where dust, sand, and leaves get trapped and hold moisture.
This is just a patch piece where rust and drilling out spot welds left me little to work with:
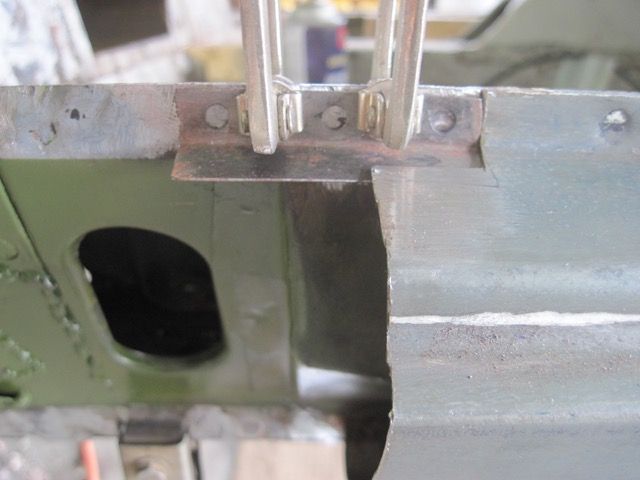
Here I have decided to save as much of the original outer rocker section as I can. It looks simple to make, but it is not. The bend radii, distances, and curvature have to be just right or it will not fit.
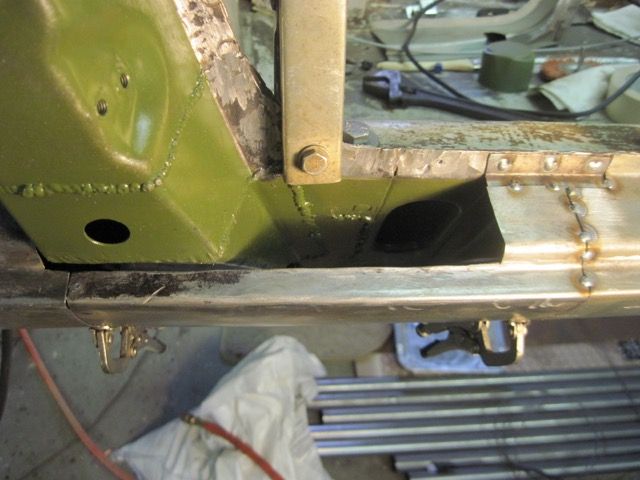
Only the bottom part was rusted out; repairing this segment is much easier than re-making the whole panel section:
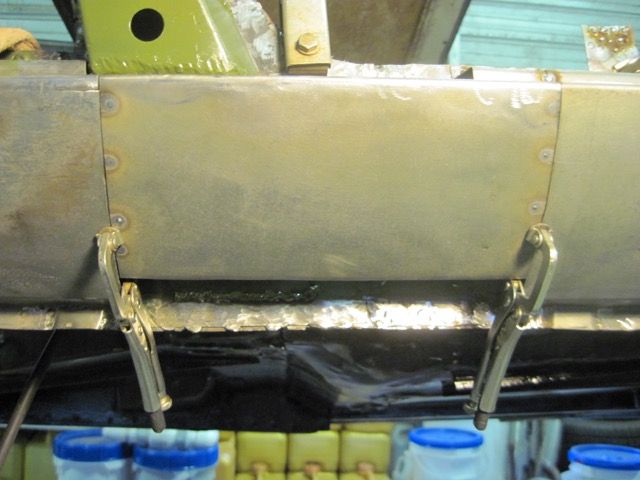
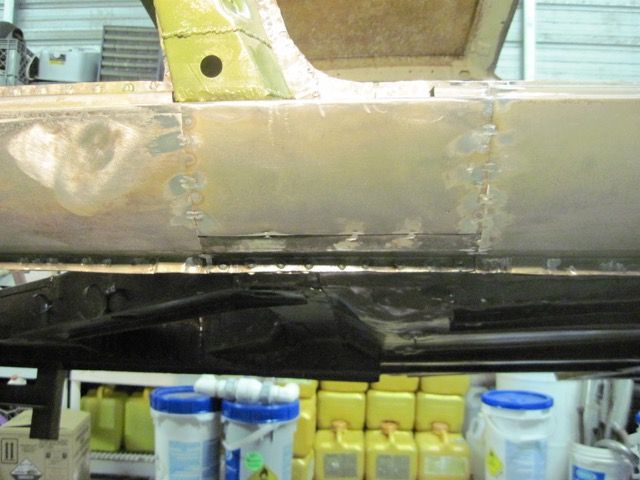
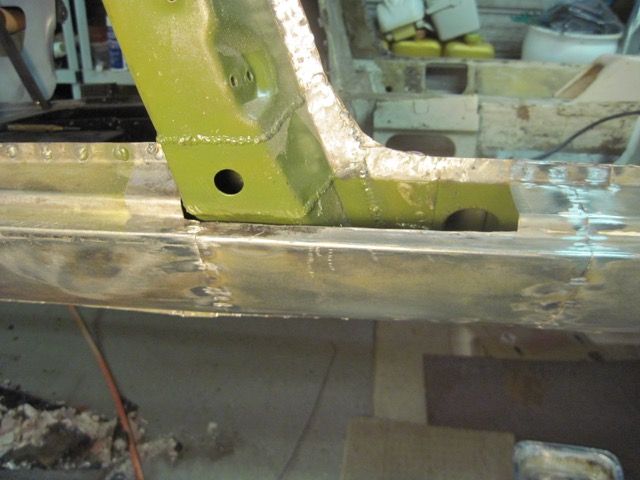
Now I am starting to rough in this larger repair panel:
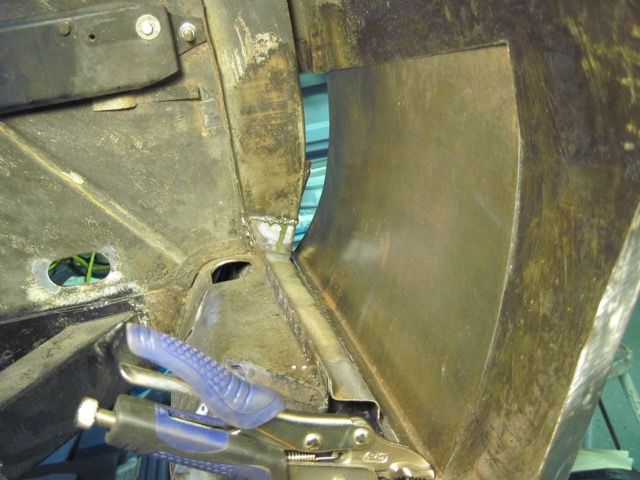
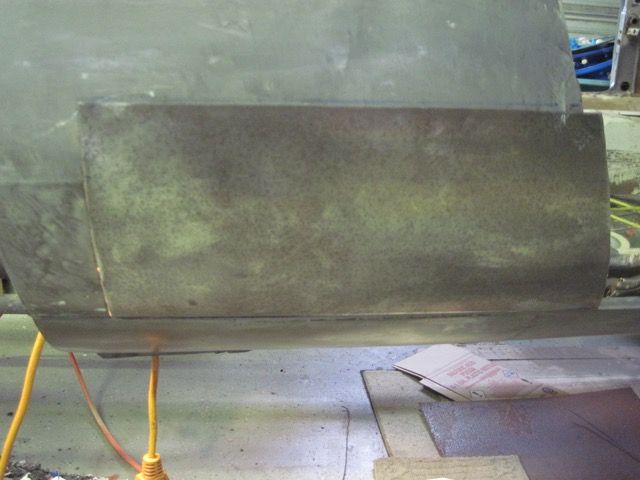
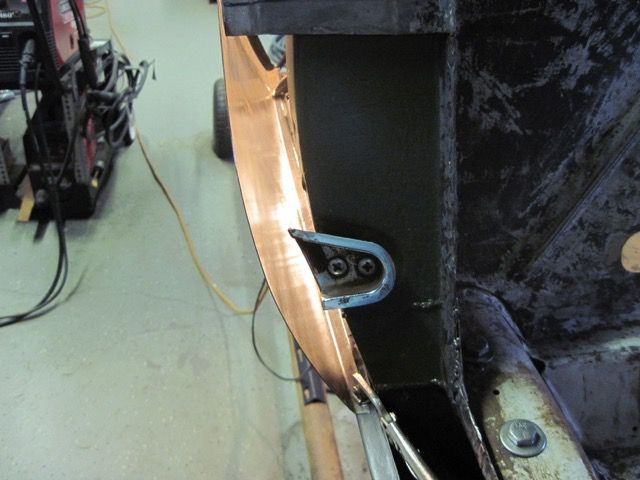
Here I am making the flange on this repair panel where it mates up with JW’s piece:
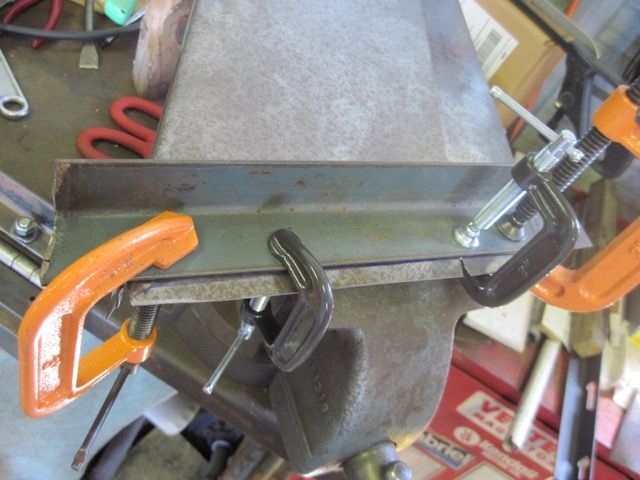
Starting to take some measurements. This sits out too far:
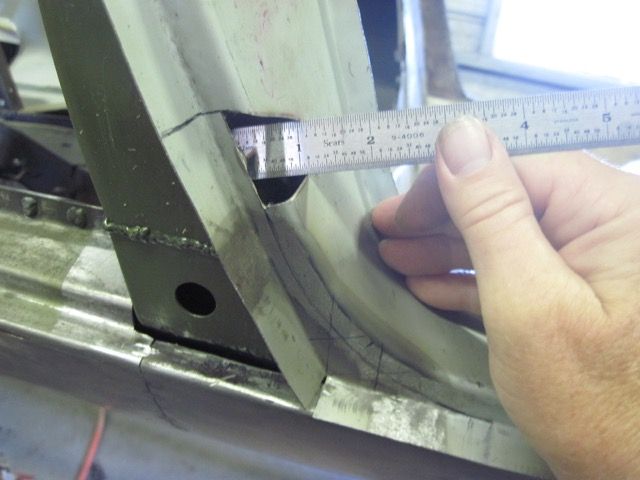
This curve needs to be sharper, to make this panel sit back farther:
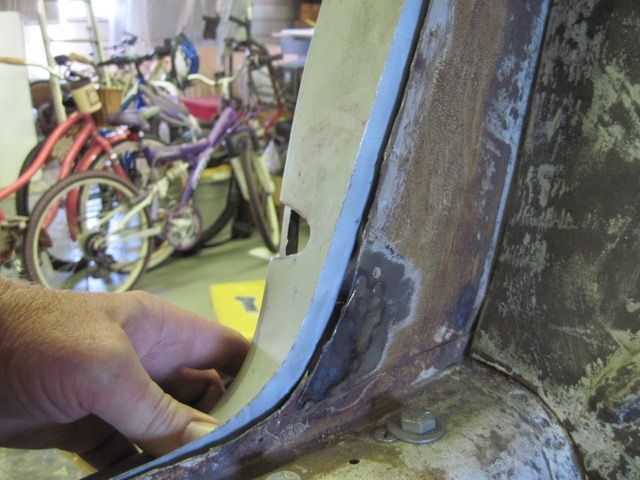
Not so easy to do. I hate to cut into Johnny’s fine panel, but I have no choice:
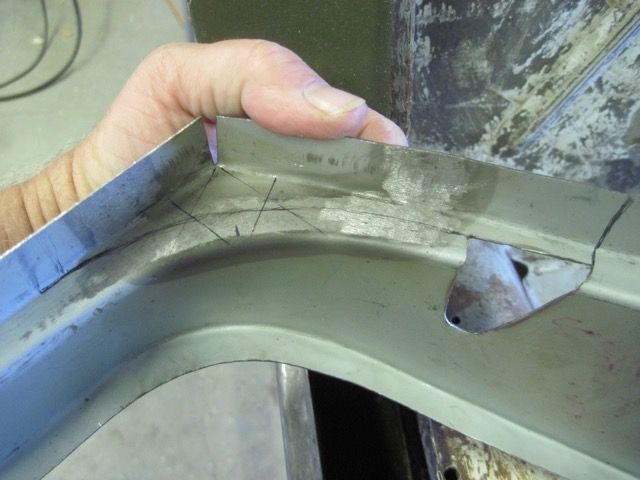
With that lower corner segment removed, I can use the shrinker & stretcher on the flanges that remain, and massage this piece to fit my car:
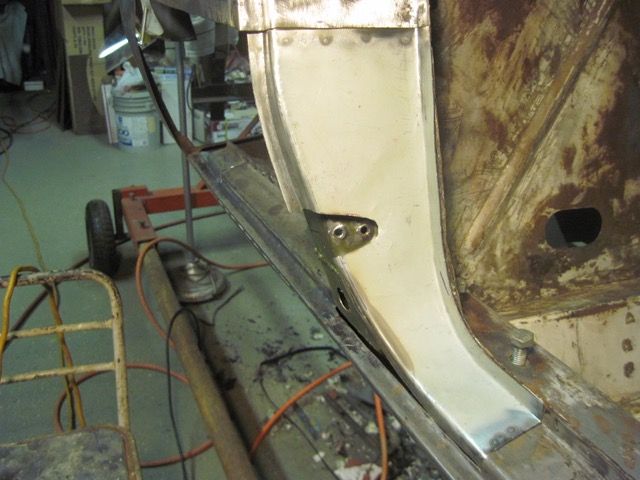
I used the old door to check the alignment of the guide:
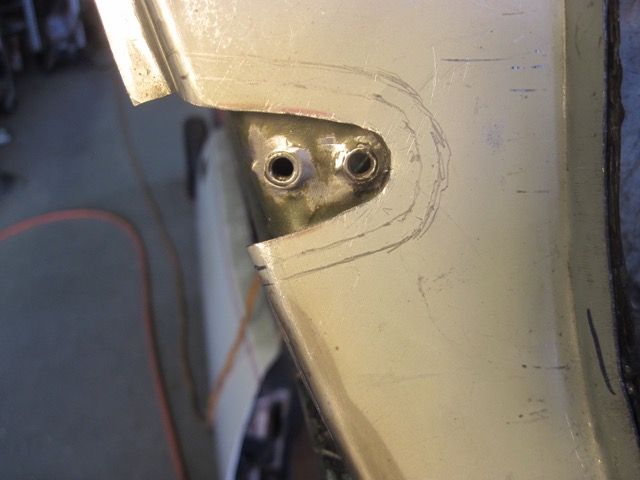
Sketching the cut out for the guide:
Getting there:
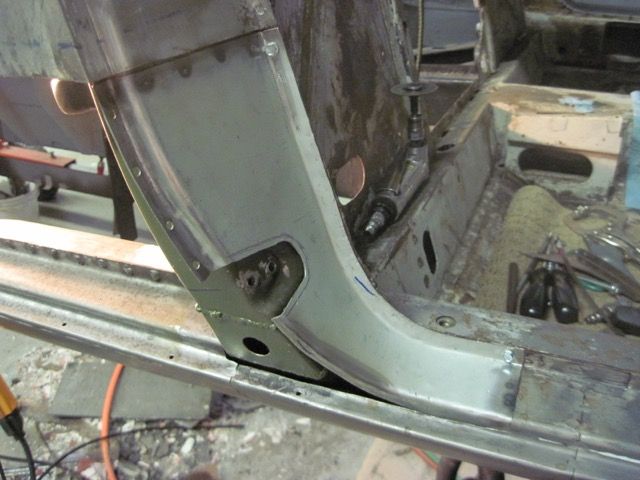
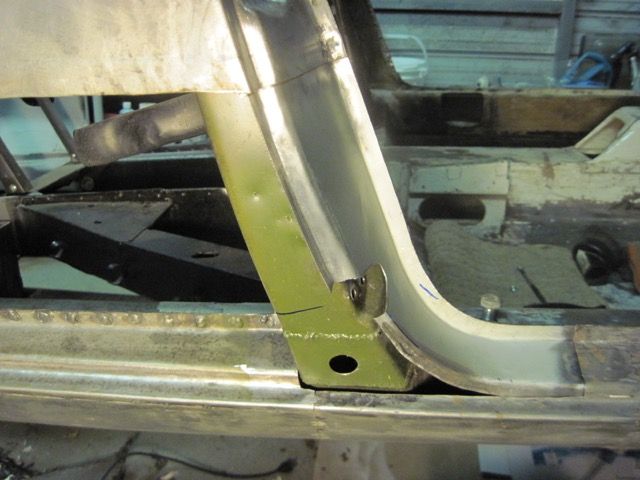
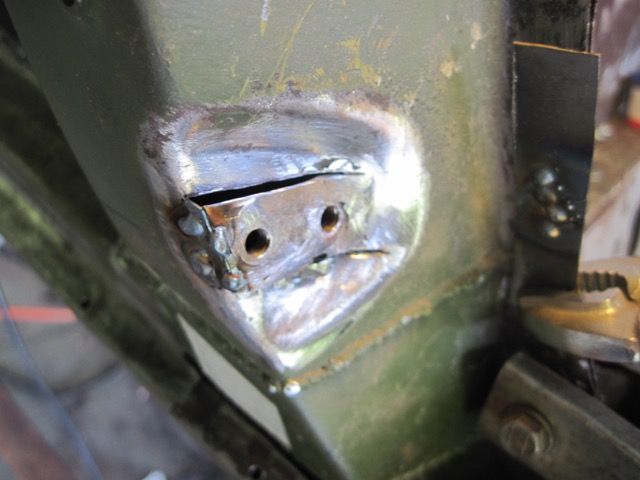
The mounts for the guide had to be pulled forward and angled up a bit. This was a pain in the butt to do. This pic only shows it partly done, I finished it up better than this.
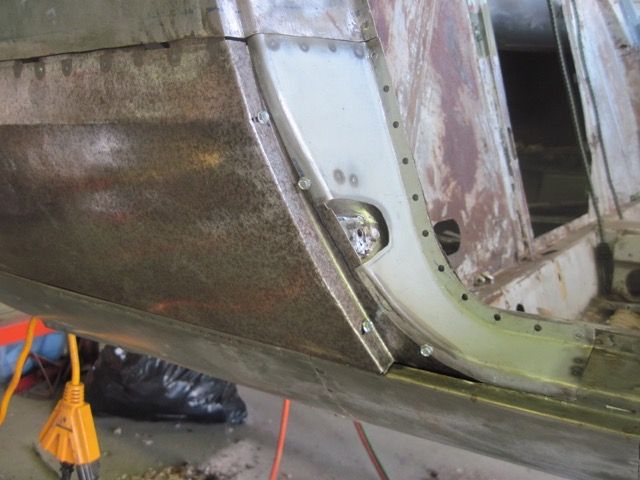
Now I’m finally fitting up both panels:
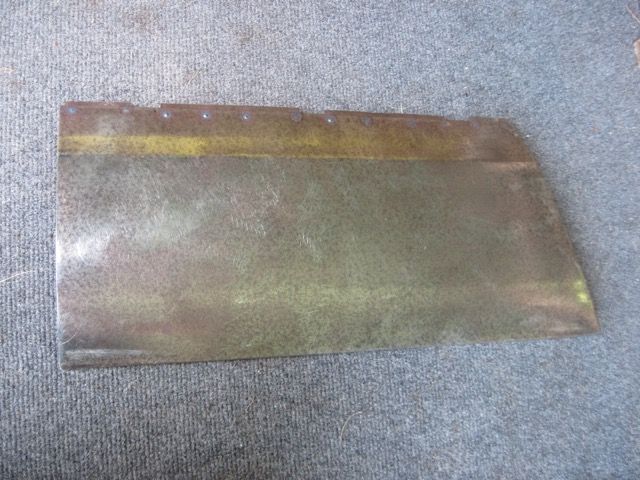
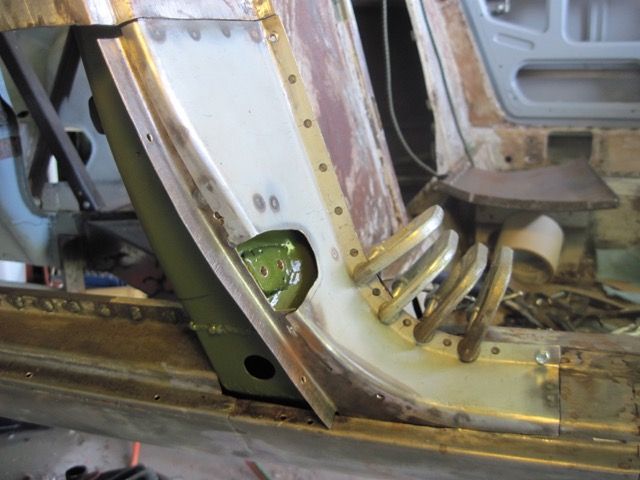
I’m welding on some backer strips. The gaps are there to allow for some panel clamps to hold the panel on flush while I weld it back on the car:
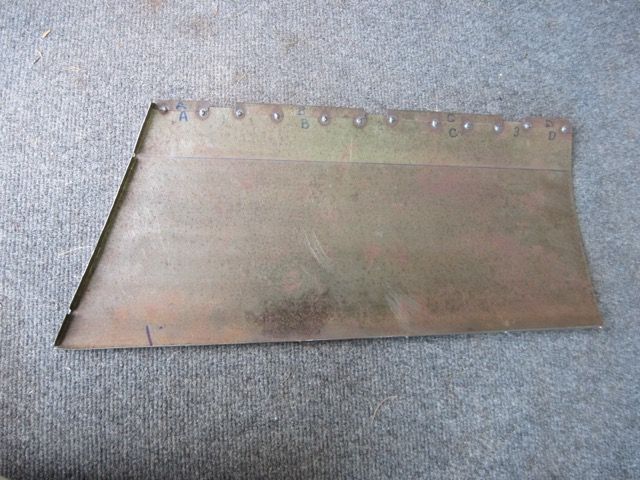
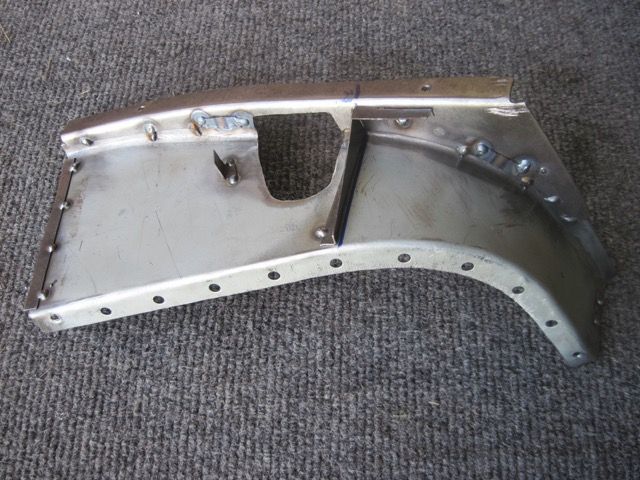
The set back of JW’s panel flange was just a bit too deep, so I cut the whole thing off and made a new one:
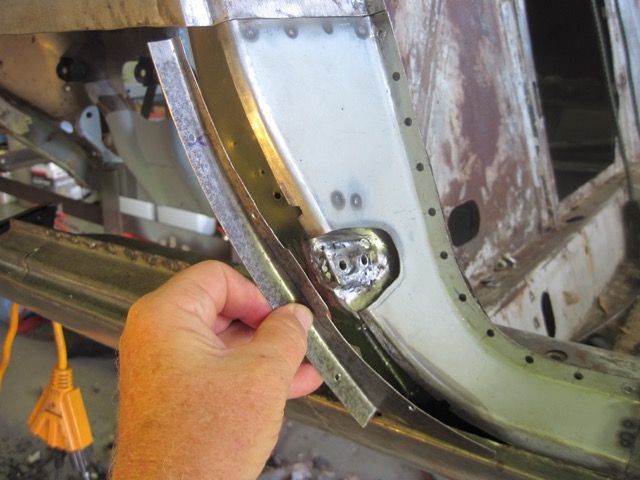
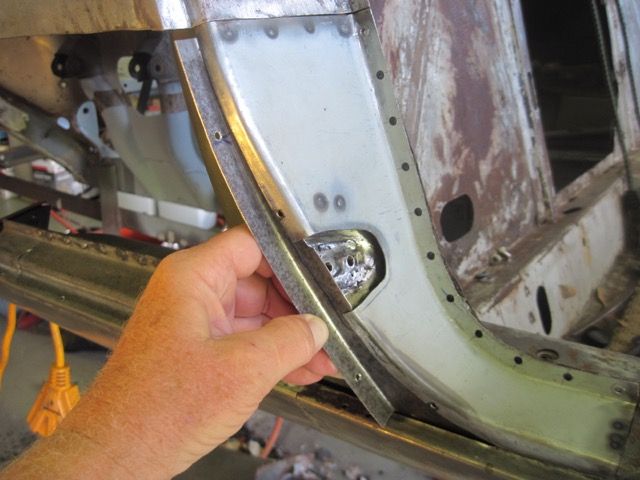
Here is the slightly modified panel ready to install. I added a small tab inside, above the guide cut out, to push the panel out slightly and make it fit up to the guide better. Below the guide cut out, I added another to prevent the screws from being dropped down inside the rocker panel:
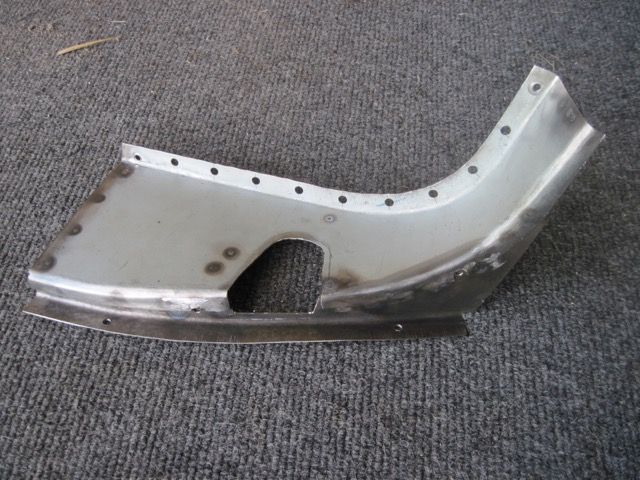
Finally ready to weld it in place:
Followed by the big one:
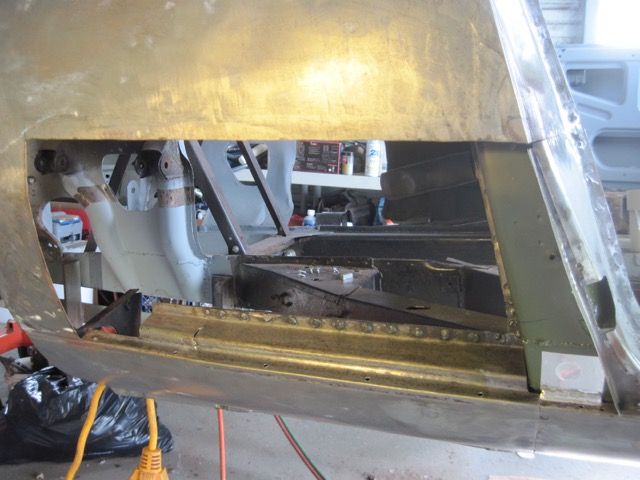
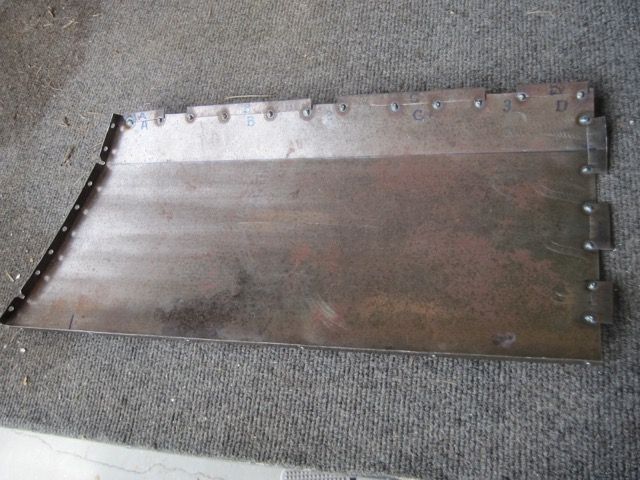
Again, I am missing a picture of this area finished metal working. I’ll add it later.

Here I have decided to save as much of the original outer rocker section as I can. It looks simple to make, but it is not. The bend radii, distances, and curvature have to be just right or it will not fit.

Only the bottom part was rusted out; repairing this segment is much easier than re-making the whole panel section:


Now I am starting to rough in this larger repair panel:


Here I am making the flange on this repair panel where it mates up with JW’s piece:

Starting to take some measurements. This sits out too far:

This curve needs to be sharper, to make this panel sit back farther:

Not so easy to do. I hate to cut into Johnny’s fine panel, but I have no choice:

With that lower corner segment removed, I can use the shrinker & stretcher on the flanges that remain, and massage this piece to fit my car:


I used the old door to check the alignment of the guide:

Sketching the cut out for the guide:

Getting there:


The mounts for the guide had to be pulled forward and angled up a bit. This was a pain in the butt to do. This pic only shows it partly done, I finished it up better than this.

Now I’m finally fitting up both panels:

I’m welding on some backer strips. The gaps are there to allow for some panel clamps to hold the panel on flush while I weld it back on the car:


The set back of JW’s panel flange was just a bit too deep, so I cut the whole thing off and made a new one:


Here is the slightly modified panel ready to install. I added a small tab inside, above the guide cut out, to push the panel out slightly and make it fit up to the guide better. Below the guide cut out, I added another to prevent the screws from being dropped down inside the rocker panel:


Finally ready to weld it in place:

Followed by the big one:


Again, I am missing a picture of this area finished metal working. I’ll add it later.
Nice work and excellent documentation. I am wrapping up presently a similar project.
As always UFO.. I love your jump in and do it attitude. Well done sir.
Love being able to see the details up close. Great work!
Fantastic work Rodney. I am surprised you had to modify the outer B post I sent you. I thought I had got the shape correct on my former? I have sold lots of those panels and have never heard anyone say the lower corner is the wrong shape. I have a friend who has just bought a rust free car that has never been welded - I will take some profile measurements from his car and check them against my former and make adjustments if it's wrong.
Regards, Johnny
Regards, Johnny
Hi, Johnny! I had no idea you would be following my thread. First, thank you; your compliment is high praise coming from you - I've seen your work. Certainly I appreciate all the comments; there are a number of people here that are doing really top notch work.
Part of your confusion may be - I did not buy this piece from you. I bought it from another owner here state side, who bought it from you and did not need it. I only have the right one, not the left. I also have your front valance replacement, but have not used it yet.
I will PM you soon with photos and details of the changes I made. I am pleased with your product, and not at all upset that it needed a few tweaks to fit. If I can help you improve it, all the better.
Regards, Rodney
At last now, I’ll get to the issues that motivated me to do the door hinge adjustment mods. Some of my commenters suggested that I do some fitting of the doors before I get too far along. Since I’ve done some significant work around the door frames, and also had to buy a different set of doors to replace my rusty ones, that seems like a good idea. Little did I know what lay in store for me.
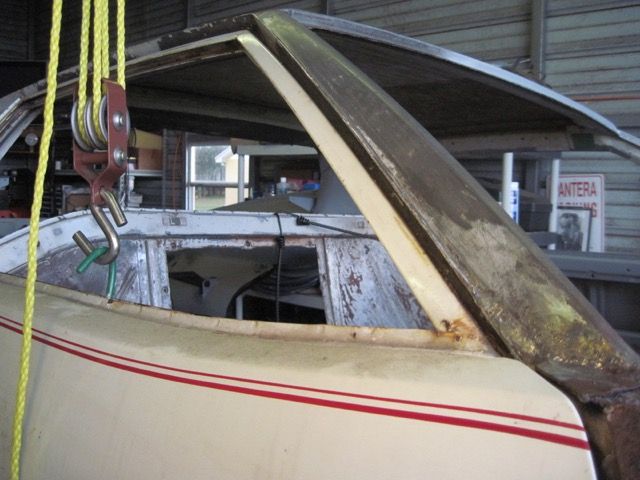
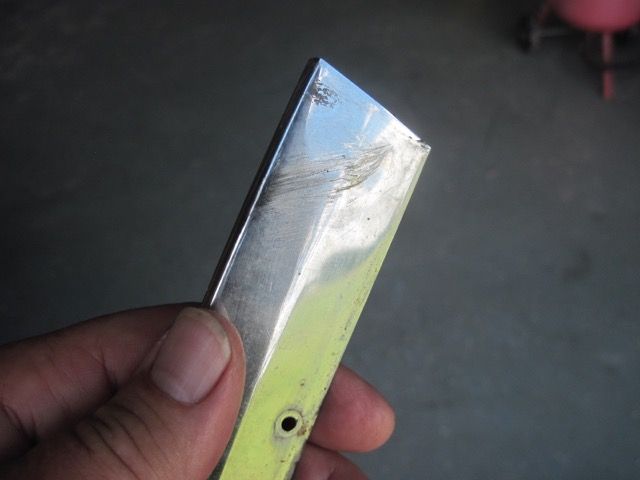
Many Panteras, I dare say most, have doors that do not fit properly. Among the more common issues is striking, or rubbing, of the extreme top rear of the window frame on the trim piece. Mine had evidence of this problem also:
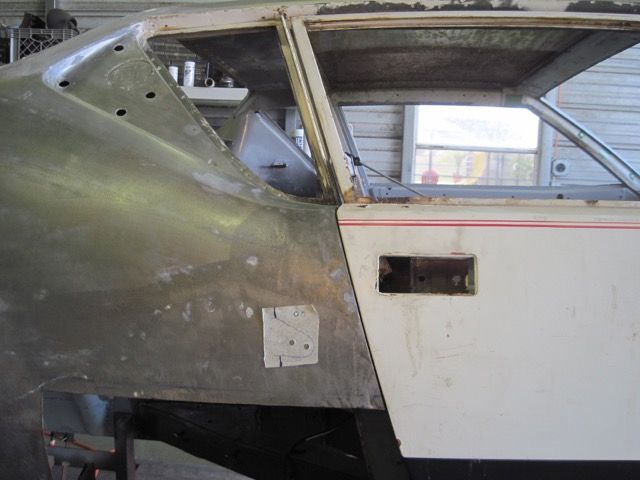
I attempted to fit up one of the old doors, to take some measurements and see if this problem could be due to poor adjustment. At this point, I realized that I could not get a repeatable adjustment, and so made the door hinge adjustment modifications I detailed earlier.
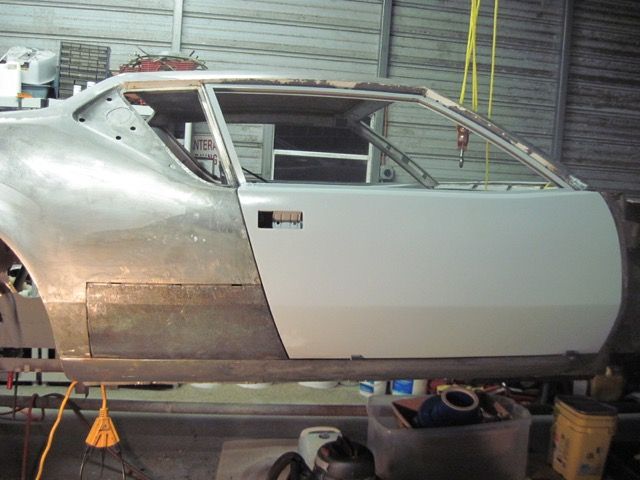
Here I have put the old door in place, and found that I could (just barely) avoid the rubbing problem with careful adjustment. Notice in this pic the door to body gap, also the window frame gap is uniform:
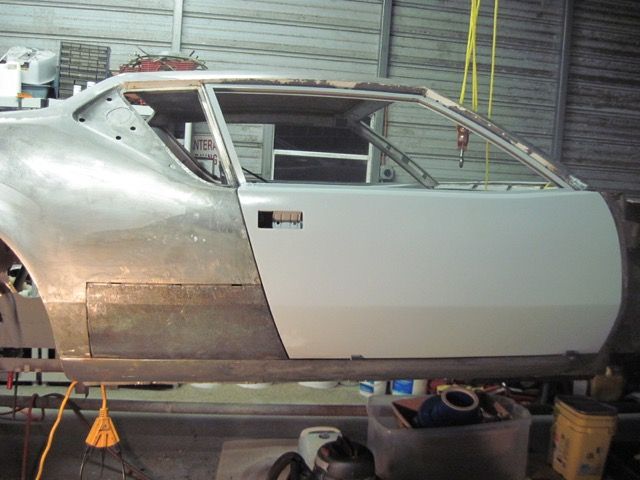
Here is a new door in place, again after careful adjustment. Not easy to see in this picture, but the door to body gap is uniform, but the window frame gap is not. It is wide at the bottom, and tight at the top. The rubbing cannot be adjusted out:
After a couple of weeks of screwing with this, trying every trick I could think of, I finally decided the only way to fix the issue was to warp the window frame ever so slightly. To do this, I had to cut the window channels in each corner, only enough to weaken them:
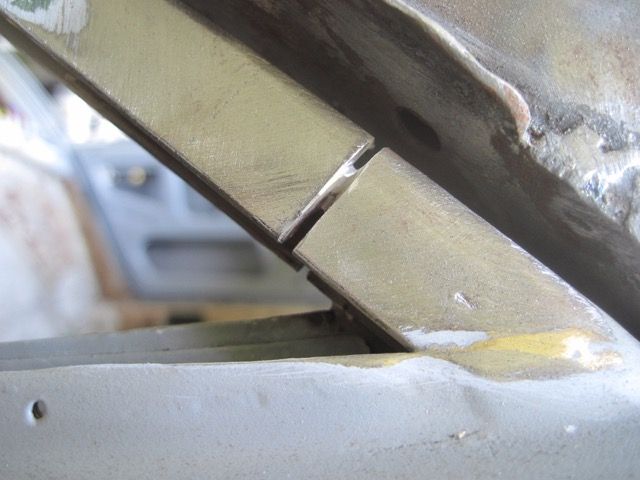
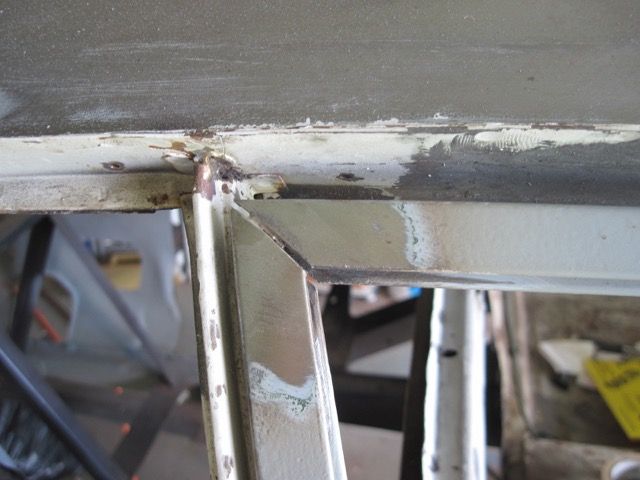
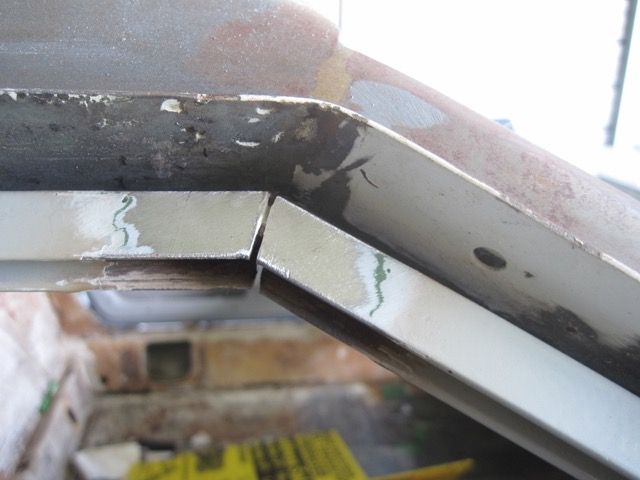
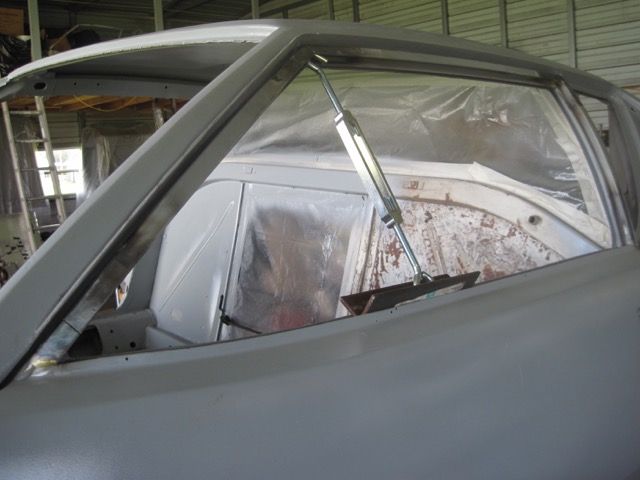
With a Dremel tool and the finest cutting disks, I sliced into each corner. You can imagine this caused some real heartburn. If I messed up, I could ruin the doors I just bought. Then I rigged up a turnbuckle to put pressure inside the frame, and warp it until the rubbing problem was solved:
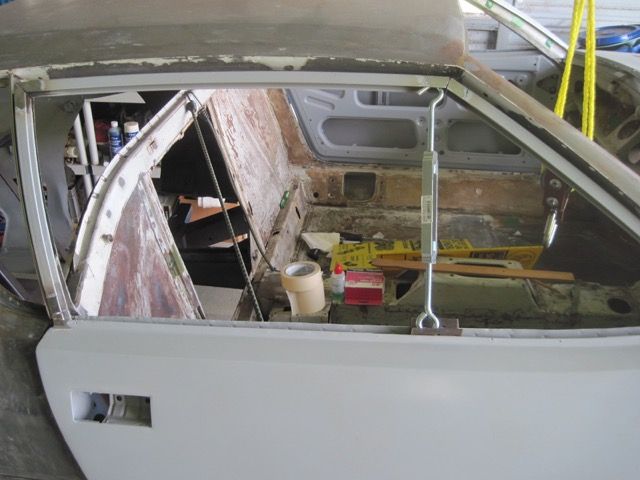
Finally, I welded up the cuts to restore the strength and hold the shape.
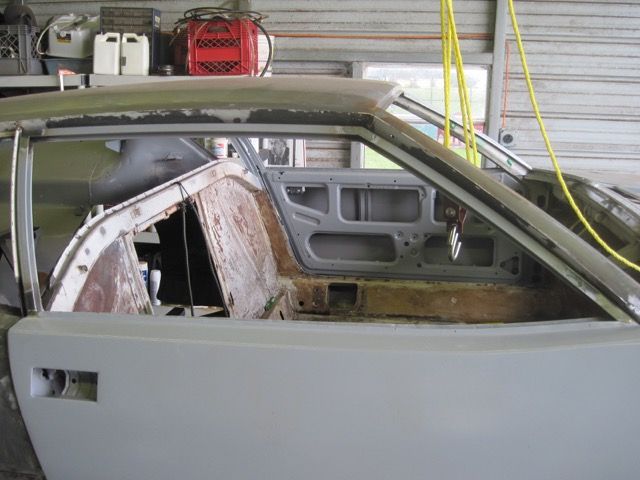
In case you were wondering, the left (drivers) door had the same problem, and had to be done also.
So now you know the rest of the story.
Many Panteras, I dare say most, have doors that do not fit properly. Among the more common issues is striking, or rubbing, of the extreme top rear of the window frame on the trim piece. Mine had evidence of this problem also:

I attempted to fit up one of the old doors, to take some measurements and see if this problem could be due to poor adjustment. At this point, I realized that I could not get a repeatable adjustment, and so made the door hinge adjustment modifications I detailed earlier.
Here I have put the old door in place, and found that I could (just barely) avoid the rubbing problem with careful adjustment. Notice in this pic the door to body gap, also the window frame gap is uniform:

Here is a new door in place, again after careful adjustment. Not easy to see in this picture, but the door to body gap is uniform, but the window frame gap is not. It is wide at the bottom, and tight at the top. The rubbing cannot be adjusted out:

After a couple of weeks of screwing with this, trying every trick I could think of, I finally decided the only way to fix the issue was to warp the window frame ever so slightly. To do this, I had to cut the window channels in each corner, only enough to weaken them:


With a Dremel tool and the finest cutting disks, I sliced into each corner. You can imagine this caused some real heartburn. If I messed up, I could ruin the doors I just bought. Then I rigged up a turnbuckle to put pressure inside the frame, and warp it until the rubbing problem was solved:

Finally, I welded up the cuts to restore the strength and hold the shape.

In case you were wondering, the left (drivers) door had the same problem, and had to be done also.

So now you know the rest of the story.
It worked! My photos are out of hock! 
did you pay the ransom OR send in the A-Team?
I used the ~original hack.
After the .jpg before the [/img] put ~original ,or otherwise stated: .jpg~original[/img]
After the .jpg before the [/img] put ~original ,or otherwise stated: .jpg~original[/img]
Add Reply
Sign In To Reply


