It was recently brought to my attention by a fellow motorist that my car had no brake lights. So, I took it home and jumped out the wires at the switch and sure enough the lights came on. Failed brake light switch. Searching the forum, I found the general consensus was to retrofit a mechanical switch and do away with the pressure switch. There are a few examples that can be found on the forum but they lack some detail so I thought I would document what I did in case someone else considers this modification.
We have a NAPA warehouse in town which really helps when looking to "make something work". I had the counter guy pull six different switches I found on their website for me to compare. I picked the one that was the smallest and seemed like the best fit. When I rolled it over, I took what I found as a sign. See picture below.
Replies sorted oldest to newest
My car had the loom originally run up next to the clutch pedal where it had been rubbed and cut so the loom was torn open. This actually helped to get the wires partly out. I have since drilled a hole next to the clutch pedal and installed a gromet to eliminate the routing problem.
Attachments
Attachments
This was one of those jobs that seemed simple enough but ended up taking me all day. Hope this helps someone in the future.
Steve
Steve
I am busy right now so I can't count threads to get pitch.
and it is hard to see if it is tapered or just corroded, I am getting an 11mm OD.
NOW the seal is an internal flare so a plug would need to duplicate OR have a face oring. Maybe leaving the abandon in place is the best
Attachments
Steve
Seal is via inverted flare.
John

http://www.doverbrakeinc.com/f...re-plug-14-tube-size
11mm = 0.433
7/16 = 0.438
1.25m = 20 tpi
1.00m = 25 tpi
counting pixels to get the pitch.
where I measure the 0.433 is erroded down compared to the last two threads
so 1/4 inverted flare
Attachments
Thanks JFB.
Ordered from Summit. 1/4" Inverted Flare Plug. Thread would be 7/16" x 24TPI.
Attachments
Thank you for this post. My brake light switch failed for the third time in one year. First one actually went bad, and the new one I got from a regular vendor leaked so badly it required days of cleaning. The third brake light switch, from the same vendor, did not leak, but it did not work either. ![]() So I gave up. Found this post, and did exactly as it is said here. Works like a charm. Perfect operation. The only thing I did that really worked is that I cut the wire-loom cover with an exact-a-knife (hobby knife) about an inch in length in the middle and put some WD-40 in there. Then I cut the wire-loom cover about an inch in length from the firewall under the dash and was able to easily pull out the two red wires with a pair of needle nose pliers. So I left the black loom in place the entire time. Other than that, I followed Steve's procedure and worked so easily. Well, I am old and fat, so fitting under the dash almost required me to be 100 pounds lighter and 30 years younger. But I managed to do it. Start to end took about three hours for me, most of which was spent trying to contort myself under the dash and then twice as long to pull myself out.
So I gave up. Found this post, and did exactly as it is said here. Works like a charm. Perfect operation. The only thing I did that really worked is that I cut the wire-loom cover with an exact-a-knife (hobby knife) about an inch in length in the middle and put some WD-40 in there. Then I cut the wire-loom cover about an inch in length from the firewall under the dash and was able to easily pull out the two red wires with a pair of needle nose pliers. So I left the black loom in place the entire time. Other than that, I followed Steve's procedure and worked so easily. Well, I am old and fat, so fitting under the dash almost required me to be 100 pounds lighter and 30 years younger. But I managed to do it. Start to end took about three hours for me, most of which was spent trying to contort myself under the dash and then twice as long to pull myself out. ![]() The Napa guy said he has used this exact switch on other cars and it has lasted without having to be ever replaced. Much better than the hydraulic original one that fails and leaks. If you haven't done so, I highly recommend making this switch before the original one leaks and ruins your carpets.
The Napa guy said he has used this exact switch on other cars and it has lasted without having to be ever replaced. Much better than the hydraulic original one that fails and leaks. If you haven't done so, I highly recommend making this switch before the original one leaks and ruins your carpets.
Nice work, guys!
I’m sure the “SL” in the switch P/N stands for “Super-Lusso”, as befitting our awesome cars!
Pantera Electronics has a brake light switch replacement that is similar to the mechanical switch discussed in this thread but uses a proximity sensor to detect the driver pressing the brake pedal. It also leaves the brake lights on for 2 seconds after the brake pedal has been released.
I did the same conversion on my Deauville with the exact same switch. The Napa switch as an OE replacement for any of the follwing cars.
Almost all Volvo 240s from the 80s and pretty much any BMW from the 70s, 80s and 90s, suchs as E21, E30, E28, E34. The partsnumber from Hella is
| 6DF003263001 |
Chiel
I just completed this swap the other day and it went fairly well! Biggest challenge was selecting the two (smaller) red red/black stripe wires and pulling them back....they were stuck to the other wires..... but the WD 40 thing in the sheathing worked....put a small hole in the sheathing at the top where it enters the car, and sprayed it in both directions.....eventually after pulling with a "smooth" needle nose, no teeth! The wires popped loose and pulled easily while lubed up!
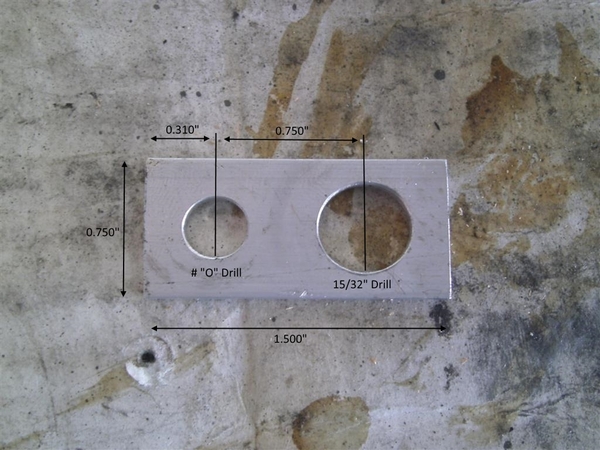
Just a note, in the drawing for the switch bracket, the smaller hole was referenced for a letter drill "O" which many won't have access to, but a 21/64" drill bit from my cheapo Harbor Freight drill selection had one that worked great! Slipped right over the stud!
One last note is that if you needed to have your switch just a little further from the brake pedal arm, you can leave the nut on the rubber stop shaft and the slip the new bracket in place and then add a new nut on top.... I found one off of perhaps an old ball joint bolt for the Mangusta......that went on.....but in the end, I didn't need to do that. Just throwing this out there.
To those that wonder, you do not need to disturb the adjustment for the pedal stop at all doing this job. No need to. The nut, once loosened should spin right off, put your new bracket in place (I added a thin lock nut) and spin the nut back down....done!
Cheers!
Steve
...The Thread is a 1/8" NPT Tapered Thread. If You wish to stay 'Hydraulic', NAPA Auto Parts has a Variety of Them.
MJ
This brake light switch modification was done on my car and I undid it… the wire was cut inside in the footwell… soldering them back together was a real p.i.A!
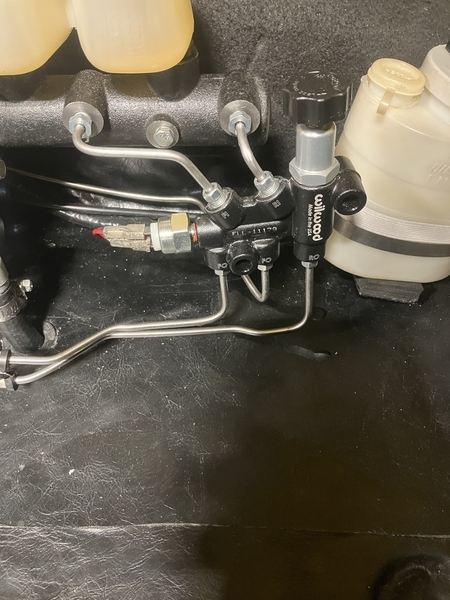
The Wilwood part did replace the shuttle valve block with the brake light switch and the brake proportioning valve
Attachments
Yours looks neat, and very professional. Looks completely "factory." But I have not had luck with those type of mechanical brake switches at all. As you know, those mechanical switches that operate on brake fluid pressure eventually fail and make a mess of things. At least that's what I have experienced twice, and once with a brand new one I bought from one of our more reputable vendors we all use, which led to the replacement of all my carpeting because I simply could not get that much brake fluid out of them no matter how hard I tried to clean them. I had installed it and within a week it leaked and made a mess of things, as it spurted brake fluid. That's why I eventually switched to the electric one installed behind the brake pedal. At least if that one fails, it is a simple replacement without a mess. I wish you luck and hope yours never fails. I truly mean that.
Yes, you are so right… once there is any leak or spillage of brake fluid it’s a permanent mess if it still has the carpet flooring! When I got my car I pulled the carpet out and found that the paint got eaten away… and surface rust.. (on the battery side)
cleaned everything out, primer, painted then glued 1/16” closed cell foam down and then glued black vinyl on top! No way any liquid can reach the metal and it’s easy to spot if there is a drip… with carpet you never spot it! Easy to wipe off and neutralize it! 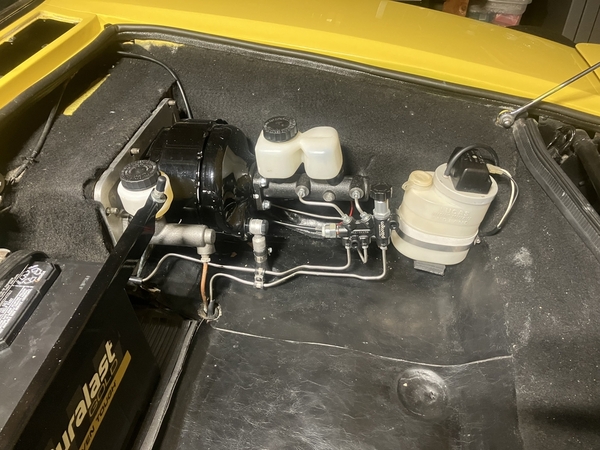
Attachments
What a brilliant idea. Wish I knew about that. Would have saved myself the money for new carpets and paying an automotive upholstery shop to install it. If I ever have to replace my carpets...I won't. ![]() I'll do what you did. Thank you for the tip.
I'll do what you did. Thank you for the tip.


