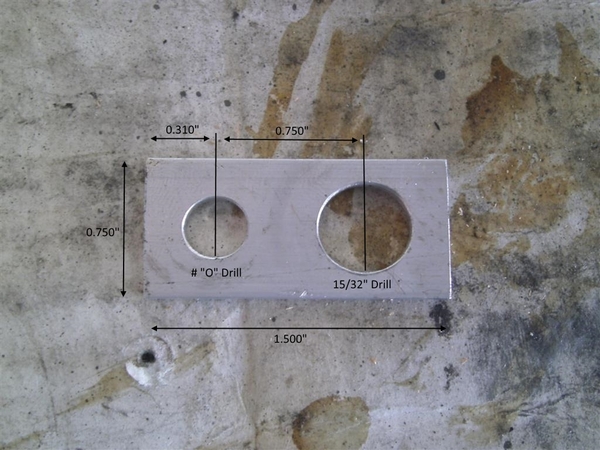
It was recently brought to my attention by a fellow motorist that my car had no brake lights. So, I took it home and jumped out the wires at the switch and sure enough the lights came on. Failed brake light switch. Searching the forum, I found the general consensus was to retrofit a mechanical switch and do away with the pressure switch. There are a few examples that can be found on the forum but they lack some detail so I thought I would document what I did in case someone else considers this modification.
We have a NAPA warehouse in town which really helps when looking to "make something work". I had the counter guy pull six different switches I found on their website for me to compare. I picked the one that was the smallest and seemed like the best fit. When I rolled it over, I took what I found as a sign. See picture below.
Replies sorted oldest to newest
My car had the loom originally run up next to the clutch pedal where it had been rubbed and cut so the loom was torn open. This actually helped to get the wires partly out. I have since drilled a hole next to the clutch pedal and installed a gromet to eliminate the routing problem.
Attachments
Attachments
This was one of those jobs that seemed simple enough but ended up taking me all day. Hope this helps someone in the future.
Steve
Steve
I am busy right now so I can't count threads to get pitch.
and it is hard to see if it is tapered or just corroded, I am getting an 11mm OD.
NOW the seal is an internal flare so a plug would need to duplicate OR have a face oring. Maybe leaving the abandon in place is the best
Attachments
Steve
Seal is via inverted flare.
John

http://www.doverbrakeinc.com/f...re-plug-14-tube-size
11mm = 0.433
7/16 = 0.438
1.25m = 20 tpi
1.00m = 25 tpi
counting pixels to get the pitch.
where I measure the 0.433 is erroded down compared to the last two threads
so 1/4 inverted flare
Attachments
Thanks JFB.
Ordered from Summit. 1/4" Inverted Flare Plug. Thread would be 7/16" x 24TPI.
Attachments
Thank you for this post. My brake light switch failed for the third time in one year. First one actually went bad, and the new one I got from a regular vendor leaked so badly it required days of cleaning. The third brake light switch, from the same vendor, did not leak, but it did not work either. ![]() So I gave up. Found this post, and did exactly as it is said here. Works like a charm. Perfect operation. The only thing I did that really worked is that I cut the wire-loom cover with an exact-a-knife (hobby knife) about an inch in length in the middle and put some WD-40 in there. Then I cut the wire-loom cover about an inch in length from the firewall under the dash and was able to easily pull out the two red wires with a pair of needle nose pliers. So I left the black loom in place the entire time. Other than that, I followed Steve's procedure and worked so easily. Well, I am old and fat, so fitting under the dash almost required me to be 100 pounds lighter and 30 years younger. But I managed to do it. Start to end took about three hours for me, most of which was spent trying to contort myself under the dash and then twice as long to pull myself out.
So I gave up. Found this post, and did exactly as it is said here. Works like a charm. Perfect operation. The only thing I did that really worked is that I cut the wire-loom cover with an exact-a-knife (hobby knife) about an inch in length in the middle and put some WD-40 in there. Then I cut the wire-loom cover about an inch in length from the firewall under the dash and was able to easily pull out the two red wires with a pair of needle nose pliers. So I left the black loom in place the entire time. Other than that, I followed Steve's procedure and worked so easily. Well, I am old and fat, so fitting under the dash almost required me to be 100 pounds lighter and 30 years younger. But I managed to do it. Start to end took about three hours for me, most of which was spent trying to contort myself under the dash and then twice as long to pull myself out. ![]() The Napa guy said he has used this exact switch on other cars and it has lasted without having to be ever replaced. Much better than the hydraulic original one that fails and leaks. If you haven't done so, I highly recommend making this switch before the original one leaks and ruins your carpets.
The Napa guy said he has used this exact switch on other cars and it has lasted without having to be ever replaced. Much better than the hydraulic original one that fails and leaks. If you haven't done so, I highly recommend making this switch before the original one leaks and ruins your carpets.
Nice work, guys!
I’m sure the “SL” in the switch P/N stands for “Super-Lusso”, as befitting our awesome cars!


