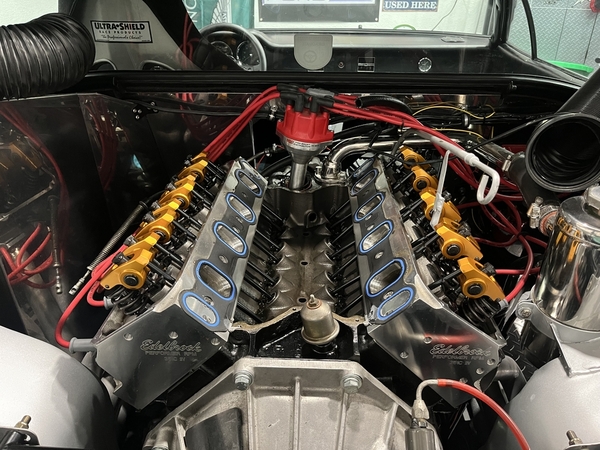
Looking for input from those with experience replacing manifolds. My engine builder had put the cork gaskets on the China rails when my 351 Cleveland was rebuilt back in 2017. The car has an Edelbrock aluminum intake manifold, and Edelbrock preformer 2V aluminum heads. For a while she was fine, but then developed a small leak in the rear by the china rail which was not enough for me to do anything about (would lightly pool by oil sender and was easy to wipe up). Then recently she developed a pretty significant leak in the front China rail on the driver side that would leave a small puddle on the floor after every drive. This was enough to motivate me to take the valve covers and manifold off and reseal. Thanks to great comments on this forum I realized the cork gaskets on the China rail should not be used and a continuous line of sealant would be better.

I put a continuous line on both the front and rear China rails paying particular attention to the corners where the three parts meet. I waited about 10 minutes for the sealant to skin over before dropping in the manifold using four cut off bolts as guides to ensure good alignment. Distracted with having a friend over as I was tightening down the manifold in two stages following the correct tightening sequence I realized after tightening everything 25 foot pounds that I had forgotten to put anti-seize on the bolts. So I loosened all of the bolts and put anti-seize on each and went back to the re-tightening sequence in two stages thinking I should be ok as the engine had not heat cycled and I thought the seal would not have been broken.

Well…today I finished putting everything together and took the car for her first drive. Upon arriving home I noticed that I have leaks along the duration of the front and rear China rails. It’s making me think taking the bolts out may have caused the issue. I had cleaned both surfaces extensively before the bead of sealant went down. Any thoughts from this forum as I want to make sure there’s nothing else I am missing before I go through this procedure again only to find the same leak.

Picures for attention.

IMG_2083

Attachments

Images (2)
  • IMG_2083: She almost looks better with the valve covers off!
  • IMG_2436
Videos (1)
IMG_2434
Last edited by 74gts
Original Post

Replies sorted oldest to newest

...You must Clean ALL Contact Surfaces with ACETONE!!

I also use the Ultra Black, on BOTH contact Sides, then as You Did, Let it Just START to 'Tack' then Drop the Manifold. This causes the 'Extra' Silicone To SQUEEZ Into, and Pack, ALL of the Voids, And the (4 Corners)!! Put all 3/8" bolts finger loose. Pull the 4 Studs put in the 5/16 Bolts ,Start Tightening from the Center Out...in 3 Phases, Criss-Crossing. Last Phase Torque to Specs. 5/16' Bolts are less that 3/8' Bolts. A Note! Don't forget the Throttle Cable Bracket goes under the Front/Left Corner, Bolt!

Smooth the Exposed bead with Spit on Your Finger. The Four Stud Alignment was My Invention! I've Never had a Leak, since using Acetone to Clean off Oil!

I Doubt taking out the Bolts Would cause a Leak, Provided You Loosened them One-At-A-Time!! I think You may have had degreaser or slight Oil, on the surfaces. Clean with Alcohol, Maybe.

Acetone Always!

You don't need anti-seize. If you're trying to Seal Oil from the Bolt Holes, use Teflon Tape, or 'Liquid' Permatex, looks like Brown Tar, goes on with the Brush in the Cap. Use Sparingly, You don't want any of this stuff getting into the Oil!

Good Luck With It!

See You on the 'Highway of Broken Dreams'

Last edited by marlinjack
@marlinjack posted:

...You must Clean ALL Contact Surfaces with ACETONE!!

I also use the Ultra Black, on BOTH contact Sides, then as You Did, Let it Just START to 'Tack' then Drop the Manifold. This causes the 'Extra' Silicone To SQUEEZ Into, and Pack, ALL of the Voids, And the (4 Corners)!! Put all 3/8" bolts finger loose. Pull the 4 Studs put in the 5/16 Bolts ,Start Tightening from the Center Out...in 3 Phases, Criss-Crossing. Last Phase Torque to Specs. 5/16' Bolts are less that 3/8' Bolts. A Note! Don't forget the Throttle Cable Bracket goes under the Front/Left Corner, Bolt!

Smooth the Exposed bead with Spit on Your Finger. The Four Stud Alignment was My Invention! I've Never had a Leak, since using Acetone to Clean off Oil!

I Doubt taking out the Bolts Would cause a Leak, Provided You Loosened them One-At-A-Time!! I think You may have had degreaser or slight Oil, on the surfaces. Clean with Alcohol, Maybe.

Acetone Always!

You don't need anti-seize. If you're trying to Seal Oil from the Bolt Holes, use Teflon Tape, or 'Liquid' Permatex, looks like Brown Tar, goes on with the Brush in the Cap. Use Sparingly, You don't want any of this stuff getting into the Oil!

Good Luck With It!

See You on the 'Highway of Broken Dreams'

Great input Marlon thank you. And yes, I did read the stud guides from you…great idea!

That said I did not use acetone, but I did use lacquer thinner, which I had read online was good to clean the surfaces. I was careful to clean both surfaces really well. I will switch to acetone next time if you think it makes a difference.

We also removed all of the bolts and then very quickly redid the torque process bolt by bolt with anti-seize on them. I did this because stainless bolts were going into an aluminum surface.

Next time I will control what I can control, ensuring that the surfaces are fully cleaned with acetone. Then, make sure that the bolts do not have to come out immediately after having been set, and only put them in one time!

Another option is to use the cork gaskets with sealant on both sides of it.  For me it is easier than a thick bead of Ultra Black Permatex.  Also, I now use Right Stuff as a sealant instead.  The reason is that Right Stuff dries much faster and comes off much easier later if needed.  It costs more.

My process is to put a thin layer of Right Stuff onto a clean china wall, then put the cork onto that and then set the manifold onto the engine to press the the cork down into sealant.  I use the cutoff guide bolts as well for this (thank you Marlin).  After an hour or so, I pull the manifold and put another layer of Right Stuff on top of the cork and do the final install of the manifold.

I use the tube of Right Stuff, not the pressurized gizmo.

I have done this many times on Panteras and do not have leaks.

Attachments

Images (1)
  • mceclip0

...No offense intended, I have a Pile of Cork End Gaskets. I never use them because they Shrink and come apart, in time. You can have them for free.

I cannot say this Enough! That 'Tiny Bead' of Ultra Black, I put on 'BOTH Contact Sides', Thourally! That way NO Void is Missed!

MJ

Last edited by marlinjack

Plus one on the bead around the ports on the intake gasket.  The engine in my photo above (with the oil pressure gauge) burns a lot of oil without it.  It does not do it at first and later on the smoke starts.  At this point in time I use gloved hands to completely smear the intake gaskets with a thin coating of sealant on both sides prior to final installation of the intake manifold.

I don't think there is perfect alignment with my Edelbrock Torker intake manifold and Ford D0AE closed chamber heads.  Perhaps other setups have better alignment with the intake and heads, and can run dry intakes gaskets.

I have another Pantera with a Hall Pantera Weber manifold and Ford closed chamber heads, and I am near final assembly of the engine.  Maybe it will seal with dry intake gaskets.  I am tempted to try it but putting Right Stuff on the gaskets is a small extra step and will probably go that route.

One other thing I would add as a best practice in case others come back to this post in the future. Dry fitting the intake manifold and marking along the manifold where it meets the gaskets on the headers makes sense. I did not do this, and when I ran my continuous bead of sealant on both China rails, I ended up with most of my sealant outside of the manifold in the corners, because I was assuming the manifold would hide the majority of the gasket. One of my corners has a wet gasket because of this.

Attachments

Images (1)
  • IMG_FFA75F607AAF-1

Add Reply

Post
×
×
×
×
Link copied to your clipboard.
×