Just before Christmas I blew a needle roller cup out of the left inner Uni Joint.
(I suspect it was missing the circlip but was covered over by little stainless dress up discs).
I decided to bite the bullet & make up a conversion to 930 Porsche CV joints.
Nothing new here really, its all been done before, but I thought I would photo the process so others can see what is involved.

I already had the rear suspension uprights & yokes drawn up on Solidworks from doing the taper roller bearing conversion.
This made it easier to design a flange to adapt the Pantera/ZF yoke pattern to the Porsche CV pattern as a lot of the Pantera parts I had already drawn up.
I machined up the adaptors from 125mm 4140 tensile steel so the threads had good strength.
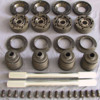
Pictured below are the parts used, top of the parts picture are the adaptors, (zinc plated black) which have the 6 bolt pattern of the Porsche CV's & the 4 bolt pattern of the Uni yokes. They also have a good internal radius machined for axle clearance under plunge.
(Not in the picture are the M10x60 cap screws required to hold the CV’s to the adaptors).

So the M10 bolts pass through the CV's into the adaptors from one side & the 7/16" UNF bolts pass through the yokes & into the adaptor from the other side.

One side of the adaptor has a female location diameter for the 930 CV & the other side a male location diameter to suit the yoke.

Weakest point of the whole system is the four 7/16" UNF bolts, (compared to the 6 x M10 bolts through the CV's).
So I hunted around for some super tough bolts that would hopefully not fail.
I found ARP Chevy/tilton flywheel bolts to be perfect for the job, correct length of plain shank exactly 7/16" diameter, total bolt length spot on & 190,000 psi tensile rating.
Expensive, but you don’t want these bolts letting go.

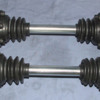
Axles are race buggy 930 axles 15 5/8” long.
Being a race axle they are fully floating without CV joint shoulders, (no stress risers).

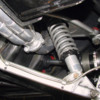
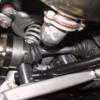
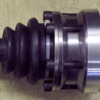
Installed picture shows the axles installed on the hoist.
So the suspension is in full droop.
CV’s clear the aftermarket sway bar bushes by around 5mm, (only after fitting countersunk screws to the Sway bar mounts, had to do this to clear the Uni’s previously).

Total weight of one axle/CV/Adaptor assembly is 8.7 kg, compared to the original Uni assembly of 8.9 kg.
So slightly lighter & I would guarantee better balanced.

It’s important to use a small diameter CV boot as with the car on its wheels the boot does not have a great deal of clearance to the inner guard hole cutout.

Finished the installation today & took the car for a good thrashing.
So far, all good, no noises, no grease leaks.

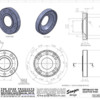
I have also included here the drawing for the CV adaptor if anyone wants to make their own.

Attachments

Images (1)
  • CV_PARTS_copy
Original Post

Replies sorted oldest to newest

I performed a very similar CV conversion about 4 1/2 years ago and am happy to report no durability issues. I do have some comments for people who are considering such a conversion.

When I began the process of figuring out what parts to use, I spoke with Kartech Offroad in Southern California. I described my proposed set-up and asked them: "where's the weak link in this setup?". They said the only regular failures they see in 930 CV joints are in the stamped steel CV ball retaining cages. They recommended using aftermarket 4130 cages. They went on to say that the other failures they see in racing situations are twisting of the axles and shearing the splines off of the axles. Both of these problems can be dealt with by using axles made from 300M rather than the cheaper 4130.

For people looking for the ultimate in weight savings, lightened CVs are available as well as gun-drilled axles.

One final comment: after having my CV axles installed for a few months, I started to notice little "globs" of CV joint grease in my engine compartment. Sure enough, centrifical force was causing grease to "ooze" out on both sides of the CV joints, spraying grease around my engine compartment. Kartech informed me that Porsche uses paper gaskets on both sides of their 930 CV joints to keep the grease in, but some people prefer to use RTV sealer instead.

My adapter design is slightly different than Edge's. My adapters have super high strength ARP studs Locktited in place. The CV joints are bolted to the adapter then the adapter is held to the OE companion flange with ARP nuts. My adapters have no hole in the middle so I won't be faced with a big, greasy mess when I need to pull the half-shafts for maintenence. This makes installation less messy too. With Edge's design, you could use a Porsche/Lobro grease cap between the adapter and the CV joint to contain the grease when removing or installing the half-shafts.

I bought the Porsche 930 CV joint gaskets from pelicanparts.com and Lobro CV joint grease caps are available from GKN Driveline (part # 215 315 25 00 001).

Attachments

Images (1)
  • CV_Adapter
Last edited by davidnunn
Yes, a larger drawing would be better but unsure how to do that on this Forum.
David,
Here at the Edge we build sand dune type buggies & have been using 930 CV's for years.
When you talked to the buggy company in regards to where 930's fail it’s mainly due to the nature of the buggy application.
On the Pantera the shafts are close to dead horizontal, which means the balls move very little within the CV cage.
On a buggy 930 CV's are used because they not only handle heaps of power, but will also handle 22 degrees of CV/axle angle, (up to 25 degrees with cage modifications).
The 40mm wide CV housing allows a lot of sweep, thus lots of axle angle.
So that type of modification is of no real benefit to the Pantera.
Failures occur in buggies mainly due to high wear, (at high angle the balls sweep the full width of the CV housing, each rotation of the CV & generates a lot of heat).
The main cause of failure is intermittent shock loading.
Imagine a buggy racing along a track at 100 mph, hitting bumps & getting airborne.
Generally when you drive this way you keep your foot buried on the gas to keep the nose high.
When you are airborne the wheels speed up to higher than your ground speed.
You land with the full weight of the buggy, (plus inertia) on those drive wheels.
So the buggy either instantaneously speeds up, (unlikely) pulls a massive wheel stand, (unlikely at 100 mph) or breaks traction & spins the wheels, (unlikely with that instantaneous traction).
Or simply breaks something within the drive train.
The first component under massive load is the CV, then the axle, then the transmission.

Obviously this is not a great concern with the Pantera.

To seal the CV against the drive yoke flanges there is a very close fitting location diameter.
What I also did upon assembly was smear a small amount of silicone sealant around the location diameter mating faces to stop grease finding its way out.
The adaptor did not really need a hole all the way through, I done this for two reasons.
First to gain more axle plunge capability.
Main reason was at the suspension upright.
When I converted the uprights to taper rollers the wheel axle poked through the drive yoke a few millimeters more than standard, so I needed more clearance between the new adaptor & the very end of the wheel axle.
It was easier just to put a hole right through & gain axle plunge clearance as a bonus.

JTPantera,
Total weight of one axle/CV/Adaptor assembly is 8.7 kg, compared to the original Uni assembly of 8.9 kg.


I did think of using studs instead of the ARP 7/16" bolts.
Main reason for using the bolts was the accurate plain shank on the bolt.
It is a precise fit within the Pantera/ZF yoke, so no backlash can occur or crushed threads which could create backlash.

Axles purchased from Dan’s performance parts in San Diego, part number # 01-16-2203-0
7/16” UNF bolts to hold the adaptors to the drive yokes are ARP part # 230-2801, (three sets required) these are a 12 sided bolt head so can only be tightened with a ring spanner.

CV joints, best to use the German made GKN Lobro units.

If anyone wants a PDF version of the drawing just email me & I can email it back to you.

Email: tony@edge.au.com

Or go here to the Australia Pantera Forum where the drawing appears much larger.
I put up the same post here:
http://panteraaustralia.com/fo.../124.html?1295789747
Last edited by edge
quote:
When you are airborne the wheels speed up to higher than your ground speed. You land with the full weight of the buggy, (plus inertia) on those drive wheels. So the buggy either instantaneously speeds up, (unlikely) pulls a massive wheel stand, (unlikely at 100 mph) or breaks traction & spins the wheels, (unlikely with that instantaneous traction). Or simply breaks something within the drive train. The first component under massive load is the CV, then the axle, then the transmission.
Obviously this is not a great concern with the Pantera.


From Open Road racers' experiences, when one Pantera got "major air" over a large bump and the driver doesn't get out of the gas in time, the shock load on landing twists or breaks the $2200 ZF input shaft in a stock drivetrain. The u-joints and halfshafts survived just fine. On another racer's car that hit a humpbacked bridge at 150mph, the front lower frame rails completely cracked off their welded connection to the main body. Only an aftermarket stiffening system in front kept this one from being a feature on the 6 o'clock news. Jumping a Pantera is unhealthy to your bank account and maybe your body!
The 1980's BMW M1 Procar Series race cars had the same problem when racing after a rainfall, when the track was drying out. If the car went through a puddle of water, the big slicks would loose traction and the engine would rev to the limiter. When the car came out of the puddle, and got instant traction when the tires hit dry pavement, the shock load would snap the input shafts. This was with the BMW M1 version of the ZF, which was an improved version of the ZF that came in the Pantera. Other than the case, I'm not sure if the M1 ZF is stronger. Probably not.
Post
×
×
×
×
Link copied to your clipboard.
×