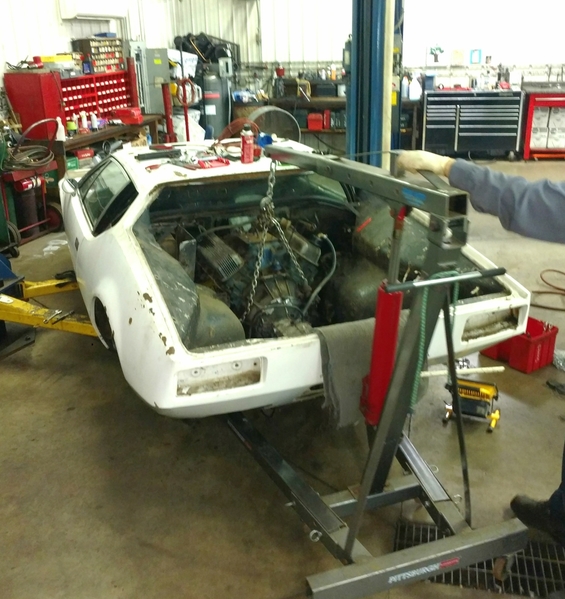
For those of you who have pulled and replaced engines...

In your experience what is better for pulling an engine out of a Pantera, a hydraulic crane type hoist or an overhead gantry type?

I presume the gantry is better but wasn't sure.  Is there a significant difference? 

Last edited by George P
Original Post

Replies sorted oldest to newest

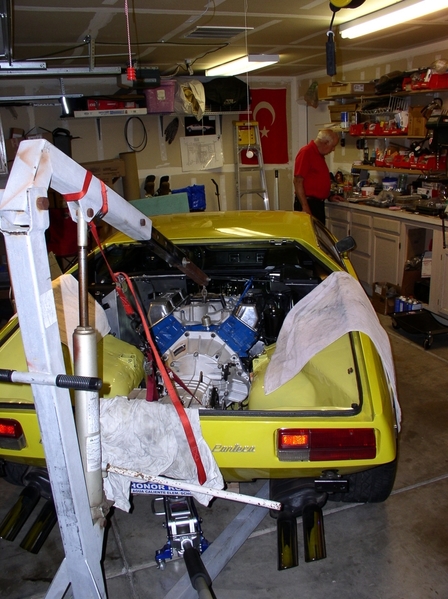
If you are pulling the engine and transaxle at the same time, you better ensure that you have long legs (forward of the engine CG) on your hoist.  Most of the $200 Harbor Freight engine hoists don't have enough length on the legs to ensure the stand won't tip forward....

It is a very long reach from the back of the car to the engine / transaxle balance point (which is about 4-6" forward of the front of the front of bellhousing).

That wouldn't be so bad except you have about 2' of car (the back of the vehicle) that forces your hoist to be fully extended....  (which OBTW puts you right about at the limit of hoist capability (~1000 lbs)….

Rocky 

05-24-2014 [17) (Medium)

Engine_Pull [10)

Engine_Pull [13)

P1010008

Attachments

Images (5)
  • 05-24-2014 (17) (Medium)
  • P1010008
  • Engine_Pull (10)
  • Engine_Pull (13)
  • P1010008
Last edited by George P

...One More thing...Don't forget to Remove the Distributor CAP, or the Entire Dist. If You loose control of the Rolling, You could Hit the rear Window! On the Initial Lifting of the Weight, The Hoist will MOVE FORWARD! The very reason You need the protection for the Rear BODY! Good-Luck!

Last edited by marlinjack

So this one won't do it?

(From description of Harbor Freight Item #69514
https://www.harborfreight.com/...hop-crane-69514.html

This 4000-lb. capacity foldable shop crane delivers the lift you need combined with the advantage of compact storage! The crane includes ram, chain and hook and is rated up to 2 tons. The foldable shop crane is easy to use and easy to store.
  • Boom extends from 41 in. to 61-3/4 in.
  • Crane height adjusts from 73-5/8 in. to 89 in.


I could go measure the car, but I am not sure where their measurements are taken from.  I need to know how far it extends from where the hydraulic piston will hit rear of the car.

If I had to guess - I would say it won't cut it - You might be able to add extensions to the boom and the legs, but.....

You need a measurement, and maybe HF has one set up for their "Tent Sale" this weekend.

As you point out, the hydraulic cylinder is the part of the hoist that hits on the back of the car...


I have a HF 2 ton foldable hoist (although it is an older orange model) and it has always done everything I need on multiple Panteras. I find the legs are plenty long enough and no forward weight issues, although to get them under the car it does need to be raised on jack stands a little. During one of the recent sales events I did purchase an air over hydraulic cylinder upgrade to make for easier raising.

Last edited by joules

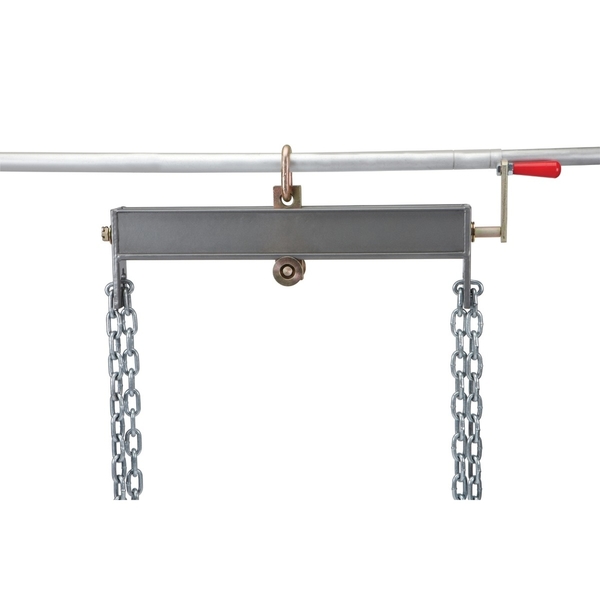
Using a load leveler may help.  It has the effect of lengthening the arm of the crane (somewhat) and thus negating some of the issues described above.  In my case it is indispensable because my crane is barely able to clear the back of the car.  I have a note to myself to get a longer crane after my last go around 2 months back.


image_23198

Attachments

Images (2)
  • image_23198
  • image_23198

Dear Over 50,

          The topic of engine/ZF lift brackets or "hooks" is a digression from the original post.  Briefly, I do not know of anyone manufacturing these.  Mine is based on a picture an Arizona member sent me years ago.  I was impressed that it was such an improvement over the usual "chains, whips and ropes".  Mine was fabricated locally, tweaked after one or two uses and performs wonderfully.

          Chuck Huber in Arizona has also done a couple of articles in the POCA newsletter about his Mark I and Mark II engine lift brackets. 

          I recently discovered that the "Hook" doesn't fit onto early pre-L bellhousings which have a different rib pattern.  Chuck Huber's Mk I and MkII would not have this limitation.

         I will send you a PM.

                    Warmest regards, Chuck Engles


Dear Perry,

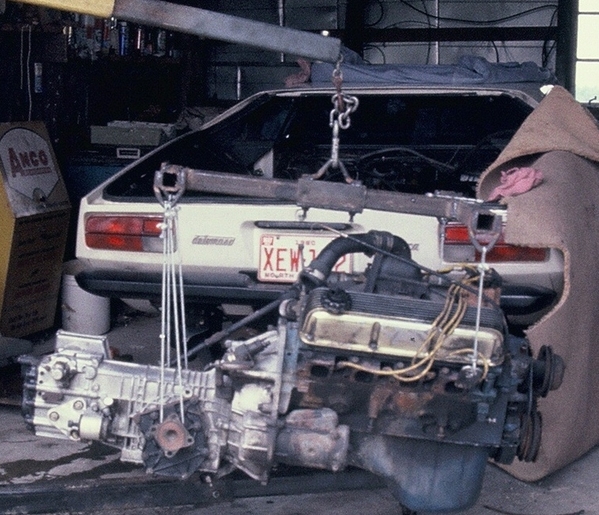
        Please note that one of the preceding posts by Rocky containing several pictures shows his extended cherry picker arm and his Mark I engine lift bracket.

        Please see the following pictures.   They show the lift and the bracket.  There are several shots of the "hook" with adjacent ruler for those keen enough to make their own.  

         Full disclosure: Rocky's Mark II engine lift bracket design is elegantly simple.   MIne is probably a little over-engineered.  If you do build one, then you'll also need two longer bolts as the normal bolts will be too short to work with the hook.  

                    Warmest regards, Chuck Engles
I use a chain and two bolts in the back of the heads, it's pretty much the balance point and not far off where Rocky has it. Then a strap around the ZF behind the axles for a manual tug to angle up for the lift over the rear valance. As good as the balance bars are they are not a lot of help on a Pantera IMO as the clearance engine to roof isn't there. Do not try and remove the engine with the decklid in place you are simply asking for trouble and a dent, it's a pretty simple task to remove it, a two person lift for ease, but I usually do mine single handed.

Here is my Mark II style.....  It works on Edelbrock Performers, and Stock Cast iron.  No reason it couldn't be fabricated to work with most all manifolds, but.... I mocked it up on the Ford cast iron manifold, but once it was made, it interfered with the larger runners on my new Blue Thunder manifold.

That's why I went to the Mark III design.

Rocky

This is the hoist bracket used in the last three pictures in my first post, above.


IMG_5316 [Large)IMG_5319 [Large)IMG_5331 [Large)


Attachments

Images (3)
  • IMG_5316 (Large)
  • IMG_5319 (Large)
  • IMG_5331 (Large)
Last edited by rocky

Here is the Mark III design, in a "mock-up" (engine only) configuration (first picture), and prepared for lifting of the whole engine / ZF combination (3rd picture).

The two bolts on the rear (3rd picture) are to spread the load, and reduce the cantilever loads on the 4 bolts around the carb pad.

This cost me about $8 in steel, and 30 minutes of fabrication time. 

Note that it works on both the Ford Cast manifolds, and my cool new Blue Thunder manifold (3rd Picture).

Uploaded 01-15-2018 [15) [Large)Uploaded 01-15-2018 [16) [Large)Uploaded 01-20-2018 [9) [Large)

Attachments

Images (3)
  • Uploaded 01-15-2018 (15) (Large)
  • Uploaded 01-15-2018 (16) (Large)
  • Uploaded 01-20-2018 (9) (Large)
Last edited by rocky

LOW TECH  Down and dirty (very dirty) This is how I did it.

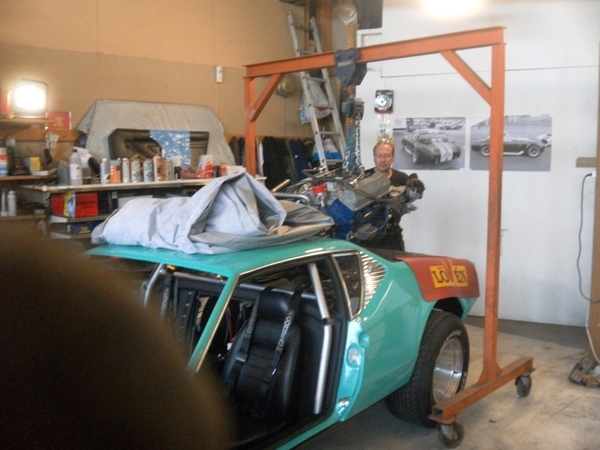
The engine and trans were suprising very well balance when chained this way.   . Removed the Carb , note the thick pad  against the tail panel , it was needed maybe 3 -4 inch of clearance .  I used a foldable picker just like the Harbor Freight model you Linked to  (don't remember where I bought mine, have gone through a couple different models and capacities over the years - motors keep getting lighter. )    Will protect the trans from the chain contact area going back in.  

No I won't be using the roof as a work bench for the install after it comes back from paint. LOL  ( That drove my son crazy. )  IMG_20180924_233559IMG_4928

Attachments

Images (2)
  • IMG_4928
  • IMG_20180924_233559
Last edited by jerrysr

Add Reply

Post
×
×
×
×
Link copied to your clipboard.
×