The chassis of mid-engine cars like the Pantera are designed around very specific parameters, and the chassis behavior (balance) can be very sensitive to how it is set-up. The designers (in this case none other than Gian Paolo Dallara) leave very little room for "customizing, experimentation or improvement” because they designed the chassis to explore the limits of performance from its inception. It would be counter-productive for a person such as myself to assume they could improve upon the engineering of someone with the credentials of a designer such as Dallara. A mid-engine sports car chassis is therefore not a crude apparatus like the chassis of a 1960’s era muscle car or Mustang.
All the various aspects of chassis design and chassis componentry impact each other, and must work in harmony. Therefore from the perspective of Pantera International there are several topics, including the topic of wheel size, that dove tail into the larger topic of chassis set-up. Its important to conceptualize how these things interact with each other before we go about altering them.
Before getting started there's one thing I must point out. North American Pantera owners and enthusiasts are not accustomed to seeing the Pantera sit as low to the ground as it was originally intended to sit. They're accustomed to seeing it sitting high, like it was on stilts.
PreparationTires:
The front tires should be about 24.0 to 25.0 inches in diameter. Tire diameter affects appearance due to the way in which the diameters of the tires match or vary from the arch of the fender wells. Tire diameter also impacts ground clearance. The rear tires should be about 2 inches greater in diameter than the front, plus or minus a quarter inch. But never more than 27 inches diameter.
The 1971 and 1972 Panteras (Pre-L) were set-up for a tire combination having a difference of 1.7 inches between the OD of the front and rear tires. The later standard body Panteras (i.e. the L-model Panteras, the European GTS versions, the North American GTS versions and the Group 3 versions) were set-up for a tire combination having a difference of 2.3 inches between the OD of the front and rear tires.
If your Pantera is equipped with shocks lacking ride height adjustment (such as the OEM shocks or the red body Koni shocks) then as the difference in front tire to rear tire OD diminishes the front of the car will sit higher in relation to the rear, as the difference in tire OD increases the front of the car will sit lower in relation to the rear.
If your Pantera is equipped with shock absorbers having adjustable spring pre-load, and you adjust the vehicle’s ride height to achieve a level chassis, then as the difference in front tire to rear tire OD diminishes the front wheel wells will “sit-over” the tops of the front tires a bit, and the front of the car will ride a bit lower. As the difference in front tire to rear tire OD increases the gap between the front wheel arch and the tops of the front tire will increase, and the front of the car will ride a bit higher.
In preparation of adjusting the chassis the various chassis components should be in known good condition:
• Control arm bushings of OEM rubber construction should be new enough that the rubber is compliant rather than hardened by age and use. If the bushings are of poly-urethane construction they should be in good condition, and they should be of the design that promotes rotation of the bushing around an inner sleeve, rather than the older type in which the eyelet of the control arm rotates around the bushing. If spherical rod ends are employed they should have no play.
• Ball joints should be tight, they should have no excessive play, they should move freely as the suspension moves up and down or as the front tires turn left or right. The rubber boots should have no rips or tears.
• The difficult job of adjusting front wheel camber is much easier with the addition of camber adjusters (aka camber locks) to the front upper ball joints. The adjusters prevent upper ball joint slippage too.
• The bushings attaching the rear suspension vertical supports (i.e. the hub carriers or uprights) to the lower rear control arms should have no play in them, and should operate smoothly as the suspension moves up and down. It’s not uncommon to find these bushings having excessive resistance to motion (i.e. friction) or to be seized tight.
• The steering rack should be in good condition, the rack bushing should be tight, and there should be no unwanted play. The rubber boots should have no rips or tears.
• The tie-rod ends should be tight, no play.
• The anti-sway bar pivot bushings, those located in the middle of the bars attaching the bars to the chassis, should be in good condition. This is a good application for replacement bushings made of poly-urethane.
• The method in which both anti-sway bars attach to the lower control arms is very poor; the attachment has an insufficient range of motion. Improved attachment hardware utilizing spherical ball ends is available, and highly recommended. Poly-urethane bushings have less range of motion than the OEM rubber bushings; therefore the use of poly-urethane bushings for attachment of the anti-sway bars to the control arms is discouraged. Such attachment has been known to snap anti-sway bars in two, break attachment straps, etc.
• Front wheel bearings should be cleaned, lubricated and properly adjusted.
• Rear wheel bearings should be tight. If they are not tight they should be replaced (an improved wheel bearing kit is available from Panteras by Wilkinson). The axles should be inspected for signs of damage caused by spinning within the rear wheel bearings (they should be a press fit) and the axles should be repaired if they have been so damaged.
• The shock absorbers should be in good condition; old shock absorbers should be rebuilt or replaced.
If your Pantera is a concourse car, and original looking shocks are desired a set of original black “Ariston” shocks (manufactured by Koni) or a set of red body aftermarket Koni shocks can be rebuilt and painted which ever color is appropriate for the particular car (early North American Panteras were equipped with black Ariston shocks, later North American Panteras were equipped with blue “Telecar” shocks). The Ariston and Koni shocks are the only rebuild-able shocks designed to use the factory springs.
The dampening of the OEM shocks and red body Koni shocks is best combined with tires having taller sidewalls, such as tires designed for 15” wheels or 16” wheels.
If OEM style shocks and springs are employed the ride height shall not be adjustable other than removal of the spacer installed by Ford. If you prefer to use the chassis as it was set-up by Ford then we encourage you to do so. However removal of the spring spacers installed in North American Panteras does not impair the Pantera’s performance or make it dangerous. It lowers the ride height of the vehicle to its intended (European) setting and improves chassis performance. Removal of the spacers is recommended for performance minded owners.
If your Pantera is NOT a concourse car, then replacement of the OEM shocks with aftermarket shock is a wiser choice. See the note regarding shocks in the “improvement” section.
ImprovementsIf you prefer to use the chassis as it was set-up by Ford then we encourage you to do so. If you wish to explore the performance built into the chassis, and/or the performance to be gained with modern tires and shock absorbers then we encourage the following modifications.
• Modern low profile tires outperform older generations of tires in every way; they outperform the tires designed for the 15” wheels when the cars were new, and they outperform the tires designed 25 years ago when 17” wheels first entered the scene. We suggest 225/40R18 or 245/35R18 front tires combined with 285/35R19 rear tires as a good modern tire set for the Pantera.
• The OEM shocks are only recommended for tires designed for wheels of 15 inches or 16 inches in diameter. The stiffer sidewalls of modern low-profile tires require shocks that operate with less friction and are designed with improved dampening characteristics. Modern gas filled shock absorbers having adjustable dampening and adjustable spring pre-load are a necessity for Panteras equipped with wheels larger in diameter than 16 inches. Adjustable spring pre-load is necessary if you wish to “dial-in” the ride height of the chassis.
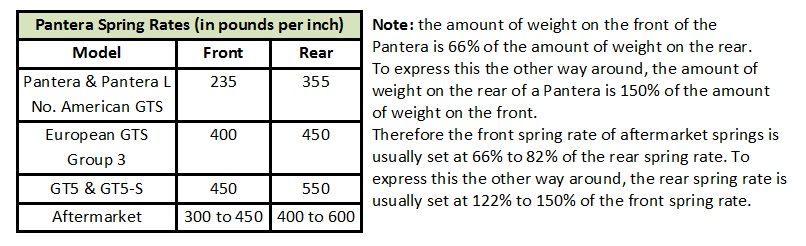
• Aftermarket shocks equipped with adjustable spring pre-load require new coil-over springs; the diameter of the OEM springs is too large for the new shock absorbers. Spring rates for the new springs must be selected. It would be erroneous to believe the spring rates of the OEM springs will complement changes in the tires and shock absorbers; the new springs need to be firmer. Obviously the spring rates shall impact the “performance and balance” of the chassis. The faster the car is driven, the lower the car sits on its suspension, the heavier the car is, the stiffer the springs need to be.
• Ford reduced the size of the rear anti-sway bar in North American versions of the Pantera from 7/8” OD to 3/4" OD to reduce the likelihood of oversteer. The 7/8” OD bars (22mm) were installed in European Panteras however, and are available via Pantera parts vendors. Installation of a 7/8” OD rear anti-sway bar is recommended for best handling.
• Modify the upper front control arms to allow for additional caster.
Dallara originally designed 6° positive caster into the front suspension, but Ford reduced it to a dismal 3° (Pre-L) in order to slow down the response to driver input at the steering wheel and to replace the possibility for oversteer with the earlier on-set of understeer. The move to Goodyear Arriva tires in late 1972 was accompanied by a further decrease in caster, to 2-3/4°.
There is minimal provision for adjustment of the front suspension caster. It is for the biggest part built into the chassis. If the chassis is adjusted to sit level as recommended, the caster should be 2-3/4° to 3°, unless your Pantera is a push-button version or a European version.
2-3/4° to 3° of caster is not enough for stability in a sports car with such a low amount of weight over the front tires. It also diminishes the amount the front tires “lean” into a corner when they are turned. If you wish to set up the suspension for better stability, for quicker and more precise response to driver input, for improved front tire “grip” in corners (less understeer), and to restore the balance originally built into the chassis, you may want to consider increasing the front caster (reversing Ford’s changes to the front suspension). The most common method to increase front caster is to modify the upper front control arms to allow more caster adjustment. The car responds better to at least 4 degrees of positive caster. The caster setting is sensitive to the width and diameter of the tires, air pressures, chassis ride height settings, etc.
Changes in caster may impact your Panteras “bump-steer” behavior.
AdjustmentChassis “ride height” and alignment adjustments should be made with 1/2 tank of fuel and a driver & passenger each weighing approximately 150 pounds +/- 25 pounds sitting in the seats. The tire pressure must also be adjusted to the settings you plan to use.
North American versions of the Pantera were rated for tire pressures of 28 psi front, 26 psi rear. The lower pressure for the rear tires was intended to combat “oversteer”. European versions were rated for 31 psi air pressure in the rear tires; we feel the European pressure recommendations are a good starting point for the performance minded owner. We have no control over what size tires you shall equip your Pantera with; therefore it shall be necessary for you to experiment with the tire pressures to achieve an ideal setting. That ideal setting may achieve equal wear across the tires, or equal temperatures, or balanced handling, or highest cornering speeds. It is up to you to decide what criteria you shall use to establish the ideal tire pressures for your Pantera. As you may expect, the Pantera’s handling is sensitive to tire pressure, tire width and tire diameter ... things that affect the tire’s contact patch.

(1) Rear Ride Height:
The rear ride height is adjusted using the spring pre-load adjustment of the rear shocks; it should be set so the lower rear control arms are level to the ground. This is the lowest recommended setting, providing the least amount of ground clearance, the lowest CG (center of gravity), and the best handling. The term “handling” refers to both (1) the most precise and quickest response to driver input via the steering wheel and (2) the ultimate tire grip and speed during cornering.
Whereas many automobiles are “lowered” to improve handling, the Pantera was designed to be about as “low as you can go” right off the showroom floor. Of course, Ford altered the ride height of North American Panteras by installing spacers between the shock absorbers and springs. The OEM spacers were about 5/8” thick in the rear and 1/2” thick up front.
If this ride height is too low for you, and you prefer something a bit higher, you can adjust the pre-load more to raise the rear of the Pantera further, in the same manner Ford did, and with the same impact upon the vehicle’s chassis performance.
(2) Front Ride Height:
The chassis was designed to sit level, the frame rails between the axles, running along the side of the car beneath the doors, should be parallel with the ground. After setting the rear ride height, the front height is adjusted using the spring pre-load adjustment of the front shocks to achieve a level chassis. A 24 inch bubble level on the door sills can be used to “rough-in” the spring adjustments. However, measurements must be taken to make sure the ride height is equal distance to the ground at four points; i.e. front to rear on both sides of the car.
When the chassis sits level, the axis of the control arms are also level, in other word there is no anti-dive or anti-squat built into the suspension. If the chassis is set-up properly no anti-dive or anti-squat is needed, the chassis will remain level during braking and acceleration.
Changes in front ride height may impact your Panteras “bump-steer” behavior.
If the tires are the right diameters, there shall be a small gap between the OD of the rear tire and the rear fender arch, fairly even all the way around the circumference of the tire. There shall also be a "proportionally equivalent" gap between the outside of the front tire and the apex of the front fender arch.
The car will sit fairly low to the ground if the rear ride height is set to achieve level rear control arms; there shall be enough ground clearance to get a floor jack under it, and clear driveways, but not much more. (3) Alignment:
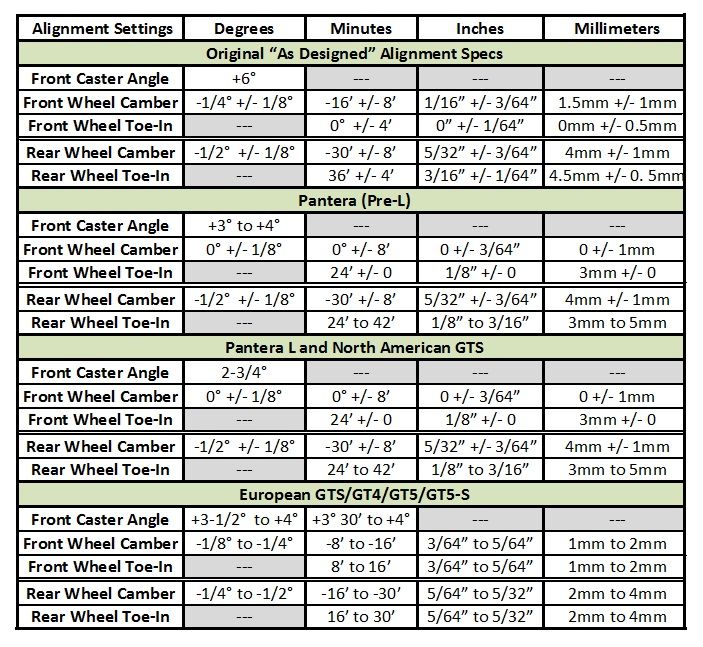
Referring to the diagram below, the “As Designed” alignment specs reflect the settings developed under the direction of Dallara. To slow the response to driver input and encourage the earlier on-set of understeer Ford reduced front camber from 1/4° to 0° while they increased front toe-in from 0” to 1/8”. Ford did not alter the rear camber settings because they did not want to do anything to reduce the grip of the rear tires in corners.
If you have no interest in deviating from Ford’s settings, then we encourage you to use them. If you wish to explore the performance built into the chassis, then we encourage you to use the “as designed” settings or perhaps the settings designated for the European GTS.
(4) Bump Steer:
Test-drive your Pantera after all these adjustments have been made. Determine if the vehicle's directional stability over bumps is satisfactory; if not then bump steer needs to be adjusted. Adjusting bump steer involves altering the height of the steering rack to achieve a mounting height where the changes in “toe” are as linear as possible during suspension deflection over bumps, rather than toe increasing or decreasing with the amplitude of suspension deflection in a non-linear way.
The chassis of #6018 has not been adjusted to accommodate the diameters of the new tires & wheels; the rear of the car is set-up properly but it sits a little too low in the front. See how the front wheel arches overlap the front tires a bit, the previous set of tires were only 1 inch difference between front and rear OD (24.7" OD front, 25.7" OD rear). The new tires have a front to rear difference in OD of 1.7 inches (24.7" OD front, 26.4" OD rear). Once the chassis is adjusted things will look better. There's no denying however this car sits low to the ground ... as designed.


