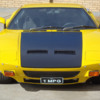
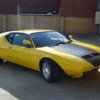
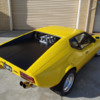
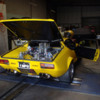
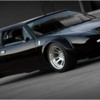
New colours for Pantera 4384.
Bonnet & boot lid painted satin Black.
Ran the Pantera on the Dyno today at West Racing here in Perth.
Tuned real nice up to 4500 rpm.
Then the computer comes up with a "Sync Error" & the car starts to backfire.
It's looking for the Sync sensor which goes where the Distributor used to be.
It's there, just not wired in as we were running the tune the same way the injection was designed, (Older 80's setup & was without the sync).
But the Motec seems to want it there so will have to wire it into the computer & get it back on the Dyno.
So far its producing 320hp @ 4500 RPM at the wheels.
Still has 2000 RPM to go so it may do somewhere in the region of 375 HP at the wheels, which would equate to around 500hp at the crank.

We chewed around 35 litres, (8.5 gallons) of 98 octane today on the Dyno so the car is living up to its "1 MPG" plate!

Here are a couple of Youtube videos of it on the dyno.

Oh & CRANK THE VOLUME !!!!

http://www.youtube.com/watch?v=1h3_I9bm_wg

http://www.youtube.com/watch?v=BovQc9vBdjo

regards,
Tony

Attachments

Images (1)
  • NEW_COLOURS_5_A
Last edited {1}
Original Post

Replies sorted oldest to newest

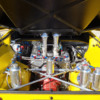
Engine, Original 351 Cleveland 30 thou over.
Flat top forged pistons.
Balanced crank.
CHI 4V alloy heads.
11:1 compression.
High volume 7 litre sump pan.
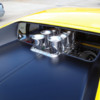
8 x 48mm throttle bodies.
Custom made Velocity stacks with internal filter screens.
M48 Motec ECU.
2 x electric water pumps, (first one runs with ignition, second pump comes in at 95 degrees C).
High flow remote truck bypass Thermostat in custom housing mounted next to Swirl bottle at right rear of engine, (for easy access & maintenance).

Attachments

Images (1)
  • NEW_COLOURS_18_A
Last edited by edge
The car currently has 15x9.5" Front rims & 15x13" rear rims.
Tyres are:
Yokohama 285/40-15 Front.
Yokohama 345/35-15 Rear.
They are spun Speedway half rims by Sander, so the wheels are three piece.
Great for getting the offset exactly right & really lightweight.
Centres are Ford pattern Forged alloy.

I have started making new rims.
These are:
17x9.5" Front.
19x13" Rear.
I sourced these spun outer rims from ROH in South Australia.
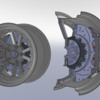
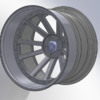
I will be machining the centres from billet, GT4 style 10 spoke.
Shown here is the new design front wheel.
Front brakes are 13" Wilwood GT rotors & Wilwood 2" alloy hats, (fitted to the outside of the hub).
Aftermarket alloy wheel hubs from IPSCO.
Calipers are Brembo 8 piston Monobloc's.

regards,
Tony.

Attachments

Images (1)
  • 17_cutaway_copy
Will, thats a good point & I will try it on the next Dyno run.
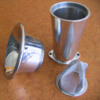
The filters are only modified stainless Tea strainers that go inside the stacks, so the air flow is hardly affected.

I do have some fine filter snap on socks made by "Outerwears" that go on the top of the stacks if I go on a decent trip & likely to encounter dusty road works.
They will certainly reduce power.

regards,
Tony.

Attachments

Images (1)
  • Velocity_stack_assemb_copy
Sure Laslo.
Although I don't really want to go making a set of rims for someone.

The outer rim halves are not that expensive, but the centers are going to be hell pricey.

I buy a lot of Aluminium for my CNC so get fairly decent prices.
But the 4 billets alone are going to cost $5,000.00 if I buy here in Australia.
In the USA the billets will only cost $2,500.00, so that's where they will come from.

At the moment the idea is to find a machine shop in the USA that is close to the Aluminium supplier, ship straight to the machine shop, then to OZ.
Reason being is that each billet weighs 75 kg & finished machined is only 6 kg.

I already have the steel flares required to fit the wheels into the body.
Rear flares are GT4, but I'm using GTS flares on the front as I don't want to widen the front wheels outward too far.
Trying to keep good steering geometry.

I must say your black GT4 has been a real inspiration for me.
My car is one of those projects where you take it off the road for a few months, do a few jobs & then drive it again.
If I had the chance to strip it & start from scratch it would be a very different build.

I did contact Dragway where you had your rims made, he quoted over $9,000.00 to make 17" fronts & 18" rears.
But I was not happy with the way he welded the rims together & I wanted deeper dish spokes, (something I feel nearly all of the GT4 rim designs lack).
I also decided to move away from 18” rears as there is no longer a good selection of really wide 18” tyres.
Purchased the tyres ex USA which are:
FRONT: Bridgestone RE050A Pole Position 255/40R17
REAR: Bridgestone RE050A Scuderia 345/35R19

They are really large diameter rears, but I feel the 35 profile will be a better handling tyre than the 30 or 25, as well as look better.

regards,
Tony.

Attachments

Images (1)
  • 19_inch_3_piece_rim
Yeah no worries cool, and i know what you mean. My wheels were very expensive 9k, but i did get them to look exactly how i wanted them with pretty deep raked spokes (as well as deep dish), which resulted in having to have them machined out of the thickest chunk of billet they could get which made them heavy.

... Now am also having trouble with tyres for the 18's! ... might have to save my current tyres, keep that set of wheels to the side for shows etc and get 17's and 19's made as well later on ... I hate it when tyre company's discontinue tyres, it shouldnt be allowed! Mad

Attachments

Images (1)
  • lasgt4-09
Laslo, your right, the availability of suitable tyres is what the rim design needs to be based on.
(For that very reason I purchased two sets of rear tyres just in case they are discontinued).
Sorry, by deep dish I did mean the deep raked spokes.
Although the dish is an important visual appeal as well.
Wheels such as PIM's have flat spokes & even Wilkinson would not do the deep raked spokes I wanted.
The look of your wheels is what I'm after.

Out of all the Pantera’s with aftermarket wheels your wheels are the best I've seen, (only my opinion obviously).
A combination of the original GT4 look, with deep dish, deep raked spokes, that 70's smaller front wheel look & the massive rears.
Also what is important is to make the spokes on the rear wheels thicker, (wider) than the smaller front wheels.
To keep the correct proportions between front & rear.
Otherwise with such large rim diameters on the rear the spokes can look too spindly.

I’m taking my time on the computer getting the design just right, no rush.

Yes, it’s the thickness of the billet that makes the rears so expensive.
480mm diameter x 155mm thick 6061 T6 alloy.
That’s a big chunk of Alloy !

regards,
Tony.
yeah, the combo of deep rake and deep dish meant that there is a fair bit of offset and cantilever force on the rear wheel hubs, not sure if its a good thing really and gotta keep eye on wheel bearings too .... and ... also in the back of my mind i keep thinking about the wheel studs, i think i better get heavy duty thicker ones sometime soon before they snap ...

I have often thought tho, isnt it the same thing with modern cars if your wheels are really wide but the outer rim is flush with the hub, and all the offset will be on the inside, there will still be that same cantilever force if there is camber etc?? ... in theory it seems to make sense, but im sure its better to have it this way??
Laslo.
I have modified my rear uprights, bored out & shrunk fit/scotched keyed a sleeve in.
Then fitted large 80mm OD taper roller bearings.
So they are very tough.
I stayed with standard length M12 wheel studs to maintain strength.
When the new rims are made they will also have a centre location diameter to share the load.

With a modern car & a front face wheel, to maintain the same track the car would have longer suspension arms.
So uprights, brakes & suspension arms are tucked up inside the wheel.
Most of the cornering loads are transmitted to the wheel rim at the outer shoulder of the tyre.
(Hence the reason why offroad racers only run bead-lock plates on the outside & not the inside of the rim as this is where the leverage is).
The force on the rim will remain the same, but the rim construction is different.
So the modern front face rim transmits the loads directly into the face of the rim where the studs are.
This is more ideal.
As opposed to the Pantera outward offset rims where the load is trying to flex the outer rim.
Not as ideal, but looks better on a 70's vintage car.

So it’s another good reason not to run super low profile tyres, (20 & 25 profile) on rims that are widened outward. As the tyre has very little give & will transmit more shock loadings to the rim.

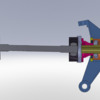
Attached is a picture of a section view of the modified Pantera upright.
Orange area is the new steel sleeve on the inside of the upright.
As mentioned above, this is shrunk fit & scotch keyed into the original upright.
The upright is cast iron construction so welding is a bad idea, hence the mechanical fixing of the sleeve.
The outside of the upright does not need boring out to suit the bearing, its already 80mm diameter.
Blue area is the original upright.
Yellow area on the inside is a bolt on Aluminium seal housing.
Red area on the outside is also a bolt on seal housing.
Red area on the inside is the original driveshaft flange.
Aqua green area on the outside is a combined axle spacer/inner seal diameter.
Black area is an Alloy Wilwood brake rotor hat mounted on the outside of the axle hub face.
Wilwood rotors.
This drawing also shows the Adaptor flanges & 930 CV joints/axles.

regards,
Tony.

Attachments

Images (1)
  • pantera_mod_rear_upright
Post
×
×
×
×
Link copied to your clipboard.
×