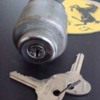
Looking for some help w/ the stock Mangusta ignition switch. I'd like to replace an ugly generic replacement on #1010 with something as close to original as possible.....especially regarding the quality of the key. Imo the current group of reproduction switches - Mr. Fiat, etc - fall short here, so at least initially searching for a period Fiat item is my preferred approach, even if it turns out to be an imperfect match.

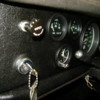
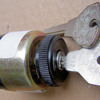
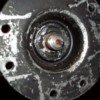
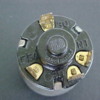
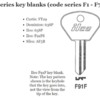
The attached image shows the desired type switch from a 1970 'survivor' Goose. I assume it's a SIPEA unit; maybe originally a FIAT 600 part. The perplexing part is the key's rounded shape. I thought the 'standard' OEM key was more of a polygon (shown in pic #2). Can anyone with an original key confirm or illustrate what the top of the key looks like? Maybe there were more than one style used? Is 'FIAT' evident on the original key, or perhaps 'SIPEA'?

By looking at old photos it's clear that a lot of original switches have been replaced with various alternatives. (I've seen smoked ignition terminals on more than one wiring harness so contact resistance may have been an issue). The classic Bosch switch seem to be the most common replacement. Thanks for any help, regards, Nate

Attachments

Images (1)
  • Goose_dash_8MA1046
Original Post

Replies sorted oldest to newest

While I can't comment on the key shape (mine is definitely not an original), the ignition switch in #1114 is almost certainly original to the car and it is a Magneti Marelli 15/54.

If you need photos of anything, just ask. My car was largely original so I may be able to help.

Mark

Attachments

Images (1)
  • Ignition_Switch
You can find people in Hemmings who rebuild anything electric for cars. If you have an original switch they can restore it. Mine acted up twice, turn the key to stop the engine and it would keep running. I took it apart, it is pretty simple inside. I cleaned it up, it looked new anyway, and used Lock-Eze in the keyholeand it was fine for years. It did it again this Fall and I used Lock-Eze again.

The original has a notch in the base below the threads that matches the hole in the instrument panel to keep it from twisting. I used an aftermarket switch for awhile and it would keep twisting.

I would have your original rebuilt, it will be better than new.

DICK RUZZIN
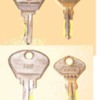
A picture of my keys......
Top one is door key, which is definitely a Fiat item (locks anyway) but this is a replacement blank.

There are two original ignition keys below it, the middle one being an original Magneti(sp?) key blank and the bottom one being a replacement blank if memory serves me.

I was always told that the ignition switch for early models (pre-German involvement?) was a Fiat "panel switch" from the 600 and other lines with flat panel dashes. 600 being most prevalent. I looked all over and found nothing. Only recommendations to find a generic switch and be happy.....!

My switch failed in a most dramatic fashion, as I think I outlined years back.....when a piece busted off the inside and fell down and shorted the main hot lead "in" to ground and melted stuff all the way back to the fuse panel. Was not a pretty site. NO FUSE PROTECTION ON THIS WIRE should be noted.....!!!

SO, if you absolutely must run an original switch, as least take the time to orient the switch so that the hot wire "IN" is at the 12:00 position!!! This could save your bazillion dollar car from becoming beer can slag in your garage......

THAT said, before my switch failed, when running my lights, the switch was always VERY HOT to the touch, indicating a bad connection (hindsight is wonderful isn't it! Wink ). When I replaced it with one of Nate's "ugly" switches, the hot switch scenario went away!!!!

I feel a LOT more confident driving my car places now!!!

OK back to original switches. These switches are big POS's.....and the Fiat world has pretty much sucked them all up.

I did purchase one of the Chinese made switches sold by someone in Greece, thru the British eBay site.....world class part right? Nope, world class POS again! The tumbler pattern resembled the profile of a paper clip and the actual switch action was hard and "kachunky" when moved.

Needless to say, I tossed that switch in my box of spare parts and decided that NOTHING is worth putting a BAD part in the car when it is such a CRITICAL PIECE!

What I would suggest perhaps, is coming up with a common switch, and having key blanks stamped to resemble the Morelli Magnetti keys..... or file/cut your key to "resemble" the original style......

Again, biggest thing I can say about this all besides good luck finding an original switch in usable condition, is to orient your switch so that the main hot lead is at the 12:00 position! This may put your key "upside down" perhaps for normal thinkers......but it's the way to go, unless you like watching smoke boil out of your ignition switch and wiring harness......while on the side of the road or anywhere for that matter!

Your choice, please be smart about it!
Cheers!!!
Steve

Attachments

Images (1)
  • DSCN0808
A few years ago I went through all the wire clips on the fuse box and cleaned everything. I guess a good idea would be to have a professional check the electrical system even if everything is working well. A little corrosion on a wire attachment means trouble.

If you have an original switch that is troublesome I still say that the best bet is to send it for rebuild. A good source will make it better than new.

Maybe a good idea would be to gather all the maintenance points that people have discovered and do some preventative care.

For me:
!.
Make sure you unbolt the front upper A-arms and grease the upper ball joint.

2.
After 40,000 miles, disconnect the shift linkage at each end to reverse the shaft 180 degrees. The u-joint wear points will be on the other side, like new.

3.
Same with the steering. It has two u-joints.


DICK RUZZIN
Dick,
re your maintenance points...slightly off topic...

1) Grease is good! For some reason I thought there was a grease zerk on that upper ball joint on mine....no reason to remove it, unless of course you are greasing the two nylon inner bushings to get rid of squeaking!

2) I don't know how you would reverse the shifter linkage. The heim joint on the rear portion of the shaft that acts as the support, is captive and cannot be removed. Also, I believe that there are two different lengths of the shafts on most cars. I thought I did see shift shafts that had two supports....but I didn't think that this was very common.

3) How would you reverse the steering shaft? Splined at the top and flanged at the bottom...would be a feat of engineering to do so... unless of course you are suggesting that any intermediateshaft is separated at the u-joints and turned 180 then u-joints reinstalled????

I think it would be easier to suggest to all that they actually grease their shifter u-joints AND the steering shaft u-joints!

Ciao!
Steve
STEVE,
1.
My upper front ball joint is covered by the top of the upper A-arm. Remove the three 8mm bolts, lift the A-arm, remove the small bolt and screw in a Zirc fitting at the top of the ball joint. Then grease it. You could drill a hole in the upper A-arm and install a permanent long Zirc that sits above the A-arm after re-installation.
2.
For the shift-linkage, just leave the two heims, my car has two in place on the subframe, after the shaft is loose at both ends and roll it over 180 degrees. Done.
On the steering, once you unbolt it at the front end and remove the steering wheel just turn it 120 degrees as there are three bolts in the front. You may have to drill some new holes in the steering flange to accept the wheel. Or unbolt the flange and reset it on the splined shaft.

My cars u-joints, steering and shifter shaft are not all greasable. Johnny Woods has a source for the trunions but I was told they are getting scarce, very expensive.

The work on the two shafts places the U-joints in a new position so the wear points are also new.

I also made a flexible removable cover for the two heims joints that are on the shift linkage where it is bolted to the frame to keep dirt out of it.

DICK RUZZIN
Dick,
Next time I have my front wheels off, I'll be sure to check that top ball joint!

As for #2, your car has one of the odd configurations for shifter rod with two trunions! I haven't bought any of the heim joints used for the trunions, but if memory serves me they are rather large ones and are expensive indeed! The bits that are on either end of the shaft with the trunion, are also welded on to the shaft! Sort of a permanent thing....but then not that much load on it to need replacing either!

I recall that my steering wheel flange was keyed! Not real excited about drilling 6 new holes in the flange......for now will keep greasing the u-joints that I have!

Odd that your main axle u-joints are not greasable! Makes the job a bit more of a bugger!

A cover on the shifter trunion is a great idea! The constant movement and proximity to the headers tends to wear/bake any lubricant off....leading to stiff shifting! Requires me to give it a shot of LPS or a finger full of moly grease to get things moving again! But some sort of a fire resistant flexible "stuff" would surely help with that!

Steve
Thanks to all for the input. I'm convinced the original Marelli switch has some issues (unvailability being one, certianly) and I'm now leaning toward a Bosch solution instead - cheap & eminently doable, better than the Chinese part I currently have.
As for the shift linkage the proximity of the one U-joint to the header looks bad. As you know everything is really tight in that area....will try to take a photo of the aluminum 'shield' that I have around the trunion and post shortly. In concept it should deflect at least some of the heat. More later! Nate
TEVE,
This is relative to the switch as it is about solving future problems, like worn out switches.

1.
UPPER BALL JOINTS
Remove the three 8mm bolts from the top A-arm attaching it to the upper ball joint, Lift it and expose a small bolt. Remove it and screw in a Zirc fitting. Then grease it. The squeaks will go away.
Herb Grass’s upper ball joint broke, it had never been greased. No worry though, the steering will get very stiff before that happens, a warning that it is going to happen.

2.
SHIFT LINKAGE.
To remove the shift linkage simply remove the 10mm bolt through the shift rod, the shift knob is attached to it.
Then loosen the u-joint on the shift box on the side of the trans-axle. Turn the entire assembly over, 180 degrees and re attach everything. You do not have to remove the Heims joint or joints that are attached to the rear subframe to do this.
Wear in the joints result in sloppy movement of the shift lever, sometimes resulting in different gears than expected. Eventually you will not be able to use all the gears.

3.
STEERING SHAFT JOINTS.
Unbolt the three bolts on the front of the steering shaft that attach it to the steering. rack. Remove the steering wheel. Remove the large nut at the top of shaft that is under the steering wheel. Rotate the shaft 120 degrees and re-attach everything.

Rotating the shafts re-positions the joints to points where they have not worn before.
Not all u-joints have grease fittings. Half of mine did not.

New joints are very hard to find, Johnny Woods has a source.

DICK RUZZIN
Dick,

OK I figured out your intentions here, but a separate post on "routine maintenance items" is in order I think! #1 would be replace or attend to ignition switch hot lead orientation!

As to your #1 about upper ball joints: Mine literally exploded in place. Upper and lower. When I took the pressure off of the front end at one of our PCNC tech sessions, and was checking things out, I had pieces falling out of them. Symptom was leaning wheels and horrible tread wear!!! Luckily I had new ball joints on shelf....unluckily they were 18 miles away back at home! Grease is recommended however you get it in there.....

#2 Shifter shaft: Ok I think you mean rotate the entire shaft, in place, 180 degrees. Not remove and swap end for end! Only one problem with this, that I have seen, typical Mangusta thing....not sure if the factory did this or well intending mechanics, but in some cases the main shaft that goes from the fulcrum point (nearest) and forward thru the firewall, has been bent with an ark of sorts, making rotating it a dicey proposition.

If the shaft is straight and unaltered, then what you suggest would work, providing someone hasn't welded the rear spline joint in place on the shaft! Give a mechanic a torch and he's gotta weld something......!

As for your #3, steering shaft, again as in #2, "YOUR MILEAGE MAY VARY"! Enclosed is a pic of my steering wheel mounting flange. You will see that the wheel mounting bolts are not symmetrical on 120 degree points, AND please note the key way that pretty much tells you where this thing is going to go. However, for all I know, a well intending prior mechanic of my car may have keyed this thing.....wouldn't be the first time that I have been misled by previous labor efforts......again, on my car.

Now, if you are the type that loves drilling holes OR you have a key way cutting tool in your shop, by all means, go for it. But I don't believe that many will have the means to do anything. Dick, your car may have been made without this key thing......and you can rotate your upper flange and there may be others that can do this.

Your mileage may vary!
Ciao!
Steve

Attachments

Images (1)
  • 100_0383_(Medium)

Question on keys ! actually, maybe 2 questions; 

   - is the Glovebox key the same as used for the doors ? 

  - (does anybody know) what the part numbers are for the keys? The door and glovebox are S.A.F.E.-Torino, but there (should be the Mangusta song) there are several variations....With names "FT32," then FT33, FT34, and FT35.... The seller here seems to use the same picture for each one...Months ago I bought a pair and hope so much that FT-35 is actually the right key  

 https://www.ebay.com/itm/Vinta...Q9zcGEodBg:rk:1:pf:0

Btw, the ignition switch seems more popularly known as a Q148  (-A, -B or -C, it seems). 

 Lastly, since a large pickle jar I labeled "precious bits" seems to be lost somewhere in the garage, I was happy to at least understand this weekend that the Glovebox Latch on the Goose is taken from an Alfa Giulia Sprint...So this weekend was spent buying loss insurance on Ebay (fuse cover from a Maserati Mexico, Mangusta emblem, and at least I know where to spend a lot of money to get a glovebox latch with 2 keys... ...And some day, I can dream that pickle jar shows up I won't have to beg and plead for help on the hood pins and heater knob...! Lee


Lee,

Your pickle jar is not lost.     It is "stored in a safe spot"........   Can't tell you how much stuff I have "safely stored" lately......! 

If your FT35 key fits into the locks you should be fine.     As to "what is correct?"   That's a loaded question......right as in "came with your car" or right as in came in all the rest of the cars?

These days, "right" can mean "it fits, looks old, and no one else can tell me otherwise..."!

Keep in mind that the factory and apparently it's suppliers used different parts as shortages occurred during production.....     There are no "correct front turn lamps, no correct side markers, no correct brake calipers, no correct dash parts....  ONLY different versions!!!!    I understand what you are trying to do though, get your car as original as possible to how it left the factory.

Problem is that the car right before or right after yours may have been different in tiny ways not seen until you unwrap things.......

Ciao!
Steve


Hi Lee, check this out!

http://reoriginals.com/gloveboxlock-n0108.aspx

...didn't know about the Alfa angle but had seen these latches on ~60's Maserati sedans (e.g., Sebring?? 5000GT??).  If the Reoriginals part comes with the keys shown it would be great for Mangustas  

I'll attach a photo of the stock glove box barrel this eve....it's 5-pin unit vice 6-pin as for the door lock so they are not interchangeable.  Regardless the same key works on both if things are set up right.  Like Steve says who know's what is totally correct(!) but fwiw the locks on my car are FT35 (i.e., Curtis FT35 replacement blanks fit), and I believe this corresponds to SAFE code '2000' series.  You should be good to go.....

Attachments

Images (1)
  • Goose 1010 glovebox latch a
Last edited by nate

Nate, thanks so much ! I always love to see naked pictures of mechanical things , and the find at my next door (to the car, not me) Texas shop is terrific--even the Alfa guys don't seem to carry the part (and amazing that even at Re-originals there is no attribution to whatever car it would go on…).

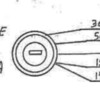
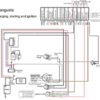
  Steve, believe it or not I went to work humming to ZZ Top's Blue Jean blues, '..if I ever get back my pickle jar, Lord, how happy could one man be...." But fyi, the "15/54" seems to be the designation for the terminal...Here from the original schematic;ignition switch

[update November 2022; The numbers in the schematic are DIN 72552 references, https://en.wikipedia.org/wiki/DIN_72552 . The "INT" designator isn't defined, but probably means "Ignition" and provides a dedicated contact for the Coil...At least, preserving an isolated contact to keep the car running is probably a smart choice. Otherwise, its pretty simple; Terminal 30 is the input from the battery/alternator, 50 is to the starter solenoid, and everything else is connected in Run.  Older switches and older definition distinguished a "16" terminal instead of the "15" terminal, either function as the hot wire to the coil and seem to do the same thing as the INT terminal.   The 15/54 essentially means "everything, both #15 class circuits (ignition) and #54 (kitchen sink of lights or whatever).

Nate clued me in a long time ago, Italian motorcycles had nearly the same switch, but (maybe except for Moto Guzzi) no "start" position (only 2 positions). Those switches are the Q149 series.]

Now, what does " Avviam" mean ? Lee

Attachments

Images (3)
  • ignition switch
  • Mangusta charging starting and ignition
  • q148c terminals
Files (1)
Last edited by leea

Ok, my (ex race car) has lost the whole key assembly, ran off a safety toggle only.

car now painted and need to get some parts to start fitting up as stock street car.  I have a (poor) copy of the Fiat Switch  but it’s only a 3 position (off, on and start) so no accessory.  

question is did the original switch have 4 positions including an accessory function?

(Steve have noted your comments re positioning the hot love at top!)

cheers

Larry

Larry, the Mangusta is a simple 3 position (off, run, start Magneti Marelli Q148C) switch. I thought that maybe Fiat 600 added the accessory position (the 4th position), but I think its likely that any transition to the accessory position happened only in the mid 70's and so then were probably ALL attached to steering column mechanical locks...At least, both Fiat 124 up to 1974 and Fiat 850 1972 were still 3 position only. The Goose accessories are mostly wired to operate all the time (and well, that means the window motors…but oddly, not the courtesy lamps in the front trunk and engine compartment, so as I can tell the ignition had to be ON for these to be used, and my experience was that leaving the ignition ON and motor stopped makes smoke if the points are closed.

  The Q161 seems to replace the Q148, I cannot really see a difference (and even, association to the "G" key isn't clear..


A couple choices that appear to be right (one clearly the “F” key, the other may be…Lee
https://www.ebay.com/itm/174899704956

https://www.ebay.com/itm/274104172630

Last edited by leea

Add Reply

Post
×
×
×
×
Link copied to your clipboard.
×