

Post #300 - I had to take it!
Here's a picture right out of the '80's
")
quote:Originally posted by Rocky:
It's Alive,...
There is THUNDER on the Street of the Panther again!
quote:Originally posted by Rocky:
Post #300 - I had to take it!
Here's a picture right out of the '80's
NAUGHTY, NAUGHTY! Got any more?
How about this one....
Engine Operation!
Here's some pictures....
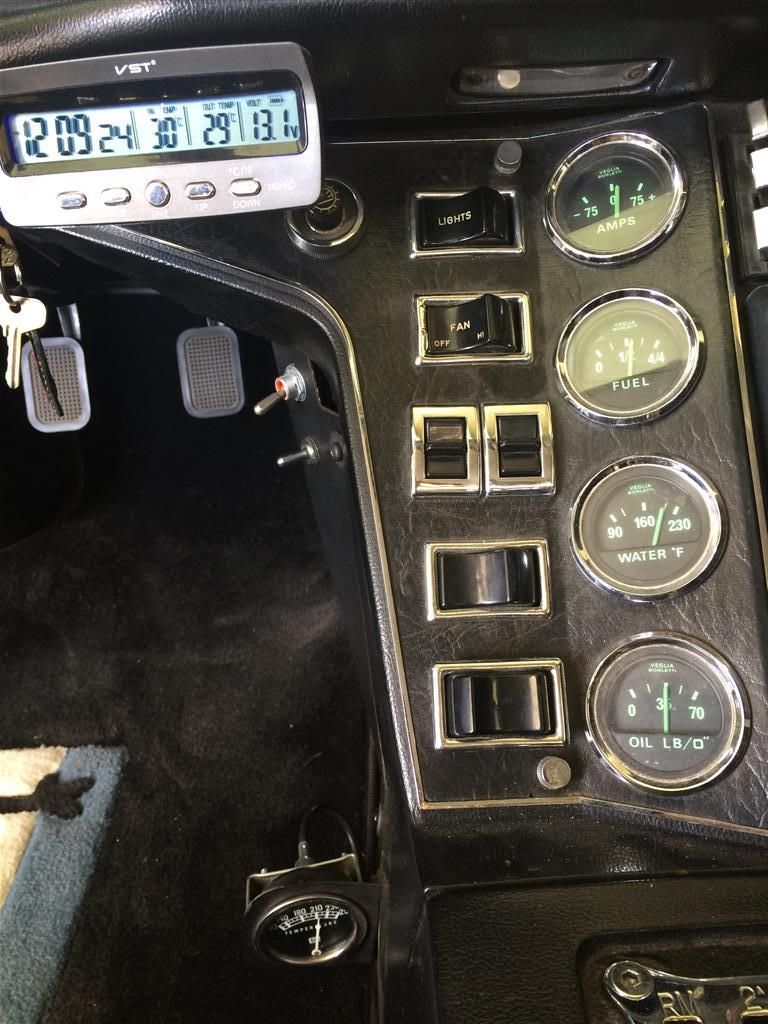
Instrumentation - I melted the heck out of my timing light pickup.....
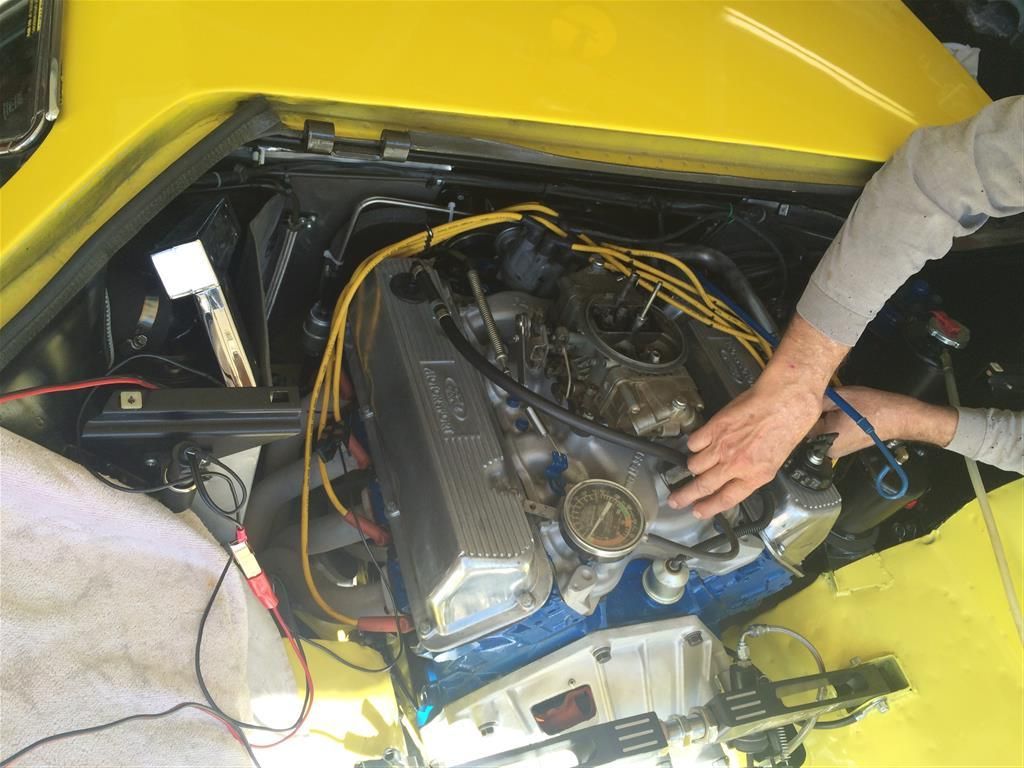
Innstruments... Don't believe the oil pressure value.. It is much higher (70 psi)
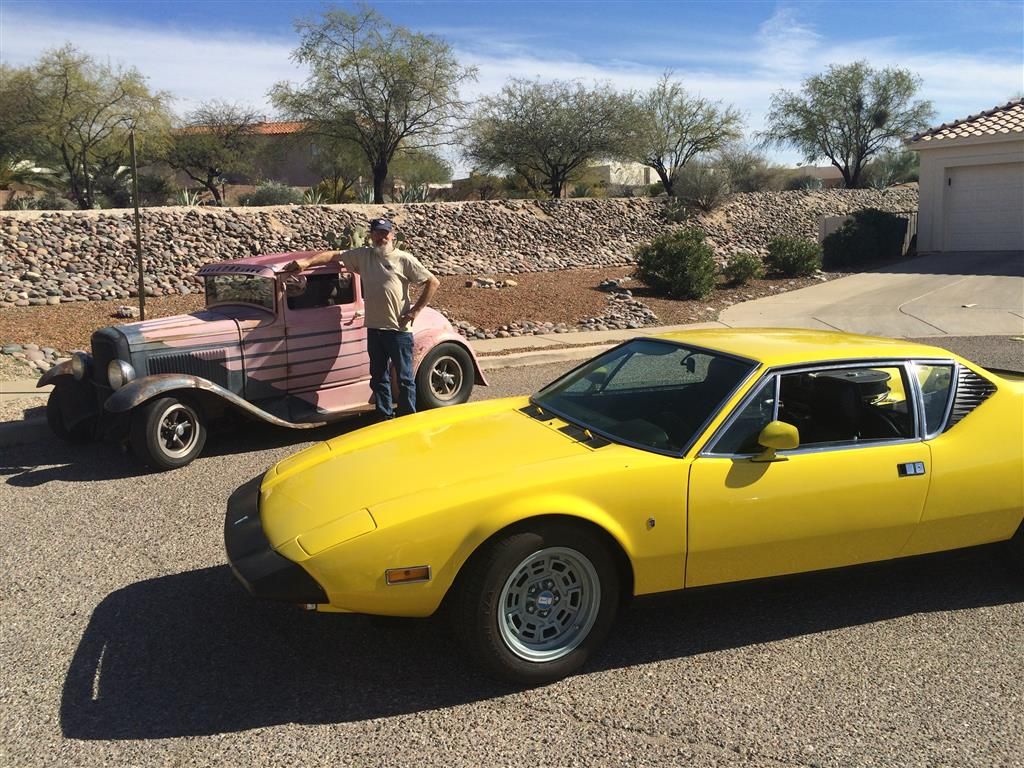
Wade's Model A with it's 429 Super Cobra Jet. I can't thank him enough for the support of "Build #2".
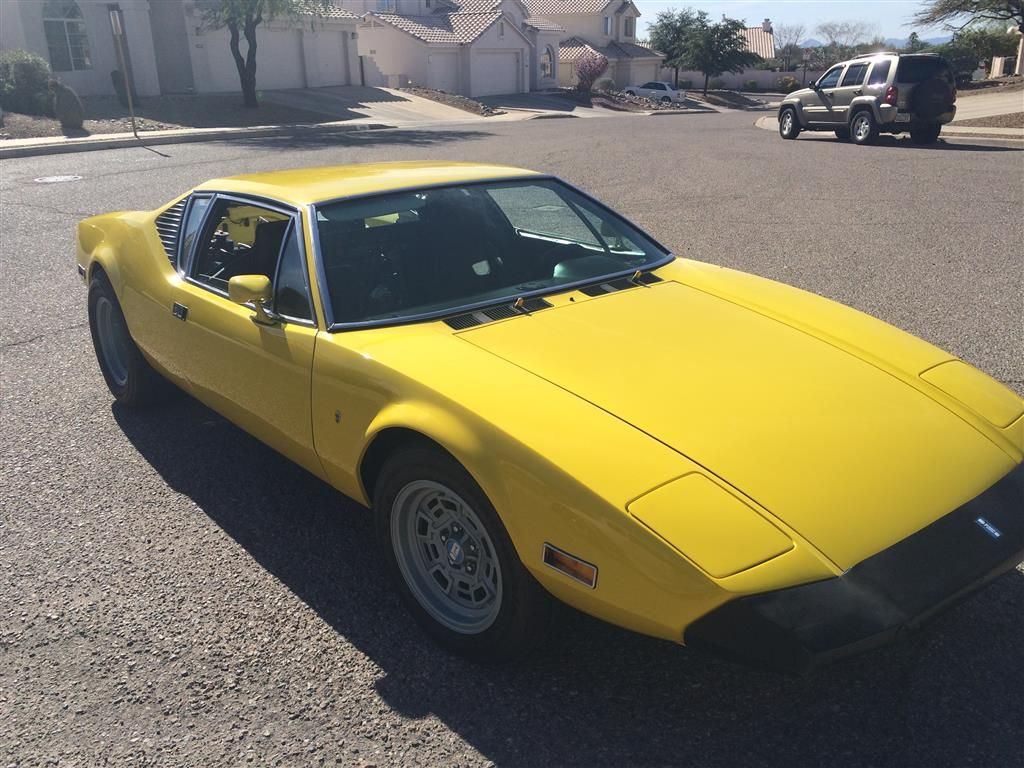
On the Road Again!
Engine Operation!
Here's some pictures....
Instrumentation - I melted the heck out of my timing light pickup.....

Innstruments... Don't believe the oil pressure value.. It is much higher (70 psi)

Wade's Model A with it's 429 Super Cobra Jet. I can't thank him enough for the support of "Build #2".

On the Road Again!

Mission Accomplished!
Still work to do, but..........
New engine installed, runs and drives!
ZF Rebuild Completed, no issues with:
2nd Gear Syncro Cone Replacement
Taller 5th Gear
Taurus Window Motor Conversion
Remote Heater Valve Mods and Manual Heater Shutoff
Reduced Bulkhead Cover
ATO Fuse Box Install
Battery Cut-Off Switch / New Battery
Inset rear bumper
Powder coated rear bumper and engine screens
It's great to have a Pantera again!
Rocky
Still work to do, but..........
New engine installed, runs and drives!
ZF Rebuild Completed, no issues with:
Taurus Window Motor Conversion
Remote Heater Valve Mods and Manual Heater Shutoff
Reduced Bulkhead Cover
ATO Fuse Box Install
Battery Cut-Off Switch / New Battery
Inset rear bumper
Powder coated rear bumper and engine screens
It's great to have a Pantera again!
Rocky
ROCK - N - ROLL !!!!!

Got my decklid installed tonight. I couldn't have done it without the wonderful Mrs. Rocky. She loves this kind of stuff (NOT!).

You can see the new inset / powdercoated bumper...


You can see the new inset / powdercoated bumper...


Nice work Chuck !
Ron
Ron
Nice job. Now go out and enjoy it. Mine will be done soon so that we can do some of these events together.
Thanks, guys - I'm driving it today.
It's funny, but these things are NEVER "done-done". I can always find more things needed...
* Air Conditioning
* DeTomaso Cover over Rear Sway Bar
* New Wheels
* ??
I guess that's part of the fun, and why David B. had to sell his white car.... He finally finished it!
It's funny, but these things are NEVER "done-done". I can always find more things needed...
* Air Conditioning
* DeTomaso Cover over Rear Sway Bar
* New Wheels
* ??
I guess that's part of the fun, and why David B. had to sell his white car.... He finally finished it!
Hopefully it doesn't take you 25 years to finish yours!
Oh come on David - from what I read, you had two Panteras, and the second only took you 14 years to get it right (and IMHO - your white car was SUPER!)
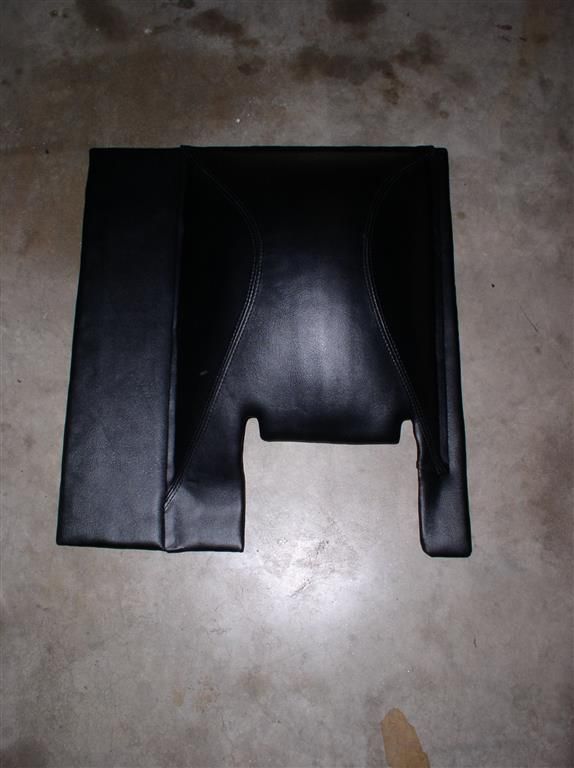
A little more progress...
I completed the reduced bulkhead recover work!
Results:
"New" Bulkhead Upholstery
"Quick Access" to Engine Cover
Mrs. Rocky gets three extra inches (legroom!)
I'm thrilled with the results. Very nice fit.
A little more progress...
I completed the reduced bulkhead recover work!
Results:
I'm thrilled with the results. Very nice fit.


quote:Originally posted by Rocky:...
I'm thrilled with the results. Very nice fit.
.
I agree, VERY NICE!
Thanks, Joe -
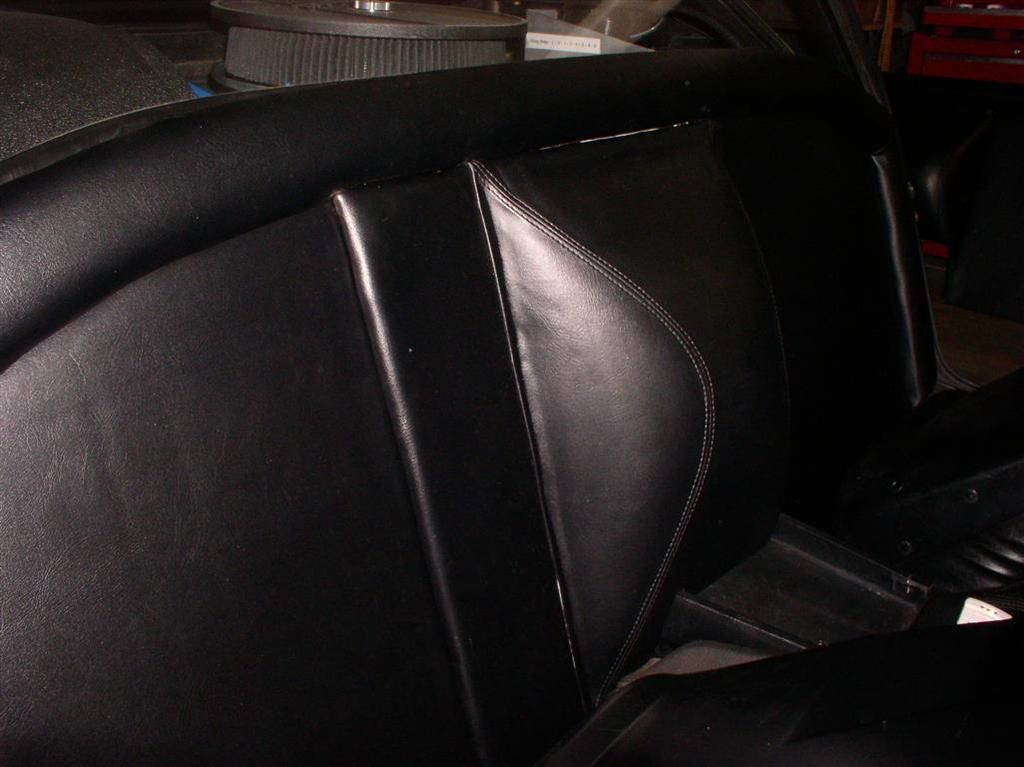
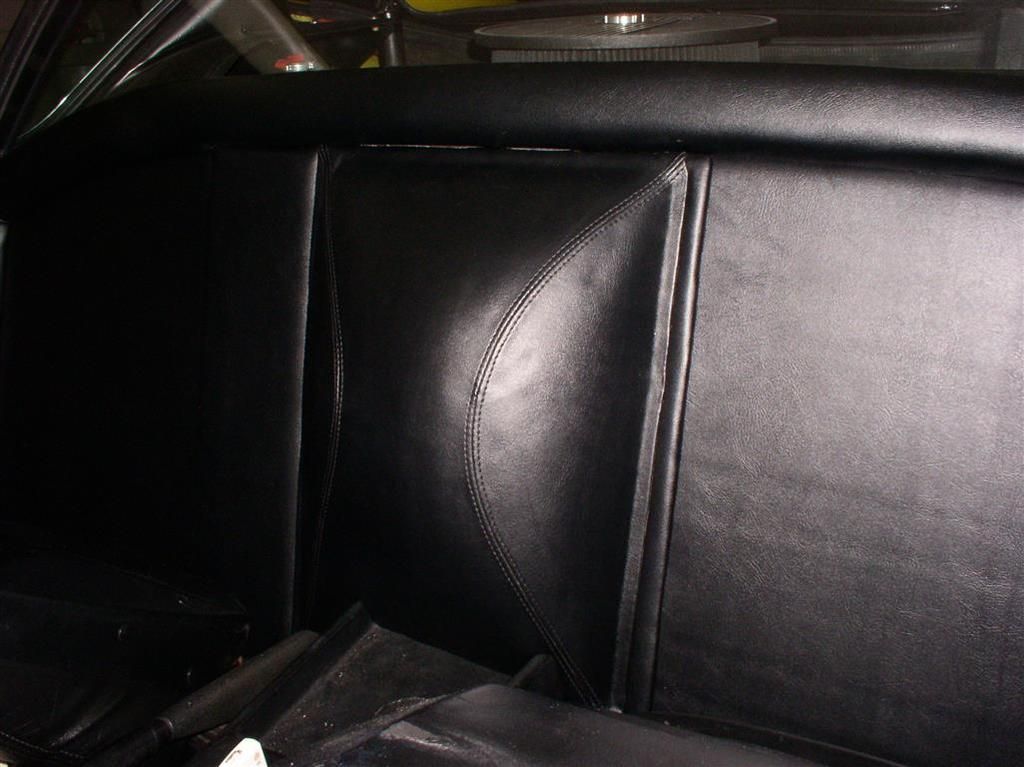
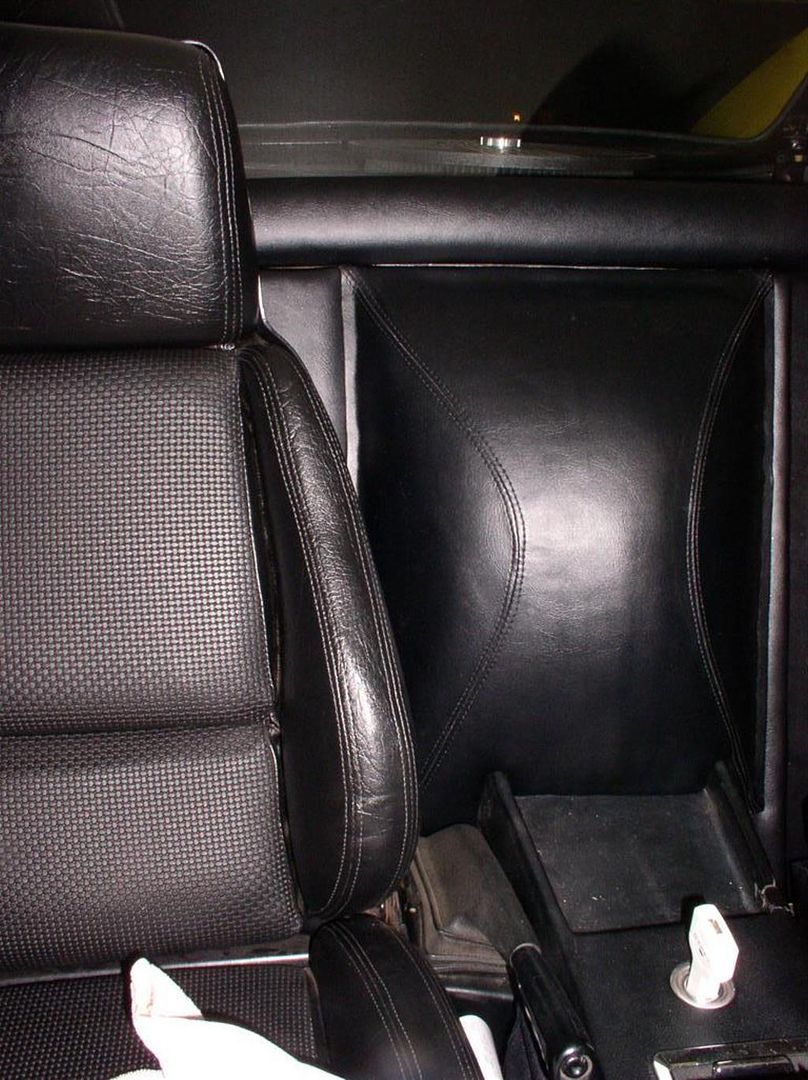
Did you note in the bottom picture how the "hump" goes over the edges of the dash tray? That was my custom design.
I lose a little of the tray, but it closes off that area.
Rocky
Did you note in the bottom picture how the "hump" goes over the edges of the dash tray? That was my custom design.
I lose a little of the tray, but it closes off that area.
Rocky
Nice job.... It looks great.
Nice work! Just how the factory should have done it.
Ron
Ron
Thanks, guys for the compliments.
Here's a picture of #5357 at C&C (Tucson) on 03-12-2016, and another car that I would love to get my hands on - (it's for sale!)
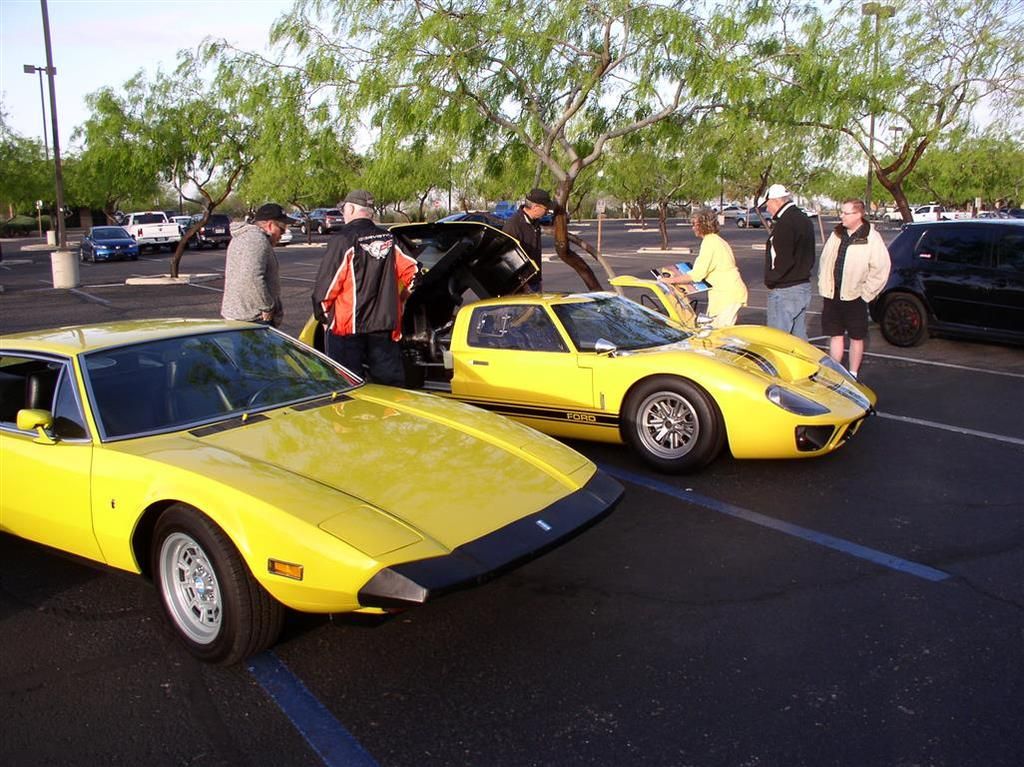
Slideshow of the event, below....
PS> That's a real GT-350 (motor is being rebuilt, that's a 302 in there now), and a couple of other neat cars...
Slideshow - Cars & Coffee - Tucson (March, 2016)
GT40 Asking price?
quote:GT40 Asking price?
I'll tell you later!
I updated the slideshow a couple posts up with pictures of Jim Click's Vintage Racers from "Fords on 4th" - a Tucson area car show held 03-13-2016.
JT - The girl who is selling the Superformance GT-40 is looking for ~130K
I've got the spec sheets - if you are interested - I can scan them and get them to you.
Rocky
JT - The girl who is selling the Superformance GT-40 is looking for ~130K
I've got the spec sheets - if you are interested - I can scan them and get them to you.
Rocky
Hey Rocky,
Looks fantastic man. Really first rate.
Looks fantastic man. Really first rate.
Rocky;
Like the engine "bubble" cover. Was trying to figure how I wanted to do the same. See you left the upper horizontal upholstered section intact.
I like that.
Like the engine "bubble" cover. Was trying to figure how I wanted to do the same. See you left the upper horizontal upholstered section intact.
I like that.
Thanks, Jag -
If you look at page 24, you can (sort of) see how I cut the hump off the big panel.
I was able to do the upholstery on the big panel myself, but the removable "bubble part", with the curved seam was too much for me. That part cost me $150.
I did use the two vertical metal "attachment strips" (with nuts) on the edges of the bubble to hold the material down. Don't throw those away!
Rocky
Jag, cutting the firewall bubble loose is something racers did in the '70s. The Gr-3s came that way, I'm told as running a factory 4-point roll cage meant the panel could never be removed unless the cage was first removed. Its quite simple: the leatherette upholstery is done separately on the bubble and the main panel. By unbolting the two metal strips and pulling on the bubble-upholstery, it comes off.
To cut the thin fiberglas, use a fine- tooth wood saw. Leave about 1" across the top. When the bubble is cut free, trim it until there's about a 1/2" clearance all around, and re-glue the removed upholstery back onto the cutaway bubble. Stretch & wrap the main upholstery as far as possible around the main fiberglas panel and touch up visible cut edges with semigloss black paint (or even a Magic Marker) so when the two panels are back together, the cuts are invisible. Two strips of velcro will hold the cut-free fiberglas bubble to the underlying steel access panel.
This has been the subject of several illustrated articles in the POCA Newsletter during the past 10 yrs, all done at home. It is also the first step in self-constructing a flat-firewall Pantera.
Thanks Rocky, Seems to close to retail pricing for me.
So just to keep the team up to date....
Fixed my 700 CFM Carb Issues...
Several other minor corrections applied... like wiping off the rear cross bar, and adding an additional hold down screw to my radiator cover panel. Oh, I also cleaned my windows yesterday.
Once these cars are set up, they seem to run pretty well.
Just got back from a run to Mount Lemmon with the Cobras. It was fun.
Only one minor issue - one of the Cobras hit a rock, it kicked up, and whacked into the Tranny, and put a big hole into it. The Cobra pulled in to the parking lot STREAMING tranny fluid.
I just learned the T56 (I think) Trannies use ATF...
Attachments
Images (1)
")
")
Chuck, GM started switching their std trannys to ATF (a 0-wt hydraulic oil, not a load-bearing lubricant) over 2 decades ago. I found it full to the brim in an '82 Z-28 4-speed that seized 2nd gear to the mainshaft at an event, even though the gear was submerged in ATF. Most of us suspect the switch was done to gain about 1 mpg in their gov't D.O.T. CAFE rating; too bad about your warranty claims.
Most savvy car owners immediately switched their boxes back to 80 wt gear lube with zero problems from the 'thicker' lube. A few of my autocross friends lost gearboxes in new Corvettes from lack of proper lubrication of the transmission gears.
Most savvy car owners immediately switched their boxes back to 80 wt gear lube with zero problems from the 'thicker' lube. A few of my autocross friends lost gearboxes in new Corvettes from lack of proper lubrication of the transmission gears.
It's been a while since I posted (here)....
I was poking around through an old POCA Profiles, and what do I find....
My Car, second in the '88 Concours in Costa Mesa, CA. Very cool.
Neil bought the car in 1985 (I have his cancelled check). It's nice to know the history.
I was poking around through an old POCA Profiles, and what do I find....
My Car, second in the '88 Concours in Costa Mesa, CA. Very cool.
Neil bought the car in 1985 (I have his cancelled check). It's nice to know the history.
Attachments
Images (1)
")
_(Medium)")
So I'll help you, if you help me!
Here's a picture of a really slick little petcock that I got from Ace for $9.99. I am using it as a radiator drain - it threads right into the 1/4" NPT threads in the drivers side front of the radiator.
(I am not so sure about it's classification as a Valvula Recta, though!)
Anyway - It has a solid attachment point for a short piece of hose so your antifreeze doesn't pour all over everything.
It is 100x better than the crappy petcock on the right in which the little "wing nut/hose bib" came loose on me.....
It looks like it will work great.
Attachments
Images (1)
")
")
")
Rocky, when I loom up a set of custom wires, I imagine the distributor cap as 2 halves, split along a front to back line. This would be where your cap clips are in your photo. Route 4 wires to the left and 4 wires to the right. Take the wires (2 from each side) that have to cross over to the opposite bank, and route them behind the cap. I'll see if I can take a pic.
Can't help you with the pump fitting though.
Can't help you with the pump fitting though.
Thanks, Rodney -
A picture would be great.
It's like a puzzle!
A picture would be great.
It's like a puzzle!
A local engine builder did something unusual for spark plug wiring and my buddy Bill helped me really dress it up nice. When I get my car back I'll take a picture or two. Basically with the distributor in 180 degrees OFF, two wires no longer cross. Looks really nice. You just need to remember the OFF part. ;-)
Thanks, Rick -
Bill was talking about this mod. I am assuming you guys are not running vacuum advance?
Of course I'd love pix.
Regards -
Chuck (a.k.a Rocky)
Bill was talking about this mod. I am assuming you guys are not running vacuum advance?
Of course I'd love pix.
Regards -
Chuck (a.k.a Rocky)
Rocky, here are some pics. I kind of mocked this up on the engine stand; took me a bit to find the box with the dizzy in it.
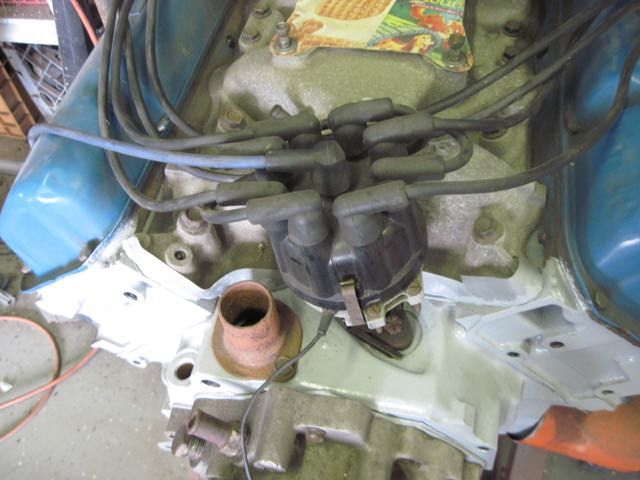
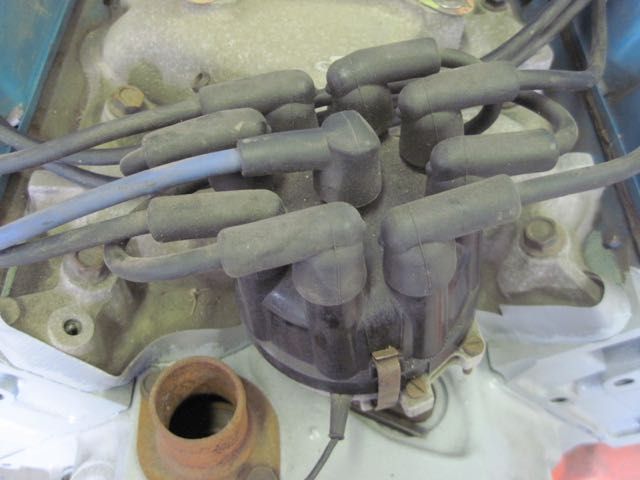
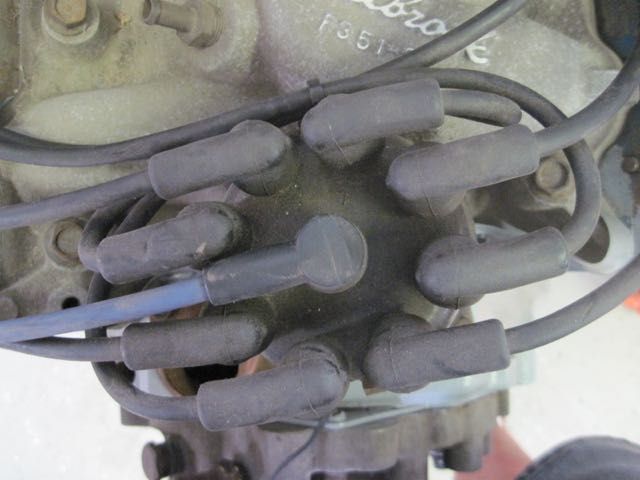
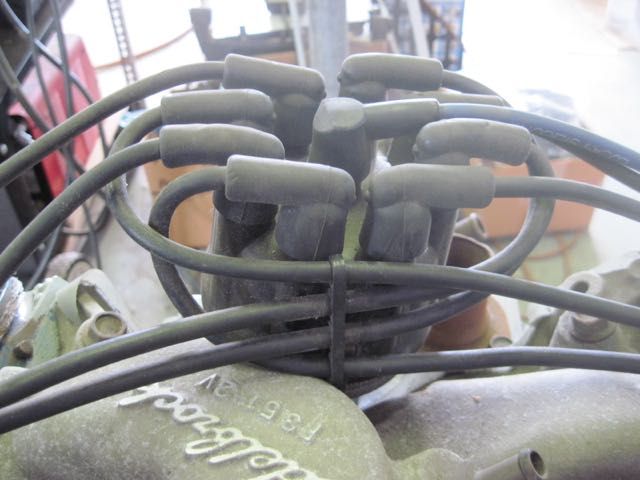
Rick's post reminded me of something; you can put the dizzy in any way you want by just re-assigning which post is #1. The order doesn't change, just the starting point. Doesn't matter if you have vacuum advance or not.
Think of it this way. The body of the dizzy will only fit in certain ways. It is limited by obstructions, the vacuum can, access to the cap clips, and so on. The cap is keyed to the body, and only fits one way. But the dizzy shaft, rotor, reluctor (or points cam) can fit in many ways. I don't remember how many teeth are on the gear, but it will go in that many ways. I don't know if this will really help with looming the wires. I would think it would cross just as many as it would un-cross, but maybe so. I'd have to play with it and see.
Also, don't get carried away with looming the wires really snug; you can make the cap really difficult to get off.
Thanks, Rodney -
The wire holder trick on the back side is a good one. Thanks for the pictures - I will go out and give it a shot!
I see what you are saying about the rotor... That makes sense now too...
Regards -
Chuck
The wire holder trick on the back side is a good one. Thanks for the pictures - I will go out and give it a shot!
I see what you are saying about the rotor... That makes sense now too...
Regards -
Chuck
")
")
")
")
Thanks, Steve -
Your setup looks good, as does your motor!
Not sure how I missed this for so long.
I like the idea on moving #1... I need to think that through, but it looks like a cleaner setup....
Thanks, all for the ideas!
Here's my latest mod, - Stainless bungs TIG'ed up on the bottom of my cooling tubes. With my new petcock in the radiator, and Steve's "old racer's trick" (petcocks in the block), I won't make a huge mess draining down the coolant....
Attachments
Images (1)
")
")
It's Alive, It's ALIVE!!!!!!!!!!
How I got started this morning....
After a few minor mis-steps...
Finally - The euphoria sets in....
You Tube - Frankenstein
How I got started this morning....
After a few minor mis-steps...
Finally - The euphoria sets in....
You Tube - Frankenstein
Attachments
Images (1)
")
You funny guy!
I know I haven't posted in a while... My car is "done" (Ha-ha-ha!)
Anyway - here's a shot of my new bumper getting prepped for paint. It will match my original black "faux" Cougar Sport Mirrors that are also getting shot by Rick P. at Duval Body and Paint.
I am sure the ensemble will look very cool.
Rocky
Anyway - here's a shot of my new bumper getting prepped for paint. It will match my original black "faux" Cougar Sport Mirrors that are also getting shot by Rick P. at Duval Body and Paint.
I am sure the ensemble will look very cool.
Rocky
Attachments
Images (1)
")
")
was there any "blemish" with the old bumper?
did you get new glass for the mirrors?
did you get new glass for the mirrors?
The old bumper was wiggly on top, and had had a couple of "hits" on it. The PO had tried to have it refinished, but it didn't stand the "test of time".
I just pulled the glass out of the mirrors, and will re-install in the newly painted shell.
On the faux Cougar Sport mirrors, underneath the mirror body, there are two vertical phillips screws. Remove them, and the mirror and adjusting ball slide out.
Easy!
Rocky
I just pulled the glass out of the mirrors, and will re-install in the newly painted shell.
On the faux Cougar Sport mirrors, underneath the mirror body, there are two vertical phillips screws. Remove them, and the mirror and adjusting ball slide out.
Easy!
Rocky
I think I have the same mirror and glad to hear the glass came out easily.
I was thinking about seeing if I could get "image is closer" glass. not as great as most passenger side, but enough to help see better
I was thinking about seeing if I could get "image is closer" glass. not as great as most passenger side, but enough to help see better

Rocky,
Did the glass bumper fit properly?
I have one and when I test fitted it a couple of years ago the fit wasn't very good. Bad enough that I wouldn't put it on the car. Put the original back on and the glass one is on the shelf waiting it's turn on the to do list.
I was just curious if the body shop had to modify yours at all before they painted it?
Thanks,
Doug M
I will find out very soon.
Test fits were limited to "eyeball assessments".
Rocky
Test fits were limited to "eyeball assessments".
Rocky
Rocky/Joe
All the sport mirrors use the same glass (Mustang, Mustang II, Pinto, Cougar, Torino, Montego, Ranchero, others?). Standard replacement glass for the right hand mirror is easy to find. If you need make & part number let me know.
In my sport mirror equipped Mustangs, and my Pantera, I used 3" round "stick-on" convex mirrors to improve rear vision. I would like to find convex replacement glass for the sport mirrors, I'm sure it once existed ... the sport mirrors were used in so many applications. A convex replacement would look better and perform better than a simple 3" round stick-on mirror. Several years ago I spent perhaps an hour looking for convex replacements to no avail ... but I haven't pursued that issue further. I keep busy.
The other dream is to replace the remote adjustable mirror assembly for the left hand mirror with a standard mirror from the right hand side. I haven't put any time into assessing the possibility of doing that either.
If you guys have info on either subject ... please share it.
Got my mirrors and bumper back today - all the parts look great, thanks to the Duval Body and Paint Team (Thanks, Rick P.)!
I reassembled the mirrors and got them mounted up. It's hard to get a good picture of a black mirror on a bright yellow background!
Anyway - take a look.
The bumper is disappointing - the finish is great, but - in the same vein as Doug M, the fit on the bumper is bad - it is too narrow, and none of the studs line up with the holes in the body.
I surely should have test fit it before proceeding to paint - in fact I should have test fit it the day I received it.
Makes you wonder... Used bumper advertised as a Hall Pantera bumper (never finished / never mounted). It's impossible for me to know the backstory. Disappointing.
Rocky
Working on a back-up plan with the bumper. Will keep the forum posted on progress.
Attachments
Images (1)
")
Happy to help Rocky.... Any time!
Chuck,
Mirrors look great. Talk to Kirk Evans about the bumper.
Ron
Mirrors look great. Talk to Kirk Evans about the bumper.
Ron
I am quite sure that those fiberglass bumpers are manufactured and supplied by Kirk Evans.
I am using one. It IS from Hall Pantera.
I would not say that it fits poorly at all. It just fits differently then the original crash bumper does.
I can't say either that the mounting hole locations were any kind of a problem.
It is SO MUCH better of a part then the original, it took me five minutes to decide that I love it.
Of course we don't have that intense heat, sun and all those rattle snakes hiding in the sand traps on the golf course, so maybe that's the difference.
I get sun burned on a cloudy day. I know. Strange. That's life here in NY. Strange is normal. You don't want to really know what we think is strange here. You would not come out of your room and you would be hiding under the bed all the time.
I'm not worried. I've got big guns too with PLENTY of ammo. They don't fit in the Pantera though? The car is too small. What amendment is that again?
Thanks, guys -
Will keep you posted on the progress. I have come this far - can't give up now!
Rocky
PS> The Texas guys probably have recommendations on rear window gun racks - they just take the ones from their trucks, and cut them down a little!
Will keep you posted on the progress. I have come this far - can't give up now!
Rocky
PS> The Texas guys probably have recommendations on rear window gun racks - they just take the ones from their trucks, and cut them down a little!
Pictures from ESTuned Dyno Day.
I ran my car on the dyno here in Tucson. Everyone wanted to see the Pantera!
It was a whole new crowd of people, lots of young kids.
It was a fun time. I didn't put down the massive horsepower (I am running my basically stock, original motor with 100K miles on it), but it was close enough to the advertised numbers to satisfy me... but I need to get my "new motor" back together!
Click Here for The Video of My Pull
Attachments
Images (1)
")
I fix my original bumper by installing aluminum piece under and it looked great but body shop left it in the sun and it split edge of bumper. I purchased fiberglass bumper but it was way to small. purchased 2nd one from Steve Wilcoson and it fit great.
Attachments
Images (1)

quote:I purchased fiberglass bumper but it was way to small.
I guess I got one from the same batch....
do you think the fiberglass front bumper could be cut and extended to fit better?
I think so, but the logo pocket is in the center. So you have to either cut it in two places, or you have to do the minor fiberglass/bondo/filler work to fill the sides of the hole.
It's just beyond my skill level to chop that thing in half, and then put the pieces back together to make it look right.
Rocky
It's just beyond my skill level to chop that thing in half, and then put the pieces back together to make it look right.
Rocky
it might be worth letting a body shop fit it.
I would think two cuts, three pieces of the two bumpers and the center wing. with the two ends fitted, patch the wing back in.
I have daydreamed the center wing being raised about 1" for more nose down force.
I would think two cuts, three pieces of the two bumpers and the center wing. with the two ends fitted, patch the wing back in.
I have daydreamed the center wing being raised about 1" for more nose down force.
")
I'll be joining you soon with my cat for some cruises.
quote:Originally posted by PanteraDoug:
I am quite sure that those fiberglass bumpers are manufactured and supplied by Kirk Evans.
I am using one. It IS from Hall Pantera.
Doug,
I do not supply any fiberglass to Hall Pantera or any other vender but Ron McCall. I do supply Pantera Performance but have not sold them bumpers for years.
My bumper is distinctive---it is widened to fit the car and has hard line corners rather that radiuses. The important issues is it fits the car.
Here is one just finished with recessed daytime driving lights mounted. You can see the front outer hard line corners in this picture. The customer did let me knew the one side of the car was crashed and the work was poorly done so they did have some minor fitting but it was not do to the bumper's construction.
Attachments
Images (1)

Another shot with the lights on. I am building some new mirrors that you can actually see what's behind you, that fit the car properly and will be easy to install. The last attempt to fix the BMW replacement mirrors worked but is way to labor intense to build and finish the new mounts. I will post something on a mirror thread later.
I've worked very hard making sure each part fits the car so if someone thinks they have an AmeriSport part that does not fit, please contact me direct. If it is mine, I'll figure out what the problem is and if it is not mine, I'll do my best to talk you through a procedure that will make the part work.
I've worked very hard making sure each part fits the car so if someone thinks they have an AmeriSport part that does not fit, please contact me direct. If it is mine, I'll figure out what the problem is and if it is not mine, I'll do my best to talk you through a procedure that will make the part work.
Attachments
Images (1)

Took the Big Cat up to the top of Mount Lemmon today.
The trees started falling over, and dropping their pine needles as I drove by looking for a parking spot!
[/QUOTE]
Nice work Rocky, Congratulations!
The trees started falling over, and dropping their pine needles as I drove by looking for a parking spot!
Nice work Rocky, Congratulations!
quote:...any fiberglass to Hall Pantera or any other vender but Ron McCall
Thanks, Kirk for the follow up.
I may give you a call, I put some energy and $ into the bumper, and would appreciate the help from an expert on the fitting.
Rocky
I bought my bumper around 1985 from Hall. It fits so well and the fiberglass is so nice I presumed that you made them.
quote:Originally posted by Kirk Evans: Took the Big Cat up to the top of Mount Lemmon today.
The trees started falling over, and dropping their pine needles as I drove by looking for a parking spot!
I did that drive a couple times with a buddy stationed at Davis Monthan AFB. It was 112F in Tucson and 65F when we parked the car to start hiking. You could feel the temp drop by the minute as we circled and switched back up the road.
Best,
Kelly
Kirk,
Are those lights LED? Look fantastic. I'd like someone to something similar to my metal bumpers except incorporate the turn signals.
Are those lights LED? Look fantastic. I'd like someone to something similar to my metal bumpers except incorporate the turn signals.
quote:Originally posted by Husker:
Kirk,
Are those lights LED? Look fantastic. I'd like someone to something similar to my metal bumpers except incorporate the turn signals.
Jon Hass makes them. It's a nice set up.
https://www.youtube.com/watch?v=ZXDMgswNPps
Daytime driving LEDs plus turn signals. I think you need to make a separate key on wiring change if you want the "driving lights only" to come on.

I understand now. When you said steel bumper, I was thinking front early. You are talking late model rear full width bumper, correct? Maybe we should discuss this by phone.
Kirk,
I replaced my early steel bumpers with the built-in turn signals with euro bumpers. Consequently I no longer have front turn signals. I've been researching options and thought this concept for the rear bumpers could be used for the fronts as well.
I replaced my early steel bumpers with the built-in turn signals with euro bumpers. Consequently I no longer have front turn signals. I've been researching options and thought this concept for the rear bumpers could be used for the fronts as well.
")
")
that is a "clean" looking manifold!
")
Really nice Chuck. I'm jealous.
")
November 2107 ???
It's an advance copy!

Rocky; Really like that engine lift!
")
The most bizarre thing I have ever seen...
I have had a giant Palo Verde Beetle stuck inside my cooling system for the last year of operation.
We need to figure out what these things are made of, and build our vehicles out of them.
Good thing for the High-Flow Robertshaw thermostats.
I have had a giant Palo Verde Beetle stuck inside my cooling system for the last year of operation.
We need to figure out what these things are made of, and build our vehicles out of them.
Good thing for the High-Flow Robertshaw thermostats.
Attachments
Images (1)
")
This was my "spare motor" and had been sitting in my garage for a while.
Apparently I had not sealed up the Thermostat opening when I pulled this motor and this guy got in.
He couldn't have gotten in through a radiator top-off, so he had to be in there since the motor was installed in ~ June of 2016.
Unbelievable.
Rocky
Apparently I had not sealed up the Thermostat opening when I pulled this motor and this guy got in.
He couldn't have gotten in through a radiator top-off, so he had to be in there since the motor was installed in ~ June of 2016.
Unbelievable.
Rocky
Attachments
Images (1)
")
You must be using the older anti freeze.
If you used the safe, envorimental friendly stuff, he could have crawled out when you removed the housing
If you used the safe, envorimental friendly stuff, he could have crawled out when you removed the housing

Gives new perspective to the term, "getting out the bugs"?
")
OBTW: Steve's thread on the Mangusta Rosewood shift knob encouraged me to think about other options than my anodized knob.
Here's a couple of neat options (the black one is ebony wood). The item on the right is a hand made DeTomaso Wine Bottle corker.
Couldn't help but show them off.
Rocky
Here's a couple of neat options (the black one is ebony wood). The item on the right is a hand made DeTomaso Wine Bottle corker.
Couldn't help but show them off.
Rocky
Attachments
Images (1)
")
Engine looks great Chuck...can’t wait for Dino results!
Dyno...damn auto correct!
Add Reply
Sign In To Reply