Any suggestions about removing the pedal assembly in a '73. I have everything loose but I can't get it through the existing opening. Enlarge the opening? Some special trick to get it out? Suggestions appreciated.
Original Post


Any suggestions about removing the pedal assembly in a '73. I have everything loose but I can't get it through the existing opening. Enlarge the opening? Some special trick to get it out? Suggestions appreciated.
Replies sorted oldest to newest
Do a search for pedal assembly removal. There are several threads that will help.
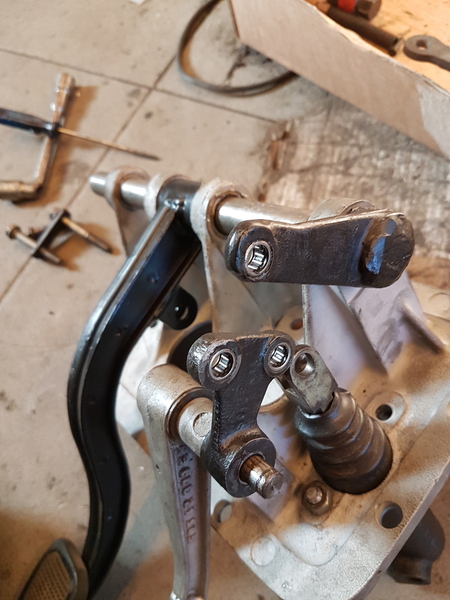
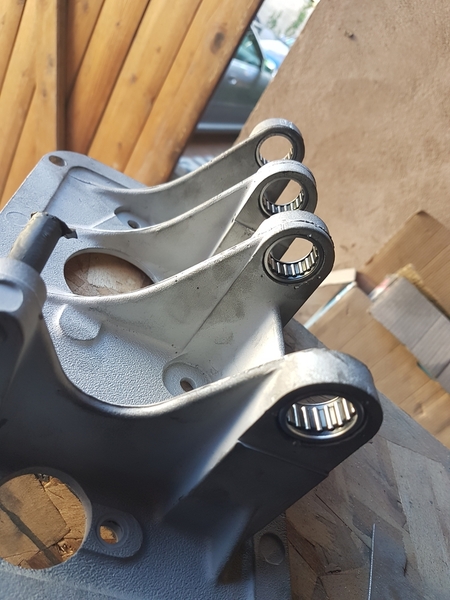
Removing and installing the pedal box is easier when the brake booster and gas pedal are removed. Getting it out is easier that putting it back in place. I have resorted to cutting specific notches (once the assembly is out) on both sides of car's sheetmetal to help facilitate installation. The cutouts cannot be detected once the pedal box is reinstalled. The overall rigidity of the pedal assembly is not affected by the notches in the car's sheetmetal after it it is reinstalled. Without notches it takes two people to wiggle the assembly back in place. I do not have a picture of the notches in my car but here is a digram that our forum member davidnunn provided. David's digram shows a notch on the clutch side. I made notches on both side.


 I just had to deal with Replacing both masters and pedal return springs on the pedal box!
It took me three hours (with breaks because back hurts, fingers don’t fit, eyeglasses falling off…I could not believe why I couldn’t get it out) to 30 minutes to put it back together! There must be a way because there was just no way that back then in Italy they did the same bloody thing! The hole didn’t shrink in the last 50 years… I guess lol
I have the “assist” system for the clutch but I think in general it is the same to get the box out….
Here’s what I learned: suck out all hydraulic fluids of the reservoirs. Disconnect all the hydraulic lines and plug them. Remove clevis pin on brake master. Remove brake pedal stop / brake light switch bracket. Undo fasteners holding brake master cylinder. Depress brake pedal and fix it spring with zip tie so the pedal can loosely move around. Remove gas pedal stop… it’s a Bit##! Welded that bolt on the stop! Undo all nuts and bolts holding the pedal box - 2 person job or needle nose vice-grips! I replaced all those bolts with Allen head bolts, also the bolts holding the clutch master! Disconnect the throttle cable from the pedal. Go to the front and pull pedal box partial out and canted like in the picture… remove clip from clevis pins and push them out! The pin connecting the clutch master as worn in (small steps) needed some lube, turning and gentle tapping to leave… you may have to try different ways.. from the inside footwell (I couldn’t) or from the trunk.. once you get the pin from the gas pedal and you are able to pull the shaft with pedal out you will find things at getting looser! In the end you have a dogleg casting with 3 holes, One of them has a needle bearing which is for the gas pedal going through, and on the upper hole or two flat steel arms attached that connect to the clutch pedal shaft arm . A small L bracket that attaches to the lower bolt ( needle nose vice grip to get rid of it… replace with Allen) of the clutch master cylinder and on the other end the gas pedal shaft goes through. And the hole in the middle get pinned to the clutch master. with all this removed, and both pedal springs pulled together and secured with zip ties bring there arm that is attached to the clutch pedal shaft straight down parallel with their pedal box plate and the whole assembly comes out!

With ease!
to put it back together: put the pedal box plate back, (angled like you see in the very first top pic) attached to flat steel pieces to the clutch pedal arm (I did this from the footwell with a longer clevis pin, a one handed “Houdini” and then pushed it out with the correct one from the trunk side) and Pinned it from the footwell side! Then hang the clutch master on the dog leg (IMPORTANT!!!!!!!! with the pedal hanging down the clutch master should stick out - I think you can put it together with the pedal fully depressed and the master cylinder not doing any action) 
 stick gaspedal shaft back in, back outside put L bracket onto gas pedal shaft, insert Allen bolt into clutch master… (why did they use hex… ???)

Sounds intimidating but it really is not that bad! Have patients,have grease, have new Allen head bolts (invented 1909) and life is gonna be so much easier! Yes, it’s not original but I don’t grinch anymore if I have to go down there to do some work!
I put it back together on the workbench first to see how things go together because Parts Were just falling down into the foot well when I took it apart but now it makes sense.. three hours to get it out 30 minutes to put it in
Now it would be 20 minutes out 20 minutes in…
Like with all Chinese puzzles… Once you figured it out… It’s easy!
(updating as I go along)


Picture above!! This would be the wrong position to put the gas pedal shaft in!


see, those two pins visible can be reached from the trunk, once the are removed the arm from the clutch pedal comes down and you can remove that pin too! Ready to pull the assembly out…😅
Do you want me to post more as I go through my “new” car ??
Electric incl. headlight motor, external fuel filler, bleeding, steering and more are on the list..
like ❤️ If yes…
otherwise I just shut up

Have you checked that the holes in the triangular lifter are not worn and still circular? This is very important to obtain full travel and properly disengage the clutch
Yes I did! The only wear I found was on the clutch master pin and the fork ( on push rod into Clutch master) and it was part of the new clutch master cylinder!
I also measured from the flange to the rear part of the hole of the fork (no wear there) and adjusted the new master to the same distance! Everything on this car is just dry! No oil, no grease…. Was parked in a museum for years and then in a garage from 2020 till October this year when I bought it. Very concerning to me but I work my way through 😅
thank you for commenting!
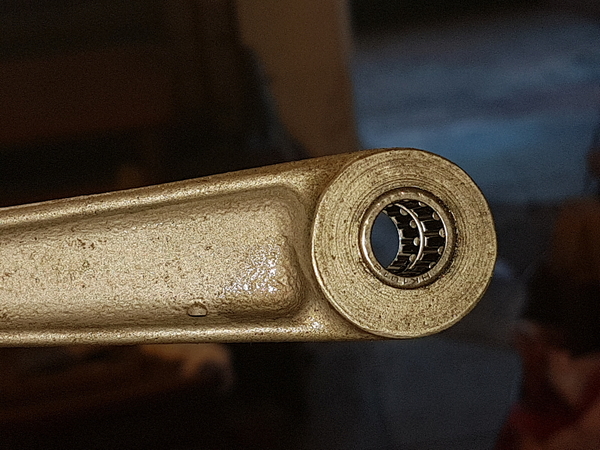
P.S. I love their solution with Needle bearings… that’s going on my list once I’m through the whole car…. i’m sure there’s a second round coming lol
 I forgot… the gas pedal has some wear as well… I’m thinking bushing 20mm long for the 10mm shaft..
ipsco.org makes a replacement pedal. My car came with a broken pedal and a broken pedal that was welded, so it must be a common failure.
Dan
Needle bearing city!!!!
Pretty!!
Can’t argue… they are a great mechanical wear solution!
If the sandcast is prone to breaking I may go for the upgrade…do you know if that billet pedal comes with the ball for the cable…?
Doesn’t look like it …
I tell you - not a speck of grease on the whole car!!! 😭


I did measure the clutch master after I took it out… flange to hole and adjusted the new part but the pedal had a… well, not really a hard spot… felt like you “pull a magnet off” resistance… So my guess is that the clutch wasn’t adjusted correctly from the get go! I’m thinking the 2 flat arms connecting to the pedal arm just were not is the correct angle in relation to the leverage of the pedal arm! (Not enough angle)
i turned the rod 2 turns in and now it feels even… No “hard” spot in the beginning!
But needle bearings are in the future!
Next is brake lines, shuttle valve, proportioning valve.. Try to get smart on that…
I too have a slight hard spot at the beginning and I voluntarily left it for two reasons:
- there is no place to place your foot next to the pedal, it therefore often rests on the pedal and with "the hard point" you are certain not to engage the movement and not to put the bearing in contact with the clutch mechanism.
- we preserve the entire stroke of the master cylinder and therefore of the slave cylinder which is very important to properly disengage the clutch and preserve the synchronizations
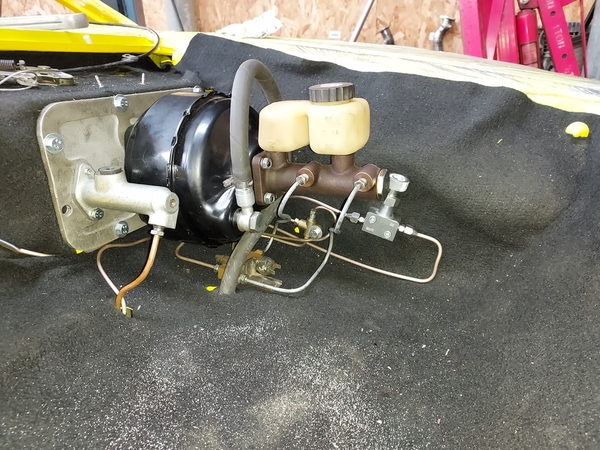
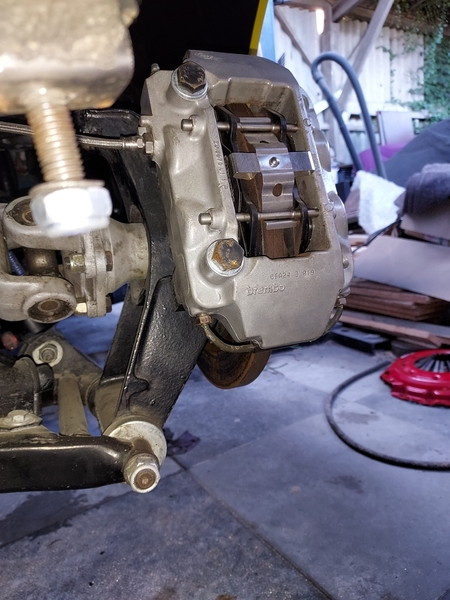
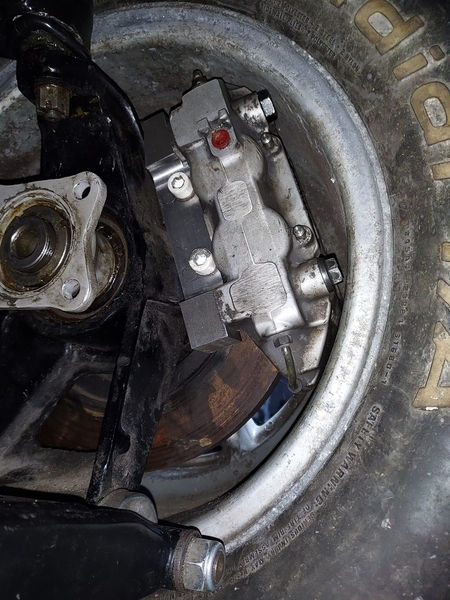
For the brakes, I kept the original front calipers which are quite good but I replaced the weak rear calipers with four-piston calipers. I know that the rear calipers are now oversized compared to the front and so I removed the pressure limiter on the front circuit and installed an adjustable pressure limiter on the rear.
For the moment I kept the shuttle valve, it doesn't leak and it avoids having to tinker with a system for the rear brake lights. If one day it leaks, I will delete it.


Thank you for your input!!!
Very interesting!
I thought the brake light switch is on the U bracket inside the footwell going over the brake pedal.. If that is not the function of that switch can you tell me what it is?
The larger calipers you have now in the back:
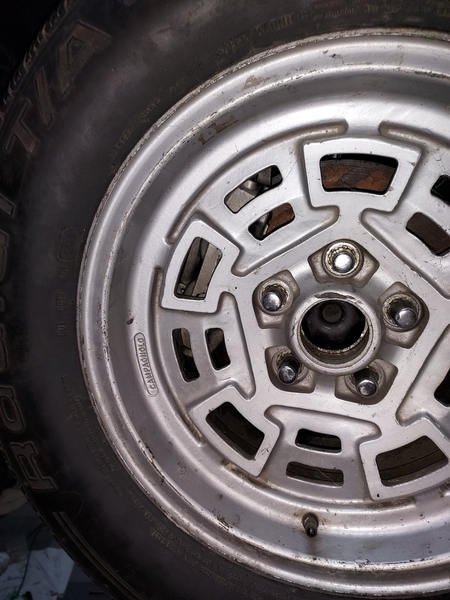
-do they fit inside the original rims?
- does your parking brake work better with them too?
-Who and how much…
steep learning curve 📈
I just looked at your thread and you did what I did back then with my 1974 911 Carrera Targa!
a lot of work!!! 👍👍
one reason I bought this Pantera last month was it already had the dropped floor pans..(I’m 6’2” but at least in skinny Lol) and it was located only 1.5 hours drive from my home! In 2016 it got sold to a Museum and the guy I bought it from bought it in 2020. It looks like in those 7 years it got only driven for a couple hundred miles… if that…! Car has now 32K on the clock..
The switch on the bracket is not factory but is a common solution to failed hydraulic switches.
Okay… thank you… now that makes sense! My brake lines don’t look very trustworthy anymore so in the process of redoing them I think To delete that “beauty”! Question remains in which line to install the proportioning valve?! I would like to keep the original wheels and maybe upgrade the rear as @rene4406 did if they fit my rims
The factory proportioning valve is installed in the front circuit to limit the front braking power as the rear calipers are woefully undersized. In most applications with correctly sized braking system the proportioning valve would be in the rear circuit.
If you are retaining the stock brakes leave it in the front circuit. For an aftermarket upgrade I like the HiSpec calipers from the UK as they incorporate a parking brake that is designed to meet the MoT rolling road resistance/hold test.
 Is this a good option?
Everyone says on this forum that the kits offered by SACC Restoration are excellent. However, I am not sure of the usefulness of 6-piston calipers on the rear of a car which does not have ABS and where the risk of wheel locking is therefore significant, unless you are an excellent pilot. From my point of view there is a way to have a very good system for much less money with used equipment.
Yes my calipers fit inside the original rim, they are front calipers from Renault Mégane RS II or Clio RS III (Brembo like the Porsche); I bought them for €200 on Ebay. I made the brackets myself to fit them. They do not feature a handbrake and I installed a hydraulic handbrake. If you want to keep a completely independent handbrake you must install a mechanical caliper specifically for that or an electric caliper from Tesla; this is relatively easy given that the hubs have four attachment points each; There are several thread that cover this subject.


Speaking of HiSpec Calipers in the UK; on the web site they mention the issue of “too much caliper” for a given rotor diameter. It seems more is not necessarily better. Also, it should be noted, their rear calipers with integral parking brake, as well as their parking brake spot caliper, both use the OEM cable routing, in a Pantera application. I also understand they have the appropriate adapter brackets, for the Pantera.