
Sunday I started dismantling the Pantera for this winter's paint job. Those that read my rendition of Le Mans Classic know that I hadn't planned to paint the Pantera, I didn't want to. I can never again lean over the fender without fender protection, and I can no longer enjoy a lunch on a ferry with the Pantera squeezed in between other cars and fat tourists. I'll worry about the paint job! Bummer. I'm a bit like my wife on this point. She likes a car with dents, so she doesn't worry about getting a dent.

OK, I exaggerate, but you must admit I have a point. I had the perfect no worries Pantera: all things mechanical worked, paint was scratched, cracked and still shiny when going by fast...

No more. New paint job. Plan is to disassemble and grind off all the paint. I could paint it myself, I've done that 5-6 times before, but right now I have nowhere to do it, and I've in latter years made friends with a pro painter who will paint it for not a lot of money. And of course he can do a better job than me. He said he would only do it if I removed all paint, he refused to paint on top of the miserably and thick American thermoplastic paint it has now.

So all paint has to come off. This will reveal it all. Rust? Dents? Major body work? Eeker Only time will tell.

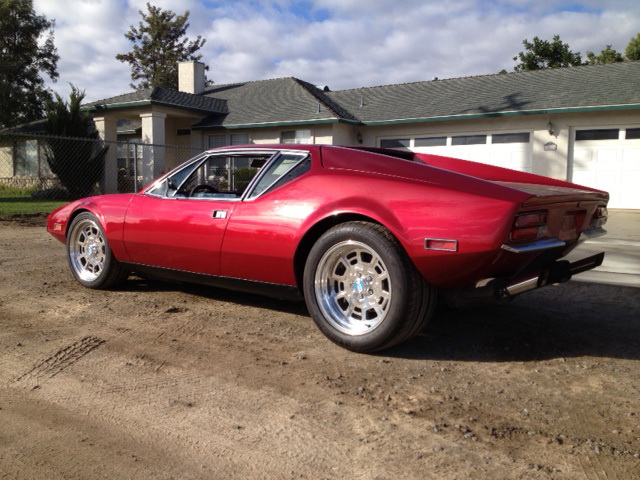
So what color? As can be seen in the picture it was yellow at birth. Well right now I haven't found a color I like more than the one it has. There are many reds nuances out there, not all pretty, some look like tomato soup past its prime. And some look like a F-car wannabe (which is quite difficult to be when Ferrari changes its nuance according to their sponsor's wishes, like Marlboro). Some people want desperately to have a color nobody else has. Well I want what I want Wink My red is quite dark, like there's a little blood in the paint. Reminds me of the blood, sweat and tears shed over most Panteras... I like it, and as I said, right now it looks like I'll end up with the same color.

Taking apart so far, gone pretty well, nothing major broken. I bent a window bright trim piece, spent an hour getting it back into shape. And the nice people who assembled it before me has made my job easier by only installing half the fasteners to save a few minutes.

The painter has a time slot for it in November. I don't know if I'm in a hurry. If I just find a perfect body underneath the paint, I have plenty of time, if I don't I'm in a hurry.

Soon the mufflers will come off. Hhmm, maybe I should just try to start it w/o mufflers? I've got time to try that Sunday morning I believe...

Updates will come at random intervals.

Attachments

Images (1)
  • IMG-20120911-00029-2
Last edited {1}
Original Post

Replies sorted oldest to newest

good luck. fun and scary at the same time.
my little panel and paint job turned into a full scale nuts and bolts restoration. only its second since i have owned her in 15, no wait 17 years.
enjoy the process.
I secretly hope you find the perfect body under the paint and no nasty hidden secrets. unless its a bullet hole and you have elvis's car.

cheers
cj NZ
Finished disassembling. That means no mufflers, had to just start it. Sounded like dragraces I attended many years ago.

Spotted some damage today. Right door closing mechanism, the one with three bolts at the back of the door, on the right side there were washers under the bolts. Why? Because the holes have been ripped too big. I guess this either means that the car has had an accident on the right side, or the door has been pried open with a crow bar. Door skin under coating is different to the left side, and the left side has original yellow paint. So my guess is a new door skin. I'll know more when I get the paint off. It's like gold mining, except you never find anything good, only bad surprises.

So now I'm ready to grind off the paint. Don't really have the energy right now, but I thought I'd do a small area to see how long it takes. The first square feet were OK, then it took forever. Have to have new sandpaper discs, they wear out fast, going to the store tomorrow to get all they have.

Attachments

Images (1)
  • IMG-20120914-00039
quote:
Those that read my rendition of Le Mans Classic know that I hadn't planned to paint the Pantera, I didn't want to. I can never again lean over the fender without fender protection, and I can no longer enjoy a lunch on a ferry with the Pantera squeezed in between other cars and fat tourists. I'll worry about the paint job! Bummer. I'm a bit like my wife on this point. She likes a car with dents, so she doesn't worry about getting a dent.

I've had the same dilemma with my car. Cracks, crazing, and dents from age and use; I'd like it to look nicer up close, but the moment its repainted I'll worry about every little nick or scratch. Keep us posted on your progress Mikael.
Have fun grinding! A word of caution though. It is my understanding that the origional paint had lots of lead in it. If there is original paint under the repaint take precautions by using a good resperator and doing it outdoors (or your garage will be contaminated like mine). Also, ZONKEY (#1549) had only a little damage but there was hardly a straight panel on the car. All had been straightened by the factory paint job.
I've started to get serious now. Plan to do the front third this weekend. Went to the shop to get the material. Some hours of work. Fortunately we had guests Saturday late afternoon so I had to stop.

quote:
there was hardly a straight panel on the car. All had been straightened by the factory paint job.


I believe you're right. No major dents found yet, but apart for the top of the fenders, there's filler everywhere.

Attachments

Images (1)
  • IMG-20120915-00040
My guess would be stretch holes, seen it before on the wife's Stratus on the panels. It's just that they're so round...?

The rust area above looks stretched also, metal around the holes is thick, not rust thin. I've found 5-6 places where they seemed to run out of metal, my trusted welder will add some.

Rocker panel is like new, and one of the straightest panels on the car.
I, too, have been following your progress since I am about to embark on a complete restoration.
My vehicle is completely disassembled with only the windshield and back glass remaining.
I am planning to have my vehicle media blasted-probably baking soda.
Just curious since you are sanding should I be concerned with media blasting.
My view: Blasting for me means shipping it out, I don't want to do that if can be avoided. Careless blasters can put dents in the middle of larger areas.

Yes, grinding does scratch the metal, and you have to careful at corners and bends. And move around, don't overheat.

About the heavy primer needed, well if you think that your metal on a Pantera can otherwise just be primed and painted, that's in very few places the metal is straight enough. I always cover the entire car in what we call spray-filler, don't know the translation. All that said I will go over the whole car with less coarse paper, to remove the worst imperfections.
As far as Paint stripping is concerned ...

Mark Charlton put me onto a GREAT, GERMAN tool.

It is called MBX. It is available from the US as well.

For EUROPE follow this link:

http://www.monti.de/de/automotive

For US and Canada follow this link:

http://www.mbxit.com/

What I particularly like about the tool is it does not "grind away" or heat the metal when removing the paint - Although it still generaltes paint dust. (but even for the dust they have a dust attachmetn). Have a look at the videos !!

One of my best tools.

HTH

BG
Last edited by andriyko
I was a bit ahead of schedule starting this weekend. But doing the back of the rear deck lid took almost all day, not finished yet. So many angles.

First angle grinder died today, bearing shot. Three left, but two of them heavy and need to push the button all the time. Will probably shop for a new one Sunday.

Still hope to finish the big areas Sunday, so I can start cleaning the garage. If not, it'll be an evening next week I get to that.
Bought a new Bosch grinder (the broken one was an AEG). Now I have two Bosch. Bosch is an amazing brand. I don't think I've ever had a Bosch product fail on me. I've had one grinder where the carbon thingys wore out, and my current Bosch drill is a bit weak after I dropped it in the salt water when working on my boat. Don't think Bosch can be blamed for that. My house has two electric garage door openers. The one which was already installed when we bought the house is a Bosch, the other brand has been repaired twice.

When it seems like all other brands deliberately reduce quality to make a short term profit, it's great that a few brands exist for those who don't mind paying a bit more and get something of quality.

So why am I doing this advertising for Bosch? Well, as soon as I stop writing, I have to go out and get to work again...
Last edited by noquarter
Finally, it's bare metal everywhere where the paint is visible. The inner part of the two lids were a pain...

I'm finished grinding, at least until the painter comes by next week, he may put me to work again. Started to get the red dust out of the garage, wonder if I ever will get the red tint out of my carpets...

Next step is for me to start welding, filling the areas where they hadn't enough metal. Plus aligning a bit, in some places it can be better, will reduce the need for filler.

And a few things that need fixing now that I can do it without the risk of scratching the paint.

Attachments

Images (1)
  • IMG-20120923-00067
I took pictures of all the cracks before grinding, and I'll add some metal there. Usual places, c-pillars into rear quarter panels, rear lamps, bottom of a-pillars. Plus some strange ones that were just due to inferior/mismatched fillers. A few cracks won't hurt though, just shows the torque Wink

And unless somebody tells me the holes in my front fender (pictured earlier) are from a celebrity with more star quality than self control, I'll fill those holes with metal.

Still can't decide the color. This weekend I've moved from red to yellow to blue metallic... Or maybe just a clear coat, it would be a look like no other car in the world for sure...
Well, I've now decided on a color. And I'm not going to tell which. I will say that it's a color I'm sure no Pantera has ever been painted before (so, not original). And it's a color many will hate, few will like, even fewer will be indifferent to it. Do I do it to be different? Not really, it's just the most beautiful color in the world, on a car or otherwise...

Unless I change my mind...

Besides that, not much progress, waiting for the painter to have time to come by, fixing a bit of Longchamp and Jeeps. This weekend I'll start the metalwork.
I've started on the metal work. Rust in one place only, but a lot of places with holes and just a general lack of metal, filling that in.

On the topic of panel gaps, I don't think you can expect a lot from a hand built 72 car. When I contemplated painting on that day at Le Mans Classic, I looked thoroughly at my panel gaps and compared to the other Panteras there. It was actually quite good, and a lot better than my previous Pantera. One area annoyed me though, the top of the door at the a-pillar. Here's a picture of the left side, looks pretty OK

Attachments

Images (1)
  • IMG-20120929-00076
No more rust holes. Welded all the machine gun holes as well. Only need to fix the right door, some alignment issues that require some metal bending etc.

The painter was here. He said, do this, do that. So still some work to do. He didn't like my color choice, he wasn't even sure that color could be had in today's water borne paint. We'll see...

Attachments

Images (1)
  • IMG-20120929-00082
I'm a bit puzzled why some think that an original color is important. 90% of our cars are modified, bigger wheels, more power etc. Why pick an original color? You're never going to fool anyone into thinking it's an original car anyway. Those that could be fooled wouldn't know what an original color was anyway. And the Pantera orig colors are just a tiny subset of the colors out there.

My orig Camaro is original Ermine White. I hate white, but for that car there was no other choice of course. For my Pantera there's thousands of possibilities. Fear the worst!
Eeker
Started going over the body to get the details right. Going over every curve and imperfection, I feel now I know that Pantera body better than a teenage boy knows the body of his first girlfriend Razzer

Not much has happened this week. I've spent some hours aligning the right door better, welding the elongated holes etc. That actually made the alignment more difficult, so maybe there was a reason for the elongated holes? Still, it's compensating a problem instead of correcting it, that won't do!

Found a decent fit now. Now I need to take the door off, so I can grind of the last bits. Then it has to go on again, because there's no way the painter can get the straightening correct without the door in place to aim at. And after that it has to come off again when he paints it. And then, what I fear most, I have to put it on when freshly painted, without destroying the paint Eeker

As can be seen I don't have too much space either

Attachments

Images (1)
  • IMG-20121005-00111
Doors have now been off, and I've sanded off all the paint I couldn't really get to when they were installed. I also did the crawl-on-the-floor-and-face-upwards part of the paint removal. That means that I'm finished removing paint!
party

I've now done that job on three cars, hope I never have to do it again, with my tools, not much room and a day job, it's hard work.

So, the doors were off, and normally I'd leave them off for the painter to paint. But since they don't have much tolerance when aligning and especially the right door jamb area needs some filling, I put them back on and spent two hours aligning them. Only then will the painter have a chance to fill and straighten the car so the gaps won't be too crude. And after that he can remove the doors again.
(in both doors the wiring to the red warning lights in the back of the door is way too long, is that the case on all Panteras, or was this car originally a 4 door? Wink)

So all done? Not at all. Sanding, welding and straightening of metal is done.

Today I'll remove the sealer on the underside of the deck lids, and apply new. Will also start to remove all the paint dust that's everywhere. Fun times...
Mikael,

Did someone add the brace? Looks like it to me but I'm new to this stuff...

Looks like you've done a lot of work. I'm going to be doing the same really soon- probably in the spring and removing all of the exterior primer back to bare metal. Going to use some epoxy primer and stick with the same brand of paint materials all the way through. I'm so excited that I've already bought a cheap spray gun for primer.
Last edited by George P
Spent some time removing red paint from trim parts and rubber gaskets.

Those that are easily offended, don't read on. My painter, never one to shy away from generalizing against a whole continent, says that in an American paint shop, the two most important people are:
    The one masking all the items that should have been removed
    The one buffing out all the imperfections after the paint is applied
I know there are a lot of good mirror solutions out there, but I like my more or less useless ones. I decided to make them less useless by moving them so they're visible through the front triangle instead of the main side window (where 1/3 was behind the divider). (Chrome trim only installed for alignment)

Old holes to the right, welded shut now, no going back.

Bonus question, which track is shown in white?

Attachments

Images (1)
  • IMG-20121013-00130
quote:
You did leave us hanging with the paint color though...


Yes. And my priorities are still that special color. And if that's not feasible, I'm going for the old red or a bright yellow. The special color is so special that my painter doesn't like it, and he's not sure it can be done with modern water borne paints. A Pantera is an extreme car, it can bear an extreme color. And as opposed to some Lamborghini colors, this is an extreme(ly) beautiful color, not just an extreme(ly) rare and bright color, IMHO of course
Painted all the black trim parts. Had to do a bit of filling, but not much. If you use a cheapo high gloss spray can, it'll end up in the semi-gloss black that I was after. Parts are high gloss when paint is still curing, see picture, when cured, they'd be semi-gloss. If you want proper hi-gloss, you need a proper paint gun and preferably some clear coat. But these parts were newer hi-gloss AFAIK

Also decided that some in-cabin parts that are normally black will be body color, like a modern car. If I regret it, it's easy to spray them black at a later date.

Attachments

Images (1)
  • IMG-20121021-00140
Been away a few days, crummy Danish damp autumn weather. I had put plastic over the car to avoid drips of water. But the dampness in the air condensed under the plastic, so I had several areas of fresh rust. So I knew I had to move it to the heated brick and mortar garage that normally contains my daily driver Longchamp. Had to wait for 15 minutes w/o rain, and then the wife, son and I pushed the Pantera to a better environment (but so small and dark fixing things in there is not easy).

Before doing that, I had the seats out. Primarily because getting them in and out normally scratches something, so now was a good time. The passenger seat was out, so I could get to the p-brake, the ratchet mechanism needed some TLC. The driver's seat was out for the maybe 10th time in my quest for a good driving position. I hate those seats, they're too thick, so finding room for me and my tall frame has involved several modification to the seats. This time I raised the front mounting to get leg support for my right leg. Also moved the accelerator yet another cm forward. And since my last seat modification moved my butt backwards (to get room for my right leg) I had gotten too far away from the clutch, so moved that closer to me.
And of course vacuumed tons of red paint from the carpet while seats were out.

Attachments

Images (1)
  • IMG-20121021-00141
quote:
How were you able to get enough room to pull the gasket from behind the dash?

Do the top and sides. The bottom will follow. If you are not going to reuse the gasket, just cut it.

quote:
When replacing, do you plan to put the trim in the gasket before installing?

The trim, gasket, and windshield HAVE to be installed as an "assembly". Put the gasket on the glass, install the trim, and install the "assembly".

John
A quiet evening in the Jyllinge/Denmark DeTomaso home. Laying in bed, only me awake in the house. Staring at the dark ceiling. Can't sleep. Thoughts are running on:
"My mystery color will be great. Maybe. The painter didn't get back to me with a go/no-go on it before he went on vacation. Can he do it? How much more will it cost? Or maybe I should just do the red I had? It looks good. And good with chrome trim. But there are many of them. Too many? Many because it looks good in red. People can think it's a F-car. Or even worse, they can think I want them to think it's an F-car. Aaarrgghh! Now I'll never get to sleep. But what do I care what people think? I don't. Unless I want to sell it. Which I don't. Not now. Not ever? Had my Camaro for 25 years, still have it... Originally the Pantera was yellow. Yellow is a great color, but better with black trim, like Dave2811's beautiful car. Yellow and chrome too much? There's no such thing as too much for supercars. Well many Lambo colors are ugly. But back to the Pantera. I like blue metallic a lot. Same color as the Longchamp would make a great couple. But the stylish gentleman like dusty blue look is not for the Pantera? How about the Dark Blue met on the Corvette in the newest Summit catalog? Is that photoshop or is it that bright and deep? And looking at the Pantera in the nude (no paint, just metal), silver looks good as well. Can't make up my mind. What do I know for sure? I don't like green. I don't like black. I don't like white. I hope the mystery color will work out. Then again, I might never be able to sell it. Hhhmmm... That's good! Mystery color it is. Zzz"

As you can see I've more time on my hands now. It's ready for paint, painter is on vacation. Might pop into the living room and see what the wife is doing with her life...
Bummer
My painter says that my mystery color can't be made. So I have to rethink.

What I was looking for was a glow in the dark highlight neon yellow. I painted it on a Camaro in the 90s, it was copied off a bicycle that was highlight yellow, like I think some firetrucks are in the US? What you do is that you paint the car white, and then apply a few layers of very yellow, but also see-through, paint, that gives the effect. My Camaro in sunshine was something else, often it was pictured in magazines when at car shows, just because of the paint. And the pictures didn't do it justice, a photograph could not capture the effect on the human eye. The effect was such that when it was parked on the street beneath my 1st floor apartment, the ceiling in my apartment would be slightly yellow. And on a sunny morning with dew on the hood, you almost couldn't see anything.

But…that was back in the days before water borne paint. I'm told this see-through yellow can't be made water borne, and the cars you see today with something neon yellow, that's film attached to it. So "back to square one"

Attachments

Images (1)
  • 6591029426_Billede1
Hmmm. So nuclear, glow-in-the-dark yellow can't be painted today? Too bad.

You aren't alone. I had my car repainted 2 years ago and went through the same process. I seriously considered the burgundy color from the last page, a-la Johnny Woods (or Colin Bradshaw, whose GT5-S came from the factory with that color). You can drive yourself crazy with the options, so I took the easy way out and repainted mine the same color as it was before I started...
Dave, your car is beautiful, no doubt. The problem as I see it with yellows and reds, they can't be judged by pictures, and the wrong shade of yellow looks faded and the wrong shade of red looks like tomato soup past its prime.

Kristian, you are MR TURQUIOSE by now. Too difficult to spell for me, RED is easier.

Still have a few trick paints on my mind, but the painter seems to shoot them down one by one, and maybe there's a good reason why nobody has put them on a private car before. I'm adding a picture of my red car, just to remember it, doesn't look half bad... Big Grin

Attachments

Images (1)
  • DSC_0941_01
That is an impressive paint job. Although, I am not refering to the color. Rather, how they sharpened all the lines of the car. The lines are very straight and visible reflecting the panel angles very well. Most non-pantera shops miss that whole effect and tend to soften them with their poor sanding technique. Rumor had it at one time that many cars left the factory with "crisper" lines than others as the kersite dies used to stamp the panels lost their edge over time. Whether true or not, crisp lines are a dead giveaway to a quality restoration. And yours are sharp!
Just wondering...
Tire rack has a web page where you can see all their rims on your car. How about color? Has anybody produced a Pantera photoshop something where I can see all colors on a Pantera? Ideally with known car colors to choose from, but otherwise just a palette? To help me decide?

BTW, my Pantera has not been moved to the painter yet. We haven't found a day with no rain and dry roads for 6 weeks. Makes me wonder if I live in the right country...
quote:
How about color? Has anybody produced a Pantera photoshop something where I can see all colors on a Pantera? Ideally with known car colors to choose from, but otherwise just a palette? To help me decide?

I put something like that on my website, but I don't have a color palette for users to mix their own colors.
http://www.banzairunnerpantera.com/color_selector.htm
Finally! Today we moved my Pantera to the painter. After nervously looking for a dry bright day almost 2 months, they promised below freezing, no snow, not even any clouds, pure sunshine, in a 3-4 hour window. We only needed 45 minutes. So I called the painter early, he needed his breakfast, and then drove to my house with a powerboating friend. And guess what, when they arrived and my mobile's weather forecast showed only sun, it was snowing. Not a lot, but f...... annoying!

There was no turning back now, so I invented a drive bag for paint free cars. First plastic cover, then the normal cover to keep it all in place. Not ideal, but pretty ok.

We had to push it bare, and of course that meant that we were in a hurry. We had no time to rig a hand winch, so we "just" pushed it up onto the trailer. Not as easy as we thought, but halfway up and snowing, you find strength you didn't know you had Wink
quote:
About the color, I've narrowed it to something blue by looking at all blue Pantera in the registry. Showed the painter my favorites, he'll make a sample spray for me...

FWIW, I love the Ferrari 355 blue on these cars. A fellow PCNC member painted his the lighter of these shades (bottom) and it looks great!

http://www.thewatchersnetwork....-ferrari-f355-17.jpg


http://www.thewatchersnetwork....ars/ferrari-355.html
The metal has been prepared, deep scratches removed if any. And the straightening has begun. I warned the painter that there was filler almost all over, very thin in most places, but still. Is it the same with all Panteras? "Hand-built"? Especially the front lid, looks very straight in metal, but when starting the work, you can see the result

If you wonder why you can spot a bit of red on my car in front of the left rear, it's because I want the painter to measure it, so we can replicate it, if I end up going with red.
Rear deck lid had a dent at the rear, and also a non-standard brace beneath, pictured earlier. Took some straightening and then some filler. Somebody must have sat there, if it was the owner placing a woman there, I hope it was worth it...
Maybe this car was the reason they started putting a profile in the middle of the rear deck lid?

Well, at least it's WIP! burn rubber
I think I've asked this before, but did I get any answers? Almost everywhere I removed the paint to the metal, I found a thin layer of filler. Most of it very thin, but I found almost no surfaces that were just painted straight on. Is that normal for Italian hand built? Or are all you guys' cars totally straight under the paint? Eeker

A lot of negative can be said about my previous paint, but it was 100% straight, so somebody did a good job straightening.
quote:
Originally posted by No Quarter:
I think I've asked this before, but did I get any answers? Almost everywhere I removed the paint to the metal, I found a thin layer of filler. Most of it very thin, but I found almost no surfaces that were just painted straight on. Is that normal for Italian hand built? Or are all you guys' cars totally straight under the paint? Eeker

A thin layer of filler or thick layer of surfacing primer is the only way to block the body completely, optically, smooth. It is a common show car technique.
quote:
Most of it very thin, but I found almost no surfaces that were just painted straight on.

Mine had just a thin coat of primer underneath the original gold metal paint so I assume the metal was staight from the factory. On top of the original paint I found several coats of filler, primer and paint from two resprays.
quote:
when you hit 200 posts you have to paint the car i'm dying to see the new color


I'm doing my best. Weather delayed me 2 months. But at least there's progress now. I have a month off in April, that's when I plan to put it together, so I'm not hurrying the painter. So all I can do is stop posting progress pictures... Razzer
The plan is that the painter calls me whenever he's in doubt about straightening, drove there Tuesday to discuss the right door alignment, a challenge since the rear fender is a replacement. He also pointed my attention to the fact that the top horizontal chrome window list is straight, but the roof it's supposed to seal to has a curve. Not an easy car to get right. When he thinks he's finished straightening, he'll paint it one color, and then I go through it and "sign" it off. Good thing, I get what I want, he gets no complaints.

He said he would give it a layer of epoxy paint, so "it won't rust in your lifetime". I'm not sure if that's what can be seen here or if it's sander or what ever, but seeing it in one color suggests progress.

Attachments

Images (1)
  • IMG_0705
Went to the painter today for final inspection etc. They've done a good job with the body, only found two areas to correct by holding bumpers and other stuff to the body. Had new DeTomaso and Pantera scripts, needed holes elongated very slightly, better now than when painted.

Color is chosen and mixed! The few I have communicated my choice to have not said anything like "great color!", so it may only be to my taste. Great!Razzer

I finally decided after having seen it in a parking lot at work. Plenty of nice colors in sunshine, but they all looked dull in cloudy conditions. Not this one. It has a "shine" to it, and amazing two tone ability. Like the two tone colors, but with both tones the same color. If that makes sense...?

Regardless, decision is made, I like it. It's called KMF Recife Bleu.
Status on the paint job. The color is just as I wanted. The straightness of the body is better than I expected. I know that curing filler can change that slightly, but the starting position is as good as it gets, maybe one of the straightest 70s Italian cars IMHO. No orange peel, they did 2 layers of clear coat, then wet sanded the whole car (external surfaces) and 2 layers more. Ended up paying a little more than first agreed, paid with a smile. The painter swears that this is the last project like that he'll take in. I'm sure he loved to look at it every day, and was sad to see it go...
quote:
Originally posted by No Quarter:
So now the pleasure of Pantera ownership is over. I dare hardly touch it, or even go by. Putting the doors on will be a nightmare. And will I ever get the courage to actually drive it? Fast? Eeker


Put down your flower hat and relax. Make the first healthy burnout right outside the garage.
You can always re-paint it. burn rubber
I hope you guys (and gals?) have enjoyed following this project. It's been fun writing about it. I've tried to show it all, all the steps, warts and all. Not just say "the body was perfectly straight" and "no rust".

The color choice has been hard to do. I've seriously considered at least 5 colors. But now that I chose blue met, I remember that half of the cars I've owned have been blue met, so maybe it's not so surprising.

Now the car has to rest a while, I may go sit in a chair with a beer watching it, but no assembly for now. When it's assembled and running, on a sunny day, I'll take some good pictures.

Thanks Smiler

Only picture of it in sunshine:

Attachments

Images (1)
  • IMG_0761
Mikael....love the color....the larger flake makes the color pop! What kind of paint and clear coat was sprayed? You may be luckier that those of us here in communist California (HAHA) with all our paint laws. Our paint has changed so much over the last 20 years it's not funny. My daily driver already has clear coat problems after only 3-4 years after a minor accident repair. I'm trying to decide on colors also, but don't want these kinds of headaches on the Pcar so I'm also considering solid colors with no clear coat. Definitely not as exciting as your color.
Today I had time to go out in the garage and sit with a beer. That never happened though, I felt at urge to assemble something. With not much light or room I had to pick what to install, but here's the side marker installed.

Notice how when the paint is new, the rest of the car looks old and dirty. Which it is!

Attachments

Images (1)
  • IMG-20130302-00039
Some more assembly today. The threads in the bolt holes where painted hadn't been masked, so I'm rethreading them, bolts won't go in. I think I got a thick layer for my money...

Plan is today to get it drive-able, let it rest for a week more, and then on Saturday move it from the small heated garage to the bigger unheated garage where I can work on it. Unfortunately the weather is great, that means fixing the boat which is outside...
quote:
The threads in the bolt holes where painted hadn't been masked, so I'm rethreading them, bolts won't go in. I think I got a thick layer for my money.

I just dropped my 66 Mustang off at the body shop a couple weeks ago and they had a difficult time removing the wiper arms because the last time the car was painted (1982) the shop didn't bother to mask the wiper shafts and painted them, then apparently pounded the arms onto the painted shafts.
What a nightmare. I thought I was well prepared but...

Front lid: Easy to carry. I had spotted that the threads were full of paint and re-threaded them, otherwise we would still be standing there. Some alignment, 15 min job.

Rear lid: Thought that was going to be easy, because I left the hinges on, only took the pins out (replaced with a bolt and nut), so alignment should not be an issue with this heavy piece. But I forgot that all hinges had received paint, so the middle part on the lid didn't go down between the outer parts so the hole aligned. I'll spare you the whole story, but using a thin screwdriver, then thicker, then the bolt with the threads made pointy. And hammering on the lid with a sledgehammer on top of a cloth and a piece of wood. Not to my liking, but didn't damage the paint. It took us 45 minutes to get it properly seated so the bolts could go through, all that time my friend balanced the heavy lid. He looked tired afterwards

Doors: Balanced them on a chair and used the lift to align the car, went easier than expected. When I closed one door I heard the sound of something breaking and something dark the size of a nail fell to the floor. Fortunately it was only some of the hardened black plastic around the wires.

So we got all four on, without major damage. I still need to spend a few hours aligning everything.

I had of course taped all the edges first. When I then started to remove the tape I found out it was crap tape. It didn't come off in one piece, and some glue stayed on Mad Took me 2 hours to get 95% off, the remaining 5% can't be reached Mad Cheap crap tape!

Enough for today...

Attachments

Images (1)
  • IMG-20130316-00061
Today I aligned the 4 add ons. Doors were easier than expected. Rear lid involved some welding because a thread on the lid starting turning. Front lid was a bit high on rear corners, so I stood up, feet in the cabin, body though windshield hole, wooden block under the middle part, and pushed down on the corners. Just a bit, did the trick. I wonder how the pros fix these kind of things...!

So Lexus freaks, bring on the small steel ball to check alignment! Well not quite, and I'm not too obsessed about things like that on a performance car. But it's better than before it was painted, and what's most important to me, the doors etc. are easy to close. I'm glad I spent the hours aligning when it was bare steel, and that I "insisted" the painter put the doors on when filling.
Things are going slowly and I deliberately don't force it, better do it right than fast. I have April off from work, so then we'll see.

In the mean time just wanted to share this birthday "card" I got from my son, he knows what I like! The text is Danish, and even if you understand Danish, it won't make sense, it's inside-family jokes that I won't share here Big Grin

I think he maybe mixed the 2 digits of my age? No, unfortunately not... Eeker

Attachments

Images (1)
  • 1971-detomaso-pantera-wheel
Question for the community. The scripts on the rear, how should I fasten them? I've heard the following ideas, not sure which to use, don't want to break them, don't want them to ever fall off:
1. Orig clips (who has them?)
2. Make 3mm threads on the three pins, 3mm nuts
3. Put some body sealer in the three holes, gently push it in, will it stay
4. Double-sided tape for emblems, spend time cutting the not needed away
5. Any better ideas? Can't weld them in (just joking)
I believe threading them to be a better solution as you can snug them nicely against the body.

However, I saw the best solution in Reno at the Fun Rally. This individual had painted the script onto the rear panel and cleared over it. It looked original and avoided all the cleaning issues. I was so fond of it, I am painting the script on my current restoration.
Was about to put front grill on, when I found this I've never seen before: Two sets of wires that had been cut and just left laying around. There are the following wires:

One set:
Thick yellow
Thick pink
Thick blue
Yellow
Red
Grey
Brown

Second set:
Grey
Brown
Black

They all seem to come from the main wiring in the right fender in front of the wheel. They were cut and taped off before it left the US to get to me. Judging by the state of the tape, decades ago.

Does anybody know why this was done, to live up to some US regulations? Amazing the car can drive with 10 cut wires. And everything works up front: Lights, blinkers, horn, fans.

Attachments

Images (1)
  • IMG-20130330-00086
Think I've found out, found a good wiring diagram. All colors seem to relate to fans and relays, and my fans have been moved to the rear of the radiator. So somebody probably just cut the wires and left them there. Currently I have one fan controlled by a thermostat and one controlled by a switch from inside, isn't that the way it was set up originally?

Never mind, now that I know what it is for and everything works, just rip it out!
quote:
Currently I have one fan controlled by a thermostat and one controlled by a switch from inside, isn't that the way it was set up originally?

Yes, for the '71 cars only. The '72 and later cars used two thermo switches for the fans (one thermo switch per fan). That's why there is one switch on the center console ('72 and later cars) that isn't electrically connected to anything.

John
Time to install the glass, windshield and rear quarter window. Should be quite easy:
• No welding in the window frame
• Same windshield
• Best available new rubber
• Trim pieces sat almost perfectly before

Got some advice from Johnny Woods, before installing, lay the trim pieces on windshield, see fit. Didn’t fit very well in corners. Spent a few hours bending them with my hands, rubber hammer, wooden block etc. Got a great fit I thought.

Yesterday the window guy got here. Super guy, meticulous and interested in doing a good job. BTW, if you remember my experience with another local window firm and my Longchamp, I ended up having to repaint the hood, roof and rear decklid at their expense, because they put their tools on my newly painted car. This guy, who’s company translates to “The Window Man” is a lot better.

We put the rubber on the windshield, tried to install trim. Didn’t fit that well in corners. Took it out, bent some more, one corner up, one corner down, and now it fit perfectly all around the windshield. Time to install.

Still, after all that effort, when the windshield was installed, the lower corners didn’t go in the rubber as they should. Hhmm. Then we pushed, later hammered gently, all the time scared the windshield would say: “Enough”, and crack. It got better but not good.

Frustrated, I said, I almost want to put a clamp on it and push it down. He said, let’s try it. So we ended up putting super window glue down there, and a clamp on all night, both sides. And then we had to continue today.

Attachments

Images (1)
  • IMG-20130405-00103
Today we continued, glue curing over the night. It did indeed help, not perfect, but frankly I can’t remember how it looked before I took it all apart.

He did some sealer all the way around on top of what’s in the groove, and we discovered a small stone chip, he fixed that for me as well. And then it was time for the rear side windows, 10 minutes each, no problem.

All in all 4 hours of work. If any Danes want a window installer that cares about the car he works on instead of just slamming the windshield in and drive to the next customer, I recommend him. He comes to where the car is. www.rudemanden.dk

Only a few days work left now…

Attachments

Images (1)
  • IMG-20130405-00105
Spent most of the last 24 hours getting the right window to go up and down freely. Lots of bending and twisting and taking apart, normal adjustments wouldn't suffice. Reminded me of when a friend years ago had fitted another door to his car because the old one was rusty. He hadn't managed to get it to fit very well, so in attempt to be funny, I asked him what brand of car he got that door from... Roll Eyes
Point is that the curvature (never thought I would use that word) of the window and the chrome frame are/were not the same, so I had to fiddle with a lot of things. I seem to remember a Taurus solution, or even a Pantera modified solution, is that right? Is that a higher torque solution, or just an easy solution for when the window motor breaks?

I constantly think there's 1 day's work, then I can drive, but after a day's work, there's still one day's work. No worry, it snowed yesterday. But I would like to DRIVE soon!
Here's a thread on the Taurus window motor conversion: http://pantera.infopop.cc/eve/...=921100755#921100755

I just spent ALL DAY yesterday fiddling with the rear passenger window on my 69 Cutlass convertible. The window has been difficult to crank lately, and then my daughter and her friends took the car out Friday night and forced the hand crank when it became difficult to turn (rather than lifting the glass to assist) and the glass dropped into the body. What I hoped to be a 2 hour project turned into ALL day, but I did disassemble the other side as well and greased the regulator, rollers and slides, as adjust the limit stops, so I shouldn't ever have to do this again.
Mikael, Prior to disassembling my car for paint I noticed at car shows many panteras with ill fitting windshield mouldings. This is probably a function of once it comes off it never goes on the same again issue. Needless to say we had the same problem we fought and fought the moulding to no avail. Finally we decided to drill a small 1/16" hole in the windshield lip with the windshield and rubber installed without the moulding. We then drilled a small hole in the moulding and threaded some small stainless wire and pulled it thru. We then tied the wire off arould a small screw. This is essentially a strap for the moulding holding it down. We initially thought of using glue but we were concerned about future dis-assembly problems. I imagine this is one of the reasons some people use the glue in windshields. I dont think they look proper on our cars. At least now my mouldings fit well. Smiler
Yes, it takes some fiddling to get it just 90% right. Is that because of "hand-built?" When I did a frame off resto on my 68 Camaro I remember that things fit as they should when installing them. On the Pantera, quite a big part of what I installed had to come off again and be adjusted in some way to fit properly/symmetrically etc. Bumpers, everything in the doors, interior roof moldings etc.
Mikael,

Okey. Looks very much like the ones from PI - I bought some stainless mufflers for mine too, but haven't mounted them yet.

Kristian: That would be awesome, with a cruise. But I have an appointment with a photographer and a model, that wanna shoot some pics of my Pantera. Crap..... Would have been much more fun driving with You Guys !!!!
Haha, Kristian - Good reply ! roll on floor

But.... The photographer have asked me if I could manage to get a couple of Italian sportscars together for a shoot this summer. So I might need a Pantera or two more. Also have a Maserati Mexico, Lambo Urraco, Countach in mind that I know of. It could be a fantastic shoot. He will make the shoot in Roskilde, at the "Musicon" - So if You're game, You're in !!

Let me know......
Post
×
×
×
×
Link copied to your clipboard.
×