Finally had time to do mine, the first took close to 5 hours (lots of breaks to re-read the instructions, decide if I really wanted to go ahead with the non-reversible mod, try aimlessly to remove the motor/regulator without first removing the window glide thingy, keep the kids from bickering, figure out which tool to use to trim the mounting studs on the regulator (busted a bunch of cut-off blades for the Dremel, couldn't get the right angle with the hack saw ... finally found the flush cut saw with a metal cutting blade was the cat's meow - only needed a little bit of grinding with the Dremel to get it perfectly flush), and running to the store to get 1.5" 1/4x20 bolts)).
The second window was done in about an hour and a half (1/2 hour to get the motor/regulator out, 15 minutes to cut the studs, grind them flush, cut the regulator for the new motor (recip saw cut it like butter), and a shot of rust-proofing paint, 20 minutes for lunch, 1/2 hour to re-install everything, button it up and test it).
Special thanks to my western compatriot who supplied the motors - molti grazie!
I finally had to chance to finish up the driver’s window motor conversion last weekend. The actual conversion to the Taurus motor on the driver’s side went really fast. However, try to get the window to go all the way down and get everything aligned seemed very time consuming and tedious compared to the passenger window.
Also, when I ordered the Ford Taurus motors from O’Reilly’s Auto Parts they each arrived with slightly different mounting systems - the same bolt pattern but just different backs. (I will try and post a few pics to show the difference). I slightly modified the back of the Taurus motor mount on my driver’s side window to get a more complete gear mesh. The passenger’s side meshed nicely from the get go.
Once again, I am very pleased with the conversion and I would highly recommend it to anyone with their stock window motors.
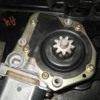
This is back of the motor that I used for the passenger side door. The alignment and mesh of the gear on this motor with the regulator gear was excellent. The gear actually was thicker than the one that I used on my driver's side (see driver's side motor pic).
Both motors were ordered from O'Reilly's Auto Parts for the same year Ford Taurus but came in with the different backs. After performing the conversion I would prefer this style over the one I used on the driver’s side.
Both motors were ordered from O'Reilly's Auto Parts for the same year Ford Taurus but came in with the different backs. After performing the conversion I would prefer this style over the one I used on the driver’s side.
Attachments
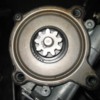
This is back of the motor that I used for the driver’s side door on my car. The motor gear was not as thick and, therefore, the mesh of the gears of the motor and regulator was only about 70 percent.
I ended up grinding down the back cover and insetting it slightly to gain a better mesh. This was not hard, but did take some time that was not required with the other styled back. After my slight modification the alignment and mesh of the gear on this motor and the regulator gear was excellent. I’ll post a pic of the modified back so you can have a visual of what I did.
I ended up grinding down the back cover and insetting it slightly to gain a better mesh. This was not hard, but did take some time that was not required with the other styled back. After my slight modification the alignment and mesh of the gear on this motor and the regulator gear was excellent. I’ll post a pic of the modified back so you can have a visual of what I did.
Attachments
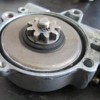
Here is the modification I did to the back of my driver’s side motor. Grinding the ears off the back and dropping the back into the case allows the motor/gear to sit farther down on the original Pantera regulator assembly. This pic is before I sealed it shut using gasket maker.
Before doing this, I verified that dropping the back down inside would not interfer or rub on anything. After I let the gasket maker dry around the edges I installed the motor on the regulator and was ready to go.
Before doing this, I verified that dropping the back down inside would not interfer or rub on anything. After I let the gasket maker dry around the edges I installed the motor on the regulator and was ready to go.


