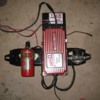
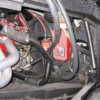
Here's the ignition control sub assembly with the MSD box mounted in a more appropriate location---IMHO
Kirk
I am amazed at the artristry and have studied the photo's in hopes to learn the details of putting mione together.
I have a question on the second photo going back that shows the location of the coil/MSD/solenoid. Just to the right of the solenoid is a straight pipe-like object I can't identify. what is that? (coolant expansion tank overflow?)
Also, is that photo taken through the removed rear quarter gill?
Joe
quote:Originally posted by Kirk Evans:
Here's the ignition control sub assembly with the MSD box mounted in a more appropriate location---IMHO
The Pantera-Electronics controller is the same dimension as the MSD. It has many additional features to the MSD, including...it doesn't require a tach adapter and it works ALL of the time.
Just to the right of the solenoid is a straight pipe-like object I can't identify. what is that? (coolant expansion tank overflow?)
I do not remember, sorry.
Also, is that photo taken through the removed rear quarter gill?
No through the wheel opening with the shieldout.
The Pantera-Electronics controller is the same dimension as the MSD. It has many additional features to the MSD, including...it doesn't require a tach adapter and it works ALL of the time.
This car was finished 3 years ago and I do not believe Jon had his system available---and the customer already had the MSD. I personally have never experienced a MSD failure but have modified several cars to run the MSD only under boost or as needed manually so the radio worker better. Bother car requires 2 separate control systems--one ran a Dura spark and one ran a standard unilite. The Dura advantage was it retarded the ignition during starting.
Pantera-Electronics is the real-deal making fantastic items to improve the car. I have not ran the ignition control module but if it's like everything else Jon makes, it will be first class.
Wow! Came out beautiful Kirk. Hope the owner appreciates what you did. I do. It's a magnificent car. 
Beautiful car - Kirk you are an artist.
Devin
Devin
Thanks for sharing, the repairs turned out awesome!
Fantastic work Kirk. Sexy colour, what is it,
it's what i was hoping for 13 yrs ago and ended up with a very plain red. love it.
it's what i was hoping for 13 yrs ago and ended up with a very plain red. love it.
Hi jjenn.
Welcome to "Club damaged cars".
Mine is 9053 (dont know hav to uplode Photos)
I think it is possible to repair car 6672 and yours also. not so bad at all.
With the right skills, tools, time and money almost ewerything is possible!
Dont know if you know this one.
www.rscorse.com (look under Detomaso store)
They have rear fenders. 1650euro each.
Kjeld
No worries---here is a crashed Italian from several years ago with a ton of damaged front end parts including ABS controls, the complete AC evaporator and heater box with blower. Many other frontal items required replacing or repairs not including the sheet metal. It took a hard front end hit.
Attachments
Here we are all most ready for the new sheet-metal and fiberglass internals. One thing that was incredible---when I started installing the new front end, all of the rivet holes on the internal fiberglass shrouding lined up the frame---and I mean all of them. It didn't even require pressure to install the 1/8" rivets from the fiberglass to the sheet-metal---I've drilled mounting holes using the part to be mounted and they have not lined up that good. A big salute to Ferrari on this one.
Attachments
Nose on--the customer did his own painting which we often do for people on reconstruction jobs---rust of collision. The lines on the fender helped me check the metal shaping on the left fender which was slightly damaged on the new front clip. We were very lucky to find another very late 328 that was smoked on the left rear. I bought the whole car and was going to build a toy targa 288 wan-na-be.
Attachments
Kirk,
What does something like the rebuild of this GT5-S cost?
Thanks,
Cliff
What does something like the rebuild of this GT5-S cost?
Thanks,
Cliff
Add Reply
Sign In To Reply


