
Don’t worry about the internal jumper. The two black wires that are currently on one connector can be separated, and used to supply both of the terminals that were connected by the internal jumper.

as for the relay, earlier this year I stumbled across an amazingly cheap and readily available substitute. Multiple sellers on eBay and Amazon. Just about every seller will be shipping from China.  Be sure what you order is the 12volt version. They do not have the internal jumper. But you now know how to work around that issue.

8E7D357C-D18A-444B-BD72-F2D2581CCD0F

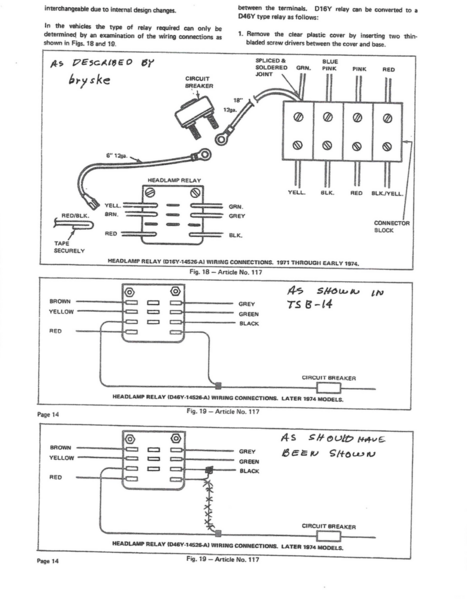
as Forest has been sharing, it looks like your relay has received some misguided love and attention in the past. Not quite sure how it ever worked with the red/black wire not connected.🤷‍♂️🤷‍♂️

Keep us in the loop as you move forward.

Larry


Larry.

Attachments

Images (1)
  • 8E7D357C-D18A-444B-BD72-F2D2581CCD0F

Follow up to what Forest just posted

we are in agreement on the blacks.

we are in agreement on connecting a wire next to the small red wire.

After studying the three diagrams I agree with Forest you should connect the wire coming from your circuit breaker. Leave the red/black wire covered with electrical tape.

if you have some handy, I actually prefer using glue-lined heat shrink tubing on the unused connector. I leave it a half inch long, shrink it with my HF heat gun and pinch it together while still warm for a tight seal.

Larry

Last edited by lf-tp2511

Hi again all,


Once again thanks for all the inputs, and especially the last diagram Forrest, extremely helpful. :-)

I’ve now hooked up, I believe all according to that later diagram. I’ve attach pictures, I don’t want to test it before getting the GO from the experts, in fear of ruining something in case I misunderstood something.

Please take a look a let me know the verdict if it’s done correct? Big thx in advance.

Attachments

Images (4)
  • IMG_8040
  • IMG_8041
  • IMG_8044
  • IMG_8045

Oh, forgot to ask, do the circuit breaker needs to be screwed on to the relay or is that irrelevant?
And I assume the relay neither have to be screwed in place for it to work, I’m thinking if there’s some kinda grounding needed is needed through the small metal nuts in the top of the relay? I would assume no, but better ask then be sorry of course.

Hi guys! :-)


Great news! - "IT'S ALIVE"! - the head light now go up and down on reaction of the head light button. :-)

You guys are amazing - nothing less!

ONE thing though - when I turned on the ignition, the head lights door open up, with no lights on and the head light button was in "Off/Close" position. And when I then turned "On/open" position, the head light door closed and same time the lights came on. So it seems to me something is "reserved", I'm thinking if it can be the head light door motor wires are reversed. I know when I tested the limited switches, I saw the head lights motor wires had drop their electric spades on both wires, so I put new spades on and put them together, but without knowing which wire belonged to what wire on the motor. One wire from the motor was black and the other was red. If I remember correctly I wired the yellow wire from harness to the red one and the black to the red from the harness. (but I might have done it opposite).

What's your take on this? Would it be a simple as reversing the wires at the motor or?

The easiest way would be to let the lights either open or close all the way then disconnect the two wires from the motor and check for voltage across the two wires you disconnected with a volt meter or test light. If no voltage between the wires you are good. Need ignition switch in acc position while testing.

Last edited by forestg

Thx, I'll give it a try :-)


I was thinking, I could also test the head light motor alone, disconnect the electric spades and connect a separate 12V battery. I assume that it must be designed like +12V raises the head light doors and -12V closes the doors. Or oppersite.

Then I would need to connect the right choice to Y (Yellow), I assume the wiring diagram would indicate if +12V on Yellow wire would raise the doors or is that assumption wrong? (just asking to get wiser)

Hi Forrest,


Tried your trick with swapping back to fig 18 diagram. And now the head lights works nicely.
Didn’t test the limited switches with the motor disconnected plus voltmeter. I think I’ll do the in the weekend, for now I know the setup works. (Super nice btw to see them work as previously). And then I can continue with other stuff, there’s plenty to do on the car still.
Once again many thanks to everyone helping out. Couldn’t have done it without you guys!

FWIW, after driving our Pantera regularly in the rain, I found the headlights would move very slowly either way. I watched the action with the front hood open and heard a sizzling noise when my wife hit the switch.

The stock motor is meant to operate ungrounded to the car. The up/down motion comes from the up/down microswitches, depending on which one grounds. The motor leads are extremely short and go to a peculiar bakelite insulating grommet/ vibration support  bolted to the back of the motor. After 30 years, the grommet/support cracked and held a tiny bit of water.

The water boiled from high electrical current  when the switch was depressed. It also partly shorted- not enough to blow a fuse but resulted in very slow headlight movement. I threw the broken grommet away and used insulated male/female push-connectors on the wires, with a tie-wrap around the motor & wires for simpler vibration relief.

No more problems although the plastic inner gear in the headlight mechanism  may crack just like in window motors. Since the headlight and window mechanisms are identical, you need a third brass gear in there, too.

Add Reply

Post
×
×
×
×
Link copied to your clipboard.
×