
Just for information it would seem there are two sizes of OEM thread pattern that are possible to find on the ZF on the reverse switch. One measures in at 10mm and the other at 8mm. The 8mm thread is a finer pitch.

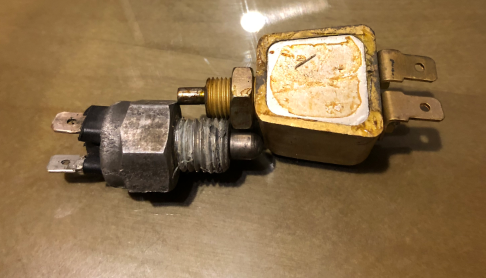
If you are looking for a cost effective replacement for the 10mm, fuelmiser make one , code is CRS110.  This is found for slightly less than half the standard prices charged for a Pantera branded  and is in fact made in Italy.

Fits and works perfectly, and looks exactly like the original switch. Made on the same machine.

Hopefully others will not have to find the ins and outs like I have had to!

Attachments

Images (2)
  • mceclip0
  • mceclip1

Panterapatt- just a little more.

Check the reverse switch hole just isn't slightly larger with threads. It would be easy to miss from above.

APO may have tried to replace it , got the smaller size  and given up when it did not screw in , leaving the smaller switch hanging, causing total confusion for all subsequent owners!!

If it is, just get the 10mm. Should only be around $20.

Measured hole - slightly larger than 10 mm.  Switch thread o.d. is exactly 10mm.  Switch falls into hole.  Closely examining hole suggests faint threads still remaining which implies PO drilled out the hole "WHY"??? but it looks very clean and untouched or botched.    I am thinking about JB Welding a thin nut on the inside of the case or just using 2 nuts.  My switch from all appearances is original given the fact I have owned the car 32 years and I found it hanging inside the engine bay.  Are we sure the early cars didn't possibly have a nut on the inside of the cover and the outer one used as the jam nut?

Attachments

Images (2)
  • hole
  • switch

Well, to close this thread I started, I successfully installed my original stock switch with an 85 cent jam nut today.  My case shows no signs of ever being threaded.  In fact, the inside of the case has a machined flat area where it was very clear a jam nut had been earlier in the life of the car.  I measured the stack up tolerances to ensure the switch probe was not binding in reverse.  FYI, a stock switch moves 6 mm full stroke with mine reaching continuity at 3mm.  So you have 3 mm of float to play with.  Put a couple small washers on the outside of the case to position the switch correctly on the inside and tighten the jam nut.  FYI the stock switch is a 10mm x 1.0 thread.  While I was in there, I took the liberty to lube the shift mechanism rod and ball with white lithium grease.   Put it back together and reconnected the wires.  FYI the green wire (white and green) is the switched hot when the lights are on.  No backup lights unless the lights are in park or headlight position.  Taking the cover off if I ever have to remove anything is painless so no issues with the nut being on the inside.  cheers and thanks for the input.  


Now to replace all the rear bulbs with new stuff.  Going to clean all the grounds that support the rear lighting as well as sockets, etc.  

I am using a new flasher which is compatible with the LED bulbs.

I have an owner in New Zealand wanting a pair of tail lights. Shipping a couple months ago was about 400 but I checked this week and restrictions have just now been removed and a 7 pound package looks to be about $100 now. I suspect your price check may have been finding the restricted pricing that is no longer in place.

was that a price check from the seller or from our USPS website?

I would be happy to purchase the bulbs and ship them from me to you at my cost if that becomes an option for you  

Larry

Hi Larry

I think you are right. The website has not been updated.

These are the options on the Bulb site.

USPS is still not available on the LED merchant options.

I also have the PE flasher unit so don't need ballast resistors.

I will keep an eye on it for a couple of days and hopefully the options will get sorted.

Attachments

Images (1)
  • mceclip0

Add Reply

Post
×
×
×
×
Link copied to your clipboard.
×