Ok, time to give everyone an update. I waited until it hit 100 here to verify results. This turned out to be a new (to this forum) issue.
So after some encouragement from JimF in WIlcox I called up Ron (really nice guy) at Ron Davis Radiators and described my problem. He said the radiator should have no problems cooling my 427 and suggested I try an Edelbrock water pump. Next I called Mark the manufacture of the TItus block and asked him what water pump he recommended. He also suggested the Edelbrock water pump. Then we talked about the differences between a Cleveland block and his aftermarket block. That when I had the ah ha moment that I'll get to later.
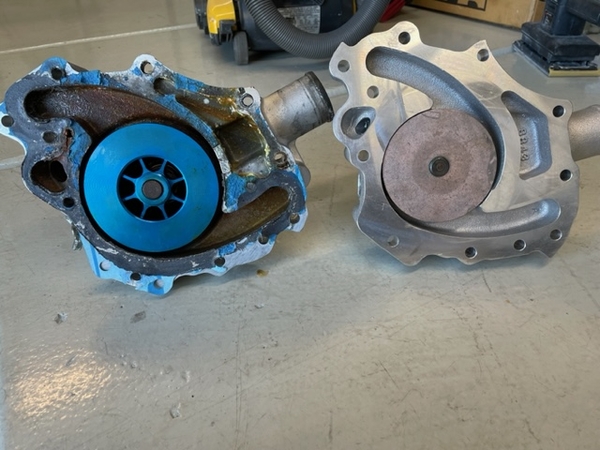
While I had requested a Weiland water pump the invoice and description from JimW tells me the one on the left that I'm replacing is a Flowcooler (F) and the one on the right is a Edelbrock (E) water pump. The Flowcooler has no obvious labeling on it to indicate what vendor it is.
The impeller diameter for (E) is 3.75 and (F) 4.2
The number of impeller paddles for (E) is 6 and (F) is 16.
The side clearances for (E) very tight at around .04 and for (F) it's .125-.188.
The (F) has open area in the center of the impeller.
While the differences are interesting, pretty much any of the normally recommended Cleveland water pumps would have worked. In fact had the Weiland Cleveland water pump been installed unmodified I would not have had any issues.
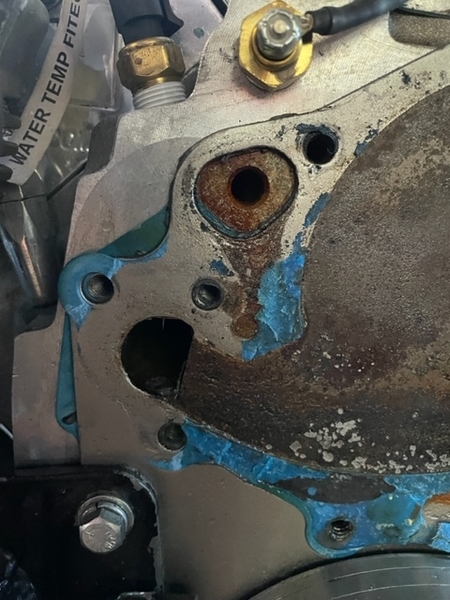
Here's the front of my block with the water pump removed. It looks very similar to what you'd find on all Cleveland blocks.
The stock temp sender is on the front above and the Fitech temp sender is above and to the left. Both measuring what I believe to be the outgoing water. Here's the problem with this picture. This is a Titus block and it uses a Windsor thermostat and does not have the Cleveland bypass circuit. That big hole below and between the two temp senders should NOT be there!!! That's how much water is bypassing the block and going right back out and to the radiator. This also dilutes the water with what's being returned from the heads causing lower readings than it would otherwise.
I taped the hole, put a pipe plug in it, and since I'd already bought the Edelbrock water pump I went ahead and installed it. Ran a few laps around the block, blew the water hose off of the lower water pipe, put 4 gallons of pre-mix radiator fluid in it, bled it, and went to bed. The next morning with no time to test, packed up the car and the wife and I went to Yuma with the rest of the AZPOCA team. I was nervous the whole way there and back. A/C didn't work but it was a very mild weekend for AZ and everything turned out great. On the freeway there and back it was running mostly in the 180-189 and in traffic with no A/C in Yuma the highest it got was 201.
In the last month I've done a couple of 30 minute runs around town and from ambient temperatures in the 95-105 range it takes 30 minutes to slowly climb to 201. Before it'd take less than 30 seconds with the a/c on or higher rpm to take it to 215. I need to take some longer around town drives to see how high it'll get and if it'll stabilize at some threshold that's reasonable.
The a/c is now fixed. Two coolant leaks at the condenser and an electrical issue at the compressor. Now I've got an oil leak coming from between the engine and transmission. The oil dye indicates it's the motor. Odds are the rear main seal. We'll see...
In case you missed the unmodified Weiland reference, apparently it comes without the bypass port drilled in it and the TItus block comes without the bypass port drilled in it. Allowing that much water to bypass the block was a serious cooling problem. :-(


