The copper rivets were esp used whenever there was any contact between steel and aluminum—for example, the steel braces against the carpeted aluminum engine covers, or the cast air intakes on the engine wall sides (terminating near the battery on the left and jack), or a few on the hood. Galvanic corrosion esp between the gullwing engine covers and the steel chassis is common on the Goose, and requires electrical isolation (paint and/or tape when the surfaces are crimped together) and use copper rivets…otherwise, moisture and dissimilar metal creates a battery (!) Lee
The copper rivets were esp used whenever there was any contact between steel and aluminum—for example, the steel braces against the carpeted aluminum engine covers, or the cast air intakes on the engine wall sides (terminating near the battery on the left and jack), or a few on the hood. Galvanic corrosion esp between the gullwing engine covers and the steel chassis is common on the Goose, and requires electrical isolation (paint and/or tape when the surfaces are crimped together) and use copper rivets…otherwise, moisture and dissimilar metal creates a battery (!) Lee
Greg,
Missed one point when I was looking..... the lower mount for the inner rear a-arm Unibal joints.... As built that "H" shaped piece is held only to the rest of the chassis on one side of the "H".
As you have added the other upper reinforcements in the rear suspension area, I would consider building the rear side of the "H" up to the frameworks. BUT, that area of the long arms going to the rear of the frame looks different from what I remember seeing....... I have not heard of any of these breaking off.......but, what do I know! Perhaps others with early cars can chime in!!! Need to do a little sleuthing to see what's what here!
Found a couple of shots of my rear engine bay showing "mid production" build!
NICE WORK!!!!
Steve
Attachments
I got some more work done on the 1968 Mangusta. Epoxy primer on the floors, engine compartment, wheelhouses, and front frame area. Seal sealer and undercoating where needed. Now I am starting to do the smoothing, straightening, and filler work. I hope to have the rest of the car in epoxy primer soon.
Attachments
Wowza... That is impressive work... Perhaps the inspiration needed to jump back into the rabbithole on my own wild goose chase
MH
Great documentation. I can see this being handy to someone down the road.
Greg, I was thinking last week about you and eager to see an update....wow, are you making great progress. Looks absolutely great.
AAAAGH! BOOGER WELDING ABOUNDS....or as I also call it "worm welding"....as if you squeezed a worm a few times to get piles of poo like you found!!! Now, you also say that some of this may have been from prior "repairs" due to offroading experience........ BUTT, I have seen pic's of factory welding that looked very similar to what you have!
Then there are other cars, that have really proper nice welding throughout...... My car had beautiful welds, but I never knew where the factory ended and prior owners continued.........in "clean up" and restore or "show car" efforts!
You had asked about the numbers and frame markings near the serial number.....have never seen the format that you have here! "Normally" you find some sort of a star then an 8MAxxxx and another star.......but your car being only the 42'cnd ish car built..... things were probably sort of fluid......!!!
Outstanding progress!!!!
Cheers,
Steve
Attachments
Never thought I'd see the day. The car has been primered and block sanded several times and is in finish primer. Next I will rebuild the doors and engine covers. Then I will tackle the removable roof.
straight and solid...that car is going to look great even 100 years from now. Will be fun to see how you engineer the detachable roof....Lee
Nice job Greg.
I finally made some time this last week to rebuild one of my Mangusta doors. As you can see I didn't have a lot to work with but I found a small section of one of the two doors that I could use a profile gauge on to make a pattern. So after bending up the lower door repair and making the two corners I could then start on making the outer lower skin. I had the door on and off about a dozen time to tweak the gaps and then tack weld it together but it's pretty close. A little more adjustment here and there and I can then take the door off again and finish welding it.
Attachments
True artisan work. Congrats
What's behind door number two? The same thing as door number one....rust! Big surprise, I know. However, this door repair represents the last of the actual rust that needed to be dealt with on this huge project. I still have to address the galvanic corrosion in the rear engine gullwings but that's a different process and I will most likely deal with that when the car is back on the ground. My goal is to do some additional reinforcements to the front lower control arms and repaint all the suspension pieces and then for the first time in 20 years place this Mangusta back on it's wheels. Hopefully this will happen by spring. Wish me luck.
Attachments
Greg, have a look at "late" production control arms Steve has for sale, as they have some additional reiforcements. 1968 1969 1970 DeTomaso Mangusta PAIR of Front Lower A-arms NOS Last revision | eBay. Also I would recommend adding the rear gussets even if you are not tracking the car. Keep up the great work. Denis
Greg, this transformation from a 50+ year old car with red overcoat to a really solid, last forever body is just fantastic to watch. It is so much harder to rebuild than build, and it looks so incredible.
The galvanic corrosion on the wings is very common, and the remedy is electrical isolation (with tape and/or paint over the steel frame). If your ability with aluminum is as good as what you do with steel, can't wait to see more pictures.
But wow, you are making good progress to a great car...Lee
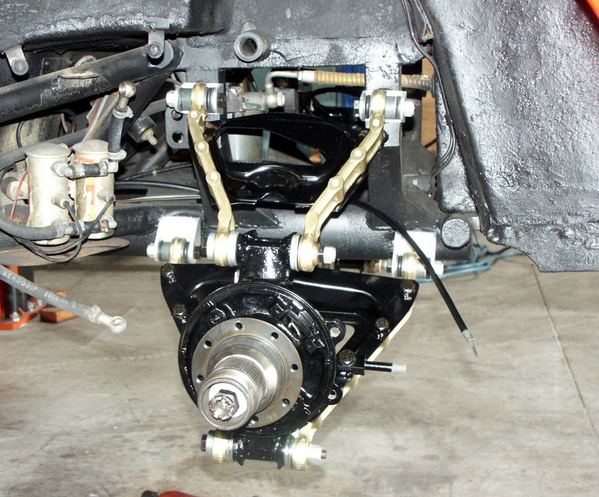
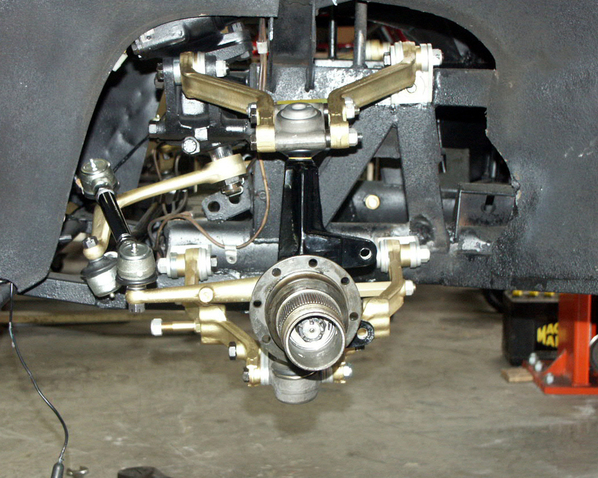
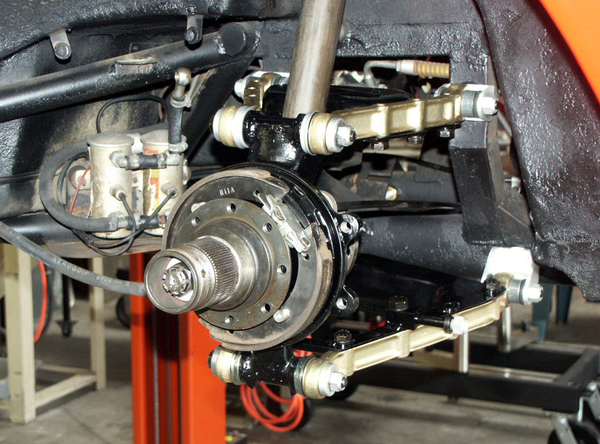
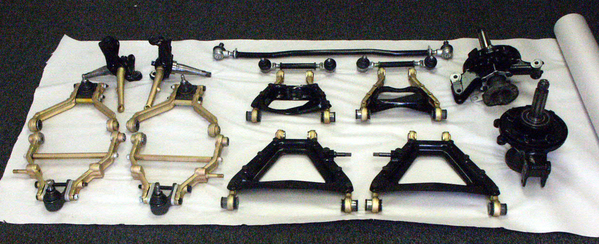
I started working on my suspension this week with the hope of getting it done in time to put this car back on the ground by springtime. This Mangusta has not been on it's wheels since the previous owner bought it over 20 years ago. First I reinforced the front lower control arms more or less the way DeTomaso did on later production cars. There were some additional reinforcements done on these arms by someone else but they looked even sturdier than factory so I left them alone. Then as I was sandblasting the components in preparation for painting I noticed evidence of some kind of plating on the parts so I decided to go that way instead. I am going to have them plated in gold zinc which may not be correct but will provide a nice contrast. 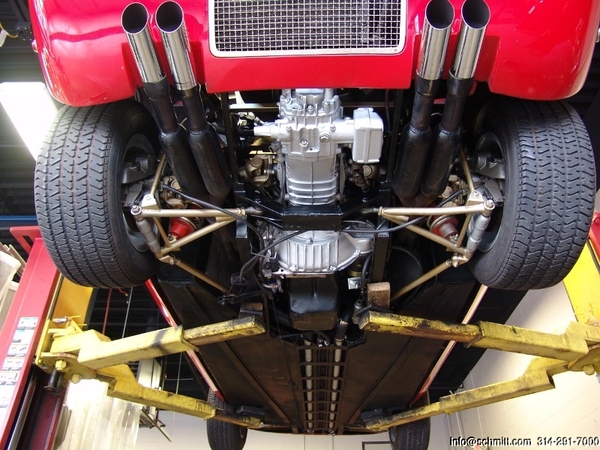
Attachments
Greg, Dick Ruzzin and Jonny Woods wrote various articles, this is one I could find quickly which explains, and I have incorporated this modification on my car.
https://pantera.infopop.cc/top...ruzzindesign-aol-com
There are various points covered, all good to incorporate as you move forward
there may be other posts as well.
I spoke to Jonny, basically most of the arms have rose or Heim joints. One that doesn’t is critical and a lot of people have incorporated joints at each end. This stops the rear wheel going toe in to toe out as it travels up / down during hard cornering.
That was a major criticism in the day. keep the original arms but suggest you consider the extra joint.
Ps I’ve sent you an email regarding the steering rack
cheers
Oh, so that's what a clean ZF looks like. I was wondering. Thanks.
While the suspension is off to the platers, I thought I'd finish up the last of the structural improvements that my Mangusta needed. I have learned a lot about how these cars were constructed and it's apparent that as the years went by DeTomaso recognized that there were a number of improvements that could be made to make the cars better. One area that was in need of help was the rear "H" crossmember that locates the lower control arm. Early cars like mine were not as strong as later cars. So, after Steve brought it to my attention I did some studying and learned how the later cars were built and decided to incorporate this improvement into my car as well. While this was not done exactly as the factory did it I believe it accomplishes the same thing.
Attachments
Greg,
Those lower a-arm mods look great! Those triangle for the rear frame sections look great!!! Those extensions to the rear "H" piece look great!!!! It's all looking REALLY GREAT!!!
What I wanna see, as I missed it in one of your last body posts, is how you're gonna fit that Firebird front grill piece on the car!!! That's gonna look revolutionary!!! ![]()
![]() :0 !!! It's too big for the Vega, so must be for the Goose.......
:0 !!! It's too big for the Vega, so must be for the Goose.......
Got a spare 'Bird grill????? Goose owner here just started a new project converting a 74ish monster bumper to small.....
Cheers!!!
Steve
@Greg Kalmes posted:I started working on my suspension this week with the hope of getting it done in time to put this car back on the ground by springtime. This Mangusta has not been on it's wheels since the previous owner bought it over 20 years ago. First I reinforced the front lower control arms more or less the way DeTomaso did on later production cars. There were some additional reinforcements done on these arms by someone else but they looked even sturdier than factory so I left them alone. Then as I was sandblasting the components in preparation for painting I noticed evidence of some kind of plating on the parts so I decided to go that way instead. I am going to have them plated in gold zinc which may not be correct but will provide a nice contrast.
I got the suspension back from the plater this week. Everything came out great looking but there was a problem with the lower control arms. The arms had too many pinholes and pits in the factory welds and every time they attempted to plate them the cleaning solution that had collected in the pits would drip out and ruin the plating. I have a solution to that problem that I am going to try and I will let everyone know how that comes out.
Attachments
Who does your plating?
When I need silver or gold zinc plating I use Key City Plating in Dubuque, Iowa. When I need chrome done I use A.I.H. Also in Dubuque.
That will be an interesting look, @johnnywoods did an engine bay restoration where the client wanted a similar deviation on plating. Technically not "original", but the end result was gorgeous.
MH
...as someone who really values the original look, I see these and think, well, a can of black spray paint is always available. And until then, geez, do they look brilliant ![]()
Greg, the best rule to always keep in mind when restoring your car, is just to remember that it is your car...!! And the care that is going into this car is remarkable...Lee
(ps, I think I remember JW's comment that engine bay in the Goose is somewhat like peeking into a bear cave...I polished the brass water tank because otherwise, over the carpet and under the engine covers, its really pretty dank in there...)
Lee, I agree. I always try to do my own cars a little differently so they don't look like anyone else's. That having been said, after sandblasting the silver paint from these parts I could see evidence that they had originally been plated. I couldn't tell the color for sure since the parts had been sandblasted previously. Some parts looked like silver plating and some spots looked gold. So I decided to plate them with gold zinc because the several Ferrari Daytonas I've done of the same time period used gold plating (probably cadmium) on various suspension components including the control arms and I thought it was a nice look and these parts will contrast nicely with the aluminum uprights, orange Koni's, and black engine compartment. Here are some pictures of a Daytona suspension to illustrate what I mean.
Attachments
HAH! Lee, I was looking at pictures before I read your note....thinking what the heck did someone do to their Goose???? Knock offs???? ![]()
I didn't like the rear "dungeon" look in the Goose.....don't like it in 'Merican car front bays either...... So this was the reason I did mine in silver (after repairing LH rear shock tower)....so that I could see grease/oil spooge and cracks.....and on one of the first times we took a trip to one of the POCA rallys, we encountered a severe construction pavement transition on the way home.......and when I got home, sure enuf, there was a crack on the RH rear shock tower plain as day in that silver!! I can't say that it looks bad or good.....but I like it! "It's my car!"
As far as blacking the suspension etc parts out...... "one or two puddles and it isn't black any longer"!!!!
Cheers!!!
Steve
As far as blacking the suspension etc parts out...... "one or two puddles and it isn't black any longer"!!!!
Steve, I know what you mean--to me, semi-gloss is a color choice, undercoat splatter is a color choice, and bold color means whether the insert in the Nyloc is yellow or ESNA red...And all lost in perspective of the real world. Pretty interesting that Greg find the suspension pieces were actually plated at all...! Really, in a Mangusta the only really daring in the engine bay is when a few have chrome plated the rear cross bar, even a polished ZF doesn't offend anybody. And Greg, for a million things on a Mangusta, the answer on "what is right" is normally a mystery anyways. If you avoid red body color, the chance of you parking next to another Mangusta and looking the same is really low ![]() . Having such an early Goose is special in itself.
. Having such an early Goose is special in itself.
@leea posted: If you avoid red body color, the chance of you parking next to another Mangusta and looking the same is really low.
@leea as the owner of the red Mangusta that is just down the road from YOUR red Mangusta, I resemble that statement !!!
@Greg Kalmes here is a link to the Johnny Woods restoration, might give you some ideas when you get to the engine bay..
https://www.harlywax.co.uk/De-...on-Johnny-Woods.html
MH
Yeah, the Houston Mangusta club with 2 members, both red with black interior and both without the leather wrap on the steering wheel! Geez, I'd accidentally try to start your car with my key...if my car was in one piece, of course ![]()
I have painted more cars red than any other color but I decided long ago that my car would get painted something else. Originally the car was silver but to me that says Porsche or Mercedes. I have been experimenting with various colors and have found some that look like what DeTomaso called Rosso Aurora. I still have some time to think about it but this is the way I'm leaning right now.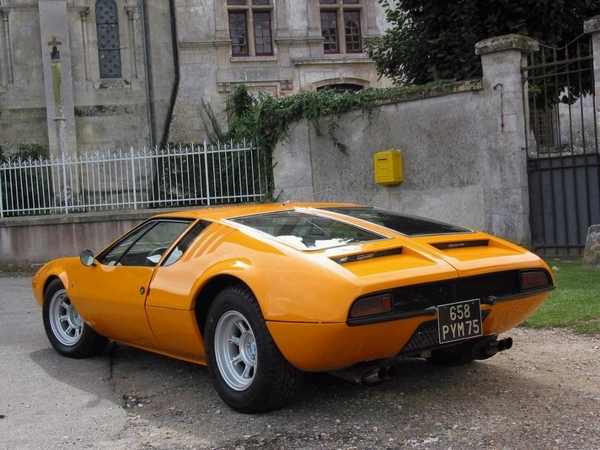
Attachments
Nice color... As Lee pointed out, anything other than red will make it stand out... BUT... Let's be honest, a Mangusta looks good in ANY color and the odds of randomly parking next to another one AT ALL is a bet even Vegas wouldn't cover...
Choose "the color less painted" (Apologies to Robert Frost)
MH
Mike, I agree, not only does the Goose look great in almost any color, but as well that color (that kind of Rosso Dino (where the DiNO stands for "DoN't say Orange") is a color that looks so wrong on some cars---but works so wonderfully on a Goose to feel both contemporary and retro at the same time...
I am still working on the Mangusta in case anyone was wondering. After getting the suspension plated and cleaning the aluminum uprights I decided I would take a break on the suspension and tackle the galvanic corrosion in the engine covers. Even though I have been doing this work for almost 45 years I have never needed to do much work with aluminum sheet metal before, other that stripping and refinishing various hoods and deck lids. I have never welded anything but steel. So, after consulting with a welder I know who has an aluminum spool gun but was reluctant to weld such a long repair panel for fear of warping the metal, I decided to do most of the repair with structural adhesive and keep the welding to a minimum. Please, bear with me until I finish these areas because when I am finished these repairs will be as undetectable on the inside as well as the outside. More pictures coming soon. Also, this repair is going to be much stronger than the way the factory had it because there was no way for them to attach the skin to the steel framework after folding over the hem but now the skin is bonded to the steel with the adhesive. This is the same adhesive that Honda says is an acceptable product to use in installing rocker panels on their cars after a collision.
Attachments
As always, impressive work... 898 is in the paint shop now, so hopefully there will be two more Mangustas on the road in the near future.
Keep at it, you're doing amazing work!!!
MH
Greg,
Welding aluminum on panels etc is just like welding steel! Tiny welds!!!! Tack weld along the way...... then Weld 1/4" stop. Go to other end of panel rinse repeat.....
Great work!!!!!!! You're makin' me jealous!
Steve


