
Been working on the engine lately and it's now starting to run somewhat properly. It's not that easy to tune an engine when you don't know anything of its condition. I've replaced most of the ignition parts, and mixed/matched a few plug wires to correct deviating resistance measurements.

Anyone care to recommend a set of decent stock+ plug wires?

The old plugs were evenly sooty/wet.

20230219_204626

When checking the compression, most cylinders came out at 125-135 PSI, while cyl. #4 just got 90 PSI. Hopes up for stuck piston rings.

After playing around with the timing / carb tuning, it now starts remarkably well, but seems to need a bit too much timing (~20° BTDC) at idle to run properly. There are naturally also issues with the carb tuning, as it does not seem to wish to idle properly on the idle circuit, and I think I'm partially into the transfer slot.

Should both crank case vents go into the intake manifold to get a correct setup? I currently only have the right bank connected to vacuum, left side vented to atmosphere.

On a side note, The Deauville had to dip its toes in the snow the other day, as the Range Rover needed a couple new ball joints. This came at a less than ideal moment, as I was planning to drive the RR on vacation the next day, and had no charged batteries to start the Deauville.

Have you ever seen a Deauville being towed by a snow blower? Note; belts don't grip on ice. Had to use the other blower with chains to achieve the desired result.

20230318_122406

Attachments

Images (2)
  • 20230219_204626
  • 20230318_122406

Finally got the booster out. Did not go as smoothly as I had hoped. One of the bolts holding the master cylinder to the booster snapped, which increases this part of the project significantly. I did not intend to repair/replace the booster, but looking at what came out of it, a bit of maintenance certainly is due. not sure if I'll fix this one, or get a new unit. They're not very cheap.

I'll fabricate a tool to open it, then we'll see how it looks inside.

20230404_200651

20230410_13523120230410_13523520230410_15061520230410_150624

Attachments

Images (5)
  • 20230410_135231
  • 20230410_135235
  • 20230410_150615
  • 20230410_150624
  • 20230404_200651
Last edited by S.Hafsmo

Project continues at slow pace.

Wiring diagram i somewhat finished. Just got to finish some details regaring the white wires, as they don't show up very well on a white sheet of paper. Nor does any other white paired wire.

I'll probably have to play around a little with line-weights as well, to make the non-horizontal/vertical lines more visible, as anything with a radius or angle tends to look almost transparent when exported to PDF.

*correction, vast improvment by unchecking the "smoothing" setting in Adobe reader.


From Autocad

Attachments

Images (5)
  • mceclip0
  • mceclip1
  • mceclip2
  • mceclip3
  • mceclip4

I found a used, but not complete brake booster from a Ferrari 308 on E-bay, and with a spare in hand I tore into my old unit (and the new one).


First drew up a booster-splitting tool,

Worked like a charm.

On the inside,

The complete unit,

Pushrod removal tool. The push-rod is held in place by a rubber cap, securing a ball joint at the other end. a bit of lubricant in the hole and it pops out. takes a bit of force.

Internals layed out,

Push-rod with spring an poppet valve


Attachments

Images (11)
  • mceclip0
  • mceclip1
  • mceclip2
  • mceclip3
  • mceclip4
  • mceclip5
  • mceclip6
  • mceclip7
  • mceclip8
  • mceclip9
  • mceclip10

Quite a bit of rust in the bottom of my original unit.

The Ebay-unit was however completely immaculate. Rubber diaphragms in both units were in seemingly great condition. Could not see much wear on the sliding surfaces either.

The push-rod is the only part missing from the e-bay unit, so I'll try to have a local machine shop fabricate a new one.

At the end of this, I'll hopefully have 2 operational brake booster units.

Attachments

Images (3)
  • mceclip0
  • mceclip1
  • mceclip2

The brake booster was not the prime suspect of the malfunctioning brake system, as mentioned I initially did not plan to refurbish the booster, only the master sylinder. When one of the bolts securing the master cylinder to the brake booster snapped however, another route was chosen.

If the booster was not operating perfectly before, I would guess the culprit would be the internal sliding surface seal. I'll have a closer look at the old parts before these are discarded (or stored).

The parts kit come from Harmon Classic Brakes, "Booster Major Repair Kit". Item no.: 62-653

Attachments

Images (1)
  • mceclip0

Got the booster back together. The spring pressure is not very hard to overcome, perhaps 40-60kg pressure required. Compressing the new rubber gasket however, requires quite a bit of force.

But as they say, it's when the going gets weird, the weird get going.

I could probably have used the hydraulic press at work, but this was a far more interesting approach.

Brake master cylinder dismantled.

mceclip4

This is where the progress yet again haulted. The repair kit I ordered from "Superperformance" for a Ferrari 308 does not fit. The bore in the Deauville is 1" (25,4mm), while the ferrari parts seem to be 22-23mm.

It seems that the GTB/S has a 1" booster, but so far I've been unable to find seals for one of those.

The used booster for a Ferrari 308 came with a master cylinder, which also has a 1" bore, but the internals are completly different from those in the Deauville. I'll take some comparison photos when I have an opportunity.

Attachments

Images (5)
  • mceclip3
  • mceclip4
  • mceclip5
  • mceclip6
  • mceclip7
Hi Steffen,

Nice construction for reassembly you have there!

I replaced my master cilinder with a 1980s Fiat Ducato unit. It is basically the same except that the rear line connects on the drives side on the master, instead of the passenger side.

For a rebuild kit there is a specialist here in Holland called C&C parts in Baarlo, ccparts.nl. They might be have the correct set.
i ordered their front and rear caliper rebuild kit with stainless steel pistons in the past, from stock and they were great.

Chiel


> Op 09-10-2023 10:45 CEST schreef The De Tomaso Forums <alerts@crowdstack.com>:
>
>
>
>
>

I started dismantling the drivers door doorcard, as this is the one in worst condition. My initial plan was to preserve as much of the original leather as possible, but that may change down the line.

I reached out to Colourlock.no (Car Spa in Norway) for advice regarding the concervation of old leather, as well as the proper method to clean it, without damaging it. The first reply I got was "reupholster. Black mold can't be removed" and thats it. Not a very satisfactory reply, and it does not address the parts of the leather where no mold is present.

I then reached out to their central location in Germany, where I got this recommendation: "use 50/50 water/vinegar to clean the interior" and thats it. No mentioning of their own producs. Which I must say that I find a bit peculiar. They did however shed some more light on why it's hard to remove black mold, with a rather thorough reply;

There is no general answer to whether mold infestation can be eliminated with cleaning and care products alone, or whether a new upholstery including replacement of the upholstery material is necessary and depends on the length of time the leather has been exposed to the unfavorable environmental conditions.

A little mold that appears on vintage car seats after a few months can usually be removed using simple means. However, sets where the mold has spread over several years are rarely available. The reason lies not only in the usually large-scale visible disfigurement of the leather - the entire inner core of the upholstery is usually also covered in mold threads. Even after intensive external processing, any stress on the upholstery, such as sitting on it, causes the effect of a bellows: the mold spores are blown into the interior along with an unpleasant smell.

It is then not a solution to try to overlay the smell with other smells. You then only get a mixture of the perfume used and the smell of mold. The nose is then even more irritated. Such serious cases can only be solved by having the upholstery core and leather completely replaced by a saddler. In this case, the upholstery core cannot be satisfactorily washed or recycled, which would not be of any financial advantage anyway: the leather has already been removed and a new upholstery core hardly increases the costs, but in fact usually improves the seating comfort considerably.

Basically, what I hear is "use the damaged parts to practice leather re-colouring". So that is what I will do. First I have to figure out what colour to use, as I actually prefer the lighter tan/faded brown to the original dark brown leather.

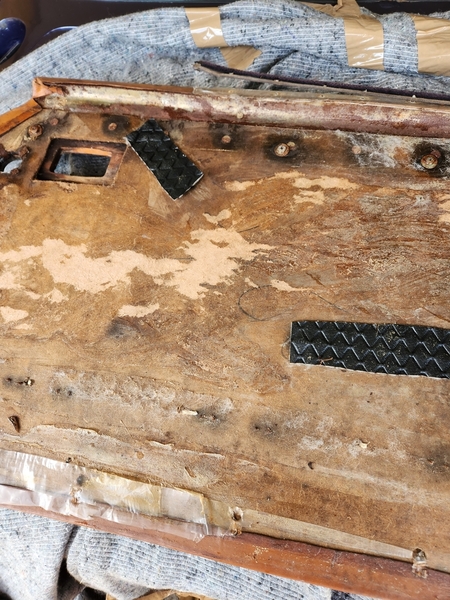
The back side of the door card with vapour barrier in place.

mceclip0

mceclip1

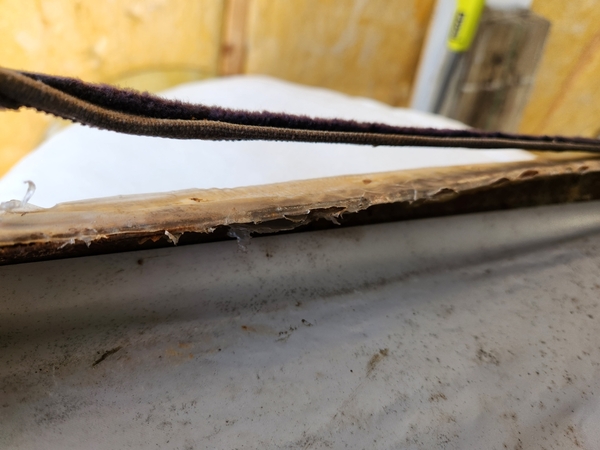
Window seal/strip. Is the rubber gone, or are these just fabric from the factory?

The black strips cover the bolts holding the arm rest/door handle.

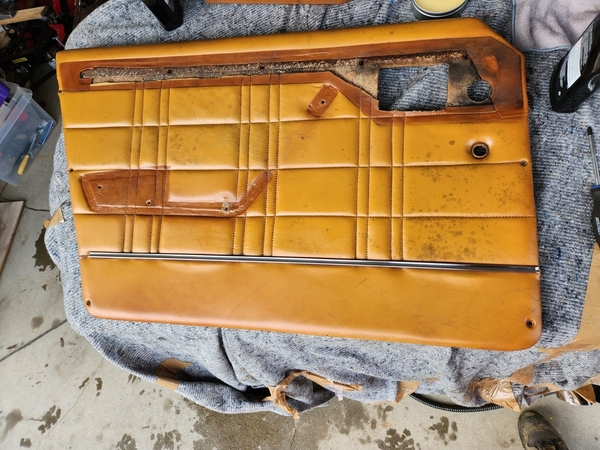
You almost can't tell that the exposed leather has faded. The remaining dark spots from the mold seem to be a permanent discolouration. It will be interesting to see what a respray will do.

Reupholstering parts of the interior is probably unavoidable, but that can be done at a later stage.

Attachments

Images (5)
  • mceclip0
  • mceclip1
  • mceclip2
  • mceclip3
  • mceclip4
Last edited by S.Hafsmo

There is no rubber seal in between. Just the fabric strip against the doorcard.

it is a very strong discolouring. Almost looks as if it has been redyed in tan in the past without removing the armrest etc. I have seen a few interior colours from partly dsimantled Deauvilles and Longchamps and the diffrence in colour was marginal, far less than  instance the mousehair dashtops which far more prone to fading.

The leather dyeing back then was still nitro cellulose based an far more durable than the current water based.

I know it came with brown leather from the factory but there is only one that I know which is called Testa di Moro. That is a dark bitter chocolate colour.

Who knows, maybe they had a medium brown option also.

@dutchie2 posted:
For a rebuild kit there is a specialist here in Holland called C&C parts in Baarlo, ccparts.nl. They might be have the correct set.
Chiel
Your advice did indeed pay off. C&C parts can provide.
Thanks Chiel!
I've also acquired a hone for the master cylinder. Mostly to satisfy my curiosity, and to reveal its true condition.
Before,
After,
There are still a bit of pitting in the bore, but I did not want to take out more material. I am however certain that most of the burrs/scratches are removed, and therefore won't rip the new seals.
The hone,
The external surface is also getting a refresh, and this finally gave me an opportunity to test "Evaporust", and I must say, I am impressed. Ofcourse I did non purchase enough to submerge the whole unit, but you can probably guess which part of it got to dive first.
Prior to this the part was scraped and cleaned with a wire brush. The remaining rust was quite stubborn.

Attachments

Images (6)
  • mceclip0
  • mceclip1
  • mceclip2
  • mceclip3
  • mceclip4
  • mceclip5

Black friday happened, and I bought a new tool (not the Lego Ferrari).

It's an Einstar 3D scanner, which I'll attempt to use to design new headlight surrounds, as my car currently has none.

So I've scanned the front of the car, and quickly realised that it is fare more amusing to create some sort of a GTS-like lip, just to see how it would look. Turns out, designing things that look good, is hard. And I am not very good at it.

I was trying to recreate the shape of the Pantera GT5-S, but I need to scan the whole car to get a proper impression of how it would look.

In the end I will probably end up trying to replicate the stock (?) lip, or something similar.

Attachments

Images (4)
  • mceclip0
  • mceclip1
  • mceclip2
  • mceclip3

That is a really cool tool, that scanner!

Nice to hear that C&C came through on the brake parts. I bead blasted the callipers myself and painted them with a 2-pack paint and clear laquer. They look like new.

I have an extra set of used original headlight surrounds. I know the Jehle front is altered from the original so I don.t know if they are of any use to you.

Let me know if you think you might be abled to use them.


Chiel

@dutchie2 posted:

However, the pitting is at the point where the piston rests in the cylinder,

That is a very valid point. I'll check the condition of the Ferrari 308 master cylinder.

I don't suppose anyone would remember how the small springs were located within the assembly? My "before" picture seem to have disappeared, and however I place them, they don't seem to have a proper surface to push against.

IMG_20231229_143714111

Attachments

Images (1)
  • IMG_20231229_143714111

This is the contents of the Ferrari 308 GTB/GTS master cylinder.

It's similar, but certainly not the same. The seal mounts and spring guides are different, and they lack the slimmer, secondary spring.

Seal assembly,

The bore of the master cylinder does however seem to be in good condition, and not pitted like mine.

I also did a closer inspection on the original MC, and it seems that I cannot install it in this order,

As the inner piston would hit the end cap and thus not allow proper movement. The inner piston also has a slot for a flat head scewdriver to help align the piston slot to the set screw, which I seem to remember was accessible when the end cap was removed.

Edit: My memory is, as usual, a poor source of information. The inner piston must indeed be positioned as in the above photo, as the adapter plate between the springs will seize on the larger diameter of the protrusion with the slotted head. It seems that the thinner springs purpose is to put pressure on the D-ring seal. The Ferrari 308 seals have a different arrangement to ensure spring pressure on the seals (see separate post below).

The pittings in the old bore were also on the opposite side of the master cylinder, so it could probably be used with the risk of some internal leakage.


To ad a bit confusion to these last post, Here's the content of the brake pressure differential valve, which you can read about here, GROUP 2B527 - Brake Pressure Differential Valve

I've ordered a spare part kit for it. We'll see if anything fits.

1970+ Ford Disc/Drum Brake Pressure Differential Switch Kit

Attachments

Images (7)
  • mceclip0
  • mceclip1
  • mceclip2
  • mceclip3
  • mceclip4
  • mceclip5
  • mceclip6
Last edited by S.Hafsmo

I did a conversion from hydraulic to an electric brakelight switch. Any 1980s or 1990s Volvo 700 series switch does the job perfectly. I made a bracket to mount it behind the brake pedal and used the original wiring pulled back through the firewall. No modifying other crimping on new connectors.

I can make some pictures of it if you need them.


Chiel

google Ford  brake pressure differential switch Ebay motors.usa.

replacements available for $20-$30.

those plastic switch is leaking when the inner O rings are leaking.

the plastic switch dont protect you for leaking.

when this is leaking it's hard to see , but you notice when the trunck floor is wet from brake fluid.

you also can close this hole ,or delete the complete bronze switch, that protect you from troubles and brake fluid leaking.

Simon

Christmas gift to self. Those are always the best.

This was built as a spare engine to a street/strip 69 mustang, but the owner realised he had too many projects, and sold it. He built two 351Cs of the same recipe, and the other put down around 485 crank hp. I chose to not have this one dynoed, as I recon there are better ways to part with $1000.

What's interesting is that these builds sport the supposedly woeful 2V open chamber heads. Heads are ported, adjustable rockers (machined), domed pistons .030 over (10.5:1 static comp), Weiand X-CELerator intake etc.

In its current iteration is has not been broken in, so before installing it in the car, I'll do some checks just to confirm piston to valve clearance, rocker geometry, bearing clearances, timing chain, etc.

Attachments

Images (1)
  • mceclip0

Add Reply

Post
×
×
×
×
Link copied to your clipboard.
×