

Your topic really reads like a good thriller Steve, and I enjoy reading it 
Steve,
It's like watching "Back to the Future" for me. I KNOW that when I do my Goose, I'm going to have all kinds of unexpected stuff come up. I just hope that between now and then I can somehow acquire your experience and resolve to work through everything without giving up and going for a case of beer.
It's really great that you are taking time detailing and posting all of this for the rest of us to benefit from. It is appreciated immensely! Good luck, you're ALMOST THERE!
Mark
quote:Originally posted by Kid:
Your topic really reads like a good thriller Steve, and I enjoy reading it
me too-I have absolutely no mechanical talent but I live vicariously through his posts.
I can't wait to see pictures (video?) of the beast on the road.
-and Steve will say: "A screaming Boss 302 is much better when it is in the car....!"
OK, here is my "last" big entry in this thread....I hope! ...barring any more rookie mistakes! ![]()
No pictures yet....the unbroken camera (wife's!) was at the races with my son.... There will still be a few things to take care of. Like fabricating up an air cleaner to resemble the stock one, but will have more of a dropped base for clearance...OR I swap the intake to the lower one....next winter! All else that I want to do is normal stuff....upgrade fans and fab' a fan shroud, install the AC compressor and charge the system (*find the leak too*), install braided front brake lines....pretty short list actually! Then drive the hell out of it!!!!! ![]()
Ok, don't forget about fixing the parking brakes too....
Thurs: Busted hump putting all the stuff back on the car...but quite frankly, in about 3 hours or so, I was done, or back to where I was before I did the BP thing on the garage floor! Ladder bar, trans support, sway bar, axles connected to ZF, mufflers connected to headers once again. Spent a good while adjusting the shifter...no 21mm wrenches....and I had to dork around with the trunion....it appears to have been raised as high as it would go, and to get more shaft "length" through "less angle" I dropped it down a bit, tightened rear lug nuts, motor mount bolts, as engine shifted a little rearwards while being tipped up in rear to get ZF back in. Installed my steering wheel center, as it was removed and sent to Wilkinson to be copied for another lister that was missing his! Retrieved from storage and installed LH hatch while I had extra labor.....
Today: knocked off of work a couple of hours early to get last few things cleaned up and a maiden voyage of sorts under our belts!!!
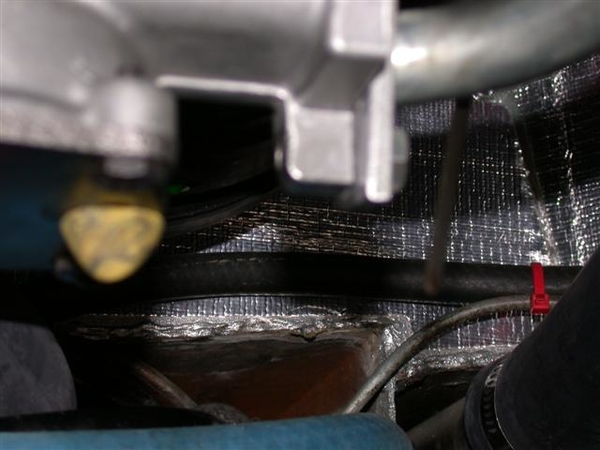
Set timing. Man that pointer is a bugger to see with all the pulleys and such in place! Found that if you go to the upper right hand corner of the access hole and peek down, you can actually see the timing marks! I had marked my 0, 10, 20, 30, 34 and 36 locations with some nail polish or something....against the black finish on the balancer so that it stood out. I am not running the vacuum advance, just mechanical, so set the initial timing at about 18 degrees and got the rest out of the mech' advance. The "retard at start" feature of the Duraspark II ignition module backs it down 10 degrees, so gives me an initial timing value of 8 degrees....perfect.
Tweeked shifter adjustment ever so slightly...
Put a bungee cord over the carpet on top of the gas tank, and prepared to back the car out of the driveway! Anticipation of zero ground clearance was high! I was going to have the wife check it out, but my son pulled in from his day at Laguna Seca watching the Historic Races, just in time to do the honors. Using the "angle out and angle in" method of going out of the driveway he says I had maybe an inch and a half of clearance.... Definitely would not make it straight out/in!!!
First impression driving the car out of the neighborhood was WOW! Smooth, powerful, and throaty (new Mangusta Int'l stainless Ansas) but not overly loud like the old burned out double glasspacks that were on prev. Cam is not that radical sounding.....but it is smooth. Holley is not bucking or complaining... First stop? Gas station. The two gallons I put in the tank to fire it up were probably almost gone....
Gassed up, I headed out to do some local stop and go driving. First thing I noticed that was not right was the clutch pedal.....evidently had a little bit of air in it so required a "pump" stroke to get a normal pedal....would deal with it later.....
Temperature is holding solid at the 160 mark on the gauge...climbs a little bit at the stop lights...but comes back down once you get moving. Was just short of 6:00 so was at the tail end of rush hour Friday night! (Oil temp showing just under 190.)
Stopped by the local shop that did my engine work and showed the owner my work...confessed my rookie mistake! He took a listen and said "yup, that sounds like an F-cam" (Ford Motorsports).
Onwards, home...out on the expressway, I opened it up a bit and found something new! Seems that it now doesn't like to stay in 4th gear! Not sure what is up with that! Shifter travels full throw in 2-3, but 4th seems a little short...but then so does 5th in the gates. It shifts cleanly into 4th...just doesn't want to stay there!
EDIT 04/06/20 This issue with 4th gear turned out to be a problem of my making when I "adjusted the trunion height properly"....or so I thought! What I failed to see was that when in 2 or 4, the shift rail/rod moves forward thru the hole in the firewall. Well, the rod was contacting the boot and round pipe that it was passing thru, not letting the shifter to move the trans internals completely into position! I found this out after the rebuild of the ZF (and the engine due to funky crank journal polish job) I believe after the Reno show in 2011 or so....when I put it all back together again and it still had a problem! (Gears looked great!) Finally found it by just sitting and staring at things when the shift lever was in different positions.....and noticed the shaft going thru the firewall looked odd. Simple un-adjustment of the trunion height which I had done earlier solved the problem!
End of edit!
I wonder if it isn't a product of having more "normal" rubber mounts now and the shifter rods are flexing and pulling it out? Never had the problem before with the rubber sandwich type biscuits and a through bolt mount...
Not gonna worry about it too much.....never used 4th all that much anyway!
Anyway, back to the drive! It is awesome to drive....it accelerates powerfully and smoothly...kept it to under 4K rpms for now....
Another impression that I was surprised to feel is the aluminum flywheel. I thought for certain that it would feel "boggy" or slow and require more throttle to launch. NOT the case! The kevlar/kevlar lined disc still feels as smooth as before. Normal three finger pressure plate is sorta heavy, but not bad....yet! Didn't get stuck in traffic....!!! The engine does rev up much more quickly!
Made it home, safely back in the driveway. Proceeded to go retrieve the RH hatch from storage and installed it. Once things had cooled down a bit, it was time to bleed the clutch again. Tangled with some fresh grease that the u-joints had shed onto various places(must have at least one bad rubber seal) and flushed out the old fluid and the air bubbles! Clutch feel is now much better! No soft spot.
My last few pieces for the muffler hangers came in the mail today, so popped them in place and called it done. (the exhaust job)
I'm not installing the console just yet....to go to the Historic Races and the PCNC corral tomorrow at Laguna Seca.... Put a towel on it.....vacuumed some bits out of the carpet, installed the inner seat belts and seats, and popped the junk tray back in place! Cleaned up the windows a bit and packed the lawn chairs in place. It's gonna get dusty anyway...
Tomorrow morning we drop in the cooler and clothing, hats and sunblock, and away we go!
Oh, and one last thing to bust my butt.....since the car hasn't been on the road for 18 months or so, I never put the new tags on the car yet.....and can't find them! Anywhere! Couldn't find the paperwork, other than in my checkbook I see where I paid DMV and the insurance last year.... Only thing I can think of is that all of this stuff was together in the envelope that I took to the tax man....and I haven't done my final meeting with him to sign everything! OOOPS!!! I couldn't find the papers for my Harley either, and that was down about as long just for nothing but time and will to ride it!!! ....working on a stupid car! ![]()
The fact that I cannot also find that paperwork leads me to believe that all of this is stuffed in the tax papers....cuz he's gotta see it if I'm claiming it.....ugh!
Oh well, we drive within the legal limits and try not to look to sketchy...yah right...me? I know that CHP (law enforcement in general) has hooks into the insurance companies AND DMV computers now, so they can see that my tags are paid for as well as my insurance...so worst I can get is fix it ticket..... ironic thing is that I have the new 2011 DMV paperwork sitting in my "to pay" pile for this month!!! Shoulda paid it when I got it in the mail...would have the new reg's already!
Anyway, looking forward to a nice medium cruise tomorrow!!! And just to taunt Mr Murphy, I called my insurance agent today and had her add "towing" to my policy!! ![]()
![]()
![]()
Ciao!
Steve
PS: Kerry, I will indeed need to change my signature! This is no longer a Boss 302, but a 331W! I failed to mention, and no one else brought it up, but in my pictures on page 16, of the second installation of the ZF, there are some OK shots of the "new" Motorsports "Boss tribute" (my name...) valve covers that they make for regular Windsor type 289-351 heads! These are the polished version and they look really nice....but you cannot get your alternator mounting bolt out, with out removing the RH cover!!! DOH!
Steve...
I'll bet its nice to have the car on the road again! I'll bet the frist ride was great! On the car licensing and DMV, I've been paying on line! You can wait till the last minute if needed and you get a print out saying you paid! (for the cops if needed) But then you probably know that?
Have fub this weekend.
Curt
Curt,
I wasn't too worried about it....although I didn't know that you could print out a copy!!! That could come in handy! ...the CHP or your local law enforcement WILL know when you have been bad or good (paid your bills!).....BUT, it wouldn't necessarily get you out of the $25 or so "fix it" ticket for no sticker....! Wife got nailed for that one year when the payment arrived before the smog cert did.....she got stopped one morning on the way to work for no tag...and the officer informed her that he could see that the "reg' was paid"...and wrote her a ticket anyway!!! I later found out when I called DMV that "I was supposed to call them..." .....(and tell them what???) WHY DO I PAY $6 FOR MODEM/DIAL IN FEES FOR AN AUTOMATIC TRANSFER TO SACTO????) Their computer system was not smart enough to figure out that they should mail me the tags....I had to call in and ask..... The downside of having a crap load of vehicles in the family......!!!
ANYWAY!!! Back to my project!
Drive to Monterey and the Historic Races (OK Reunion event...) went without serious hitches! One other dark blue Goose there in the corral(!!!!) that I don't recall seeing before...and I failed to take pictures, or run across the path of the owner! I did see his wife or S.O. sitting in the car talking on the phone...but that was it! Very nice car, with the same color interior as my car....!!! Magnesium rims were natural, and had blackened from exposure to air.... clean them up and paint or powdercoat them, and the car would really stand out with the shiny aluminum looking rims! (IMHO dark rims on a dark car look too drab...and dark!!!)
There was actually one Mangusta racing in the 65-69 FIA Manufacturers class! Lilo had his #1212 out there. I never ran into Lilo, but talked for a short time with one of his mechanics and got a little history on the car. Apparently it was turned into a race car early on, crashed bad, lost in storage for years, repaired to race again, crashed again and again lost in storage for another long term....until Lilo got it back out and put back together. I do not believe that I could find one remaining original Goose part that hadn't been modified in some little or MAJOR way!!! ...and then I missed him running in the afternoon while I was in the Edelbrock area talking to a tech' rep" about the issue with my water pump leaking.... There were at least 3-4 crashes during the day, two in the afternoon, so it sort of hosed up the schedule after lunch....and was hard to hear the loudspeakers clearly in much of the area...a shame! But it was a beautiful day for a drive!
Temp levels and oil pressure played nice! We didn't get stuck in any of the outbound traffic as one of the security folks "allowed" us to bypass the normal outbound route, which snails out of the track....and we were out on HWY 68 heading east after a lineup of a whole two cars turning left...that was a handy way to go!!! PHEW!!! I had been sweating that outbound journey!
I did scrape my oil pan ever so slightly going through the McDonalds on the way to the track. I do not recall them having speed bumps sooooo high!!! (I will not make it into work....!!!!! Need to talk to facilities about modifying the speed bumps...no center space....!!!) Haven't yet crawled underneath it to see how much paint is missing....
The clutch system also went back to requiring a double hit on the pedal before it would feel proper for shifting. Down shifting it wasn't so bad, but I would hate to stress the blocking rings in the trans because the clutch was dragging. Will check level and see if any is leaking. If no leaks, I suspect that my master is bypassing the first little bit of the stroke OR is sucking in air somehow??? Will also try bleeding it again. If I get air immediately, I know the problem is most likely in the slave cylinder. Delayed bubbles....then it is the master and ready for a new seal. Easy cheesy except for the upside down part in the driver's compartment!
After I had a good 100 miles on the car, on the way out of the track, I nailed it in first gear, taking it up in the RPM's. WOW! It blew threw the R's up to valve float before I could check out the tach! SMOOOTH and no complaints from anything....carb transition is smooth and very apparent that you are no longer solely operating on the primaries! (Idle is still rich...as I noticed that I didn't need too much pedal in the morning to start it without the choke, which is set on full off...) I'll get it tweeked in when I can schedule a dyno run after a few more miles and an oil & filter change to get rid of the break-in moly lube stuck in the oil filter now.....
I don't know if it is the couple extra cubic inches in the new engine, or if the old engine was just that screwed up in terms of the way it was put together..piston/rod combo is questionable, bad rings, but this engine just feels good and strong!!! It isn't full on 351C strong, but it feels a lot better than the old tired Boss 302 engine! ...unless I've just forgotten what it feels like to drive the danged car...after it being out of commission for...lemme check back to when I started this..or parked the car last...last known drive was on 2/1/09 to the Super Bowl party out in the valley! I don't recall driving it again after that unless it was short trip into work....but started this thread on 3/11/09...so it has been 17-18 months since I drove the car or heard it run!!! That is just wrong..... Vitamin V-room deficiency or something like that....!
Only hitch in the entire day was about a mile from the house, one of my rear brake mounting bolts fell out and allowed the caliper to contact the rear wheel. Did damage to the wheel weights and just peeled a little strip of powder coating off! I got very lucky!!!! I'll just clean the rim well, prime it and cover it with paint to seal up the exposed magnesium. That powder coating is tough stuff! Not sure how I missed tightening those bolts sufficiently....but I must have. I have resolved to use paper and pen from now on when working on the car...to make notes to remind myself of what "needs to be done" in case I get re-directed mid-project!!!!! Dug through my nut-n-bolt box today and found another grade 5 bolt and reattached the wayward caliper properly!!! Will try and deal with the rim tomorrow....today was a relax and reflect day...barbecue some ribs and putter..read on..
Another thing I figured out.....when greasing rear axle u-joints, don't go too crazy with the grease gun unless perhaps your seals are in top shape on the 4 bearing cups!!! I had greased mine very well, and it would appear that centrifugal force caused the extra grease up in the center bores of the u-joint to force it's way into the cups, and grease in the cups, out the seal until equilibrium was reached. So from now on, only 1-2 shots of grease per u-joint.....it was a BEEYATCH cleaning black grease off of everything from the rear frame to the engine covers, to the back of the heads!!! But with all the silver paint and aluminum parts, it was VERY EASY TO SEE!!!! I like it!!!
I still have work to do, but not so sure that I will update this thread with very much more info. Will probably start new individual threads to cover the pieces that remain, Air Conditioning, Fans and perhaps a shroud....and anything else that may come up!!!!
Parting shot...check out those pipes!!!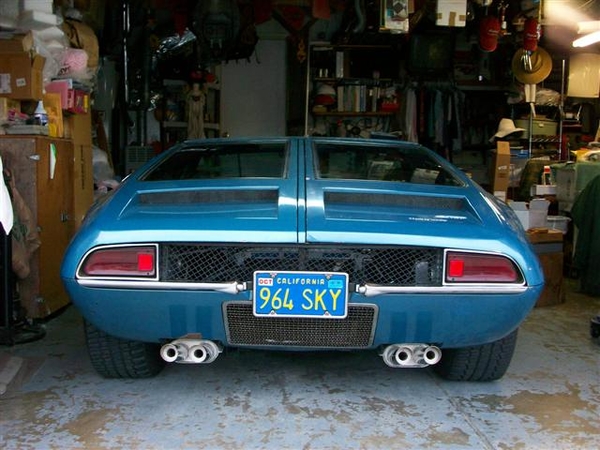
Ciao!
Steve
Attachments
Images (1)


Steve, Any updates on how the car is performing? Hits and misses.
Denis
Denis
Quick update! Hits and misses not in any particular order...except perhaps in how I need to deal with them!
Dyno run (chassis type) revealed 300+HP but some break up at higher RPM's. This is most likely due to a high volume oil pump and my roller lifter adjustment being too tight at 1/2 turn from zero lash. Going to back this down to 1/4 turn and see how it goes! Worst case, an oil pump change would take about an hour in the Goose. Nothing to get in the way of dropping the oil pan!
This gain in HP represents a 33% increase over the old tired Boss engine (which also may have been suffering from the "too tight" lifter thing too!!!!). This probably explains the big grin on my face when I nail the RH pedal!!!
Also since dropping my engine back down, my custom oil pan now becomes the lowest thing under my chassis.....going to go back to the builder and see if he can do one that is about 3/4-1" shorter!!!
Lost my fans the other night.... have you seen them???? Not the fuse, not the relay....something new!
I just need to build a new radiator shroud and electric fan setup....replace the "suggestions" for fans that were installed in Italy....
Need to drop the ZF oil and put in some new 80W along with a tube of friction modifier for the clutches...I can hear them chattering at slow speed....
Need to get the AC working! Our trip to the foothills the last weekend of Sept was supposed to be nice and cool...if you go by any other year....but NOOOOOOOOO, not this year! It was the hottest weekend of the summer....and it was fall! We were a couple of roasted weenies!
I really love the silver engine bay. The light color really makes things easier to see in the bay....stuff doesn't get lost in the blackness.
I REALLY love the new Mangusta International mufflers!!!! They are quiet, yet throaty when you bring the revs up! They have a nice growl at about 2500-3000 when you ease in to the throttle! I declined to paint them black.....I think they look fine in natural! I'll let the next caretaker paint them if they want....I probably won't care at that time!
Ciao!
Steve
Update to the update!
Have finished construction of the new air cleaner and am just getting ready to order a new 6" deep full length, fully baffled oil pan, with notch to allow starter removal, two drains, and one bung for the temp sensor.
Air cleaner is out being powder coated. See my other air cleaner post for details on that!
In the end, I raised the engine by 1/4" on the mounts. Fabbed up some spacers out of 1/8" strips of aluminum. Just got some 1/4" longer bolts for the 4 main mount points as I wasn't happy with only 3-4 threads engaging.
I also installed a 1 degree carb spacer to drop the rear of the carb, due to the angle that the Performer RPM carb pad was machined at. I don't believe that the standard Performer has this angle on it.
When I put in the new oil pan, I will also install a STANDARD VOLUME oil pump. Small blocks just don't need the higher volume, which at higher RPM's translates into higher pressure, which I believe is causing my valves to float at relatively low RPM's....5800-5900 or so. This is causing it to break up on the dyno and is not letting the carb work properly....not working really bad at all...just not working as it should!
More later!
Steve
Well, only 4 more days before we head out to Reno and I think this one is pretty much wrapped up!
I installed my new oil pan and std volume pump (see dyno sheets in next post as to why!) Fully baffled and a 6qt capacity, not counting oil filter.
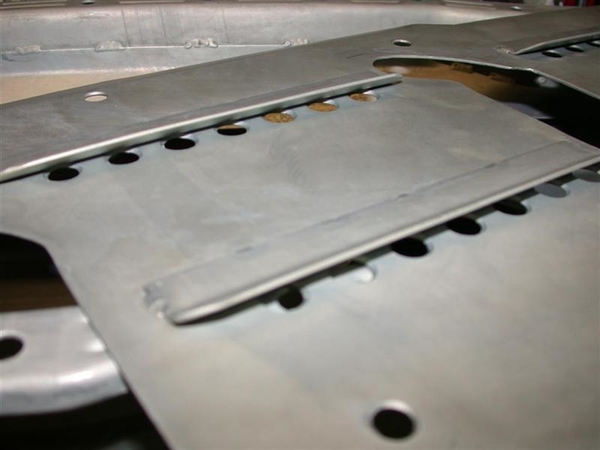
New Pan: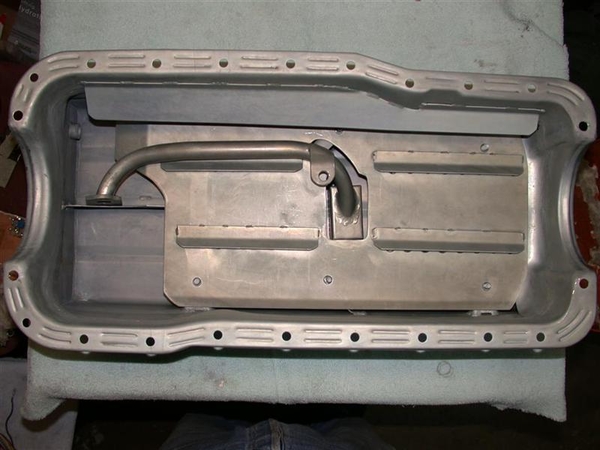
Bottom of pan. No skid plate required..read on.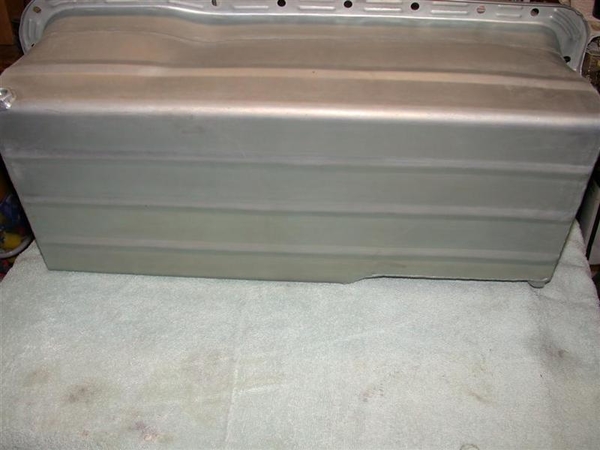
Front of pan:
Note fitting for oil temp sender and a front drain. There is also a rear drain fitting on the other side under the starter.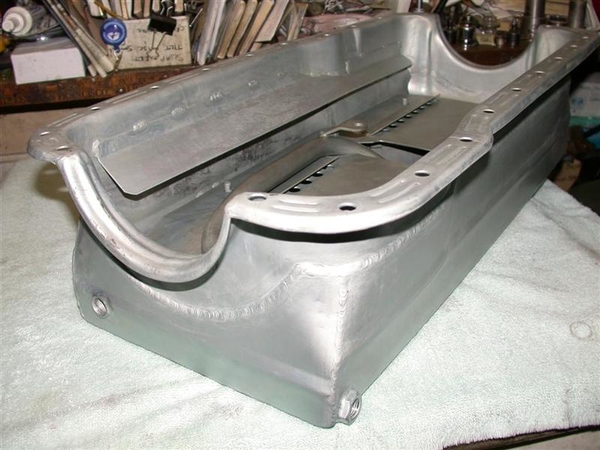
Windage tray details:
Here is how the volume stacks up when I filled it up with various amounts of water...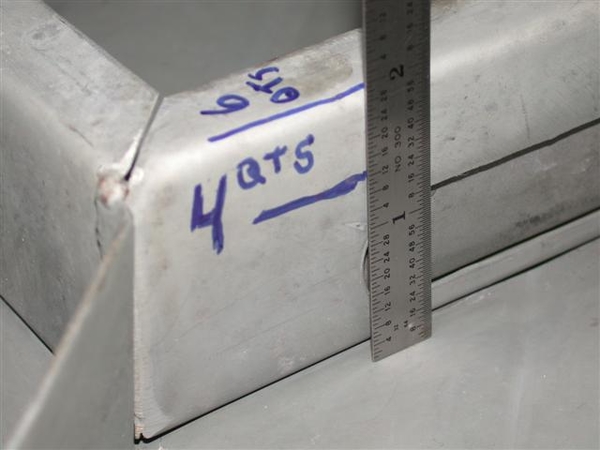
On to the installation!
First the new std volume pump!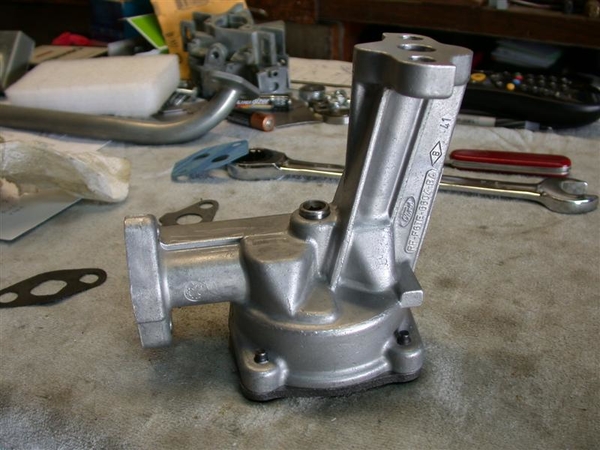
Installed with new pickup.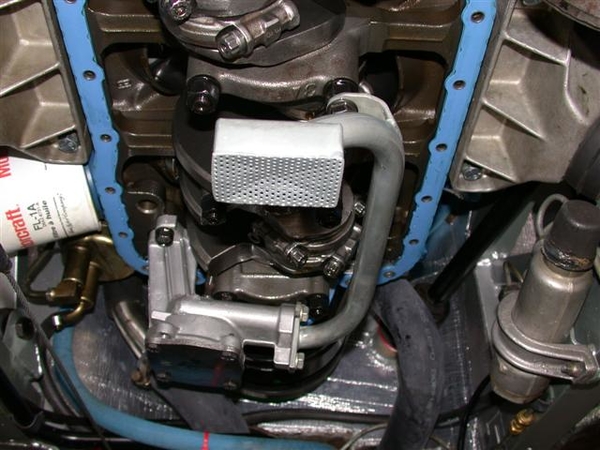
Checking clearance for pump and dipstick to the windage tray. No probs!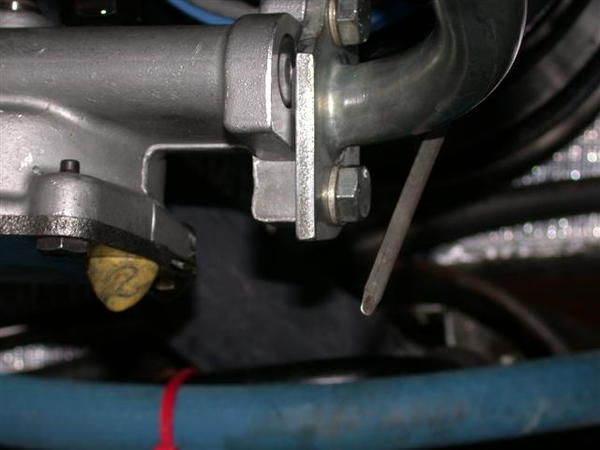
Also checking pickup clearance to bottom of pan:
At least 1/4" of clearance should be fine!
I filled and remarked the dipstick to give me a 5qt mark and a 6qt mark for full.
Underside clearance....after all, that was why I went through all of this!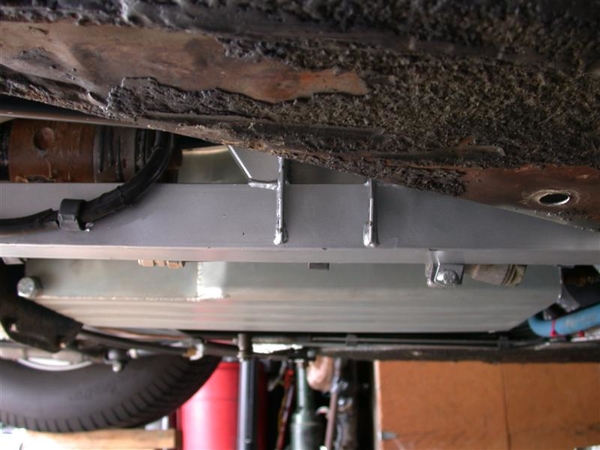
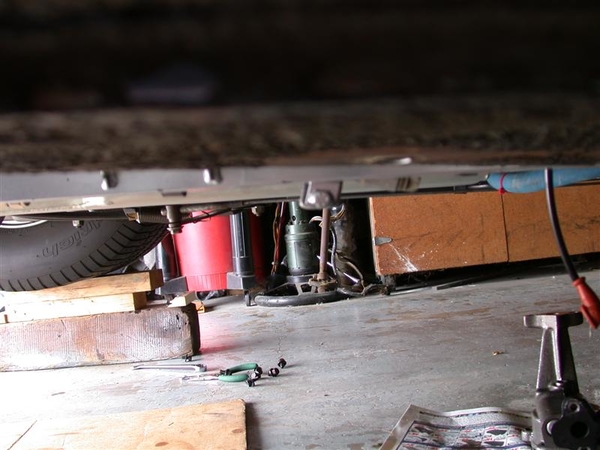
Other than the bellhousing, these are the lowest pieces on my chassis, and you can see that at least the bracket has been "touched" a few times by the tarmac or perhaps driveways!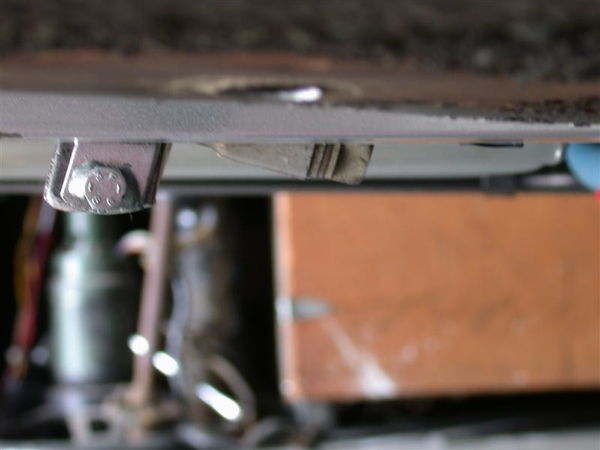
Here is as good a shot as I could get for showing the relationship of the frame rails and the bottom of the oil pan!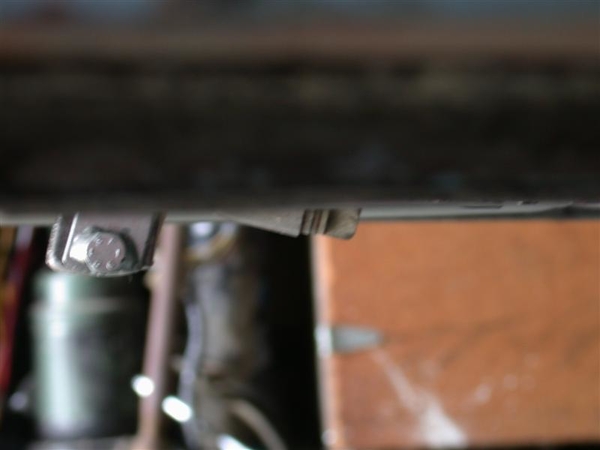
I reused my silicon gasket that had only 800 miles or so on it. I was getting a little leakage out the front seal area, so a day or so later, I loosened all the bolts up, shifted the gasket around a bit, tightened it all back up and so far so good.
Attachments
Images (18)


DYNO RUN RESULTS!
Now we're not talking any top fuel results out of a small block here. My goals were simple....make "good" reliable street horsepower and torque, and have and engine that may last 60K or more miles...of romping through the hills and dales of the neighborhood!
Limit was about 6000 rpm's for the purposes of this build and my comfort level of spinning jack-shaft components! You can see where the cam and intake run out at about where they should. NO optimization of max spark advance was done here on this thrash....this was only to get mixture set properly.
Here is why I had to change to the standard volume oil pump. About 5500 rpm's the valves started to float.... Note the mixture at the bottom of the chart shows a RICH mixture...not even on the charts yet! This was last year when I got the car running again, August I believe. Maybe late July.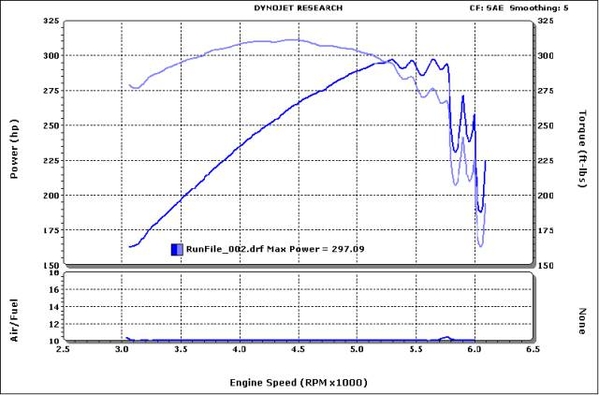
Fast forward, to new STD VOL oil pump, and last weekend! Note no more breakup at 5500. Mixture magically has not changed yet... LH side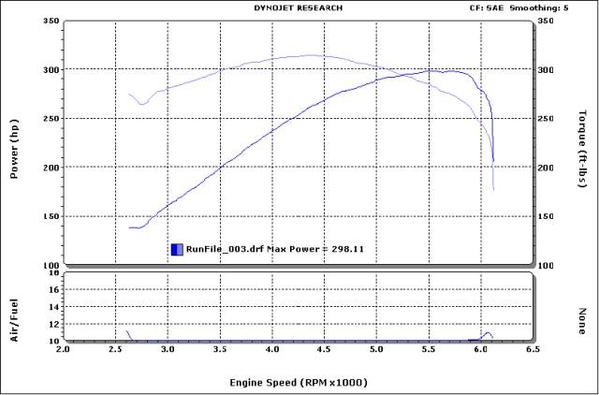
After leaning out the secondary jets from a 68 down to a 65, and reducing the primaries from a 64 to a 59, we obtained the best results! Best torque and HP of 320+ ft-lbs/ 309HP. Nice broad torque curve peaking at about 4500rpms. First we did secondaries and noticed a big change. Then the secondaries and obtained the final numbers as follows.
RH side of engine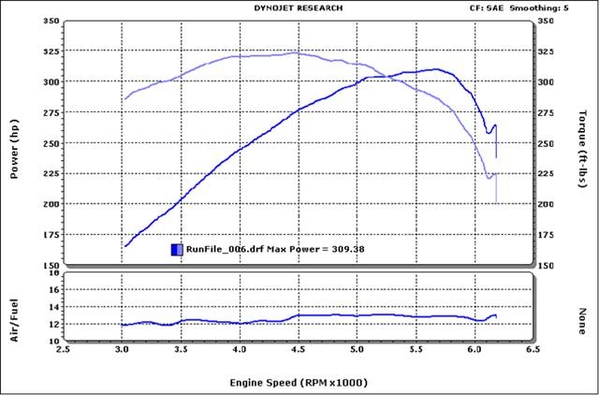
What we finally ended up with, for some reason, was the LH side of the engine being a tad more rich than the RH side. To cure this, we had to "cross jet" the carb, or make the jets different on each corner of the carb.
What I did, was increase the RH primary jet size from a 59 to a 64 (all we had for jets!) and go from a 65 to a 66 on the RH secondary.
This served to make the RH results more rich, closer to the LH results. We did not go back and recheck the LH side.....
We lost a couple of HP, but that could have been anything...me on the pedal....but the results are 1) much better fuel utilization, should be better on gas! 2) confirmation of a good solid street motor for the GOose!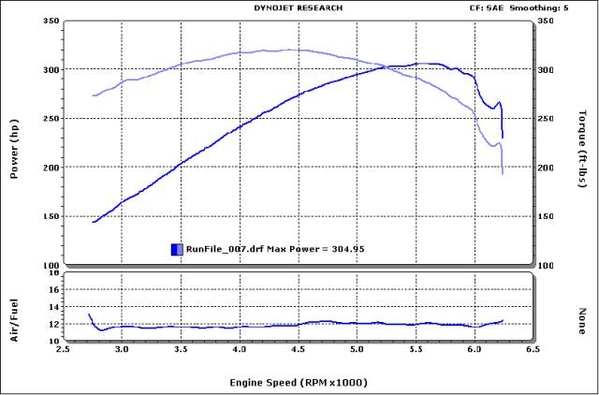
If you figure that the ZF can rob up to 25% of horsepower from an engine due to rotational mass etc, that would put this little 302 stroker (331CI!) at somewhere near the 400HP mark at the crank! Driving results back this up....as it is an absolute kick in the shorts to roll on the throttle and feel the secondary circuits kick in....and push you back in the seat!
It has been a tough project with no shortage of obstacles and challenges! In the end, definitely worthwhile!
Now, to get that ZF linkage adjusted properly! When I lifted the front of the engine a hair to make the oil pan and air cleaner fit optimally, it changed the relationship of the trans linkage....again! It's always something....
EDIT 040620: Again, ZF shifter issue was my mis-adjustment of the shifter rod support trunion such that the shaft touched the firewall shifter shaft tube in 2 & 4! Once I put the trunion back where it was....all was good!
Ciao!
Steve
Attachments
Images (5)


Mangusta1969 (Guest)
Steve,
Looking forward to seeing you again this year in Reno. I guess this year, there will be at least two Geese in the flock...
Have a safe drive.
Steve B.
Looking forward to seeing you again this year in Reno. I guess this year, there will be at least two Geese in the flock...
Have a safe drive.
Steve B.
NOT AGAIN!!!
Would you believe that on the way home from Reno, we hit a HUGE pavement transition (STUPID CALTRANS didn't put up any BUMP SIGNS!!!!) and seemingly bottomed the car on all 4 corners!
Once I got home and started looking around.... I found a crack on the passenger side shock tower now!!! Not as bad as what I started with on the driver's side...but a crack! It would appear that the addition of the two extra bosses on the ladder bar (shock to shock support bar) did it's job!
So, I get to take it all apart again. Now, before you feel sorry for me for this.....you also need to understand that after a short side trip on the way home to see family out in the valley, they called after we were out on the road to tell me that I "left a good oil puddle"..... This was pre-bump!
Apparently, my trans front seal took to leaking somewhere along the trip.... along with noticeable spooge emanating from the bellhousing, which ended up all over the RH side of the chassis... which is how I found the aforementioned crack.... Now it leaves a good tablespoon of 80/90W every time you park it...
So, I think this explains why second gear took to grabbing on me.....all of a sudden. I think the clutch disc is grabbing because it is oily....which, since it is Kevlar, I can simply soak in parts cleaner and reinstall......
EDIT 040620: I eventually pulled the ZF to take the engine apart for the bad crank journal finish, and I believe at that time I took the ZF apart and replaced the front seal, as well as a synchro ring or two and the front needle bearing in the case. Also stopped filling it so darn full of oil! Also stopped using a friction modifier (for posi units!) as I think that's what got on the clutch and caused it to slip. Other posts covered these bits....... End Edit
But wait! There's more!
Also trans related....my 4th gear just isn't happy. It was always a little funny feeling....but it would work. This time, after changing the rear gear oil before the trip, it now jumps out of gear very easily. It just doesn't feel like the lever is moving far enough that the gear is engaged fully. I suspect something in the synchronizer assy is amiss, and is not allowing the sliding hub to move fully onto 4th gear.
EDIT 040620: This 4th gear issue was self induced as I have mentioned elsewhere in other corrections. Shifter shaft support trunion adjusted improperly! Transmission was fine! End edit.
Trans needs to come out.
OK great! BUT WAIT!!! THERE IS STILL MORE!!!
When I built my 331 stroker on the 5.0L block some 3-4 years ago, there was a problem with some of the crankshaft finishing of the units in circulation, namely in the thrust bearing surface of the #3 main bearing in the block. The rumor mill would have you believe that as crank blanks were distributed to various shops for final finishing, that a shop, or multiple...didn't do such a great job of finishing the surface on the #3 thrust bearing!
(I feel pretty good that I got 800-1400 miles out of my car so far! Some have never made it out of the shop before excessive movement was noted and required replacing!)
We had checked this out during the dyno run and noticed some movement.... Later, I found my build sheet spec's from assembly, and I had noted that I measured .005" of freeplay, or movement fore/aft of the crankshaft. The "some movement" was definitely more than .005" which is about the thickness of a thick sheet of paper, or two thin ones!
Being the "damn the torpedoes" sort of character that I am, I was going to Reno, even if I had to come home on a tow truck! The car had already made 800 miles and a long blast into the Valley (Sacramento Area) last year on it's maiden voyage of sorts.....
We made the trip just fine and got at least 20MPG on the way home to boot!
When I changed the oil pan, I had found particles of metal, copper colored that stuck to a magnet.... in the old oil pan. I know I cleaned the oil pan out before I installed it....as I am particularly anal that way..... so I know these bits came from the inside of my new motor!
Finally, last month, before the PCNC meeting, I put the car up on stands and got underneath it with some precision measuring tools and determined that I had between .015" and .019" of fore-aft movement in the crank now.
While it isn't dramatically increasing, this is bad, and will need to be dealt with!!!! The fix is to pull the crank, have this one area (or whatever offending area I find) re-polished to a finer surface, and install it with a new thrust bearing.
SOOOOO!!!!
1) I pull the trans.
2) Pull the motor.
3) Send out the crank
4) Fix the shock tower crack and repaint...
5) Pop the trans open and see what the hell is going on with 4th gear. Second probably needs a new blocking ring as well... May also put in the ring gear bolts with the safety wire provisions.
6) Reassemble motor and install
7) Reinstall trans!
8) Drive the car with no further issues....from the drivetrain....
Should be a piece of cake!!!!
Why you ask?
BECAUSE EVERYTHING THAT CAME OUT WILL GO BACK IN WITH NO FURTHER MODIFICATION!!!! Or at least that is what I keep telling myself...."it was in there before, it should go back in just fine!" No milling machine, metal lathe, machine shop, BFHammer, or trips to Fastenal will be required!
Keep drinking the kool-aid.....!
Have a great week!! Get out and drive your cars!!!! I'll take the car out one last time to the PCNC meeting tomorrow nite, and then I believe it is time to bust it apart again! Goal is to be back together for a Sept 23rd run up to a car show in Murphy CA!!!
We'll see!
Steve
PS: I will not be documenting any of this portion of this adventure on this post....but if you have any questions or concerns, please ask!
OK, here we are mid-damnpendic....what better time to go back and fix this old post! Comcast trashed all my pic's when they decided not to do picture hosting several years back......and I've been WAY toooo busy to do this!
Well, I am glad I waited! Old website would have only allowed me to put attachments on the text, not necessarily "in" the text......but this new site allowed me to simply copy a pic, and paste it in the old web address for the same picture! Voila! SO, spent most of yesterday reposting pic's and updating things here and there..., it was raining pretty good here and I had promised myself to take advantage of a rainy day to do this, so I did!
My original intention was to get other owners with "stagnant" projects inspired to get out into their garage and tackle their Goose "obstructions" to getting their cars back on the road! I know that it helped a few guys at the time as I got great feedback. Another web board post for a different marque inspired me to do this, as what they had done.....inspired me to take the jump and just do it! Of course the fact that I had busted a shock mount AND I had a fresh engine waiting in the wings helped a bit too!!!
I had fun going back and reading thru all the BS I wrote and the issues I fought with. Musta been crazy.....but it was CRAZY GOOD when all done!!!! Miss that car a heap!
Enjoy again!
Steve
Sending a sincere thank you! I went ahead and archived the text and photos in case of another technical calamity. And yes, it is certainly inspirational. Do you know the car's whereabouts today? Thanks again.
Add Reply
Sign In To Reply