quote:
Is there a way to recognise from a picture a pre-74 radiator with vertical baffle from a later design with newer horizontal divider?

-Sami


No, but sticking a piece of wire in the right side bleeder valve will tell you. If the wire goes in all the way to the back of the tank, the rad has a horizontal baffle. If the wire only goes in about halfway, it has the earlier vertical baffle and should be changed. DeTomaso TSB Bulletin 2, article 35 shows the factory modification.
Corvettes, Z-28 Camaros and many other road cars have had stock aluminum radiators from the factory since the late '60s. The technology is 'mature'. Alloy rads remove a huge amount of front end weight: a stock '72 Pantera brass radiator weighs 64 lbs. A custom-built brass replacement weighed 45 lbs and a Fluidyne aluminum rad weighs 16 lbs. The Fluidyne cooled our engine much better than either of the brass ones (15F lower on long fast highway runs with no other changes).
The water you dump in the radiator will determine the assembly's life. Some areas have such corrosive water that an unprotected alloy rad has an operating life of a year or less. Most vendors now supply a bottle of 'No-Rosion' anti-corrosion fluid with all their aluminum radiators and there are others. They also suggest changing all the coolant yearly. Corvette shops stock anti-corrosion sacrificial anodes (Mag or zinc)to be put in the coolant tanks. The anodes dissolve rather than the radiator, cylinder heads or block.
Finally, home-handymen(?) tend to wind bleeder valves and other threaded parts into aluminum alloy with far too much teflon tape and force: I've seen NEW aluminum radiators with pipe-threaded aluminum bosses split wide open, returned under warranty as 'defective'. Cooling systems seldom see 20 psi; we are NOT sealing high pressures or explosive fuel here!
Last edited by George P
quote:
Originally posted by Bosswrench:
quote:
Is there a way to recognise from a picture a pre-74 radiator with vertical baffle from a later design with newer horizontal divider?

-Sami


No, but sticking a piece of wire in the right side bleeder valve will tell you. If the wire goes in all the way to the back of the tank, the rad has a horizontal baffle. If the wire only goes in about halfway, it has the earlier vertical baffle and should be changed. DeTomaso TSB Bulletin 2, article 35 shows the factory modification.
Corvettes, Z-28 Camaros and many other road cars have had stock aluminum radiators from the factory since the late '60s. The technology is 'mature'. Alloy rads remove a huge amount of front end weight: a stock '72 Pantera brass radiator weighs 64 lbs. A custom-built brass replacement weighed 45 lbs and a Fluidyne aluminum rad weighs 16 lbs. The Fluidyne cooled our engine much better than either of the brass ones (15F lower on long fast highway runs with no other changes).
The water you dump in the radiator will determine the assembly's life. Some areas have such corrosive water that an unprotected alloy rad has an operating life of a year or less. Most vendors now supply a bottle of 'No-Rosion' anti-corrosion fluid with all their aluminum radiators and there are others. They also suggest changing all the coolant yearly. Corvette shops stock anti-corrosion sacrificial anodes (Mag or zinc)to be put in the coolant tanks. The anodes dissolve rather than the radiator, cylinder heads or block.
Finally, home-handymen(?) tend to wind bleeder valves and other threaded parts into aluminum alloy with far too much teflon tape and force: I've seen NEW aluminum radiators with pipe-threaded aluminum bosses split wide open, returned under warranty as 'defective'. Cooling systems seldom see 20 psi; we are NOT sealing high pressures or explosive fuel here!


BW. What was in your car?

Curious since our cars are close in production.

I've seen Hall modify the tanks and leave a V in the middle of the right tank.
That would split the upper and lower sections of the radiator and make it a dual pass.

I'm not criticizing the use of aluminum radiators in the Pantera but I have heard of about a half dozen that failed around the one year old mark and were not repairable.

I would think that just about everyone buys their anti-freeze pre-mixed at 50/50 now and as such why would there be an issue with electrolysis with factory water?

I do remember a discussion I had with Gary Hall about this and as he said, "I can sell you any radiator you want, I have them all, BUT the only advantage the aluminum has is it is lighter and unless you are going racing and need to lighten the car as much as possible, use the brass radiator, it is repairable".

Still running the original stock unit. I'm sure it will need something some day?
Last edited by George P
Years ago, I had a long conversation with Gary Hall. We discussed different cooling setups. The aluminum radiators while lighter but that advantage isn't worth much, the front of the Pantera is too light anyway, taking weight out of the front isn't a big help. He also recommended the use of a 160 degree thermostat. The 160 degree thermostat is what the '71 Pantera's had from the factory, the use of the 180 degree thermostat was used because of the smog requirements in later models. I have used the 160 degree thermostats, but finding them is very difficult.

My pantera is modified to 435hp, while the stock setup worked for the original it failed at the added horse power. I tried several setups with little improvements. Then I converted the AC condenser core into an aux cooler by rerouting the water from the heater core. This dropped the temperature 5-10 degrees. For the most part, the car runs at 160-165, going up hills it will reach 185 degrees. (That is when the first set of fans come on.)
quote:
Originally posted by Yakone:
Years ago, I had a long conversation with Gary Hall. We discussed different cooling setups. The aluminum radiators while lighter but that advantage isn't worth much, the front of the Pantera is too light anyway, taking weight out of the front isn't a big help. He also recommended the use of a 160 degree thermostat. The 160 degree thermostat is what the '71 Pantera's had from the factory, the use of the 180 degree thermostat was used because of the smog requirements in later models. I have used the 160 degree thermostats, but finding them is very difficult.

My pantera is modified to 435hp, while the stock setup worked for the original it failed at the added horse power. I tried several setups with little improvements. Then I converted the AC condenser core into an aux cooler by rerouting the water from the heater core. This dropped the temperature 5-10 degrees. For the most part, the car runs at 160-165, going up hills it will reach 185 degrees. (That is when the first set of fans come on.)


I had the exact same discussion with him. I had to check to see that it was you that was writing this and not me.

I run a 160 also with the stock radiator. Runs fine. Never goes above about 210-220.

Consider though that if you are running a 16 psi system, you are not over heating the car until about 250 degrees farenheit.

The 16 psi cap is in there for a reason.

Personally I think you NEED to run 235 to 240. All modern cars do by design. If you don't you will build up too much sludge in the oiling system which is detrimental to longevity also.

I am actually over cooling at them moment. You are too.
How does my cooling system function? While running at the cooler temperatures my gas mileage was 17.3 mpg. When the car's temperature ran high (185 or above) the gas milage dropped by 2mpg.

Physics backs this up, Boyles law states that the higher temperature reduces the amount of fuel that will enter the engine.

The big problem is that the cooling system is marginal at keeping the temperature at 160. I am always looking for cooling ideas.
Hey George,

With regard to your self-bleeding cooling system mods, I have a few questions: why doesn't the suction line on the bottom of the header tank (formerly the overflow tank) drain the tank in seconds? Is it because it's a totally sealed system and the suction line can only draw out as much as the bleed lines can feed in?

If you reduced the size of the line from the bottom of the header tank to the water pump, from -8AN to -6AN, what effect would it have, if any?

Also, since I have bleed fittings in the back of my cylinder heads, should I connect those fittings to the header tank as well? If so, what size hose would you recommend? Perhaps -3AN or -4AN?

I just want to make sure I have a complete understanding of the theory behind the mods, before taking the plunge!

Thanks,

Dave
Two dynamic laws to keep in mind: (1) Fluids (such as coolant) are not compressible ... only gases (such as air) are compressible. (2) Both fluids and gases will flow from a zone of higher pressure to a zone of lower pressure. Never the other way around.

The air space above the coolant in the header tank cannot exist at a pressure lower than pressure of the coolant pump suction. If it did, it would draw coolant away from the coolant pump and into the header tank! So .... the air can collect in the header tank because it is compressible, but the coolant in the header tank cannot be drawn out of the header tank any faster than coolant is flowing into the header tank.

The cooling system is a closed hydraulic system. Every ounce of coolant drawn from the header tank is replaced by the same amount of coolant entering the header tank. So, what is happening, the coolant in the header tank is constantly "turning-over" but the level in the tank remains the same. If you don't believe this, open the hood of your daily driver and observe the coolant level in that car's header tank while the engine is running. Most header tanks are manufactured from opaque plastic these days. If the cooling system's pressure cap (radiator cap) is not located on the radiator, but on a tank, that tank is a header tank. You can verify this by tracing the large hose connected to the bottom of the header tank. It should connect or "tee" into to a portion of the plumbing that connects to the cooling pump's suction. The cooling pump's suction is the lowest pressure zone of a cooling system. There should also be one or more smaller air vent hoses connecting to the header tank, attached at the other end to various points where air may collect in the cooling system ... such as the top of one of the radiator's tanks.

The header tank is a feature found in the cooling systems of most (if not all) modern cars and it has been used in racing cars as far back as I can remember. There's a lot of experience there. Every Pantera owner who has "admitted" to making the mod has reported good results. All I have done is explained how easy it is, using existing components, to modify the Pantera's cooling system to duplicate such a system. I believe its easy to convert the Pantera's cooling system because the Pantera's system was originally designed to be configured in that way.

Why do I believe this ... well the "system tank" was obviously manufactured to be a "de-gas tank", aka a swirl tank, due to the way in which the inlet and outlet nipples are configured. Here's the part where the light bulb should turn-on for the typical enthusiast ... a de-gas tank (such as the Pantera's "system tank") cannot function without a header tank! The header tank is needed because it is the low-pressure point of the cooling system where air can be plumbed and collected successfully. The Pantera's "expansion tank" was obviously intended to be a header tank! That explains why the connection on the bottom of the expansion tank is so large!
Wow, thanks Professor P.

Now, I get it!

Two more questions:

1.) If you reduced the size of the line from the bottom of the header tank to the water pump, from 1/2" to 3/8", what effect would it have, if any?

2.) Since I have bleed fittings in the back of my C302B cylinder heads, should I connect those fittings to the header tank as well? If so, what size hose would you recommend? Perhaps 1/4" or 3/16"?

Thanks George!

Dave
I specify 1/2" hose for the connection between the header tank and the coolant pump to accommodate "surge" in the cooling system, which occurs when the speed of the engine rapidly accelerates or decelerates. I don't know if anything would happen if you decreased the size of the hose, other than the fact the level in the tank "may" be a little less responsive to surge. I was just being safe.

3/16" ID hose (or 3/16" OD metal tubing) should be fine for the air bleeds in the cylinder heads.
quote:
I run a 160 also with the stock radiator. Runs fine. Never goes above about 210-220.

I run a 180 stat. Quella triple-pass (Ron Davis) aluminum radiator. Weiand pump. Block bypass circuit is plugged. Hi-flow stat. Stock system otherwise.

And yes I know all about the "issue" with the lack of a bypass circuit, but in over 50K miles I have yet to notice a problem because of it.

YMMV. Wink

I'll run 180-190 on a cool winter day at cruise.

Heavy summer city traffic runs 200-220.

Like Doug said, oil needs to be hot to boil off moisture. 180 is the generally accepted low for oil temp, and oil temp generally runs less than coolant temp.

If your cooling system, stock or modified, never boils over after shut-off or when stuck in traffic, everything is fine.

Just like the Wizard of OZ said - "Pay no attention to (that temp gauge in the console".) It will just make you nervous.

Attachments

Images (1)
  • Screen_shot_2014-12-10_at_10.52.24_PM
quote:

Originally posted by HayDude:

... Is the connection to the suction of the water pump the same one the goes to the heater core ...


Yes. The two aftermarket coolant pumps I am familiar with (Flow Kooler and Edelbrock) both have TWO threaded ports for the pump suction, one is needed for the heater core, the second port makes a ideal place to plumb the header tank.
George(or anyone), I have a question about the continous radiator venting.
your illustration shows the vent on the far common tank, thus there will be a slighly higher pressure here than if it was on the exit tank. Is that intentional?

on my increasing getting longer list of things to do, I was planning on having a local radiator shop inspect/rebuild my original radiator and possibly reuse it. another question I am having is the use of the original bolt on fan switches. Is there an adaptor to use the more common threaded switches.

with all due respect Smiler to your experiance...I question a statment you made concerning placment of the fan switch.
"The fan switch should be located in the radiator's inlet tank (the lower tank) so as to sense the coolant temperature regulated by the thermostat."
I was thinking if the switch was located in the outlet tank, it could determine if there was air flow causing the exiting fluid to be cooler than the thermostat regulated radiator inlet temp and thus start and stop the fan based upon car speed. it appears the original design's intent was to do this (with a 10c and 20c drop for a 192F thermostat), but the horizonal tank baffle modification defeated that for one of the switches. Is there experance to indicate this does not work?
quote:

Originally posted by JFB #05177:

... your illustration shows the vent on the far common tank, thus there will be a slighly higher pressure here than if it was on the exit tank. Is that intentional? ...


Yes

quote:

Originally posted by JFB #05177:

... Is there an adaptor to use the more common threaded switches ...


Since the radiator is being rebuilt, I would personally have the OEM temp switch "bungs" removed from the radiator and replaced with M22 threaded "bungs" rather than to use an adapter. I'm sure the M22 threaded bungs are available.

quote:

Originally posted by JFB #05177:

... I was thinking if the switch was located in the outlet tank, it could determine if there was air flow causing the exiting fluid to be cooler than the thermostat regulated radiator inlet temp and thus start and stop the fan based upon car speed. it appears the original design's intent was to do this (with a 10c and 20c drop for a 192F thermostat), but the horizonal tank baffle modification defeated that for one of the switches. Is there experance to indicate this does not work? ...


I pondered this question myself. I have no experience with the temp switch installed in the outlet tank, other than Panteras. And that was a bad example Smiler . But I know for certain that mounting the temp switch in the inlet tank works.

I checked-out various older European cars (with emphasis given to the way the Germans do it) and found they installed the temp switch in the inlet tank. It occurred to me the thermostat and the fan switch comprise a closed loop control system, and from that perspective mounting the temp switch in the inlet tank makes more sense. In that configurations there is less time lag between the action of the thermostat and the fan control, and they are working together to control the same variable, i.e. the temp of the coolant exiting the engine block. The fans won't turn on until the thermostat has opened fairly wide, and that alone has proven insufficient to control the engine outlet temp. I can't say if that's why the OEMs chose to do it that way, but it would be my best guess.

Installing the switch in the outlet tank may sense the temp rise sooner, but now the fan control and the thermostat are attempting to control two different variables; i.e. one the radiator outlet temp and the other the engine outlet temp. You could get into a situation where the dog is chasing its own tail (control oscillation).

Best wishes for success what ever direction you decide to take.
Sick Cat,
Thanks for the link and all the specific information you provided

I googled the "WAHLER THERMO FAN SWITCH 823-959-481F75-M5002" in an attempt to determine its settings, but not sure I was getting proper info (I found 75C)
Do you recall and if yours is sensing the radiator inlet or outlet?

Has any one ever measured the radiator outlet temperture for a stock radiator with the car at cruise speed (please state thermostat also)?
I looked those up on those web site's with pelican and that is a different part now as mine have regular spade connectors, interesting,.
As I recall one of the connections, lets say inlet is a certain temp to turn on the flexalite fans and the one on the outlet will turn on the Meriah's up front if the flexalite's quit or are not cooling enough, meriahs rarely come on but when they do between the two sets it's a lot of air. I'll try and dig the info up, I was suprised as it's been a while.

Mark
I am going to do the modification as George has suggested, my tanks appear to be original and in good shape. The cap on the expansion tank is a Motorcraft RS-77 which I would like to replace but I do not see a replacement or cross reference available. Were the expansion tanks a European style fitting as well as the swirl tank? Is there a recommended replacement for the cap?
If your Pantera's coolant tanks are equipped with the original necks, the way I see it you have two choices. These have been the choices for decades. Keep in mind that the original pressure limit was 13 psi, because the radiator (and heater core) were assembled with solder joints.

(1) You can have the pressure tank's European radiator cap neck replaced by a radiator shop with an American pressure cap neck, and then use an American 13 psi cap (Stant 10329 which has the release lever).

(2) Leave the tank neck "as-is" and use a higher pressure 16 psi cap, which shall operate at a lower pressure (about 2 psi lower) when used with the European neck. I don't have the correct number, but I'll bet it is either 10330 or 10331 (both are 16 psi caps).

Keep in mind that in converting the recovery tank into a head tank that it will operate under a lower pressure, therefore 13 psi shall be serious overkill for its new application as a head tank. There is a good possibility that the standard American radiator cap (Stant 10329), which shall operate at about 11 psi when screwed onto a European neck, would be more than adequate for this job, so long as the cap is in good condition and seals against the radiator neck as it is supposed to do.

What this community of owners needs is for people who have already performed these experiments to chime-in and share their experiences.
When I first bought my car it was a factory system with hood vents and it ran at about 195 and suffered from temp creep. It would continue to creep up one degree at a time until it would boil over at the lights and then boil over at low speed etc... I have incrementally changed my system and can report on each change. At that time I was running the car back and forth to Tampa about an hour from here, the car ran very well and was right at home OTR, it seemed like it didn't even know it was running other than the temp creep. The first thing I did was stolen from David Archabalds Sebring car, I took the vent screen off my hood and left the hole wide open, I then put a ramp in front of the vent hole and it created a low pressure vacuum which pulled out more air. That one mod got a good five degrees which I really, really needed at the time. That single first mod would allow me to run to Tampa for an hour and then make it light to light to the property before it creeped up over 210 and boiled over. After that I built the motor, bought a radiator, did all the tricks, and my car runs cold and happy. I run in the low 180's and even in the summer I seldom need my fan on short trips... My car has not seen 190 in years (shorter trips when it's 1000 degrees in summer) and I have ice cold a/c with the condenser up front, and she's a daily driver ( 3, 4, 5 times week). 425/450 HP

Parts List:
Mccullough Fabricating Radiator (sp)
Spal 16" fan (sucker)
Hood vents w/ramp
SS cooling tubes
Flow cooler anti cavitation water pump, double gaskets
The correct thermostat
and the Head tank mod

This combo is the answer, at least for me. I have not turned my spal fan on since last september...

Attachments

Images (1)
  • CatRad
Last edited by plt-1
A system that has no leaks and holds pressure will not boil over to OVER 240 F.

An engine boiling over at 213 indicates the system is open to the atmosphere, the cap is not sealing and the system has zero pressure in it.

It is imperative that the Pantera be pressure tested and holds pressure AND THE CAP IS TESTED TO HOLD as well.

This car is one of the first "high pressure" systems like we have in todays cars.

It's normal operating temperature is right around 230 F not 195 F.

IT WAS DESIGNED to run hot NORMALLY.


The fluid level in the pressure tank will normally settle to several inches below the top of the neck.

That is correct function for this car


The most likely scenario in a Pantera running like this is that the wrong cap is on the pressure tank,and there is no pressure in the system.

The description of the temperature steadily increasing and then boiling over is exactly the symptoms of no pressure in the system at all.

Many US made caps will not seal properly to the Panteras European made tank neck.

No one needs to re-invent the wheel here. You need a cap that seals at 13-15 psi and holds that into the system.

50/50 anti-freeze will technically boil over at 252F under those conditions.

You CAN stuff it by running 75/25. That will give you about 10 more degrees on top.


My car even with a 15 psi cap will only hold 13 psi in the system.

The Veglia temperature gauge at some point in the '73 model year was changed from a top reading of 230 to 260 degrees to stop the service complaints that the gauge is pegged on maximum high and is going to boil over.
Last edited by panteradoug
Most informative sticky! I purchased my 73, #5936 a little over a year ago and am just now figuring out the mods. Before I get to my overheating problem let me describe the engine setup. Most notably I have the Magnuson Dual Screw SC with a couple of Weber carbs, jacking the HP up to the mid 500's, I suspect. When this was installed in late 80's, I believe the cooling fans were modified. I have two Perma-kool Blower fans and a third sucker fan on the downstream side of the radiator. The Perma-kools run simultaneously and appear to run all the time. The third sucker fan runs off of temp, as best I can tell.
The balance of the cooling system is in original configuration, radiator (stock), piping, hoses, etc. I have a 16lb pressure cap, seems to be in good shape and holds pressure.
Now for the symptoms. I go for a 30 mile drive on a cool day, temp hovers right at 190 by the gauge and stays there. The next day i go for the same drive and it creeps up to the red line, 235-250F, but has not pegged or boiled over. this doesn't matter if i'm stop and go or if i'm cruising at highway speed, although at stop-and-go it does move a little higher.
Based on this thread, I'm thinking Air in the radiator and/or bad thermostat? Would much appreciate input on what steps to take in order to sort this out.
Thanks - Mike

Ok, there is a ton of great info in this Topic and I appreciate all who have contributed.  Here's where I am on this issue:

1.  I want to go with a brass/copper radiator like the Hall.

2.  My car has older Flex-a-lite sucker style fans installed now.

3.  The radiator from Hall only has about 1/4-3/8th" clearance between the back of the radiator and the bends in the inlet/outlet tubes which is not enough to fit the sucker fans/shroud within.

So what have others done?  Do I have to have the inlet/outlet tubes extended?  Do I have to forget sucker fans and only use pusher style fans?  Do I use the Brassworks total system?  Does anyone else here have this Brassworks radiator/fan system installed?  It's a bit expensive compared to buying a Hall and even new Flex-a-lite fans but appears to be a quality unit.  Steve Wilkinson indicated that the Hall was so much thicker that it would need to be laid down at an angle rather than in the exact same place as the original - I'd rather not if possible.  

Trying to follow all the expert advice and great information here from George and others I have ordered the Flowkooler 1648 water pump, the SACC water pump pulley and a new Holley/QuickFuel HR-735-VS carb with annular booster venturis to help.  I have already installed the Hall SS pipes underneath, SS bottles in the rear and Gates green line hoses and belts everywhere.  I've also added the cut-off valves to the cabin heater.  I have installed the correct Robert Shaw 330-180 thermostat (with the hat) and have the brass plate installed, but I'm still getting gurgling and almost regurgitation after even only short drives so I want to complete the replacement of the entire cooling system.  I realize there are still more areas to cover, but I wanted to start with what I have done plus the new items mentioned above.  I also realize that a very thorough burping of the system after the installation of these parts is a requirement.

Steve W. also suggested that I not install Scott Bell's billet water pump pulley because it would help circulate the coolant too fast through the radiator and not allow the radiator to get the chance to cool the coolant.  Sounds reasonable, but others here recommended the pulley so I bought it and it showed up yesterday - thanks Scott for the quick turn around!!

So please weigh in, flame if you must, and tell me what you think.

Merry Christmas and Happy Holidays to all!!!!

If you are going brass, I have the Hall Phoenix big boy in my black car although it had to be laid foreword. Works great. I used to own an orange stock L and it had one in there too & worked real nice till it sprung a leak after many years. I recall my wife assisting to get it out of the car and the thing was pretty heavy (that's what she said lifting it out).

https://www.flickr.com/photos/102810426@N07/12241128314/in/album-72157635769607434/

Does200, thx!  Steve W. has a kit to lay forward the Hall radiator without having to weld any new tabs or anything - is that what you used?  Also, what about the inlet/outlet tubes on the Hall being too close to the back of the radiator to mount a sucker fan/shroud unit like I have now?  My original radiator has been recored at least once and it appears the tubes were extended about 1"+ to accommodate the fans/shroud.

Most aftermarket rads have 1-1/2" straight stubs coming out of the core. Insert short pieces of 1-3/8" Gates Green stripe hose connected to 90 degree adapters with regular hose clamps. 90 degree sweat-solder copper tube fittings in the proper size work well. This allows you to space the 90 degrees out far enough to fit sucker fans. If your rad has formed stubs with 90 degree turns and you want to use the more efficient sucker fans in a shroud, cut the formed 90s off and insert short pieces of hose between the stubs and the 90s.  Note- 1-3/8" rubber hose will expand enough with hot water to fit onto 1-1/2" stubs without much effort.

Part of the problem is, due to the body's low nose, the 16" tall Pantera radiator is shorter than- for instance- a 19" tall Corvette rad, both being 26" wide and both engines having similar power dumping about the same heat into their rads. If ANYTHING is off in your combination, many Panteras cannot cope with the smaller stock rad, at least at walking speeds. Once you're moving over about 30 mph, things work as DeTomaso planned. So we increase the water flow rate thru the system with a rad that has much larger tubes inside its core (1"-1-1/2" wide vs stock 3/8" wide), and use 2X or 3X bigger fans that suck 30mph air thru the entire core via a shroud, not just blow (less) air at two circles of the core.

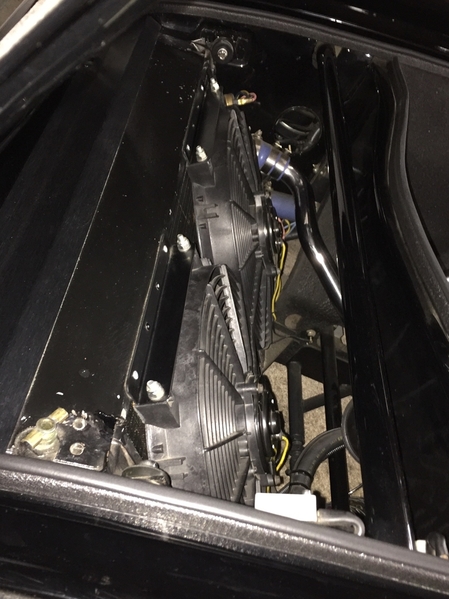
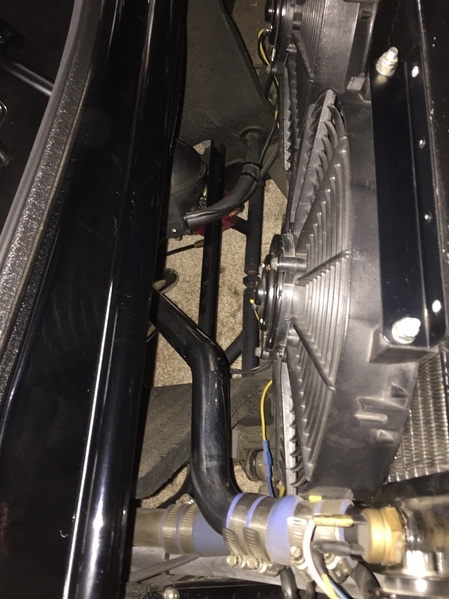
You were asking about the backside on my black car and the water tubes. I have a ton of space back there as shown in the photo. The radiator has brackets welded on it to allow it to lay forward (sorry for the dust - proves I actually drive em haha). As far as brass vs aluminum, maybe you had a bad experience with the aluminum but I have the fluidine in my red 5S and a Ron Davis in my Group 4 for years with no issues (although I don’t do a lot of miles, but do drive in the excessive slow traffic Southern CA heat).

33A517D8-2E88-47B7-A53F-7D1099AEBC35

64EA4FDC-2887-4CD8-91B0-BA698A097936

Attachments

Images (2)
  • 33A517D8-2E88-47B7-A53F-7D1099AEBC35
  • 64EA4FDC-2887-4CD8-91B0-BA698A097936
Last edited by George P

Add Reply

Post
×
×
×
×
Link copied to your clipboard.
×