Ok, thanks guys. I have chosen to go with a brass/copper radiator because I'm not concerned about lowering weight and I like the ability to repair and recore in the future like the original. So it appears that no one makes one with inlets/outlets bent 90 degrees with enough clearance for sucker fans behind? I can see from the excellent photos that laying the rad forward isn't an issue, but I would still have to have the Hall rad inlet/outlets extended to fit sucker fans/shroud. If I decide to do the reverse and install new higher volume, more efficient pusher fans/shroud instead of the sucker fans/shroud can anyone vouch for the Hall being able to fit in place just like the original - without laying it forward? Same mounting points etc? Has anyone used the Brassworks radiator? If so, can you chime in on how it mounted etc? Thx
Garth posted an excellent reply about pusher fans in your previous cooling system topic (radiator looks like it might blow) on January 2, 2018. Good reading.
https://pantera.infopop.cc/top...988#1598208419964988
Install 2 new pusher fans with new high volume blades as per Garth's post, install the Hall radiator sitting straight-up as designed. You can't buy a better radiator.
Paul,
The Hall brass/copper radiator will mount in the stock position.
John
I have had a Ron Davis triple pass aluminum radiator in my Pantera for over 20 years. It has shrouded sucker fans on the back and although the outlet is on the driver's side of the car and some modifications to the coolant pipes had to be made, it has done very well. Better than the two pass aluminum radiator that it replaced. Arizona desert tested with an accurate water temperature gauge!
Thanks to each of you! You are right George, I have talked to Garth live recently but had forgotten what a fine and informative post he wrote almost exactly a year ago. It's been a difficult and stressful year, but I think I can look forward to getting things off to a more progressive new year and I wish the same to all here! Thx.
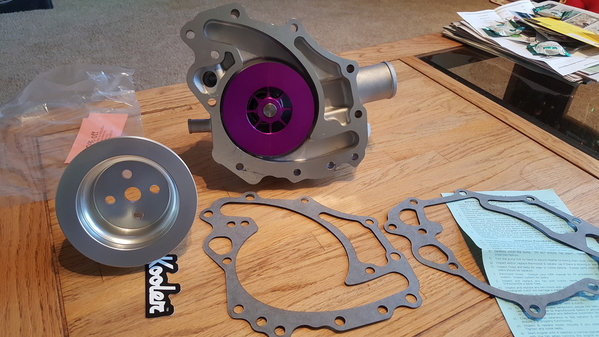
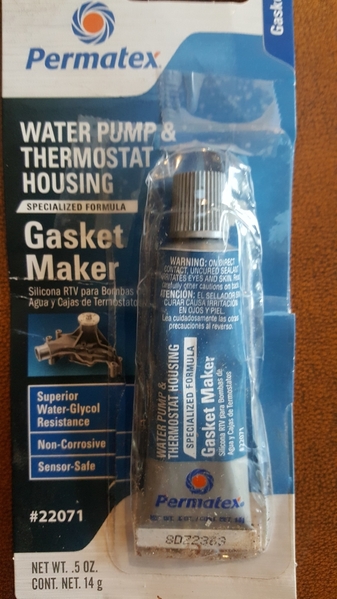
The Flowkooler water pump arrived today and the SACC billet pulley arrived the other day - so now just need the new radiator, grommets and ? to disconnect the originals and replace. I got the bolt kit from Summit with the water pump and it came with two different gaskets (why?). When I installed the correct thermostat I installed it and the gasket using Permatex water pump & thermostat gasket maker #22071 per info from two mechanics and NAPA. I plan to use the same again for the water pump installation.
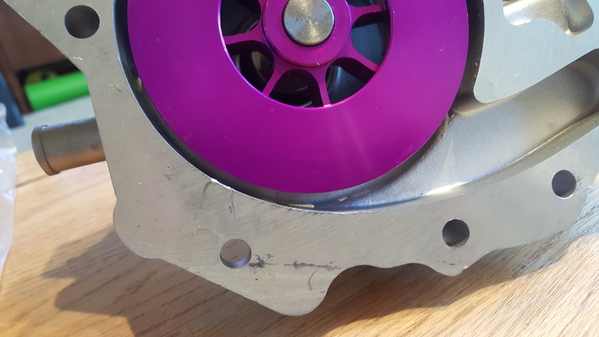
The first pic shows the water pump and the pulley together with the two gaskets. The gasket on the left looks like it fits correctly, not sure about the one on the right. The water pump has some scratches on the attachment face (see second pic for close up) but the pulley is a work of art! Nice job Scott!
Do I need to do anything with those scratches or will the gasket + gasket sealer be enough to not worry about them?
As I mentioned above, Steve W. told me not to install a pulley to move coolant faster through the radiator, but others here and Georges' excellent article on cooling suggest doing so and my inclination is to go with that advice. I have the pulley, but I don't have to install it - what do you say?
A paddle-wheel water pump will cavitate- generate bubbles- and stop pumping much water at some engine speed; street engines usually do so around 5000 rpm. Changing pulley ratios is common; smaller ones lead to 'overdrive'- pumping more at low engine speeds and not pumping enough (due to cavitation) at higher engine speeds. The old trick of clipping every other impeller blade off a stock pump moves cavitation to higher engine speeds, as does a larger pulley (underdrive). I've made a few pump pullies in several ratios for street machines that worked for their owner's purposes.
As for your small pulley, it's not much trouble to try it- only 4 bolts and maybe a vee belt; with your driving style and the roads around your area, it might improve cooling... or not. If it gets hot earlier than you can live with, just remove the custom pulley before you get boil-over. No one can really predict what will happen with any given car combination, but I wouldn't intentionally use a small pulley at long WOT Silver State events or at Bonneville.
Minor face scratches in a pump won't hurt anything; use non-hardening sealer like Permatex #2. Pressures are only on the order of 15-20 psi or less. Just be VERY sure the new pump is NOT designed to run on a late engine with a serpentine belt. Serpentine-belt water pumps are designed to run BACKWARDS compared to vee-belt pumps. Massive overheating will result from mixing this up regardless of your pulley ratio.
Thanks Bosswrench. The water pump is the Flowkooler 1648 mentioned in George's cooling system analysis sticky thread and by others so I believe it to be correct non-serpentine model:
https://www.summitracing.com/parts/bra-1648
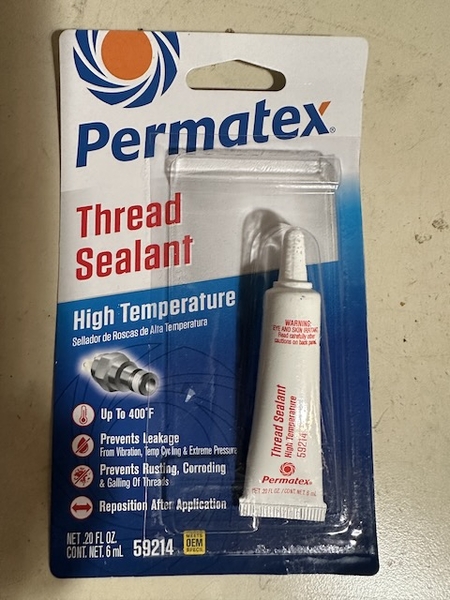
and the Permatex is this one in the pic.
Summit sent the wrong bolt kit with the pump (for a Chevy with only 4 same length bolts) and are now sending the correct kit with 11 different length bolts.
I had a chance to talk with Tara at Hall Pantera today and they will be back in the shop on the 2nd if anyone is interested, and I also got a nice call back from Dennis Quella. If I change my mind and go aluminum I'll be ordering directly from him. I am hoping to follow up with Brassworks when they reopen to find out more info about their radiator which there is a link to elsewhere but I'll put here again for general purposes:
http://www.thebrassworks.net/s...rs/product_info.html
I'm not sure what:
"Its made with tellurium copper and highly elliptical staggerred tube design and serves as the mid engines primary heat exchanger."
means, but I intend to find out.
Attachments
paulf posted:… I'm not sure what:
"Its made with tellurium copper and highly elliptical staggerred tube design and serves as the mid engines primary heat exchanger."
means, but I intend to find out …
Does anybody have any experience with the brassworks radiator? All I care about is that it doesn't leak, and looks pretty stock, since it's getting impossible to find good radiator re-builders. The Phoenix radiators are good at cooling, but both of mine leaked quickly, after a fix they still leaked!
rrs1 posted:Does anybody have any experience with the brassworks radiator? All I care about is that it doesn't leak, and looks pretty stock, since it's getting impossible to find good radiator re-builders. The Phoenix radiators are good at cooling, but both of mine leaked quickly, after a fix they still leaked!
Hey RRS1, can you provide any more info about your where/how your two radiators leaked/failed? Did you buy these new, direct from Hall? If so, how long ago? Any other information?
The diagrams show the water pump pipe going to the top of the radiator. Is that correct? On all of the old cars, the water pump connected to the bottom of the radiator. The thermostat hose would go to the top.
I see Pantera Electronics now offers a copper/brass radiator and fans, to compliment their cooling fan controller. If the new radiator is like their other products, it must be excellent!
https://www.pantera-electronics.com/radiator.htm
FWIW, many owners solve the 90 degree bend problem on their radiator in & out spigots with a pair of big sweat-solder copper fittings (that never rust) and two short straight sections of 1-3/8" or 1-1/2" rubber hose per bend. Using them also extends the crossover hose away from the core for sucker fan & shroud clearance.
The main advantage of aluminum rads (besides 1/2 the wt) is the 3-4X larger core tubes that hold more coolant and flow so much more- not possible with copper rads. The Pantera needs all the cooling help it can get since its stock engine produces as much power as a 350 'Vette but the stock rad is 20% smaller and 6 ft away from the heat source. Then we modify them for more power & torque....
Earlycat, the Blue and Red Owners Manuals show the water pipes plumbed both ways in successive factory manuals. It makes engineering sense to plumb cooled water to the bottom of a radiator so the rising flow can help chase air bubbles up & out instead of fighting gravity, but who knows what logic Ford/DeTomaso followed?
I once tried both styles on a 600 mile round trip, changing configurations mid-trip at a friends garage. I found zero difference + or - in terms of stabilized running engine temp, on our car at least. YMMV.
I judged them by weight. The heavy Hall lasts forever and makes turning better. Cools just fine. Replaced with a new Hall rad to utilize the original thermo switches for fans. Previous H had snap switches blocked off and manual fan switch firing both pushers. New Hall has larger fans but same crappy right angle fabbed hose necks. Nothing like a beautifully engineered part with two steps backward . Every 90 deg bend is detrimental to flow. Two 45's are better. Three 30's even better. A variable radius sweep, now you're back to beautiful. Besides, copper and brass are the MOST malleable metals and sexy as hell when hand finished. That's how I'd build it. Supplied with a nice clear finish. Make you paint it crappy black.
How much money you got?
The Pantera Electronics ad says "this is a customer supplied radiator". They take your unit and send it out to a radiator guy... Been there, done that...
Hello lovers of beautiful Italian American Lady I am currently in the process of restoring my Pantera L 1974, and I would like to know the best cooling system between these diagrams. Thank you for your support Willy
Attachments
Hello Willy,
I am not going to select either of your suggestions as being better than the other
instead, I am going to ask you why you feel the need to deviate from the original factory design.
there are still thousands of Panteras, stock and highly modified, that still use the original design, though often with improved radiators and water pumps.
I personally do not see the need for modification of the original cooling system, as it will function just fine.
Larry
The purpose of George's cooling system mod is to make the cooling system self bleeding. It's always a headache getting all the air out of the system and with the mod, it does it automatically, as you drive. I did it to mine but I was building an entire new cooling system from scratch. If you use a vacuum filling device to fill your stock configuration cooling system with coolant, air won't get in, in the first place.
Good morning Larry,David
Thank you very much for your analysis, I had to change my radiator and replaced it with a PI Motorsports, Inc. Pantera aluminum radiator. So you advised me to keep my original system, if I understood you correctly ?
willy
See my answer here:
https://pantera.infopop.cc/top...92#25261151688862692
The second diagram also allows an automatic purge.
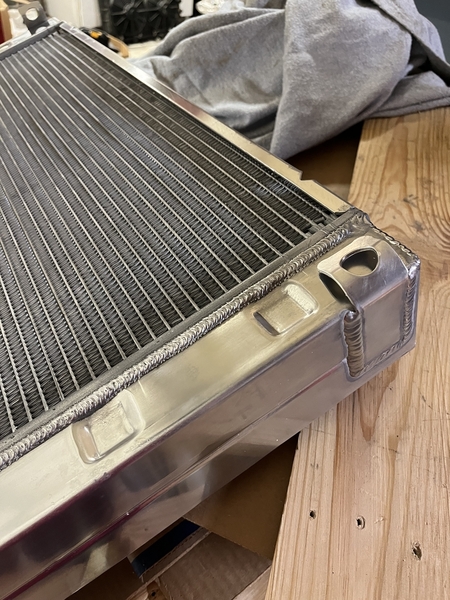
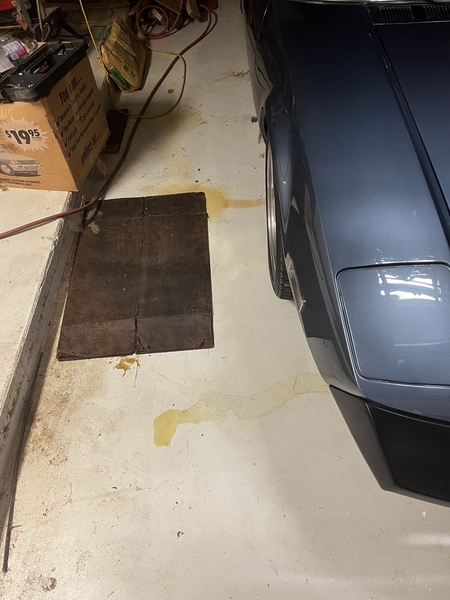 My radiator journey starts with no problem increasing to a gallon on the floor. Naughty girl.
It gets understandable once the old copper radiator is out. There is a spooge repair down in the corner.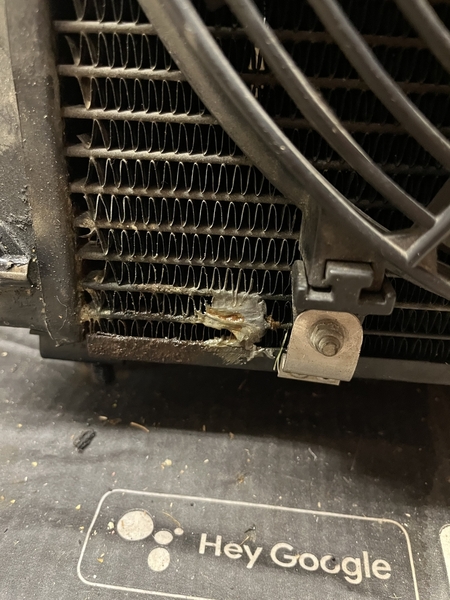
I went with the fluidyne solution. I found the same delivery problem. Bent mounting ears.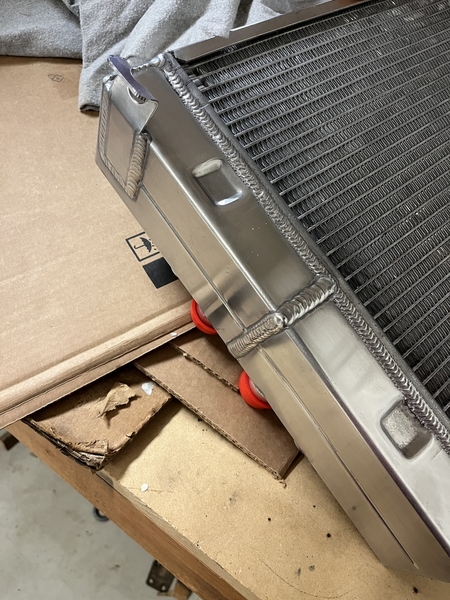
There was equal treatment for both ears.
Bent em back with wood blocks, table vise, and then c clamps. Attle be arrrite. On on to mounting fans. Also… the recommended dual fan enclosure from this list is no longer available. I will pop rivet some brackets. I figure aluminum on aluminum might corrode less. Use that flange around the edge. Reuse the bracket you can see in the spooge picture.
Attachments
Where did you buy the rad from that they can not figure out how to package something like that. Let us know as I will not buy from them.
Well. Summit. I’m not sure you can blame them. It appears it was drop shipped this way. Fluidyn ships in cardboard using expanding foam over plastic film for protection. Those ears stick out and are very soft metal. Without rigid protection, hmmm.
Im the second person in this thread to see this happen. Scroll up to see the other. I’m not letting this stop me. I’ve worked through lots of problems getting this car to reliable. It’s my date night car. No sex until it’s perfect! (Kidding)
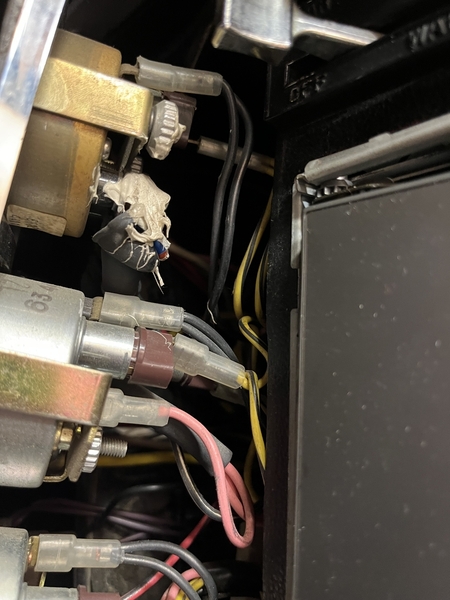
This is not the thread, but here is my amp meter insulation:
That is a custom masking tape and window caulk spooge iso 5000 compliant and waterproof to 10 meters. Under it, is an 18 gauge jumper wire between the amp meter posts. Considering this takes all the current the car can generate, great idea. I live a life of danger! I got Jon to fix the amp meter and put silicone boots over the posts, wires, and retaining nuts. I added grommets cut in half to the post base to eliminate air gap. I yearn not to burn. Happy motoring.
Attachments
Kemper, the traditional dual-sucker-fan-with-shroud that fits Pantera radiators perfectly is the Flexilite (didn't save the model). If thats the one you say is no longer available, Maradyne Co makes one virtually identical. PanteraParts.com in Carson City NV stocks them. You can improve these dual-suckers by making sure you have full battery voltage to the motors. A loss of 2V will cut fan speed by almost 40% according to my tests.
Here's the Maradyne catalog. Which one is it Boss? thanks
Attachments
If the fans are mounted in a shroud and there's no baffle between the fans, make sure both fans turn on and off at the same time.
I had 2 bent radiators from summit. Boxes were in perfect shape so it is an internal Fluidyne issue. I called Fluidyne and they took extra care to make sure the brackets were good on my 3rd radiator. I could have bent them back but I was concerned about the load that the radiator experienced that caused the bent brackets. Plus I was pissed after spending $700 and seeing this poor quality!
I could be happier. My concern was metal fatigue. That is a very soft aluminum so, maybe less fatigue than a stiffer grade. My new concern is weaseling it into the car with slightly deformed ears. The fins are super thin. Breathing on them might cause bending. A bump would leave a mark. I am pleased the shell around the sides over hangs and is spaced away from the core. That will make it easier to attach the fans.
Soon I will try the tip I read on here of putting my hoses in boiling water before pushing them on larger inlets to get those 1 3/8 hoses to 1 1/2. Hope they hold the new larger size when cooled! Happy motoring
New question. I'm swapping over the two thermostat switches. They appear to have a shoulder that would take a washer of some sort to seal them. Mine are mostly gone. What used to be between the switch and the radiator? What size is it?
Secondary question. What size is the radiator switch. I used an 1 1/8 socket and it worked ok for one but was a little small for the other. Thanks!
They're probably metric hexes. Depending on the radiator, some were VW thermoswitches.
I measured the hex on one original and one aftermarket temp switch. Both measure 29 mm. Threads are M22-1.5.
Make sure you check the threads in the radiator tanks. Some owners have reported that the threads on their new radiator were in poor condition.
The temp switches require a fiber washer / gasket. Aluminum replacements are sometimes available.
John
Nice tips. Will check the threads. I calculated 1 1/8 was 28.5 mm and was guessing 29. Now I’m not guessing. Will pick up a 29mm deep in 1/2”.
could I bother you for the dimensions on that gasket? I can put a caliper on my thermaswitch tomorrow, or see what Napa has tonight. I may have to make this. Bespoke gaskets ![]() . The list of things I make for this car is growing. It’s worth it. I’ll try “vw 29mm temperature switch gasket” and see what. See how good my google-fu is.
. The list of things I make for this car is growing. It’s worth it. I’ll try “vw 29mm temperature switch gasket” and see what. See how good my google-fu is.
I also have the famous Cleveland oil leak around the sender. Anyone ever built this area up? Any solutions besides permatex “forever” thread sealer? So hard to remove that stuff.
Thanks everyone!
Found
N0438083-VR
and ordered that from Pelican thanks all.
Be sure where the oil is leaking from before you knock yourself out. I've had senders that leaked inside the plastic body and came out around the crimp connector!


