
I was always amazed about the gas filler located in the “early” Pantera!

as I was looking for a solution I do like! I came across a “Cobra” stile filler that wouldn’t look huge for the sail panel it will be mounted on / in!
There are many different ways the factory fuel filler location (which wasn’t even used) looks :

some have a egg shape, some have a round indentation/patched up hole with spot welds…

I my case it’s a 1.5” hole that has a patch on the inside and 3 spot welds on the outside.

IMG_0044

push button:

IMG_0882

Attachments

Images (2)
  • IMG_0044
  • IMG_0882
Last edited by LeMans850i
Original Post

Replies sorted oldest to newest

IMG_0047IMG_0048That patch (center of it) is located just about where the longest indentation rib is on the sailpanel.

To get a “proper eyeball “ on the situation I removed the filler elbow

IMG_0058

And then drained the tank of all the 8 year old fuel 😳. Maple syrup?

clear hose and a piece of brake line stuffed in the end, still sticking out 1/2 inch so I can hear it touching the bottom, pull up 1/8 inch, tape hose to the piller and hose going down the side.. into my monster gas can…. Little suck with the vacuum pump and monitor… 55 minutes long…

10 gallons later.. empty

Attachments

Images (3)
  • IMG_0047
  • IMG_0048
  • IMG_0058

It’s just not really possible to show it in pictures but the angle from the original intended hole to the gas tank fill hole is rather shallow… so I won’t use that location but I go up to the next indentation rib.

Now here are the fuel caps I want to use


IMG_0052IMG_0050IMG_0051

They are the same, one chrome and the other black, designed like mini cobra fuel flip up caps.

For my taste the aviation cap is to big and to modern looking, having recessed fuel filler with a door is too complex and I think that cap is pretty and no need to hide!

I have not decided on black or chrome…

Attachments

Images (3)
  • IMG_0052
  • IMG_0050
  • IMG_0051

Because I intend to mount the filler in the piller and just use the ribbed sail panel as trim I want to make sure everything is lining up properly… I am drilling thru 3 layers, trim, outer skin and inner skin!

so I set out to make a mock up trim panel

IMG_0045IMG_0046

its important that the hinge and the locking part sit in the depression… so the hole in the skin has to be exactly at the right place!

Attachments

Images (2)
  • IMG_0045
  • IMG_0046

Here is the filler assembly…

fuel resistant hose 1.5” to 2”

next is to test it at the gas station, stick it in a 5 gallon gas can and check how it flows before I start cutting anything! I still need to trim some of the tubing going into the gas tank… about bottom of blue tape!

(tape is on it so I can’t drop it into the tank!)


IMG_0049

IMG_0059

Attachments

Images (2)
  • IMG_0059
  • IMG_0049
Last edited by LeMans850i

I seem to recall they are threaded into the casting. Easy enough to check, jamming two nuts together

you are slowly making progress and that’s a good thing especially testing the flow of fuel. Just cutting a hole and hoping everything else will work is a dangerous way to go. Looking forward to your finished product.

Larry

I went to several different gas stations today to check the flow of my filler neck and I have to say that I never noticed that there are so many different nozzles… long and short (2” only) with and without spring around, long sleeve to suck vapor off…

anyway.. it worked well… very good on the shorter nozzles and okay on others.. I don’t think it’s any different compared to the original… I use this design and keep working on it!

Locating where I want the fuel filler.

I abandoned the first hole!

IMG_0601

IMG_0603IMG_0606

I am going one inch higher than DeTomaso did.. I think the additional slope helps for the filling, and clearance for the bolt on the flange at 9 o’clock.
IMG_0607


I’ve been straight up, same location within the recess and drilled my hole! Because how the panel is more slanted in the back than in the front. I abandoned that hole as well, and moved it slightly to the left! Taped off the incorrect holes…


IMG_0615

IMG_0614

and made a mark with a drill

IMG_0616

Attachments

Images (7)
  • IMG_0601
  • IMG_0603
  • IMG_0606
  • IMG_0607
  • IMG_0615
  • IMG_0614
  • IMG_0616

And now it’s destruction time…

The largest diameter on the fuel filler cap is 3 inches , and because their panel is going over there already mounted fuel filler cap start out with a nice big 3 inch hole,!

IMG_0618

battery died… Time to take a look

IMG_0619

IMG_0620
filed out the recess for the closing and hinge mechanism
.

IMG_0624

and that’s how it looks!

IMG_0627

IMG_0629

i’ll paint black around the filler cap before assembling it.

I’m just glad I cast this markup panel!

If I would’ve done the chop on the real part, I would’ve broken out in sweat! All the holes would not have mattered because it’s all within the part that’s going to disappear anyway.. but still..

the finish work on the metal panel is going to be much easier, much nicer, because that casting here is quite brittle being fiberglass  and resin!

I let this simmer right now in my brain… Thinking, maybe to go with a different way of assembling it and make the hole only 2 3/4 of an inch diameter

Attachments

Images (7)
  • IMG_0618
  • IMG_0620
  • IMG_0619
  • IMG_0624
  • IMG_0625
  • IMG_0627
  • IMG_0629
Last edited by LeMans850i

(I’m a little late to the party with this suggestion, but…)


There was a thread somewhere in which one individual hinged the whole gill at the front, and I think he had a post/grommet setup at the rear to hold the gill closed.

Hinged that way, the airflow couldn’t open the gill.

He inset his new filler neck into the metal behind the hinged gill panel.

Your solution looks very good too!  Keep plugging along!  And keep posting pictures!  We love to watch progress!

Rocky

@rocky posted:

(I’m a little late to the party with this suggestion, but…)


There was a thread somewhere in which one individual hinged the whole gill at the front, and I think he had a post/grommet setup at the rear to hold the gill closed.

Hinged that way, the airflow couldn’t open the gill.

He inset his new filler neck into the metal behind the hinged gill panel.

Your solution looks very good too!  Keep plugging along!  And keep posting pictures!  We love to watch progress!

Rocky

Yes, Rocky, I saw that! It was and monstrosity of hinges… I think I tried to keep it simple… and in 1970s style!

black or chrome… What do you think?IMG_0635

I just read your thread. How you Went over your whole car… Pretty much did everything! I’m gonna pick your brain on occasion, if I may… I’m a Pantera Owner only for three or four months, so I’m still learning and learning  a lot! I am reading this forum inside out, top to bottom and there’s no end to it… It’s like a library without walls… endless!!!!

Attachments

Images (1)
  • IMG_0635

I decided to make a second test cut on my other fiberglass panel I made… I would like to have a little less gap between the panel and the filler cap base..

the first time I used a 3” hole saw because I thought the filler cap itself is 3” and the panel get mounted after the cap assembly is installed… the cap base is 2 1/2” so I got 1/4” gap around the base! Just didn’t feel right…

now with the cutouts for the hinge and the little locking mechanism I actually could get the 3” cap though a 2 3/4” hole, leaving me with only 1/8” gap around the base! I’m good with that! IMG_0624

local stores didn’t have a 2 3/4 hole saw so I ordered one.. coming Saturday!

I'm also thinking about moving the cap down one rib.. still higher then center of the panel… looks better but higher location would fill better… decisions, decisions, decisions,…🤔🤪

( and that’s why I made a mold to make some panels to be able to f@$& up)

Attachments

Images (1)
  • IMG_0624
Last edited by LeMans850i

here is again..center between the ribs equals half inch down from the top of the ridge. Then center of the ring 90° to it… X marks the spot, this time with the number to be able to repeat it… 80 mm

then drilled pilot hole and hold sawed with 2 3/4” hole saw instead of the 3” from the back

IMG_0654

IMG_0655


here’s the direct comparison:

IMG_0660IMG_0659IMG_0661

Attachments

Images (5)
  • IMG_0655
  • IMG_0654
  • IMG_0660
  • IMG_0661
  • IMG_0659
Last edited by LeMans850i

2 3/4@ hole is perfect fit! I am happy!

i’m only half inch higher than the original filler location from the factory… that does not make me so happy but (compared to the 1.5 inches I had before ).   well sometimes there’s a trade-off between beauty and super Duper functionality,! it might even work out, it is still more angle in the filler tube than the original ever had!

and once again, I let it simmer in my brain…. And Look what you guys have to say to it and tomorrow - maybe I’m going to poke real holes in the real metal!

(am I glad I made those fiberglass covers!!!!!)

Last edited by LeMans850i

well, it’s done,!🥵
IMG_0669
same as the last time… then drill pilot hole…IMG_0671
The lower drill mark is the center for the 1 1/2 “ hole at this spot!  It was important to make the mark with the drill through the panel being 90° to that surface and not to the grill outside!  It is angled,!!

IMG_0673
drilling from the back…
IMG_0674

being very careful with the hole saw so it can’t catch and break a rib in the panel!

IMG_0675IMG_0679
marked outlines for  Hinge and lock..

and carefully  Filing my way towards them..IMG_0683

it’s a very close fit! 1/8” around..IMG_0684point of no return…

and it’s like giving yourself a root canal, OMG 😱

at least from here on out, it’s just connecting dots lol.IMG_0685

Attachments

Images (10)
  • IMG_0669
  • IMG_0669
  • IMG_0671
  • IMG_0673
  • IMG_0674
  • IMG_0675
  • IMG_0679
  • IMG_0683
  • IMG_0684
  • IMG_0685
Last edited by LeMans850i
@Lardog posted:

You're getting closer.  Now the drill the yellow body and you are home free.  Looking Good!

Next is pilot hole from the outside through the outer skin and inner skin 90° to the Outside skin… then I have an idea with the filler neck goes..

hopefully I’m in the ballpark what I expected where I should end up..

then drill outside 1.75 inches, the inside 2.5 inches!

Last edited by LeMans850i

Here it is:

IMG_0688

covered fuel filler hole with the red aluminum plate… this shows the angle I come in.. not bad..

IMG_0690
the fuel cap is not bottomed out onto the sheet metal… I have to “flair” the ribs for it to come down! I guess another 5mm

IMG_0689
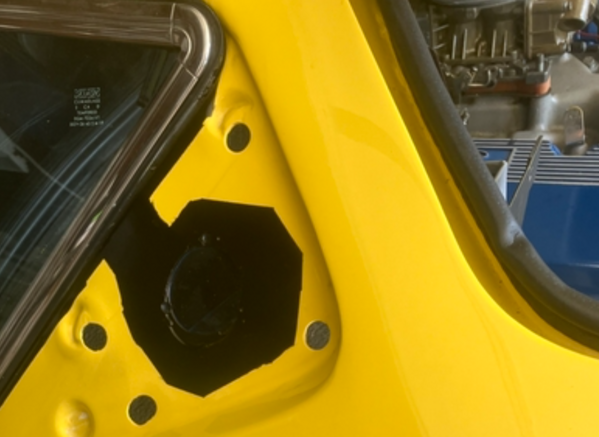
I used the long drill I had to mark the spot with paint … the angle of the inner fender didn’t let me drill through in one go!

I going to see if I have a way to get a pilot hole going and then shoot with the hole saw and an extension from the outside in… maybe..🤔

it definitely will be a Chinese puzzle putting the finished project together..

the big 3” hole would have been the easiest but -the gap- no! Patience!

Attachments

Images (3)
  • IMG_0688
  • IMG_0690
  • IMG_0689
Last edited by LeMans850i

Well, making the hole in the inner B-piller was, to say it mildly, an absolute pain in pretty much any part humanly possible and loosing a more or less important body part is always possible till very very last second until the hole is exactly where it needs to be!

I can not make any recommendations how to go about this job…  you are working in limited space, very counterproductive angles of sheet metal ( which is responsible that the hole isn’t really round from this prospective) and Home Depot doesn’t sell a StarTrek phaser (the extra small version) in their tool section!
And tomorrow …a little welding.. tube to flange.. 👍

IMG_0699IMG_0697

Attachments

Images (2)
  • IMG_0697
  • IMG_0699
Last edited by LeMans850i

Tedious little work right now, try to get everything dialed in to the closest millimeter to have enough clearance for the hinge of the fuel cap and the lever for Opening the cap. Nothing to see here… posting updates as i get stuff done.

but simultaneously I’m gonna start the next project… it’s a controversial project….that much I know!

powersteering

Last edited by LeMans850i

Warn your powdercoater; these are fairly porous castings and outgassing can be a problem. If they bake them for a while, before powdercoating, it will minimize the chances of outgassing during the post-powdercoating bake.

As an alternative finish, try Cerakote. It does not need to be baked, so outgassing isn't an issue. I've used one called CERAKOTE GLACIER BLACK. It's a semi-gloss black and looks just like semi-gloss black powder coat. It's also rated to 1,800° Fahrenheit, so it's great for headers and brake calipers.

c-7600-glacier-black

Attachments

Images (1)
  • c-7600-glacier-black
Last edited by davidnunn

Hey Lemans

You shot of your new filler position reminded me of something to keep in mind, if you are ever put in a position where you have to siphon petrol into your fuel tank from a can of fuel on the side of the road .

Not that I am saying panteras ever run out of petrol or the gauges are sometimes wildly optimistic.

Make extra sure the hose does not come out in the middle of the siphoning operation. Get a second person to hold it in.

Any spilt fuel will almost certainly  run straight down the fender face into LH gunnel of the rear bonnet , and drop straight onto your hot exhaust pipe , which is perfectly aligned below , creating much excitement.

Don't ask me how I know...


Attachments

Images (2)
  • mceclip0
  • mceclip1
@Percy posted:

Hey Lemans

Any spilt fuel will almost certainly  run straight down the fender face into LH gunnel of the rear bonnet , and drop straight onto your hot exhaust pipe , which is perfectly aligned below , creating much excitement.

Don't ask me how I know...

yes!!! So true!!! I couldn’t believe when I saw the original setup for the first time!

there was NO WAY i would have kept that filler setup!

I had   engine oil!!!!  ignited on the header on my E21 Alpina… (minor loss of eyebrows) 😳

Last edited by LeMans850i

Sorry it took so long to finish this project but some of you guys may know I do a lot of things on this car… And Powersteering took a long time and and and and let’s  just call it excuses… well, it’s finished now…

3 studs holding the filler cap base to the car, the panel powder coated, everything adjusted and tightens, hose clamps installed… and the way I did it and the result in pictures…

IMG_0974IMG_0975IMG_0977IMG_0979IMG_0980IMG_0981

IMG_0970IMG_0971IMG_0972

Attachments

Images (9)
  • IMG_0974
  • IMG_0975
  • IMG_0977
  • IMG_0979
  • IMG_0980
  • IMG_0981
  • IMG_0970
  • IMG_0971
  • IMG_0972
Last edited by LeMans850i

Now the question to ask, is, do I like it, and would I do it again and the answer is  YES, both times! it looks period correct!!👍👍

The real important thing is the placement on the panel and the tedious finishing off all the moving parts and… I am happy with what came out… I could have done better I think… More test fitting but I’m happy. But I’m getting annoyed by 1 mm off so being half a millimeter off is OK with me😊

moving onto the next project I am requiring a little help… Limited time to get it done and helping hands appreciated…

Engine cooling system…..

Last edited by LeMans850i
@jwelch68 posted:

That looks really nice.

I had an idea the other day that maybe someone has done or maybe it's a dumb idea and never tried before.

Might be interesting to do the same exercise on the passenger side but for adding coolant? Just don't Criss/Cross the two when refilling.

The idea doing something on the right hand side did cross my mind… I was thinking more in the direction of oil dipstick…

coolant would be probably doable but would you open it when it’s hot in that location…..

like they always say:  location, location, location-

and no place to hide 🫣💥☄️💦💦💦

the squeeze is not worth the juice!

Last edited by LeMans850i

I have -4066. It is an early '73. It came with the internal fuel filler.

I basically did the same thing that you have except I used the factory parts for the "can" and the filler neck. Wilkinson had them and that's where I got them from.

I had gotten the exterior hinged factory grill from him as well but the way that I use the car, it was still cumbersome.

I had the idea of the Cobra external cap but I chose the SC version. At the time Contemporary Cobra was 15 minutes a way from me and I bought that cap from him.

It's a big sucker and I considered notching the gills as you did but because that thing is a casting of unknown strength, I just opted to not notch it.

I wound up drilling out the original gills with a hole saw as you did and that was a simple task since the casting is so soft to begin with.


I am happy with the results but you have reminded me of considering the notches to lower the profile. I'll look at it again since you have successfully done it but I'm still not confident that it is not going to leave too little of the grill for comfort?

Are you guys sure that those studs unthread from the gills?

Add Reply

Post
×
×
×
×
Link copied to your clipboard.
×