@mangusta posted:

Mike,

If you have the stock timing pointer and marks, you actually can see them BUTT, ya hafta put the timing light near vertical, and mash your head up against the firewall window and look directly down.......

It can be done!!!

Those new blue reusable gaskets for Holleys work very well!

COOOOOL!!!!!!!  Getting closer!!!

S

Seriously?  I'll have a look, but i didn't see any obvious sightline...  If I can get my old borescope working that might help...   The new roller cam changed my firing order!!!    I was surprised about that...

  My list has a ton of "to do's"...  Which includes shifting the engine over toward the passenger side...   Water pump idler pulley is about 2mm from the firewall padding...  Also have to figure out what is up with my oil pressure gauge...  It's not showing anything at all...  I pulled the gauge and ran a short to the signal terminal and it pegged...  Seems to respond fine...  Also put a VOM on the sensor and it seems fine...  Will jumper the gauge directly to the sensor tomorrow to isolate gauge OR wiring...  I'm hoping it's wiring !!!

If I need to rebuild the carb I'll look for the holley blue seals...  It's a 4150 holley...  So no worries there...l

I haven't pulled the radiator cover yet to look for an air bleeder...   So far I've gotten just under 2 gallons in her...   1 gallon antifreeze & almost 1 gallon distilled water...

I'm having a blast...  (my bank account, not so much)...

I'll post a video of her running once I got mufflers on her and a decent idle... Right now she sounds like a drunken grizzly bear...

I appreciate the help, insight, warnings and patience...

MH

Yeah, timing is set by ear at this point and I still have to source the radiator hose from the right side tube to the water pump...  Haven't found that one yet, so I slapped the old one back on...  It has a leak !!!  Possibly damaged in the shop or during the pull...  Either way, I need to find a new one...

Headers have to come back off for ceramic  coating...  I switched to the big bore headers from Hall...  Had to cut notches for the plugs in the heads.  The headers wouldn't fit otherwise.

My to-do list is getting smaller...  Front suspension is next, then off to paint & body...

MH

VAROOOMBAAAA!!!!

Mike,

Hose info to help you out.

I dug this off of page 3 of my "oops I'm doing it again post"  regarding hoses.  Looks like I made two out of one for about $8....probably $16 now...!!!!  Still needed a second unique but easy to find hose as well. Read on...

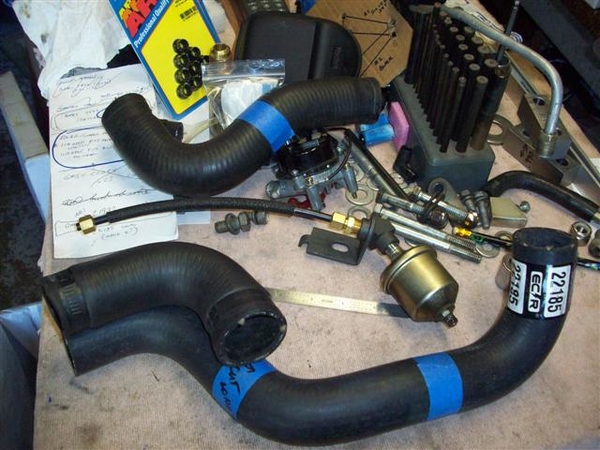
"Found a Gates / ECR #22185 (O'Reilly or Rock Auto) hose of the proper 1-3/8" diameter to make the "Y-Pipe to the under car pipe" connection!     From this one new hose,  I was able to get one piece of hose that will do the job... and give me a spare to carry in the tool box... for only $8!

I cut this new hose apart, with the RH section as you see in the picture being my primary piece, and the LH section as my spare.  I found an errant slice in the area near where the clamp would go, under the label....but once I cut the hose up I ruined my option of returning it... so for $8 I ordered another and am real fine with hanging it in the rafters until needed!"  (Might still be there????)


My old lower hose is at the top of the picture....but I had no Y-pipe and wrong water pump as I found it....a total mess.

New hoses with proper Y-pipe etc fit MUCH better!!!!!

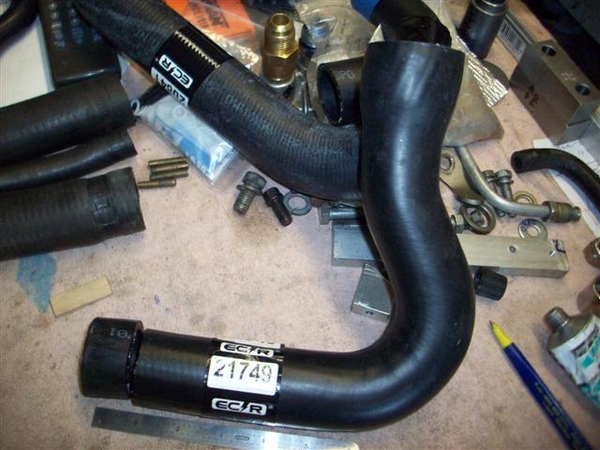
More cut and paste for "water pump to under car pipe" info from the same post!   (Gates / ECR O'Reilly) #21749- I think this may be the stock lower hose for a 67-69 small block in Mustang /Cougar models.

"Needed to do just a tad of trimming to get things to line up and not bind.

I took one inch off of the lower end. It should be noted that this hose is 1-3/4" at the top and 1-3/8" at the bottom, just what doctor DeTomaso ordered!!!"


Hope these number help you out!

Steve

Wow, that is VERY useful information.  Got a list of belts in that collection of data?  I've tried several sizes and profiles and am solid with the water pump & jackshaft belts up front...  The Alternator belt is the right length, but I think it's too wide, not fully seated in the pulley...  the A/C belt i'm still messing with...   All Gates Green Stripe so far...

Thanks for the part # on the hoses...  That is going into my archives !!!

MH

Mike,

For the alternator you may need to go down to 7/16" width or perhaps even one fraction next smaller.   I don't recall what that particular dimension was....

Otherwise, for AC belt and an Alt belt, here is where my expertise falls......as my car had the alternator mounted on what would normally be the smog pump wing of the bellhousing!!!  SOOOOO, I must defer to the masses to follow up here!

TO make matters less fun, I checked my "alternator pictures" out from various cars, and found at least 3 different rear jackshaft pulleys in use!!!! 2 sheave and three sheave!   I also wonder if I didn't see at some point in time, a belt running the AC pulley which then back fed on a second sheave to the alternator!!!  Talk about "your mileage may vary!"

Since that part of my rebuild had already been figured out during prior engine swaps etc, there was no change in belts this time!

Cheers!
Steve

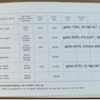
Mike, I spent a little time yesterday looking for cross-references, the Gates numbers are easier to find (but strangely, I haven't found cross-references against the Pirelli numbers...you'd think with Google, this would be easier (!) Esp, elusive is the Pirelli 261206 belt (for the alternator).

The "AS small pulley" is interesting, I assume this differentiates the large radius drive on the jackshaft side for the Anti-smog pump (and who ever calls this the "Anti-smog...). But I thought thought that was a transition that came later (so strange its in the owners manual, which I assumed was printed once, before such a transition)...

(minutes later; take back my words, how could I imagine there wasn't such a thing as a revision (!) An earlier owners manual had very helpful empty boxes for the user to fill in their answers for the drive belt....and on 2nd to last page, instruction for the oil and grease was just "Oil: winter, summer" and not MOBIL). The photo I copied was from 8ma1134 (still on ebay after ~2 years, I think) --Lee

Attachments

Last edited by leea

Sorry, nothing to offer, just that I hope you can solve it.

I (shamefully) run an AutoMeter unit in place of the OEM gauge.  It absolutely TRASHES up the classy vibe of the Veglia dash.

I suppose you could send it to a gauge rebuilder but if the issue lies outside of the gauge, in the cable or the sensor then I suppose that wouldn't help...

Good luck! Great thread to follow. Thx for posting.

Sorry @scifi, I guess I deleted my last post while you were replying to it.   I called the manufacturer and they knew the cause of the issue and gave me the solution, so I deleted the post thinking no one had seen it yet...

For those that didn't see the post, I replaced the points with a Pertronix Ignitor 3 unit...  Runs fine, but the tach was reading about half of what it should be.  I checked their website and they said *if* your tach reads too high to add a 10k 1/2w resistor in the signal wire between the coil and tach.  But nothing about reading too low...   Turns out the resistor is effectively a signal stabilizer and should fix my issue as well...   I should have verification over the weekend...

@scifi do you have your old veglia tach? The fiat 124 spider tach is a veglia and the same internals as the Mangusta tach...  Have you ever been into the Veglia's?  Pretty simple stuff...  5 of our gauges are pretty much all the same, just a different face plate... 

MH

Well, adding the resistor was a no go...  Tach didn't work at all with it inline...   At idle it reads a little low, but the problem seems to be exponential with rpm's...  Idle shows around 600rpm, but 3000rpm reads around 2000 and 4000 reads around 2500rpm.  The manufacturers website also mentioned using a capacitor...  I will call them on monday to see if they think this will help...

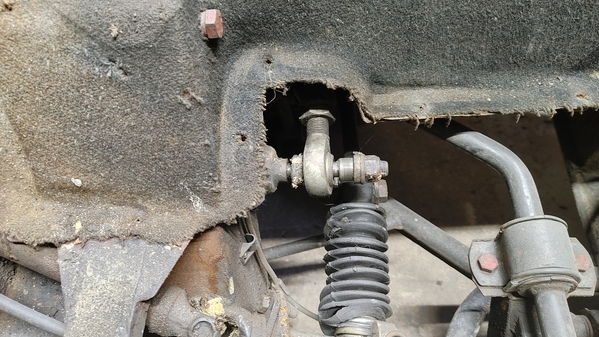
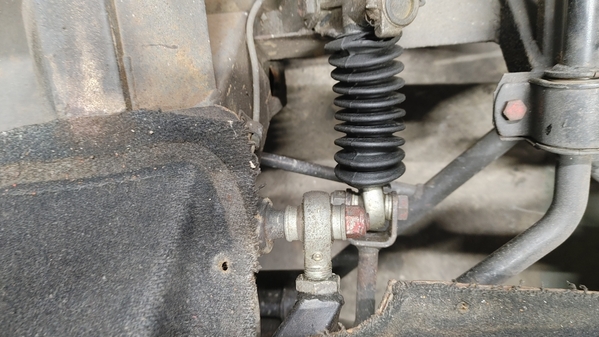
Meanwhile, I started on the front suspension .  so far I've found the offset spacers on the drivers side upper control arm heim joint completely shot...  Passenger side is perfect...  This explains some if the odd noises I've noticed in the front end.  Luckily, I do have grease fittings on the upper ball joints...  Not sure if they were original or added...  But happy to see them.

More tear down monday !!!

MH20230216_143324_HDR20230216_143329_HDR

Attachments

Images (2)
  • 20230216_143324_HDR
  • 20230216_143329_HDR
Last edited by mkeh

Mike,

2/19 Edited to correct incorrect memories!   S

I will say, that is the oddest looking bad front a-arm Heim joint affair I have ever seen!!!!   My Heim joints were bad, but NOTHING like what you have........ It just looks like there is too much shaft sticking out for the nut to hold anything together............even if all the proper parts were present????

There a long shaft that passes entirely thru the front shock tower and fastens to both heims??????   Check the other side to see what is whacked there?

It's been so long since I've been in there............ likely one of the first things I ever did......was grease the squeakyFront Rebuild_00006Front Rebuild_00007Front Rebuild_00010Front Rebuild_00011 LOWER front a-arm bushings......later doing the ball joints after the stock ones self destructed...... almost lied and said that I didn't have a digital camera.....what I DIDN'T HAVE was recollection of these particular pictures which were stuffed in a "misc" labeled folder....DUH!!!

Pics of new LOWER inner bushings from one of the vendors.....really the originals weren't bad apparently!!   The "needle" grease gun tip to grease Unibal heims.

New Unibal joints all lubed and bootied up, ready for new ball joint and installation!

Close up of the reinforced lower a-arms that some of the cars got somewhere in the late 900's or early 1000's???     My car came with one of each due to an accident......and this just happened to be the newer piece!   I modified the other side to have a similar reinforcement job done!   Requires one longer ball joint bolt on each side.....

Plews needle style grease gun fitting for the Unibal heim joints!

Cheers!!!
Steve

Attachments

Images (4)
  • Front Rebuild_bushings
  • Front Rebuild_finished
  • Front Rebuild_reinforcements
  • Front Rebuild_needlepointgrease
Last edited by mangusta

Mike and Scifi, when I had way too much time on my hands I fit a stepper motor tach into a Veglia can (and then got 90% finished with an Odometer, all for no good reason) https://pantera.infopop.cc/top...43#19905352124810043

Mike, I can only assume that the trigger for a Veglia is a strange timing consequence of the particular "monostable multivibrator" circuit, something I never quite figured out at the transistor level...Really, once connected to the the coil, you'd think that a trigger is a trigger is a trigger--but even on this blog, it seems a common experience to see a moving but inaccurate tach read. Maybe my stepper motor tach wasn't a complete waste of time...

  Yes, a tach amp like this https://www.ebay.com/itm/142171581596 may have solved the tach on my 308 that wouldn't work after I put in the Electromotive ignition...and may be worth a try. But you know, the Pertronix "should be" working now...Lee

Mike, if anything, I am fabulously happy with the undercoating texture in my wheel wells but yeah, I felt like I was standing on my head looking at the pictures here...

  Here is a closeup of the alignment spacers on the upper A-arm--as used on the other Heim joints. There is no compliance in the upper arm, only on the lowers (which I remember getting from Hall). (and yes, ignore the direction of the nylock, here just serving to avoid losing the pieces).

  I needed one or two of the spacers, luckily found a machinist willing to make them...In the picture below, I cannot remember which was the exemplar and which the copy (but guess the original is far right).

The naked rods are also shown from an 8ma6xx car below (when the car was Al's and more perfect pieces were installed...and yes, that precious Mamut terminal block has been reunited back with its proper owner ).

Attachments

Images (6)
  • 8ma1076 front suspension
  • 8ma1076 front suspension
  • upper A-arm rods (and other pieces) from 8ma6xx
  • alignment spacers
  • Goose misalignment spacers
  • front suspension
Last edited by leea

Ok, front left suspension removed...  The rear nut on the long double threaded bolt through the A arms had completely come off and the bolt was in the process of working it's way out !!!  It appears there was no damage, but I'm still cleaning...

I'm in the process of sourcing the 40mm fiat 124 ball joints and the Fiat X-19 tie rod ends...  I'm hopeful the front end refresh will go smoothly and quickly so I can get her in for paint & body soon...

Still haven't resolved that tachometer issue yet, but will experiment with a potentiometer to see if another resistance value will get me reading right...  If i can find the right value, I'll put a VOM on the potentiometer and use a matching resistor...  If that's doesn't work I'll try capacitors...

Bit by bit...

MH

Mike, if the tach is only "wrong" but working, it could be that just turning the trim pot in the Tach brings you whole...the tach/speedo are easy to open up (unlike the 2" gauges),  the guts are not fragile or uncommon. It seems that some others just suffered noisy battery voltage to the tach (so a big cap on the Battery line right at the tach just might help, even an inductor/capacitor there). Since the tach triggers on that high voltage spike, its hard to know how an external resistor or capacitor on the Tach line will do much, but who knows...

...and then comes the paint and body?

I've been looking at the pot trim...  I have a laser tachometer that i can use to calibrate with...  But I haven't messed with it yet...  I was hoping for a simple solution ...   

Yes, the tach & speedo are easy to get into compared to the smaller ones for sure...  The smaller ones aren't too bad...  Just have to be patient with them...

MH

MIke,

Pic of Ball Joint from the factory circa 1996.... cast body vs stamped temporary steel....!     My ball joints self destructed into multiple fragments....sorta like your a-arm bolt/nut affair!!! (That thing musta done all sorts of bad things on the roadways!)   Hopefully the shaft will clean up fine!

I need to defer to others and their posts.....whether this be the "big" one or the "small" one (upper(less load) or lower (more load) depending on A-arm/spring design!)......but what you shouldn't need to do.....is grind anything to get things to fit!

My crusty brain thinks that the Fiat Mechanic nearby told me..."they were a 124 Joint.....".

The tie rod ends should be standard X 1/9 items, untouched by DeT!

Progress!!!

Steve

Attachments

Images (1)
  • Front Rebuild_00002

@mangusta luckily the long bolt was still doing it's job...  The nut had come off and the bolt was sliding forward...  Not sure if all the access panels kept it in place, or just luck...   Either way, i'm glad it was still there...

Apparently the X1/9 had several tie rod changes over the years, but I did find a thread on here with the part # (might have been one of your threads!!!)...

Most of the previously listed sources for the ball joints no longer carry them, midwest-bayless.com THINKS they have the 40mm...  They are going to check it and let me know...

MH

For some historical part numbers again.....!

C. OBERT & CO. (FIATPLUS.COM)
#0005880297N Lower ball joint kit.  He had about 40 in stock..... "  (This was about 10 years ago!)
<form action="cart.php" id="orderform" method="post" name="orderform">
Part Number: 0005880297N    40MM DIAM!
Weight: 2.00 lbs
Model: FIAT DINO/MANGUSTA/1500 SEDAN
desc3: /124 SPIDER/124 SPIDER 2000
desc2: /124 SEDAN/124 WAGON/124 COUPE
</form>
Outer tie rod ends are for a Fiat Dino and are #0004100024N.
And also used in some form on the X1/9's.
Last edited by mangusta

It seems tie rods for Fiat 125 and 1300 work (and well, those are also common for the stub axle itself...). The tie rod is male thread.

And it seems that also ball joints may be shared there also...Mr. Fiat, etc--  https://www.ebay.com/itm/313984785167 or

https://www.ebay.com/itm/13439...tkp%3ABk9SR9LOva_OYQ

or

https://www.ebay.com/itm/13413...7Ctkp%3ABFBM0s69r85h

All in all, more likely a fit is from Fiat 1300/1500 than the later Fiat 124 (esp because well, the parts manual points there !

Last edited by leea

Fiat Plus had the tie rod ends (I ordered them) but only one 40mm ball joint...  He was putting the hard sell on me to modify my A arms to fit the 43mm ball joints...  I'm not sold on modifying the original A arms though...  Seems like a risky move considering the load they carry...

I've located Fiat part# 5882118 in the UK, Ireland & Italy, but NONE of them ship to the US...   and their websites ALL seemed oddly similar...

So...  Tie Rod ends located...  Still searching on ball joints...  Mr.Fiat was a no go...  Still have a few calls out, so still hopeful...

MH

Last edited by mkeh

Add Reply

Post
×
×
×
×
Link copied to your clipboard.
×