

Steve, At first when I looked at your pic, I was sure there was something wrong. Look at the alignment on mine. The torsion bar bracket aligns with the removable crossmember bracket.
Denis

Denis,
My view is from "upper left" looking back towards the bracket when looking at your photo. If I took the same birds eye view of the bracket as yours, it would appear OK. Phew!!
I still have parts missing...which could throw a brain off a bit....
Steve
My view is from "upper left" looking back towards the bracket when looking at your photo. If I took the same birds eye view of the bracket as yours, it would appear OK. Phew!!
I still have parts missing...which could throw a brain off a bit....
Steve
How the heck did the old time restorers do this without the internet and the chat rooms. We are 3000 miles apart. There must be a lot of screwed-up 'perfect' 130 points cars out there!
Denis
Denis
Steve, FWIW your Goose upper cast aluminum mounts and the rubber bushings with bonded steel washers you show, look identical to a Pantera upper mount. Pantera 351-Cs run at least as hot as a 289/302 in a Mangusta, so don't worry too much about the heat-reliablity of the rubber insulators. Just don't use polyurethane, which will melt!
What I would worry about is frying the lube out of that front heim joint next to your heat shield. Also FWIW, the Pantera uses a 3-layer sandwich of aluminum, asbestos (or maybe fiberglas, now) and aluminum on our gas tank heat shields, and this stuff is available from the vendors. It bends like dead-soft alum sheet so its easy to shape.
What I would worry about is frying the lube out of that front heim joint next to your heat shield. Also FWIW, the Pantera uses a 3-layer sandwich of aluminum, asbestos (or maybe fiberglas, now) and aluminum on our gas tank heat shields, and this stuff is available from the vendors. It bends like dead-soft alum sheet so its easy to shape.
Steve, have you tried the Edelbrok intake, does it need machining to fit the jackshaft.
Denis
Denis
Denis,
I have tried them all! Sort of....see my first posts above....
One common thing to ALL of these manifolds and a Holley Carb....getting an automatic choke to fit is the pits!!!! I have not yet solved this issue yet....
Here is my rundown:
Old style F4B: These are a copy of the "Ford-Shelby" intake sold over the counter, sometimes known as "C9OX" intakes. The center two runners are "HIGH" near the jackshaft and require a LOT of clearancing on an expensive bracket to make it work....
New Performer: Seems to fit with minimal modifications necessary. You may run into a "radius" issue at the front most intake bolt boss where the jack shaft bracket fits against it. Slight amount of file work will clean this up nicely.
New Performer RPM: Same notes as regular Performer.
Both of these intakes have the runner design reversed, so there is little to no interference with the jackshaft bracket.
There MAY be some fit issues with your front RH idler pulley bracket in the way that it fits with the front two support holes on the jackshaft bracket.....
I am using NOS parts to fit my new stuff together and as shown in one of my pic's above, the holes don't line up, even with a stock intake!!! Jury is still out on this one..... I may end up having some holes filled, and redrill them where they need to be...
Also, at the rear of the new intakes, there is no boss to attach the stabilizer leg of the jackshaft bracket.... I am going to have a boss welded on mine, once I figure out which one I am going to use!
Either or all three of these would appear to fit under the bonnets just fine with the stock air cleaner. I have pictures from other guys that have either the F4B or the Performers installed.
The Edelbrock Victor Jr series manifold is one that I wouldn't recommend installing if you want to retain the jackshaft. The one installation I saw of this version is missing about 6-8" of the center of the jackshaft bracket all together.
All in all, the stock intake, with the 1" spacer is a very hard intake to beat. The ports are large and everything fits.... it is merely the weight that is a factor!!! If only someone simply cast up a stock intake in aluminum, life would be a whole lot easier when it comes to an intake swap on a Goose!!!!
.....my frame work continues, just haven't had a chance to post pic's!!! Need to work on my ladder bar, hopefully next weekend, to get some machining done, and then it will be some finish welding, and some tidy up of the weld areas, and on to paint...or sanding, sanding, primer.... then pain.... I mean paint!!!
Ciao,, hope this helps!
Steve
OK, it was a balmy football night, plus raining outside....or at least rainy. Time to do some updates! I haven't been much on the computer as I've been busy with a bunch of stuff, as life does to ya.
Here's where I am in the frame repair:
I am working on placing the 3rd and 4th "reinforcements on the tops of the brackets. Presently am working in the ladder bar to bring all 4 holes up to 10mm size, per normal fasteners. I was cheating and using 3/8" bolts from a Cougar.... ![]()
You can see in the above shot, my relocated sway bar bolt hole (closest to shock tower mount on right). Since this one went so well, I decided to do the same to the one stripped out (oversized) hole on the right hand frame rail! It too came out very nicely, but no picture. So now I can run stock 5/16" bolts all the way around. A 220V home welder is a handy thing to have!!!
Need a little time on a mill, some welding, grinding, then more welding.... stay tuned.
Just got this in the other day too! My new idler pulley standoff!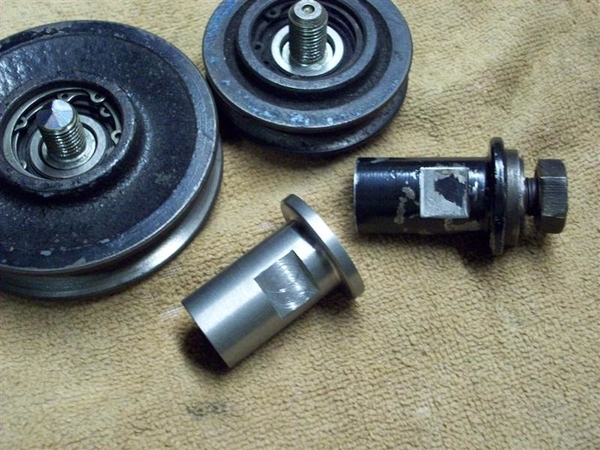
Yet another gift came, from across the pond...Roger Brotton had this made up to duplicate the one that was on the engine that I sent him with Goose #760. I added the black shrink wrap (not shrunk yet!) as a possible upgrade from black electrical tape....! (Shown on a stock cast iron intake.) It will work on aftermarket intakes nicely.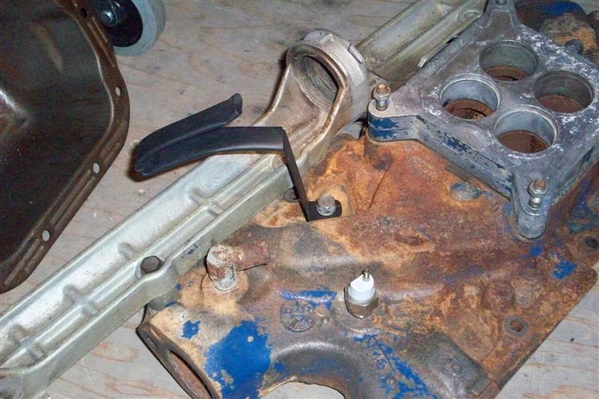
Here is a project that didn't make it far from the workbench.... It needs thinner leather, and less shiny buckles!!! ...and flat head rivets....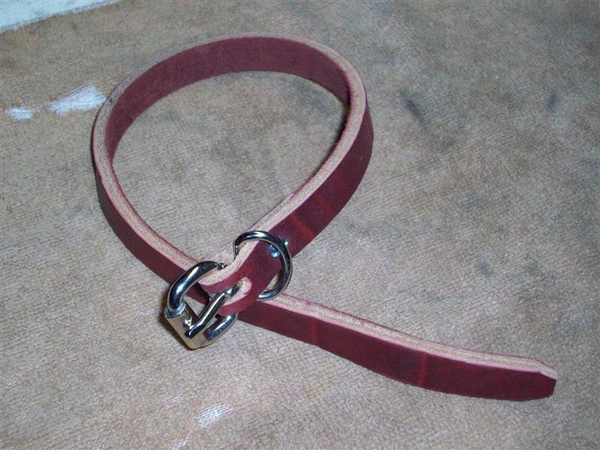
And perhaps you have been following the e-brake cable discussion in another post...or not... Here is the most reasonably priced end that I can find, that actually almost fits!!! Option that is still on the table....design table...is to make it using a simple "U" shaped piece and eliminate the little link that is on my rear brake affair..... The challenge remains to get a crimped end on the cable, and then close the opening so that the two end surfaces are touching each other in a "closed fashion" rather than open as shown. (That's why the U-thing may work better.) Top to bottom pieces... 1) Only aftermarket piece that I can find...expensive and loooonnnngggg!!! Needs to be much shorter... 2) Aftermarket "would work" but
"can't get it anymore!" 3)Side view of recent "most bestest" contender... 4) Original brazed on brass eyelet. 5) Top view of uncrimped "possible suspect".... Of course then there are probably about 3-4 different lengths to deal with, and the pesky ferules, and the different types of housing or sheathing.....sheesh!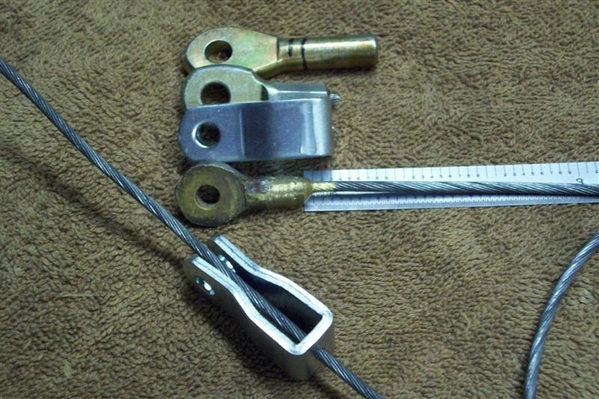
I spent this last Saturday trying to get this running.....a 1962 Comet station wagon, with a solid cammed 302 and a 9" rearend in it already! We got it running fine, but stopping was a different matter altogether! Going to retrieve it with a trailer on Thursday hopefully! This car belongs to an old friend that needs to sell it, so I will do some work to it to get it operationally fit, and then offer it up to the masses! Original owner car!!!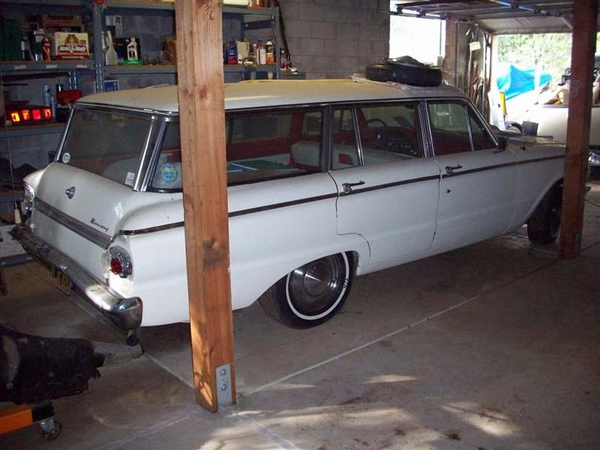
So, I have been busy!!! Even on my own car!
Steve
Attachments
Images (7)


Steve, Just thought of something for eyelets. Years ago I vivited a marine machinist who specialised in mast rigging. There be few on the West coast.
Denis
Denis
1Rocketship (Guest)
Steve; I live close to you (Millbrae). I believe "West Marine" would have your crimp-on eyelet. I believe their entire catalog is on-line, or they have a store in Palo Alto.....Mark.
OK, time for an update!
Thanks for the leads on the marine aspect! They have something that looks interesting...but have not had the time to stop at the nearest outlet to look at the parts....but they are viable, even with some machining required....
Back to my frame repairs!!! Here is a shot of the ladder bar installed, prior to the welding of the final two "improvements #2" to the mounts of the ladder bar.
I've also put the reinforcement for the trans brace in place (actually it is sitting where the actual trans mount goes...). This is meant to limit frame flexing in this area caused by the upper a-arm forces acting on the thin box tubing during aggressive turns. More on that later when I get to that portion....
Here is a closeup shot of the final area of welding that needs to be done. I missed getting by the metals shop on Friday to pick up a thicker walled piece of tubing to use as the sleeve/mount for the top of the shock tower new 3rd and 4th mounting bolts. Spare sleeve is shown standing on the ladder bar.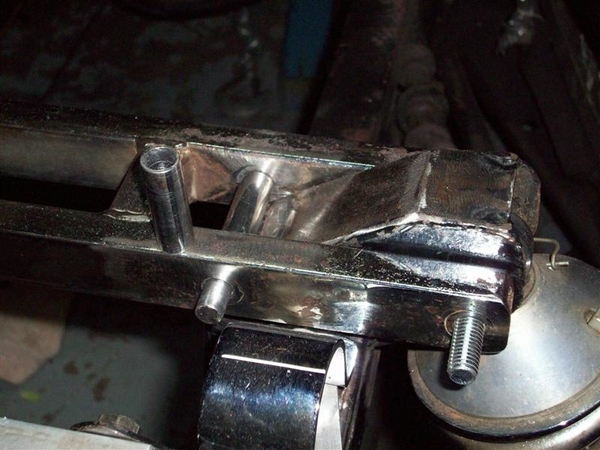
The original .500 OD tubing that I used was about .050" wall thickness once it was drilled out for a 10mm bolt. That just didn't seem like enough metal for me, in a stressed point such as this. Mild steel could tear fairly easily...only .050" thick. I upped my wall thickness to almost .120 by going up to a 5/8" OD tubing in a last minute running change....so now I'm running for new tubing and back to the neighbor's lathe to cut some new bits!
Once I have these bits in hand and fitted, I can weld them to the proper places on the top of the shock mount and I will be done with the repair portion of this adventure! Then it becomes refinishing and refining from there!!! ...and of course now we're hitting winter and barely 60 degree days....not good for painting cold steel parts!!!!! Will have to get creative and hope for an Indian summer!!!
Ciao!
Steve
Attachments
Images (2)


OK, new bits of steel (shown on right) are cut, bored to 10mm i.d. and fitted to left and right shock supports. (That is what the flat spot is...to allow it to fit down closer to the support. Welding takes care of strength issue here as force of motion would be upwards, away from the thin flat area.)
While I had the lathe set up, I also modified my upper shock bushing adapters to a 10mm ID. Previously they were 3/8"....because I cheated and installed US bolts that I had lying around....! Now every shock mounting hole goes back to stock 10mm sized stuff....and nylocks!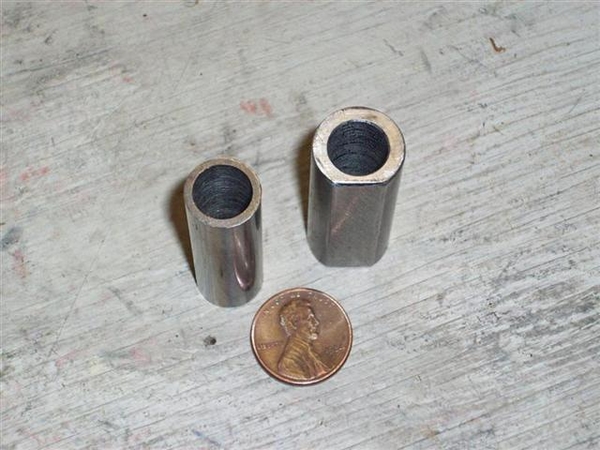
Welded up LH support...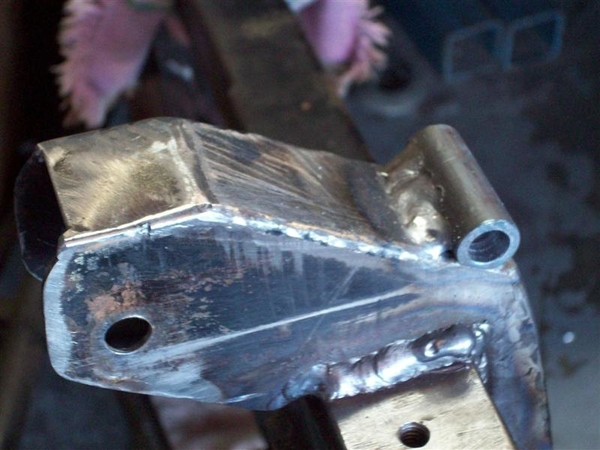
Welded up RH support...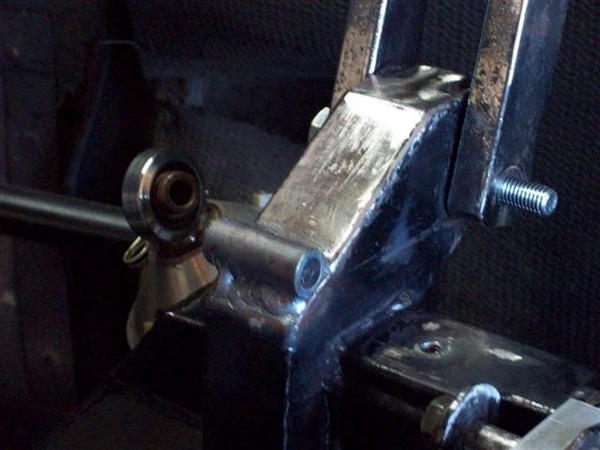
All done!!! Well, almost....
I had to use the straps to pull the frame rails in ever so little to get all the thru bolts to slip in. At this point, all 4 bolts slide in and out loosely! That will never happen again! Seriously.... I fitted the ladder bar with body weight working against the suspension (upper rear a-arm) sitting on the ground. Once the engine etc is mounted, I may actually need to spread things apart, OR, use a combo of the jack and jackstands in different locations to get bolts to "slip easily" back in place. At least two bolts at any one time should be a slip fit!!!! Minor details....
So what now??? I want to clean up some of the welding areas to get splatter and some high spots lowered a hair, where I dwelled a bit to long with the MIG tip....
I want to make up some quick "shock dummys" to use while I refinish the rest of the engine bay....so that the shocks are not in the way of sanding dust and other such sorts of crap....while I am stripping off old frame/chassis/firewall paint in preparation for new paint and heat insulation/padding! I think I have some 1" square tubing scrap around here somewhere.....
Ciao!
Steve
Attachments
Images (4)


Wow! It's been so long since my last update I almost forgot my password!!! OK, it's been just under 4 months since I last posted. It's been 3 months and aprox 3 weeks since I've worked on the car! Since my next task was stripping and painting, I've had to wait for pleasant weather in order to have the garage door open...and to muster up the will power to get back out there! So tough to do when it's 50ish degrees out....We hit high 60's this week, low 70's....spring is here! I'm back in the garage! I kept busy doing ebay sales and some tilt-colums...they only need parts cleaner and no paint....so I could convince myself to do them....but freezin my butt off not to mention my fingers, and trying to will paint stripper to work....nope. Not going there!!!
OK, that is a lie. I must have found some time to work on it, because I made up the dummy shock struts! Used some aluminum angle stock I got from Home Depot. Figured I could re-use it to make a fan shroud support at some time in the future... when I get ready to build a fan shroud for a new set of electric fans....but that's a different post...
So, shocks are out, struts are in, removed all the cross member bits so I could get at things with paint stripper, sanding tools, and whatever else comes up!
Here is what I started with on Tuesday this week: (5 pics of stuff so I can figure out where to put it all back to...)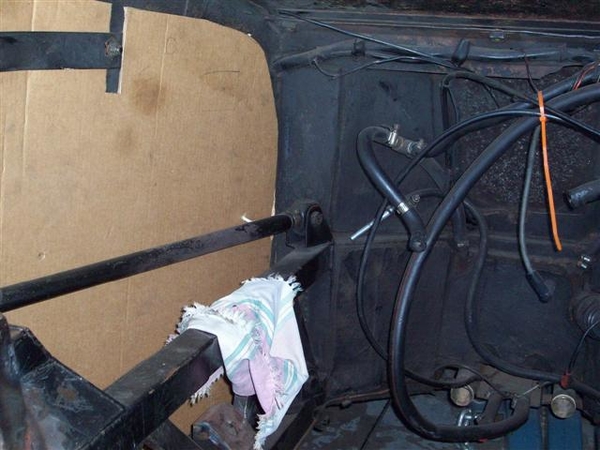
I have not yet pulled off the sound/heat insulation from any of the forward areas of the bulkhead, nor the RH side. Only from the left side where you can see the cardboard template I'll use when I work up the new insulation material...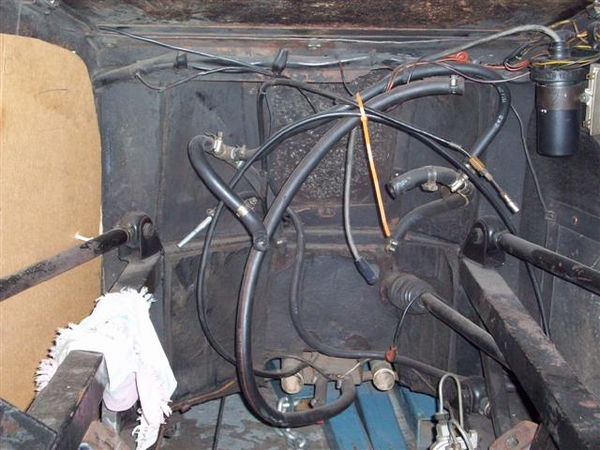
I'll be leaving the ballast resistor out. No need for it with the DuraSpark II module and coil. Good shot of the Bosch voltage regulator.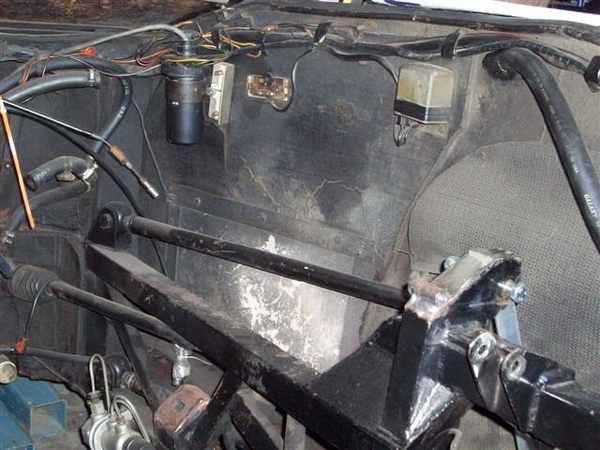
Here's where I mounted the DuraSpark module. Gotta watch out for the jack mount on the other side here!!! The rubber/canvas wheel well shield is not stock. PO had these build and installed way back during it's rebuild where it got the Boss 302 engine. Not sure how well they work......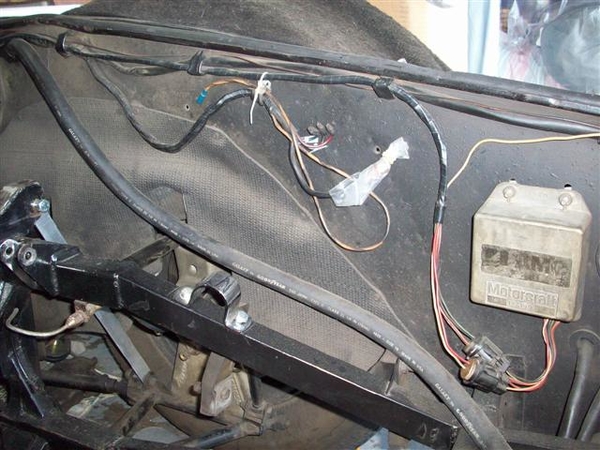
Good shot of the original style starter solenoid. This type with the "bump" button on the top are still available! The solenoid to the right, is there to supply a full +12V to the DuraSpark module during cranking. Once it stops cranking it works off of +12V from the run circuit of the ignition. This relay was from a mid 70's Ford Galaxie or big Merc, "horn relay" is the official name, so should be able to handle the current....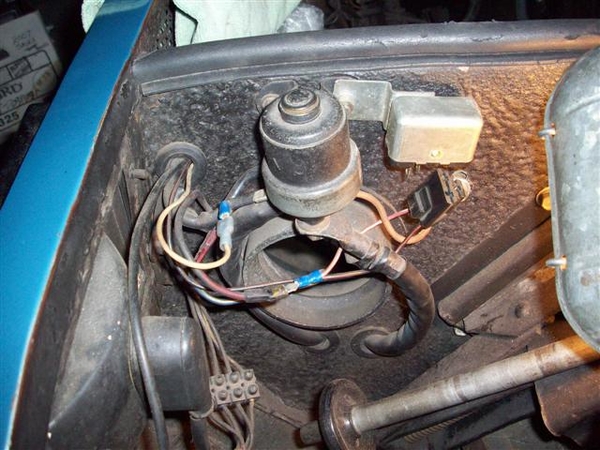
The wire holder and the bracket for the LUCAS washer bottle are held in place with aluminum pop rivets, so I hit them with the drill and popped these parts off for refinishing, and to make it easier to clean the panel and get at stuff in general!
A few minutes with a long scraper/putty knife and this is what it looked like! I also pulled out the wiring on the RH side, marked the wires with tape labels, and secured it neatly with 4" pieces of two sided 1" velcro strips. Now I can move it around nicely to work around it. The four 4-link bars are removed and the chassis is actually sitting on jack stands. I will be dropping the upper and lower a-arms so that I can degrease the mounting areas, clean, and repaint. Going with a silver to brighten things up in the engine compartment! A 1" thick piece of closed cell foam on the crossmember works wonders to sit on when cleaning!!!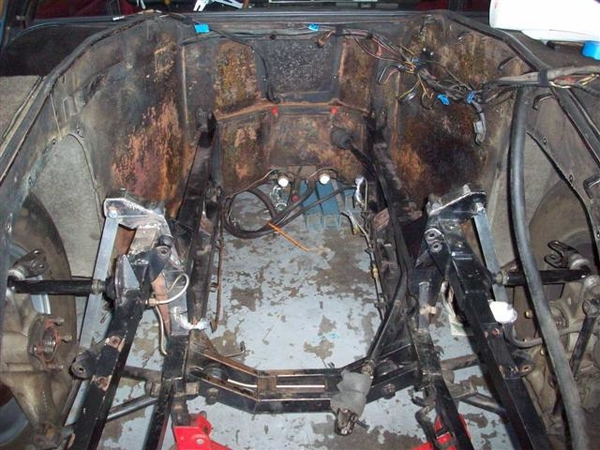
I dug out an old can of aircraft paint stripper and went to town on the LH panel area. This is where I closed it down on Tuesday night. Oops! Didn't take a picture of where I stopped on Tues! I only got the forward LH side, up to where it turns to the right. I got to this point after another night with a small paint brush, can of stripper, a couple of putty knives, a plastic pickup tub, and a roll of towels and a box of plastic gloves! Oh boy!!!
Here is where I stopped late last nite: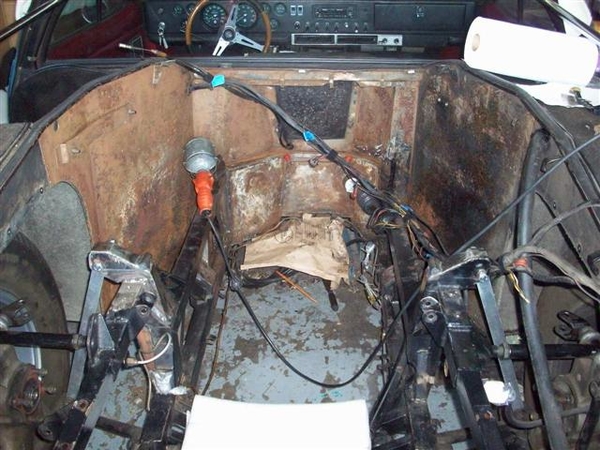
By now I'm figuring I have 10 weeks before Reno. Actually 11, but I have a trade show and a weekend away scheduled with the wife, and I'll need a break from this thing any way, end of April.... Progress will be good as long as I can get the painting and refinishing of the engine compartment done. Stuff like upper and lower a-arms go on the "optional list, as they can be done just about any time easily. The 4 link rods will be done now....they are not so easy once the engine is back in....unless you have a car lift....go ahead, make me jealous!
My plan is to take Fridays of from now until June. I have the time, and the boss is happier if I take it that way actually....his pucker factor goes way up when I'm gone for too long...... ![]()
![]()
![]()
Another night spent with stripper and tools...and here is where I left off a few minutes ago. Oh, I also found that a small brass and or stainless "parts brush" really cam in handy in all of the spot welded areas, cracks, seams, and even the flat panels...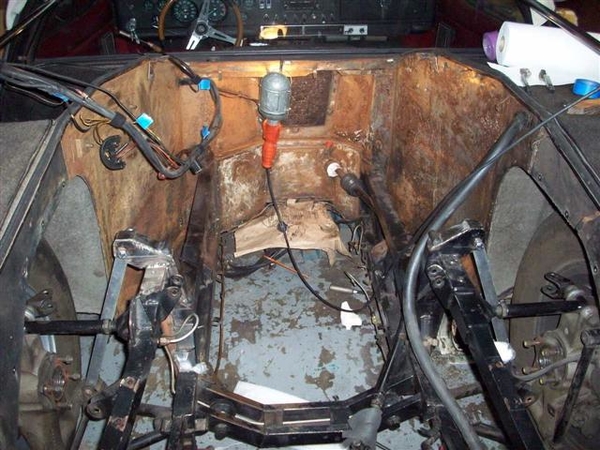
What I found under the black paint on the panels was some sort of white-ish filler primer sort of stuff. Sometimes it comes off easily, others, not so good. There is also adhesive glue from the insulation still on the walls....and surface rust....then there are the spots where it seems "super bonded" or burnt on! Could be the stripper not working properly...it's old.....
OK, I am out of stripper! Used up my stock of brass brushes, half of the stainless one I started with, and have one new one in reserve. Time to hit Home Depot...in the morning.
You can see that I stopped over the wheel well opening, where the rear panels meet the front panels. The rear sections are pretty flat, so I hope will go rather quickly. I hope.... Will need to be careful with the stripper around the rear valance area, so may take out the AC condensor to gain more access....it isn't charged...so....we'll see!
I was very pleased to see nice clean steel under most of the metal. It looks orange now, like rust, but it is surface rust that has formed from the stripper absorbing moisture in the air....or something like that. I will clean this off some more with sandpaper and then protect with something like Galvaprep and follow with Prepsol as a cleaner just before caulking the seams/corners, and paint.
Some of the paint on the chassis frame is very resistant to the stripper, and other sections, once hit with stripper, slides right off.... We'll see what happens with a new can....
I also may have baked this paint on via the header heat....but I repainted most of the chassis back when I was putting it back together last time. I'm pretty sure it was just rattle can Rustoleum, semi gloss black, maybe high temp..... It held up well, except the areas closest to the headers and where I ruptured a brake line and hosed it down with Dot4 fluid....
So, the bad news is that I will be spending at least 2 days more on cleaning down the chassis to get it ready to paint. The good news is that I'll only be spending about 2 more days cleaning and prepping for paint!!!! I did buy a new DA sander for this job...may have to bust it out and see what it does! I have some minor metal displacement from spotwelds that I would like to "dull" down. Small points of sharp steel formed and I hate cutting myself on them when I'm working on stuff..... I'm not going to go crazy and fill spot weld divots, only remove the sharp tips and points of displaced metal.
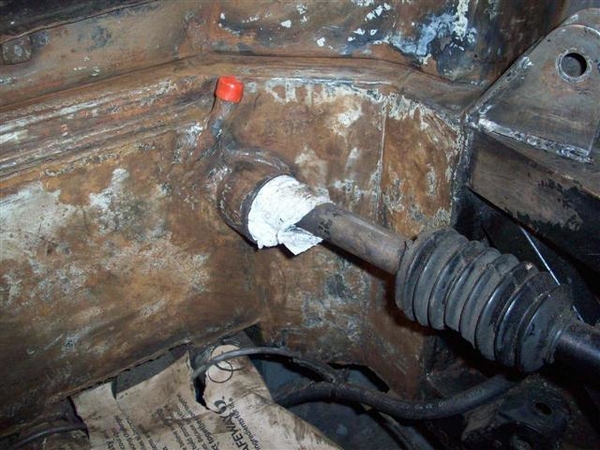
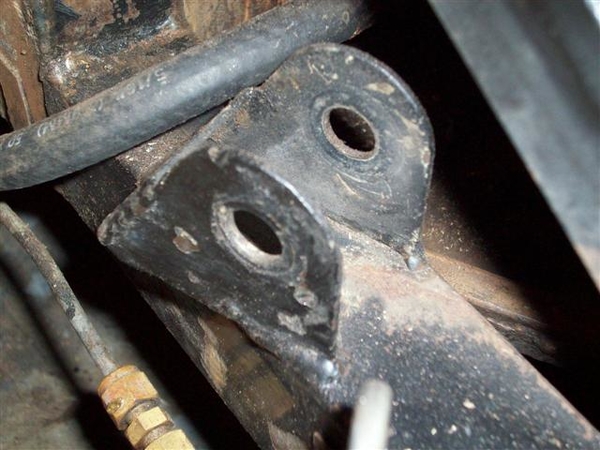
Here are some shots of my bulkhead juntions, where sheet metal body meets bulkhead, and where rear frame section meets bulkhead.
From Left to Right: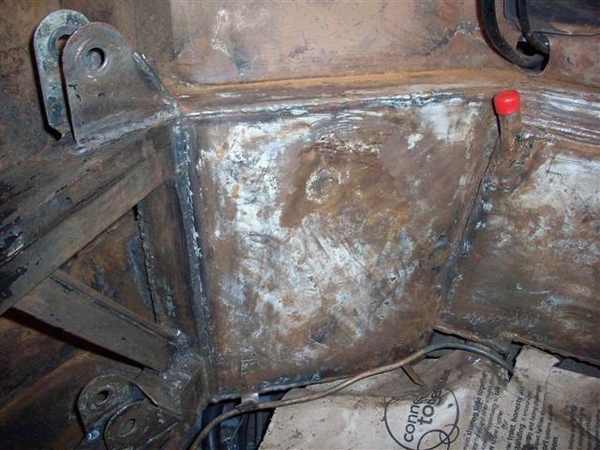
Here is the center section. Some guys have a big opening here with two large round tubes visible....not here!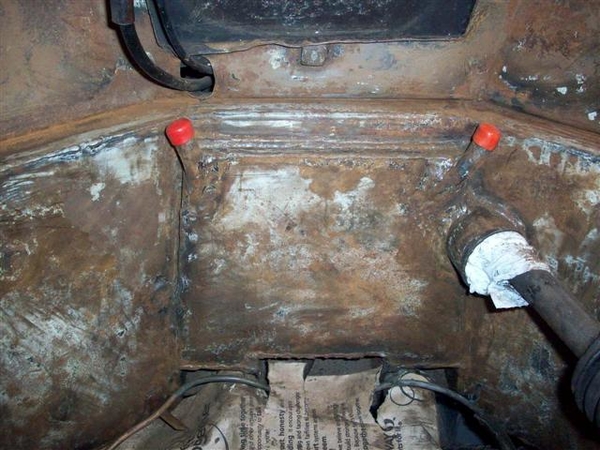
Here are the 4-link attachment points. I have heard guys tell of these cracking too, so if you are in here, check it out, again L to R top, then L to R bottom.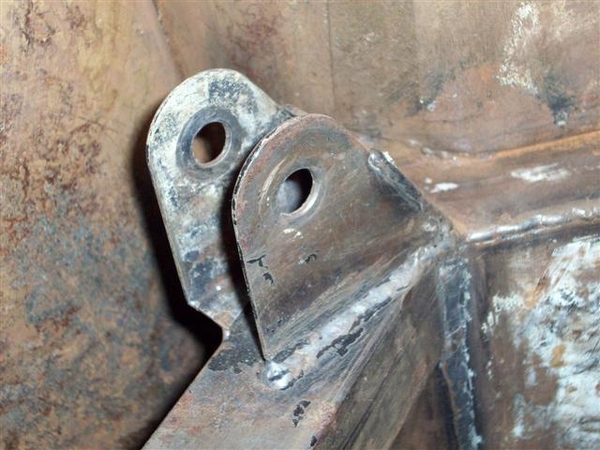
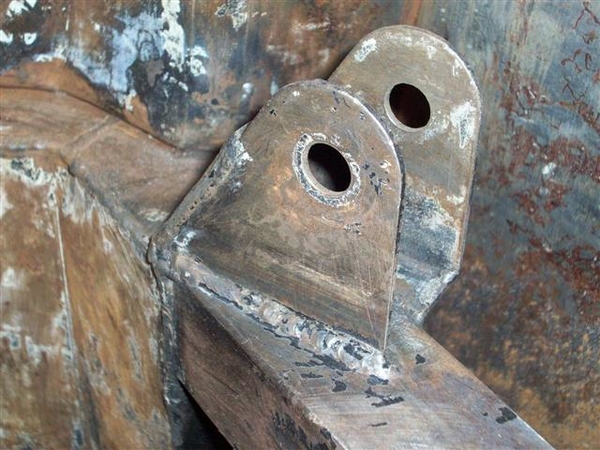
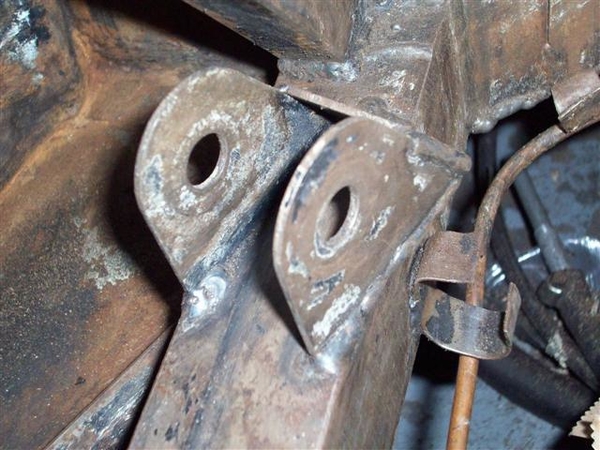
I didn't get into this area with the stripper all that well. Something to do tomorrow.... ![]()
I'm glad to be back on this!
Steve
Attachments
Images (16)


Good job Steve, Same as you we are just getting into the warmer weather, spring is in the air!!
Super nice job. I have to get to my rear wheel bearings, blew one on the last outing in the fall
2 questions:
What are those red nibs on the front bulkhead?
Are you going to replace the brake lines? 1244, 1118 and 1042 all have copper line . Yeeachh.
Denis
Super nice job. I have to get to my rear wheel bearings, blew one on the last outing in the fall
2 questions:
What are those red nibs on the front bulkhead?
Are you going to replace the brake lines? 1244, 1118 and 1042 all have copper line . Yeeachh.
Denis
Denis,
The red things are simply rubber caps that I put over the heater lines to keep stuff out!
I have steel brake lines already, but a copper clutch line. It seems in pretty good shape, so not going to mess with it unless I have to! (Read that as in- screw it up while I'm working on everything else!)
Steve
quote:Another night spent with stripper and tools
Sounds like a really good time!
Can't wait to see the finished product!
My best nights were spent with strippers 
Well, she's as stripped as she's gonna be. I am so sick of paint stripper right now.....my body hates paint stripper.....
We'll see how the body does to sanding..... I think I have some power tools to help out with that....
I did use a grinder to remove the "crater slag" on the spot welds holding the wheel well to the engine compartment side panels. A few had some nice "cut ya later" protrusions and I don't like giving up blood all that easily....so brought them back down to level.....
Hope to have paint going back on by Thurs or Friday. Days off! woooo hooooo Picked up some more PrepSol (miuratic acid?) for removing the light later of surface rust that has accumulated, then Galvaprep to coat the metal to a non-steel surface, then some etching primer and some silver rattle can Rust-o-leum type paint! Last stuff I used held up VERY well in the areas where it was allowed to bake onto the frame.....where it was really close the headers it burned away....but where there was a few inches of air space, the stuff is tough as nails. Stripper only softens it but doesn't bust the bond! I'll be sanding that stuff...... New headers should not be so close to the frame with the new non-Boss engine config.
Steve
OK, here's an update.
Forgot to mention that I removed the upper/lower a-arm bolts and dropped the rear axle hub assys. Need to de-slime them after 9 years of road action!! Lots of brake dust and grease oozings around the pivot points. (I'ts a pretty empty chassis now!!! No suspension, no wiring, no hoses.....! Scary!!!)
I should also point out that some of my NEW rubber Unibal (spherical ball joint) booties, so carefully replaced back in 2001 and a couple of years later, are already hardening up and will need replacing again! I have a stash of spares set aside.....if not, they can be replaced fairly easily while on the car. Amazing what grease will do to rubber!
Cleaned up the mounting points with solvent to get the greasy stuff off before sanding and grinding.
OK, last nite I dug out a new toy. A 6" orbital sander. While it tore thru some material with 120 grit on it, I used 220 for a lot of the areas to keep from scratching the steel up. I hate that when it bleeds thru the paint and you can see all the scratch marks..... Took a little longer and a bunch of sanding pads, but I got about as much done with power tools. The sander can only be used on about 50-60% of the large flat panels, and 50% of the frame pieces, namely the top, bottom, and inside surfaces.....
Oh, and wear a dust mask unless you like breathing iron oxide....(rust!)
So tonite, I go primitive. Just some 220-320 wet/dry paper and fingers. UGH!!! Need to get around all the wire retainers, the occasional pop rivet, brackets, and wiring, and power tools just won't cut it.
I hope that I can complete the sanding portion of this adventure tonight. Gonna be tough... I already don't like the orbital sander....but I'm sure on regular panels and roofs, it would work fantastic!
By tomorrow this time, I will hate sandpaper in general.....))
What else.....?
*Clean the rear crossmember- degrease with solvent.
*Weld on the ebrake cable support. It broke off after crouching on it..... it may break again too.....not much room in there!!! A 4 point hoist would be a dream about now.....
*Wipe the entire mess down with PrepSol, rinse, and apply GalvaPrep.
*Dry thoroughly!
*Prime within 24 hours of chemical baths.
*Paint within 24 hours of priming.
I have Thursday off(vacation) and Friday is a company holiday (Blue Moon Anniversary- 11 years since we shipped the first TiVo unit...been changing the way that millions of people watch TV and a couple of Cable companies manage their DVR's...ever since! )
As I mentioned, I will be taking Fridays off to work on the car from now until June. If there are any PCNC members with nothing to do.....I'll be hanging in the garage futzing with something! Can't guaranty you a beer, but I can provide a refrigerator to cool what you like!!!
Drop me an email for an address!!!
Ciao!
Steve
Forgot to mention that I removed the upper/lower a-arm bolts and dropped the rear axle hub assys. Need to de-slime them after 9 years of road action!! Lots of brake dust and grease oozings around the pivot points. (I'ts a pretty empty chassis now!!! No suspension, no wiring, no hoses.....! Scary!!!)
I should also point out that some of my NEW rubber Unibal (spherical ball joint) booties, so carefully replaced back in 2001 and a couple of years later, are already hardening up and will need replacing again! I have a stash of spares set aside.....if not, they can be replaced fairly easily while on the car. Amazing what grease will do to rubber!
Cleaned up the mounting points with solvent to get the greasy stuff off before sanding and grinding.
OK, last nite I dug out a new toy. A 6" orbital sander. While it tore thru some material with 120 grit on it, I used 220 for a lot of the areas to keep from scratching the steel up. I hate that when it bleeds thru the paint and you can see all the scratch marks..... Took a little longer and a bunch of sanding pads, but I got about as much done with power tools. The sander can only be used on about 50-60% of the large flat panels, and 50% of the frame pieces, namely the top, bottom, and inside surfaces.....
Oh, and wear a dust mask unless you like breathing iron oxide....(rust!)
So tonite, I go primitive. Just some 220-320 wet/dry paper and fingers. UGH!!! Need to get around all the wire retainers, the occasional pop rivet, brackets, and wiring, and power tools just won't cut it.
I hope that I can complete the sanding portion of this adventure tonight. Gonna be tough... I already don't like the orbital sander....but I'm sure on regular panels and roofs, it would work fantastic!
By tomorrow this time, I will hate sandpaper in general.....
What else.....?
*Clean the rear crossmember- degrease with solvent.
*Weld on the ebrake cable support. It broke off after crouching on it..... it may break again too.....not much room in there!!! A 4 point hoist would be a dream about now.....
*Wipe the entire mess down with PrepSol, rinse, and apply GalvaPrep.
*Dry thoroughly!
*Prime within 24 hours of chemical baths.
*Paint within 24 hours of priming.
I have Thursday off(vacation) and Friday is a company holiday (Blue Moon Anniversary- 11 years since we shipped the first TiVo unit...been changing the way that millions of people watch TV and a couple of Cable companies manage their DVR's...ever since!
As I mentioned, I will be taking Fridays off to work on the car from now until June. If there are any PCNC members with nothing to do.....I'll be hanging in the garage futzing with something! Can't guaranty you a beer, but I can provide a refrigerator to cool what you like!!!
Drop me an email for an address!!!
Ciao!
Steve
quote:some of my NEW rubber Unibal (spherical ball joint) booties, so carefully replaced back in 2001 and a couple of years later, are already hardening up and will need replacing again!
Steve, not owning a Goose anymore, I haven't tried this but how 'bout spray-Armorall on the booties? Maybe keep the rubber from hardening up so fat?
I don't know about Armour-All....I don't keep it in my stable of chemicals simply for it's reputation of drying out dashpads and causing premature cracking.......
I think the booties have some sort of a reaction with grease and or heat....
I hate sanding....I can barely type....ouch....at least 6 hrs last nite, 6 hrs to go at least....nooks and crannies, nooks and crannies....welding slag....ouch....
S
I think the booties have some sort of a reaction with grease and or heat....
I hate sanding....I can barely type....ouch....at least 6 hrs last nite, 6 hrs to go at least....nooks and crannies, nooks and crannies....welding slag....ouch....
S
Add Reply
Sign In To Reply