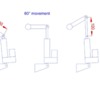
Hi Richard, not at all. When Kristian design/construct the Geometry of the Linkage he just needs to make the moving Arm the exact lenght that matches: fully retracted=Doors closed and fully extended=Doors open or visa versa. Of course it requires a bit of measuring and perhaps trial/error. But definately possible without trouble and then you avoid the hassle of external Switches. I looked at the wiring diagram briefly and should be possible to use the OE Light Switch and no modification to the Harness apart from shorting the set of wires on both OE limit Switches. But that has to be verified.
I’m amazed at the quality of your work.
And there’s so much to be learned from your build as to the intricate structure of the Pantera chassis.
Well done.
Regards,
Tony.
And there’s so much to be learned from your build as to the intricate structure of the Pantera chassis.
Well done.
Regards,
Tony.
Goodroc wrote,
"Geometry of the Linkage he just needs to make the moving Arm the exact lenght that matches: fully retracted=Doors closed and fully extended=Doors open or visa versa."
Yes, that's true but as I see the problem there are two variables: the length of the "arm" that is attached to the headlight bar and the mounting point/geometry of the linear motor with respect to that arm. Changing either of them can effect either or both of the up and down position. The exact up position end point is not too critical, you just adjust the headlight alignment accordingly. But, if the down position is wrong, i.e. the bucket is closed all of the way before the limit switch is tripped the motor could burn out. Of course the stock system has this problem too but the limit switch stops make it easy to adjust. So, either a geometric solution using fixed limit switches or adding an external limit switch(s) would work. I'm just wondering which would be easier for a given situation.
Actually, I'm surprised that Gary "comp2" has not commented as he was working on this problem in 2009 but never posted his results.
http://pantera.infopop.cc/eve/...77274/m/93610454/p/1
He posted some interesting links. With the right kind of linear actuator (with a Potentiometer) and a "Linear actuator controller" the actuator can be commanded to go to programmed positions:
http://www.slickcar.com/info_linear_actuator.asp
http://www.slickcar.com/detail...ved-door-handles.asp
some more info on the controller:
http://www.speedwaymotors.com/...t-Actuator,7477.html
I've not looked into making any of this work with the stock headlight circuitry and switch. My guess is that using external limit switches would be necessary.
If you don't care about that and are OK with putting in a separate switch to raise and lower the lights then a power window switch approach would work just fine: just hold the switch on until you get to the position you want (i.e. things stop moving when they hit a mechanical stop) and let go. Just make sure your actuator isn't strong enough to bend things!
Kristian is a very smart guy and he will be able to figure out the geometry very quickly. If someone can tell me how many Degrees of rotation the Headlight Bar is doing from closed to open I will happily provide an exact Drawing. There are several options for stroke length and that affects the length of the Arm and the time it takes for the Doors to open/close. If a 50mm stroke is used it is twice as fast to open/close as if a 100mm stroke is used. Two things are important 1) It works best if the Arm and the Actuator form an angle of 90° when the doors are half way open/closed. 2) You must construct it so that there is a possibility to adjust the position of the Actuator a few millimeters up and down in the fully closed position to compensate for wear and tear over time.
Attachments
You guys been sleeping? I used to make kits. I don't have time to mess with it any more. I sent my stuff to Scott so he could duplicate it. Might ask if he had time to mess with it:
http://www.rc-tech.net/pantera1/rhl/rhl.htm
Here are some adjustable brackets so you can see how to make them:

These are brackets to fit the bearing in the headlight bucket bracket which also strengthens it:


Here is a pannel for the short lift headlight "frog eyes"

Here is a video:
http://www.rc-tech.net/cars2/p.../hlight/MVI_0260.MOV
http://www.rc-tech.net/pantera1/rhl/rhl.htm
Here are some adjustable brackets so you can see how to make them:

These are brackets to fit the bearing in the headlight bucket bracket which also strengthens it:


Here is a pannel for the short lift headlight "frog eyes"

Here is a video:
http://www.rc-tech.net/cars2/p.../hlight/MVI_0260.MOV
Headlights work great! I like the big headlamps too
Funny seeing them move not 100% in sync.
quote:Originally posted by Push1267:
... car is going to see use mostly as a racecar I think I'll look for a more simple solution - and light weight. After all, it's very rare that the headlights are used....
wild thought...how about a gas spring that would open the headlights and a latch on the gear to hold them closed when pushed closed by hand. use an open limit switch to prevent the lights from burning when not open
(addition)
to operate the latch, I was thinking a door lock solenoid with a headlight close permissive limit switch that would be off the headlight on power
Nice solution Gary. As always, brilliant enginering and workmanship.
1 actuator operating the aluminum bar seems like the simple and light weight solution I'm looking for. I ordered one of the actuators Jan recommended, and will experiment with linkage when it gets here.
1 actuator operating the aluminum bar seems like the simple and light weight solution I'm looking for. I ordered one of the actuators Jan recommended, and will experiment with linkage when it gets here.
quote:Originally posted by JFB #05177:quote:Originally posted by Push1267:
... car is going to see use mostly as a racecar I think I'll look for a more simple solution - and light weight. After all, it's very rare that the headlights are used....
wild thought...how about a gas spring that would open the headlights and a latch on the gear to hold them closed when pushed closed by hand. use an open limit switch to prevent the lights from burning when not open
Incredible idea Joe!
You could easily have a pull cable to release the catch and then simply push the doors down by hand to latch them back. It would be very light and simple to implement.
Ron
I'm with Ron...  Great idea Joe!
I agree. That would be very simple and lightweight.
A concern is what happens when the damper is released. Unless the damper has very low pressure, the buckets will snap open very violently.
I Wonder if there are short, slow releasing, low pressure dampers available from somewhere?
A concern is what happens when the damper is released. Unless the damper has very low pressure, the buckets will snap open very violently.
I Wonder if there are short, slow releasing, low pressure dampers available from somewhere?
Hi Push,
I don't think you would be able to go to the local auto parts store for this application, due to the very points you mentioned. I would take a look at McMaster Carr. They have a large variety of lift struts with as low as 5 lbs force. I think so long as you match the strength to the need, this could be a sexy solution. An added thought.... to ensure stable function, w/o the doors bouncing, you may want to consider multiple low force struts. Just a thought...
Check out some of the options I found here..
McMaster Strut Link
I thought gas struts alos used hydrualic damping to control the opening rate 
If worried that gas spring would not hold positively open, a latch at open could be added. but now it is begining to get complicated
If worried that gas spring would not hold positively open, a latch at open could be added. but now it is begining to get complicated
Kristian, this is where I bought my Gas Struts for the rear Deck Lid. You can ask them for any combination of power, Stroke and Speed. They also have them in special light weight types. And they are located right here in DK.

Their Catalogue:
http://www.sindby.dk/fileadmin...85-2-k201309-web.pdf

Their Catalogue:
http://www.sindby.dk/fileadmin...85-2-k201309-web.pdf
Ok, the waiting has started. The body is ready for paint, but the paint shop is not. There's been a lot of small additions between the last post and this one, but this is what the body looks like waiting for transport.
I've decided to have the car painted with the steel deck and front Hood, I may have to use them at certain events. The fiberglass deck and aluminum Hood need some finishing before they are ready.
I've decided to have the car painted with the steel deck and front Hood, I may have to use them at certain events. The fiberglass deck and aluminum Hood need some finishing before they are ready.
Attachments
I also enlarged the opening in the deck to make room for webers. The deck came of a car that was used for racing so it had allready been modified. So decided to modify the deck to replice that the factory did to the gr4 cars when they introduced webers.
Here the deck before cutting with mark-up
Here the deck before cutting with mark-up
Attachments
Very nice!!!!
Ron
Ron
As always Push.... as always... all I can say is "nice work" man. I love your attention to detail and workmanship.
I'm jealous about the deck lid having already been modified.. in a sick way.. :-) I was dreaming last week about putting webers on 6001 but just couldn't get myself to cut a good deck lid. I like the way you did it. Almost can't tell. Never seen it done that way. Very cool.
She's going to be a sweet ride. Keep the posts coming. They keep me fired up
all the work is pure art!
the opening of the deck lid over the engine area looks like that should have been done origianlly to the car. can't wait to see the painted, then final results.
I bet that deck lid would look great with a modified mesh cover over stock air cleaner
the opening of the deck lid over the engine area looks like that should have been done origianlly to the car. can't wait to see the painted, then final results.
I bet that deck lid would look great with a modified mesh cover over stock air cleaner
Great idea on the decklid. I really like it. Will you modify the screen cover and make it a bit longer or are you just not going to use it? I guess it would have to be modified anyway to fit the webers.
Amazing craftsmanship! The filled-in retractor areas and modified hood look as if the factory did it! Nice work, enjoy the pictures & posts. Thank you.
Yes Rob, I probably wouldn't cut the decklid if it was uncut to begin with. I have the original uncut deck for the car in storage.
This decklid is a spare I bought that came of a race car (#1508). It actually was first used for Bonneville speed records, so it has had a cover of sorts mounted for aero reasons. There were lots of holes to fill. then it was briefly used for Gr4 racing in europe on one of the Danish Team witch Craft gr4 cars. Since it was more or less ruined, I may have gone a little overboard with the hole punching !!!
The idea of enlarging the entire opening is not mine - as mentioned, the Detomaso factory did this to the factory Gr4 cars, when they switched from running Holleys to Webers.
This car will be mostly for racing (I intend to do some historic racing under FIA rules), so there will be no engine cover
Attachments
I first saw that decklid modification in Las Vegas about 10 years ago on another Weber equipped car. When I first viewed it I wondered how they had managed to avoid cutting the decklid like everyone else did. Only after comparing it to an adjacent car with a stock decklid did I realize what they had done. To make the alteration more invisible the owner had finished the opening with edging trim the same as a stock car.
I have always felt it was the most pleasing decklid modification to accommodate the Webbers. Congratulations on discovering it and putting it into play on your car.
I did not know that it had ever been done as a factory modification.
Larry
I have always felt it was the most pleasing decklid modification to accommodate the Webbers. Congratulations on discovering it and putting it into play on your car.
I did not know that it had ever been done as a factory modification.
Larry
I kept my original decklid and put a fiberglass on mine. I cut the same opening, glued some hard plastic tubing, filled the radius with some fiberglass filler and smoothed it out. The rib really helped clean it up:


Wow, just learned something here. Another secret of the Gp4 cars revealed.
It does look good without the notch though?
Great picture.
It does look good without the notch though?
Great picture.
Very nice work Kristian ;-) How did it work out with your Headlight project? We might plan to come to the Devils Island on the 6th if the hangover is not too bad after christmas Lunch with Friends on the 5th.............

Small update. Car has been sitting waiting for a while now. The paint shop is pretty busy with winter fender-benders, so I'll have to wait a little more.
Decided to do some of the paint preb myself, so armed with lots of materials from the paintshop I spend quite some time getting the finish to my liking.
The car was basically straight to begin with so it just needed a thin coat of primer and filler. 2-3 rounds of filler and bloksanding and it's ready for the final Work at the paintshop.
One of the paint supplyers came up with some paint samples based on the original 71/72 paint codes for the red, but I wasn't sure if they are right (seemed too dark), so he's right now analyzing some remains of the original 71 red on an old headlight bucket I had lying around. It's kind of orange-red with a brownish tone.
Attachments
Lookin good Push. Was wondering when I'd see some updates... 
That rear view is sick..! Holy crap, can't wait to see it with the rubber in the wells.
That rear view is sick..! Holy crap, can't wait to see it with the rubber in the wells.
awesome...
Ok, so not to get too demanding...but how about both tires on for that full rear shot like the above pic. Pleeeeeeze...
Ok, so not to get too demanding...but how about both tires on for that full rear shot like the above pic. Pleeeeeeze...
Add Reply
Sign In To Reply


![IMG_1731[1] IMG_1731[1]](https://pantera.infopop.cc/fileSendAction/fcType/0/fcOid/1598208419896770/filePointer/1598208421543108/fodoid/1598208421543106/imageType/SQUARE_THUMBNAIL/inlineImage/true/IMG_1731%5B1%5D.jpg)


