They're referring to Project Binky. A British company called Bad Obsession Motorsport is installing a Toyota Celica GT-4 drive train into an Austin Mini. 6 years in the making. All custom fabrication. Very talented craftsmen. Worth watching.
Ok, so 898 is approaching reassembly time.
Engine Bay / Rear Suspension is getting there...
Engine is still a few weeks out, new pistons, valves, valve springs, cam, roller everything, double roller timing chain...
So now I'm looking at what I will need to do to remate the ZF to my shiny fresh engine...
So, now I'm begging for part #'s and/or advice
I'm hoping to replace pressure plate, throwout bearing, Pilot Bearing and of course clutch disc.
The pressure plate in the car was a "Zoom 020005" Long Style. I can't find that model anywhere... rebuild or replace?
Is the Throwout Bearing a standard Mustang item?
Steve L. had mentioned roller/needle bearings in the pilot bearing, does anyone know the sizes or (fingers crossed) a part #?
Clutch Disc was a "CF470" which I'm pretty sure is a discontinued Center Force model, I've read we both CAN & can NOT use a Chevy clutch... any thoughts?
Thanks in advance to all!
MH
I assume you still have the steel pilot bearing/bushing extension piece? The Mangusta and very early Panteras used a bellhousing, diff case and Goose gearbox that had different dimensions, so the pilot was extended out from the crankshaft. I built a couple of custom ones with needle bearing ejectors so the bearings could be easily backed out, but I don't remember the measurements after all this time.
Chevy clutch here. Details: I have none! Sorry.
Michael,
Some pictures in here for you:
https://pantera.infopop.cc/top...a-clutch-help-please
Pilot bearing: INA #HK1512
I used a double lipped rubber seal that I found instead of a leather version which should be original...... 15x21x5 MOS/D Double Lip Oil Seal. Sourced via Rocket Seals in Denver. YMMV!
As for more info: Try my post: OOPS I'm Doing It Again..... for my rebuild process of last engine and ZF adventure....plus cracks...... I thought I posted all of the clutch info there also.
Pressure plate is stock 1968 Ford Mustang 302 clutch. I ran a 10.5" "synthetic" material (Kevlar like..) on both sides of the disc. Disc is supposed to be some sort of Mopar piece that my clutch guy found before he passed away......bummer! Besides losing a friend of the marque, lost all of the info too! See top post for pic's of it!
Throw out bearing is stock Mustang Bower/BCA 1625 I believe. (same as Pantera.)
Note that the clutch disc and pressure plate all say 10" but you can run a 10,5" disc with this pressure plate, no problem.
Pressure plate was C7ZZ-? number......if I must I could be persuaded to dig thru my receipts for the actual number. Goose parts book lists a undeciperable partial Ford number.... might be C7TA.....
I "may" have installed a HiPo 289/Boss 302 pressure plate.... C7ZZ-7550-A... My apologies for dead brain cells!!!!!
My Master Ford Parts Catalog lists the following pressure plate for a 1968 302 with 10" clutch: C6OZ-7550-G Likely this is what came in the cars.
I know that my original flywheel had the proper C7TA(?) stamping on the backside which accepted the 10.5" components just fine, no redrilling required!
I found this from email dated 2010, but could be earlier:
My friend found me a clutch that fits the ‘goose with no modifications. Its McLeod part number 260140. I’m also using it with Hays pressure plate part number Hay-52-105 which was given to me by Roland Jaeckal. Haven’t road tested it yet but it specs out the same and the hub shaft clears the crank adapter with no machining. I’ll attach it tomorrow and hopefully get the engine installed sometime this weekSorry for the goofy format!!! Tried to fix it but failed.....short of typing it all over again.....
We REALLY NEED TO GET STICKIES for this website activated.....so that we can start a data reference area for this post and the other 401 just like it!!! Post it once......more......! Read many.......! George???
Cheers!
Steve ![]()
@bosswrench Yes, I have the extension piece, it seems fine, it's the brass bit inside it that I was thinking I should replace.
@mangusta I went through your threads earlier, lots of good info in there... one quick question, I still have the original pilot bearing adapter, but you posted a pic of your non-original adapter
is it screwed into the crankshaft? it looks like there are screw holes in the back of yours. I haven't looked that deeply into mine just yet...
I'm pretty sure I still have the original flywheel, but the pressure plate is aftermarket, just trying to decide if I should rebuild or replace it. Disc itself definitely needs replacement... it's quite worn.
I'm deep into weatherstripping and brake lines as such as well... today was a field trip to the machine shop, so I had to do more thinking that usual...
Until next time!
Thanks all
MH
Attachments
There's an extra hardened washer between the base of the adapter hole to take the force of the two removal screws without bending the bearings grease shield. This is so a bearing can be reused after being removed for inspection.Finally, the spud that presses into the crank is also threaded so the adapter can be removed from the crank. I spent quite a bit of time trying to design the thing to be service-able if you used a bearing instead of a bushing.
Jack DeRyke
@bosswrench posted:Those screw holes are so you can thread two screws in from the back to force out a steel needle pilot bearing. Otherwise, you basically have to grind it out as the bearing is too small for a puller. To remove a bushing, you just screw a tap into the bronze until it bottoms. Further turning jacks the soft bushing out, but that won;t work with a small hardened needle bearing.
There's an extra hardened washer between the base of the adapter hole to take the force of the two removal screws without bending the bearings grease shield. This is so a bearing can be reused after being removed for inspection.Finally, the spud that presses into the crank is also threaded so the adapter can be removed from the crank. I spent quite a bit of time trying to design the thing to be service-able if you used a bearing instead of a bushing.
Jack DeRyke
@bosswrench are the factory adapters similarly attached or are they just pressed into place ?
MH
Yeah, for the clutch cover, there really aren't alternatives--just the early Ford 302 version. I see that Centerforce requires a different flywheel (I can't remember, maybe ~1985 Ford changed the clutch cover (and yes, new holes in the flywheel to go with it).
The 10-spline of the ZF is not a Ford, so I matched the Chevy disc plate. I see that Centerforce lists one 10.4" disc for The -1 ZF (with 1 1/8" spine, part 387132) and a different disc for Pantera using the -2 ZF (at 1 1/16"). But I'd have to think '132 disc is fine as a replacement. Steve noticed the nose itself should be inspected to make sure there is no interference against the flywheel, but seems to be a pretty safe route. And no reason to change the flywheel...
For brake lines, good news is that the GHP71 was used on lots of cars of the time (Aston Martin, Morgan, Rolls, etc)--Lee
Michael,
The original pilot adapter is simple press in place with a thru hole for the needle bearing as far as I know. My problem is that all of my car was "re-engineered" by owner #3......who is unknown and didn't leave any instruction manual with what they built!!!!
If you look up a Dash 1 Pantera adapter, you will find all the same pieces as were used in the GOose, including perhaps the leather seal....
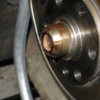
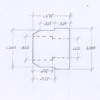
Attached are some early Pantera bits....pic and a drawing of what John found in his early P-car! (Thanks John...your efforts continue to edumacate folks!!!)
Steve
Attachments
I assume you will be going to a competent shop to have the fly wheel resurfaced. I would imagine there is a shop near you that can not only resurface a fly wheel but also rebuild your clutch disc and the pressure plate to good as new condition
In my 50,000 miles with 2511 I have done this twice and been fully satisfied
Larry
@mangusta thanks for the drawing and info
@lf-tp2511 Yes, they are one of the best shops in Houston. I will check with them tomorrow to see if they can redo the clutch and pressure plate. They are a machine shop, I'm not sure if this is a service they offer though... Worst case I'm sure they can refer me somewhere... I guess I was curious if there was an off the shelf option.
MH
...I have read through most of this and have a couple of suggestions.
1. The 'Shift-Box' (at the ZF) Should Never be DRY!! The Fact is, ALL Sliding/Moving Assemblies should be PACKED with Grease. Especially the 'Ball' Joint! The Box should practically be Near Filled with grease. All Metal to Metal contact Must have Lubrication. In the case of the 'Dry Box', after a good greasing, a Much Smoother, Easier Shifting will be Realized. Plus, the Parts will wear slower.
2. To remove a Steel Needle Bearing from it's Carrier...provided the Plan is to Never re-use the Bearing Again! First clean all grease out with a solvent. Clean solvent out and dry. With a Torch heat the Outer Race of the Bearing, And ONLY the Bearing. You are NOT trying to Expand the Carrier, You want to Heat the Bearing to Expand it! Since the Thermal Dynamics of Steel, dictate "Contraction Is Greater than Expansion", after letting the assembly Air-Cool, the Bearing can be pulled out easily. It may even Fall Out. We do this Every Day at the LFW Machine Shop. Heating the Carrier to Expand it, may Not work...as Both Bearing and Carrier, are Expanding at the same Rate.
3. One does NOT, just change-Over and re-use a Flywheel, from One Engine to Another. Flywheels Must be Re-Balanced ALONG with ALL of the 'Rotating Assembly'...Even the Bearings are Included in a Professional Balancing. Just Bolt it On a New Engine...You'll wonder Why the Rearview Mirror Vibrates!
For What it's Worth,
MJ
Marlin,
Two comments! ![]() Great to hear from you!
Great to hear from you!
1) that's a LOT of grease!!! I wonder why ZF never did or recommended this..... No grease zerks where you would expect them to do so! Case of replace parts sooner $$$ ???
2) In this case, you'd need the tiniest torch ever made to heat only the race of a 5/8" diameter needle bearing in the crank adapter! These bearings are only about $5 new, so reuse is sort of a non starter.......!
Great thing to know about the retraction thing, at least for large bearings!
Cheers!
Steve
...You would use a Oxy-Acetylene torch with the Smallest Tip. Careful to Heat and NOT Melt! One could also, machine a SMALL, 'Double-Claw' Hook, that 'Snaps' into the Bearings' Outer Race...Then 'Slide-Hammer' the Bearing Out. Some Slide-Hammer KITS, come with Such a Pilot Bearing Removal Tool.
I remember a few years back, I machined a Carrier out of Steel and put a Oilite Bearing in it. I do not remember the Customer.
The Bearing I.D. was machined to 15mm for the (-1) ZF. The Measurements of the Above Blueprint look correct*. I have been asked to, but have Not machined one since, as they are Very Expensive!
Last, NO Zerk Fitting...That's Why the Box Must be Packed with the Stuff. Perhaps you'll take this opportunity to Drill and Tap, and install the First 'Box' Zerk Fitting.
MJ
* Very nice Drawing of the 'Extension'! Most aren't That well Done. Using Building/Construction Blueprint, 'Arrow-Heads', I have not seen that before. Interesting!
@mangusta posted:Pilot bearing: INA #HK1512
I used a double lipped rubber seal that I found instead of a leather version which should be original...... 15x21x5 MOS/D Double Lip Oil Seal. Sourced via Rocket Seals in Denver. YMMV!
@mangusta HK1512 comes in as 15x21x12 instead of 12x21x5 are there variables I'm missing or is the difference in the rubber/leather seal?
@leea the GHP71 comes in as a three hose package, is that for front or rear? (or either) Right now I'm replacing the hardlines
MH
Michael,
You have it right, looking at it wrong.
Pilot bearing is one thing, seal is the other...... two items, two "descriptions".....
Seal was listed on invoice (???) as "15x21x5 MOS/D Double Lip Oil Seal"
Cheers!
Steve
This stuff on Ford pilot bearings vs bushings comes up about every 5 years or so. Good thing we have the POCA Archives! Personally, I never use a rolling element bearing as a pilot nose support- in any car, since its in the end of the crank. And that is one of the MOST hostile places for a rolling element bearing: inaccessible, hot, intermittent high loads and vibration, with no chance of ever re-greasing it since you'd have to pry out the dust shields for grease access, after pulling the tranny.
For a ZF, a Chevy pilot BUSHING fits the shaft nose but needs a home-made ring-adapter to fit some Ford cranks. And with the price of copper these days, many cut-rate shops are installing those 85% steel Oilite pilot "bushings" that are hard and magnetic. Even if initially greased/oiled, they go dry pretty quickly in that position. A gone-dry steel bearing OR a gone-dry steel/bronze bushing will wear the nose of a ZF. Repairs involve pulling the ZF, disassembly, TIG welding w/stainless steel plus machining ($$$)
So I use Lakewood Industries pilot BUSHING for any ZFs I work on, to protect the ZF nose. I use a magnet to verify it's real bronze. The pilot is SUPPOSED TO BE SACRIFICIAL to support and protect the tranny nose! That means they are not supposed to last forever. YMMV...
M!ke, the same brake hose is used on all 4 corners, its about 433mm total length and use the Girling 3/8-24 thread. https://pantera.infopop.cc/top...e-length-needed-asap
Some folks sell them in packages, but you need (4) of the GHP71.
And yes, I spent a lot of time looking for that Herringbone tubing too, but much better to make sure you get something out of rubber that isn't already 50 years old...replacement hoses are actually one of the easiest things to find for a Goose--Lee
ps. MJ, thanks for the distinction for the ZF shift box ("not dry", at least grease). The note especially on the seal to the shift box is that it should not be leaking from the ZF case, and the shift box should not be susceptible to leaking itself, something that probably won't happen on a Pantera but (with flipped tranny) will happen on the Goose.
...Bushings GUIDE a Shaft or a Drill Bit, to a Point, AXIALLY i.e. SLIDING in and Out, as In the 'Steering Rack' BUSHING.
A BEARING Supports a shaft that will ROTATE within It, and will Rotate AROUND the Shaft. As in a ZF Input Shaft and PILOT BEARING.
Oilite...Real Oilite is a Sintered Bronze that is Compressed at TONS of Pressure to remain 'Solid'. It is Porous and the pores are filled with a Light Oil. Oilite Never Drys-Out! Just warming it, and wearing-in, will cause the Oil to Oooze Out of the Pores. Carrying it in Your pocket, is Not advised, and will cause a Stain in Your Nice Pair of Slaks.
Oilite is Very Soft! Soft enough to Crush, Disrupt, Meld. It will 'Move', adjust, Conform from a High Point to a Low Point, thus self adjusting to most any Mis-Alignment, Axially, of the ZF Input Shaft. A custom Fit. 'Real' Oilite is Never Magnetic. Yes, I check this at all times. At the MOST, there may be 0.10 % Iron. This will not mar or wear the 'Gear-Hardened' Snout of any ZF! I have Tested these Bearings 'To Destruction'! Running the Bearing in the Lathe at 3000 RPM and Driving a Hard Steel Bar directly into it, with Great Force...the Oilite just 'Crushes', and is Displaced Out of the Way. Oilite Bronze is the Best Material for this Job.
MJ
Looking for thoughts on distributor swap. I'm considering purchasing this as it appears to be a direct swap without an external box so I can keep the stock look. It will give me an electronic ignition and rev limiter... (I hate points)
https://www.summitracing.com/p...x-d7130800/make/ford
Anyone see any issues or concerns? I will be using the stock Mangusta air cleaner, so clearance it always a concern.
MH
If you must....... simply put a Pertronix unit in your existing distributor. Valve springs will be your rev limiter............if your eyeballs can't read the tach! Which being Italian, is only a suggestion....! Perhaps they now have a drop in unit that has the rev limiter feature, negating the need for a new dist' body?
I am more of a fan of Duraspark II for run of the mill "sane" driving. No one should be taking their GOose to the rev limiter anyway.....as it takes $1K off of your 401K each time you do that.... ! ![]() Easy start on high compression engines, works, works, works...... Lube the center shaft of the distributor every oil change and you should be golden for the rest of it's life!
Easy start on high compression engines, works, works, works...... Lube the center shaft of the distributor every oil change and you should be golden for the rest of it's life!
Cheers!
Steve
@mangusta posted:If you must....... simply put a Pertronix unit in your existing distributor. Valve springs will be your rev limiter............if your eyeballs can't read the tach! Which being Italian, is only a suggestion....! Perhaps they now have a drop in unit that has the rev limiter feature, negating the need for a new dist' body?
I am more of a fan of Duraspark II for run of the mill "sane" driving. No one should be taking their GOose to the rev limiter anyway.....as it takes $1K off of your 401K each time you do that.... !
Easy start on high compression engines, works, works, works...... Lube the center shaft of the distributor every oil change and you should be golden for the rest of it's life!
Cheers!
Steve
Does the Dura Spark fit under the air cleaner? Any issues with wiring to consider?
MH
I think you're referring to the "big cap" vs the normal cap..... IIRC it is very close with the original air cleaner. I used the large cap on mine, however, I had to make my own air cleaner for other reasons (taller intake!). The DuraSpark II system will work with the small diameter cap just fine. The large cap came about to control spark "scatter", where spark could jump to the wrong terminal under some conditions.
Wiring consists of using an original or prefab harness from control box to distributor, two wires to provide "ON & START" to the control box, and then reuse the original coil to ignition switch wire. I think I wired in a relay to provide the either the start or run signal for some reason to do with the original Goose wiring at the starter solenoid..... Would need to dig out my notes to confirm this.
But it was a fairly easy job to do. I found an original dist-control box harness from a late 70's early 80's Galaxie-ish car, extended it to fit where I put the control box, and wired in the two power wires (start & run) to the control unit, and also into the original coil wire as needed.
I put my box back on the rear engine panel below the air cleaner duct hole but it could go anywhere away from major heat sources.
The 10 degree "retard at start" provision of the 'BLUE' strain relief control box allowed me to run a "mechanical advance only" distributor of 8 degrees, and a total all in timing of about 34 degrees. At start the mechanical advance wouldn't yet be active, so now the advance is only 26, bring in the 10 degree retard and my initial timing needed to be 16 at the harmonic balancer....doable! My compression ratio was somewhere in the 9.5-10.3 area (CRS!) running alloy heads, and it cranked over just fine in all conditions I ran into driving it to POCA rallies in Vegas and Phoenix!
I could have run a vacuum advance distributor also, but would have just limited the amount of vacuum advance......to get a tad more fuel mileage out of the deal. But I was getting close to 20mpg (again IIRC!) on regular pump garbage gas!!!
Your mileage may vary!!! ![]()
Steve
Excuse me for going far back and talking again about the Rub'n buff for the gearbox. Looks amazing and I'd like to apply some to my Pantera gearbox but I'm wondering what temperature this wax can withstand and how resistant it is to oil or gas drips???? ?
@rene4406 posted:Excuse me for going far back and talking again about the Rub'n buff for the gearbox. Looks amazing and I'd like to apply some to my Pantera gearbox but I'm wondering what temperature this wax can withstand and how resistant it is to oil or gas drips???? ?
I haven't put it into service yet, but i know of several people using it on vintage Mercedes aluminum valve covers for years and they all love it.
One note, the commonly used color is "Silver Leaf", but personally I find "Pewter" to look more correct as the silver leaf seems to me to be unnaturally bright. The pewter color looks more like the natural aluminum to my eyes. If your order it, a little bit goes a LONG way and you can order multiples of just one color or multi color packs. The tubes are small, but just one tube will likely do the entire transaxle AND the bellhousing!!! I also recommend using a combination of cloth, Q-tips & stiff tooth brushes for application, and of course, thoroughly clean the piece before application
and WEAR GLOVES or you'll be silver from fingertips to elbows in no time.
Let us know how it turns out for you.
MH
I am still attempting to find a suitable replacement for the bitumen impregnated fiber board firewall pads. I have found the Filzfelt ($$$) but it is just the felt, not bitumen impregnated. I know we've discussed this before, has anyone found a replacement they liked? or something to avoid? I got some that vintage Mercedes use and while it looks great, it's much thinner.
I am missing the two sidewall pieces, if anyone has measurements and/or pics of original pieces in those locations I would appreciate the info. Same with the asbestos panels, I have the frames, but haven't located a decent replacement for the asbestos...
MH
@mkeh posted:I haven't put it into service yet, but i know of several people using it on vintage Mercedes aluminum valve covers for years and they all love it.
One note, the commonly used color is "Silver Leaf", but personally I find "Pewter" to look more correct as the silver leaf seems to me to be unnaturally bright. The pewter color looks more like the natural aluminum to my eyes. If your order it, a little bit goes a LONG way and you can order multiples of just one color or multi color packs. The tubes are small, but just one tube will likely do the entire transaxle AND the bellhousing!!! I also recommend using a combination of cloth, Q-tips & stiff tooth brushes for application, and of course, thoroughly clean the piece before application
and WEAR GLOVES or you'll be silver from fingertips to elbows in no time.
Let us know how it turns out for you.
MH
Thank you for the answer.
Sorry I haven't posted updates on awhile, but refreshed engine has been sitting on a pallet ready to go back in...
So far aside from the ol' take apart, clean and paint, I've put in new rear wheel bearings, new hard lines for brakes, refurbed ebrake cable, new bushings in frame bridge & sway bar, new pistons in calipers, new brake pads, new firewall pads cleaned and finished ZF, new pilot bearing, new clutch disc, new heat shielding (replaced asbestos), new throw out bearing, new brakes hoses... and probably a few dozen other bits...
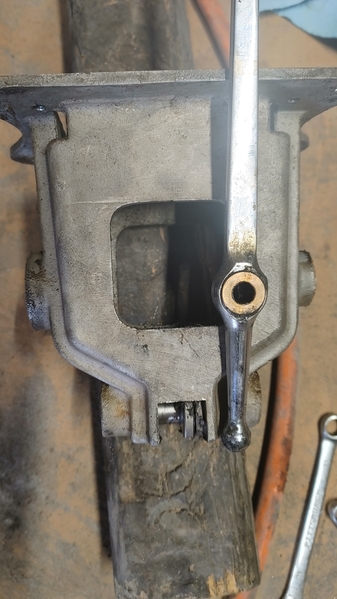
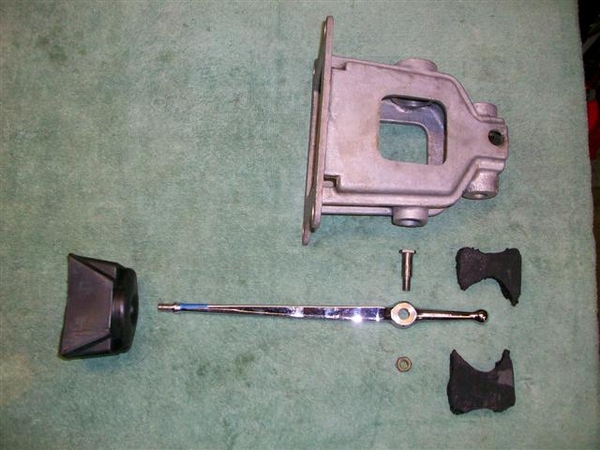
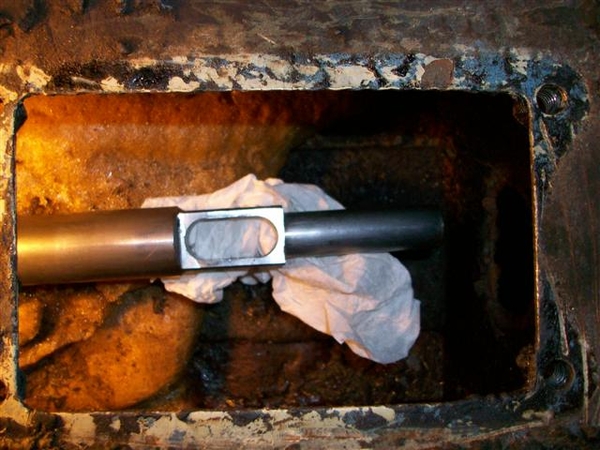
Today's WTF is putting the shifter back together... The shifter itself doesn't go all the way in... It's hitting the rod in the base of the shifter box. AND if course, that's one of the few things I didn't take a picture of during disassembly...
What am I missing here?
MH
Attachments
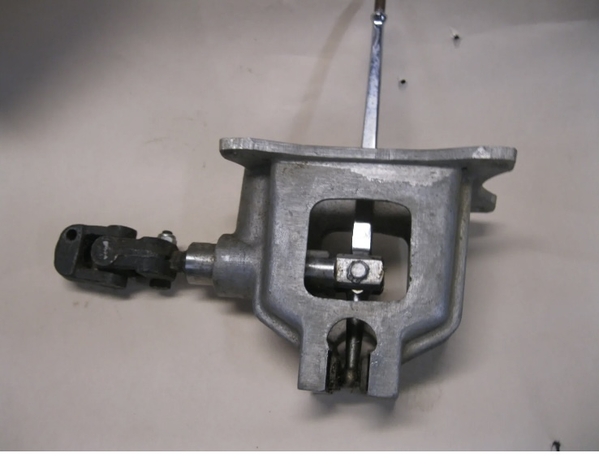
not sure I understand what your problem is. Perhaps this photo will provide some clarity for you.
if my memory serves me correctly, you should assemble the unit as pictured prior to installation
The shift lever bottom ball should index between the two black hardened “guides” at the very bottom of the cage.
The clevis at the tip of the shift linkage rod will attach to the shift lever with the bolt through the two brass bushings
hope this helps just a little bit,
Larry
Attachments
Hammer??? ![]()
It looks like one of the pads may be out of position in the housing???
It should be a "no problemo" sort of fit!
It is interesting to see that your Goose casting is different than what I found in #878, Yours kinda sorta has Pantera-ish features, AND Goose uniqueness.
The Goose does not have the U-joint right out the back door of the shifter housing......but rather further back on the shaft......
See if you can't put the arm in place without the shifter box in the car, so that you can see where the lower ball resides when in place between two pads.
The shifter should slip thru the hole in the shift rod....with no issues.....ie check your shifter bushings to see that they are in proper position and not out of place.
I do NOT recall where those black foamy looking things resided.....CRS disease!
Steve
PS: In my "Oops I'm doing it again" post, towards the end pages, I found some materials that I used for the heat shields. Check it out. If you can't locate it, ping me back......I have some of that material still. Possibly the rivets and a die for the rivets that I had machined up..........as well.
Attachments
Ok, I just figured out that one of the plates is spring loaded and you must open it up and the rod slides inside... BUT... HTF do you open it when it's in the tunnel?
MH
Assemble on your workbench, install as a complete assembly
Larry
Can you try holding the housing up after you put the main shifter shaft in place.....THEN from the top, drop the shifter handle down while trying to reach into the tunnel hole and finagle the shifter ball into place by moving the spring loaded pad???? My car had no spring loaded pads that I can recall......otherwise I would have pulled them out of the "blowed up" picture!
The "no u-joint" at the rear of the housing (and so much more!) prevents Larry's response from working! ![]()
Steve
Well, attempt #47 was semi-successful... I wedged a small piece of rubber tubing between the plates and them tapped the shifter in which knocked out the tubing,,, seemed like I was done,,, except I wasn't... now the sifter moves front to rear fine, but is EXTREMELY tight moving left to right... I have a feeling it's all coming out again tomorrow...
seems like the plates are too tight against the little ball on the end of the shifter rod...
MH
When rotating R-L L-R, the shifter lever will be pivoting on the round shifter shaft (main rod), so that rod should have been lightly greased (in the housing also) with some synthetic lube of sorts, and the bottom ball "should" be sliding also L-R R-L as it's movement will be 180 out from the top of the shifter handle....and this point on the sliders "should" also be lubed.....? Also your entire shifter shaft will be rotated when you do this....so it's not gonna be freeeeely floating...... Try it from the top of the shift lever and see how it feels......but be sure that all is lubed!!!
A note that hosed me up.... Be certain to adjust your single Heim joint at the rear chassis (two Heim joint systems could be different!) mounting point so that the shift rod doesn't get hung up on the rubber boot at the firewall, and dork with your 2 & 4 shift or perhaps 1-3-5 positions! I rebuild my ZF thinking it was majorly hosed as it was popping out of gear (but it also was minorly hosed!!!) when all that was wrong is that I had adjusted the Heim joint height incorrectly and the rubber boot was getting pinched!!!! DOH!!!!! The shaft takes an unusual path when it actually moves........have seen some pretty bent up shifter shafts to get it right! (Factory bends!!!)
Steve
@lf-tp2511 posted:not sure I understand what your problem is. Perhaps this photo will provide some clarity for you.
if my memory serves me correctly, you should assemble the unit as pictured prior to installation
The shift lever bottom ball should index between the two black hardened “guides” at the very bottom of the cage.
The clevis at the tip of the shift linkage rod will attach to the shift lever with the bolt through the two brass bushings
hope this helps just a little bit,
Larry
I think I see part of the problem, I don't have that splined coupler right off the back of the box, just a u-joint. I dang sure ain't taking that apart as I'd NEVER get it back together while inside the tunnel!!!
My rubber hose temporary spacer seems like it will do the trick, I think there is an obstruction keeping the two plates from opening all the way and the ball at the end is REALLY tight in between the plates... so I wouldn't call what it's doing "sliding" by any stretch.
I'll take it all out again, see what's going on with the plates and start over...
I appreciate y'all posting pics, it definitely helps to see others. *IF* I had that splined coupler this would have been 100x easier... Oddly, what is in there LOOKS factory... I can't imagine why a previous owner would have made such a change... and if they did just weld it all up, they did an impressive job!
Once I have it out again I'll post pics of how the shaft looks on the shifter end.
One other thing I just noticed, the shaft on mine extends all the way through the box and slides out the front! I just noticed yours stops at the shifter! Mine is like Steve posted and described. I do have the "black foamy bits", on mine it's a single thick black rubber piece with a hole in the center. I don't have the cup looking thing towards the top though.
Thanks guys.
MH
What you have is original! What Larry posted is likely from a Pantera.
As I stated, your "housing" is slightly different than what was used in my Goose, but not by basic design and function. The Goose got no detents or extra springs.....or the nice splined bit right behind the box!!! ....and I don't recall any springs down in the ball area.....but I could be totally mistaken, has probably been twelve years since I visited my shifter box! The shaft, if I recall, had to be completely removed in once piece all the way back to the ZF!
I know that I repainted the entire shaft assy, BUTT, I can't find any pictures of the whole shaft out of the car. It was grungy in one pic.....beautiful fresh paint in the next go.......!
I like your idea of removing all, starting from ground zero!!!
Good luck!!!
Steve
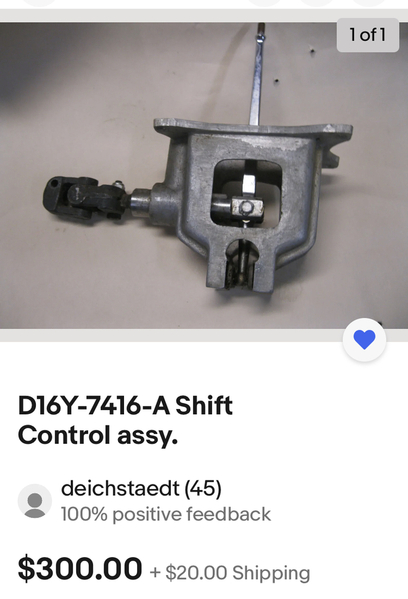
That seems like a very fair price, but I'm pretty sure I can get mine working again....
I just need to appease the DeT gods (again )...
I appreciate the info though... and will be posting more soon...
Thanks,
MH


