
....just as I thought I could jail break out of Covid and go back home, my wife got pregnant and I'm still in Taiwan--I still haven't gotten a chance to see these pieces (that I ship to the car in Houston). But my money is betting on the Lancia Appia or Ardea pins/latch.  Yeah, I bought the latch (not needing one, but still so curious if they are the same ) ...


Saw all parts of Goose completely painted and polished in platinum yesterday. Looks pretty good. Shop is reassembling, cleaning/painting engine and side bays, and fabricating and installing some parts lost during the process.

Wheel wise, anyone know if the wheels on prototype were silver, or platinum, or a mix of the two colors? Right now my wheels are silver. Atch 1 is a pic 'Roger' posted a while back of the prototype that shows the wheels platinum. Atch 2 is the way my wheels were when I bought the car with the wheel centers/spokes matching the original color of the car.

Attachments

Images (2)
  • atch1
  • atch 2

I wonder (loudly!   ) if the gold insert wasn't an owner change....

I have been seeking Ford Argent Wheel paint from VHT, for my new (to me) Pantera rims, and apparently the entire planet has been sucked dry of this version.

On my Goose I went with a BMW powder coating if I recall correctly.   There are some Dupont numbers scrawled on the receipt, but it appears that it was a two part thing as one of them is clear.......   I do not recall approving a two part.....as I hate two part paints.....trouble trouble trouble!!!

I think mine came out just a tad bright, but all I had to compare to was 15+ year old stripped to bare magnesium wheels.....not even close...!!!!   So I just went with the BMW thing.   Now, this was back in the early 00's that I had mine done.   The coating held up VERY well!!!

Some pic's for you.

Steve

Attachments

Images (6)
  • spare1
  • spare2
  • spare4
  • 101_7162
  • 101_7163
  • 101_7171

MUTTSJET,

Wheels on #596 had gold paint on the spokes. I wish I knew the answers to your question about the finish on the prototype wheels. I'd like to spend the rest of the afternoon researching that but of course, life has other plans.

A cool trick is to finish with a clear coat but use what's called a 'knockdown' clear coat. Keeps things from looking too shiny. I think we used a 25% knockdown.

It gives a special glow to the wheels that's hard to describe. Pleasing to the eye but not distract from the rest of the car.

One more thing; a horror story from the gent who did my wheels-

Lamborghini Diablo has Campagnolo wheels. The shop refinished the wheels, reinstalled them, and torqued the lugs to the proper value.  Customer picks up the Diablo and makes it down the street until the first high-speed turn. The front wheel came loose, flew off, and did massive damage to the car. Apparently, (according to the story) it was due to the fact that they refinished the area where the lug lands against the wheel. Either the slick finish or the added millimeters somehow caused the wheel to come loose. So moving forward the guy always leaves a tiny bare space where the lug lands. Not visible once the wheel is installed.

I always sort of suspected someone forgot to torque the wheels and that was the true cause. I mean of course, you're going to blame some exotic thing like refinishing because, with that construction, some of the blame is shirked off to the idea of an exotic and arcane cause. Makes you look a little less stupid than if you simply forgot to tighten the lugs. So potentially it's a BS story but I wanted to share for fun.

I looked at a bunch of cars listed on the PromaMO site.  with the exception of a few cars with aftermarket wheels and the red car with gold inserts on the wheels, they all have what appears to be Argent Silver painted wheels identical in color to the Pantera wheel.  I dont see anything that looks platinum.   If you have an account, check them all out as there must be 250 cars on the site.

Last edited by panterapatt

Simple answer. The 1st pic is the pusher the second is the driver when they converted the Prototipo to a real car. So both are correct.  I have a wheel I acquired with little or no real road use. The color as Steve has mentioned are a Ford /Mazda silver.  The wheels were clear coated and that clear has yellowed. Not as bad as the pic but still.  I seem to remember a miura with gold wheels as well. That may have been a period thing to do.

What you want to do here is ditch the Boss 302 heads. Go with AFR #1388 heads.

They outflow stock Cleveland and B2 heads by a lot. Right around 300cfm out of the box with a mild .500" lift cam. Try 250's for C and B2 iron heads. They are Windsor style and will bolt up to your 'goose headers.

You will also loose 55 pounds from the engine assembly because they are aluminum and they are a direct replacement for 302 iron heads.

You can mill them up to .020" to play with the combustion chamber cc's. You can easily get them down to 54cc's.

Then you can go with a Cobra style Weber intake which are much more plentiful then B2 Weber intakes. How you deal with the jack shaft I don't know but I have seen Webers on running Mangusta's so it must be doable.

Last edited by panteradoug

On using a  jack shaft with IDA Webers it is possible.  You won't be able the run the existing jackshaft,  you have to fabricate 2 brackets at each end, its the jackshaft mount not the actual shaft that gets in the way.  I can't seem to find a photo of the final set up we had, this are from the early mock up.  We put the Webers on when contemplating racing it but found while its sounded awesome we never quite got to grips with (more like we didn't spent enough time to get to) a proper tune for it. Its was more powerful (or at least easier get the power) with the Holley.  Torque and throttle response is much better with Webers though.  There are a couple of IDA manifolds which are made and some have the carbs angled which I think could provide even more clearance for the jackshaft.  

Hopefully the pictures assist.

IIRC we use chrome moly tube as you need to be conscious of Critical Speed and whip, if going full on to full off with the throttle. but again IIRC we only used bearings at each end not in the middle.  

Cheers

Larry  

Attachments

Images (2)
  • mceclip0
  • mceclip1
@leea posted:

....just as I thought I could jail break out of Covid and go back home, my wife got pregnant and I'm still in Taiwan--I still haven't gotten a chance to see these pieces (that I ship to the car in Houston). But my money is betting on the Lancia Appia or Ardea pins/latch.  Yeah, I bought the latch (not needing one, but still so curious if they are the same ) ...


Congratulations to you Sir! You might be surprised to read this; but babies can be born outside of Taiwan. No need to remain for that.

OK back on topic sorry for the hi-jack.

@scifi posted:

Congratulations to you Sir! You might be surprised to read this; but babies can be born outside of Taiwan. No need to remain for that.

OK back on topic sorry for the hi-jack.


...well, the critical thing is that the wife got pregnant while I was in Taiwan... But I'll be sneaking back for the first time in almost 4 years, one month from now...

..btw, re: the whipping jackshaft---At least what strikes me is that the original jackshaft housing (as a single piece tied on both ends, and a very short  distance between the mounting on the engine and the bearing centers) is different here (where front and rear uprights are independent, with apparently a long distance between mounting bolts and bearing center). Is there any feature necessary to align front to rear?

  I can see why 8ma1074 mounted (with just a high rise manifold) their alternator to the front and (in Emeryville CA) sacrificed AC...)

Last edited by leea

Steering question...does this steering rebuild kit for the Renault 4 rack look good [Steering rack repair full kit for Renault R4 4L from 1979 to end of production. - vehicules-anciens.fr]? What key points should be looked at when going over the disassembled rack to know what is good and bad? Also, should the heim joints and bushings on each end of the rack be replaced? If so, couldn't find the part number and where to order on the forum. Read forum discussion on the u-joint on steering column, but couldn't determine if there are replacement parts available,  or if it is  a unique part?

Wow, the gold paint looks great...really distinctive, so much remarkable than I had expected.

For the steering rack--who knows?! The housing itself seems to be a custom thing only for the Goose, but otherwise just suggest aiming a decade earlier on parts (say, for Dauphine)..Likely the stuff starting at 1979 and later mostly works, for some reason I think I bought parts from  https://www.franzose.de/en/Renault/R4/steering-gear/ (just to have them, I haven't done the work).

This is an area that I thought had been pretty much determined some time ago with the Dauphine being the winner (donor!).    I recall taking my rack apart to see if there was any way to remove any slack in the rack.....and found very little to be able to do!

I think I just greased the Unibal joints, slapped on new rubber booties, packed the whole thing with some new grease and put the cover back on!   A pretty hardy box if I may say so!

Here is where it get's dicey.    Denis mentioned simply going to the bearing house with his parts in hand and coming home with new parts!   While tie rod end may be true (Fiat part according to the parts book...... probably posted elsewhere on this site, but I don't have it handy(!)  but in most cars, the Unibal joint was a very custom piece!

The rack center shaft may have been modified (shortened?) when compared to the stock Dauphine parts.  I think it was modified to accept threaded Unibal (14? or 16)  joints.   That would be a MODIFIED Unibal joint where the threaded shaft section was turned down and rethreaded!    (Likely why I greased mine and put new covers on....and called it!  Actually the Unibals were in great shape and weren't loose and rattley like the a-arm ends!)  (so glad for this!!)

You are not going to walk into a dealer anywhere and find these Unibal joints.

Denis, If you can post pics of your later version with bearings (where do they go? and how?) I think that would help some......   Cuz it sounds different....?  Is yours a clamp in version (round clamps over body?)

Back to the original question, I think the "kit" would possibly work for the booties and the rag joint.   The rest of the parts are a mystery.

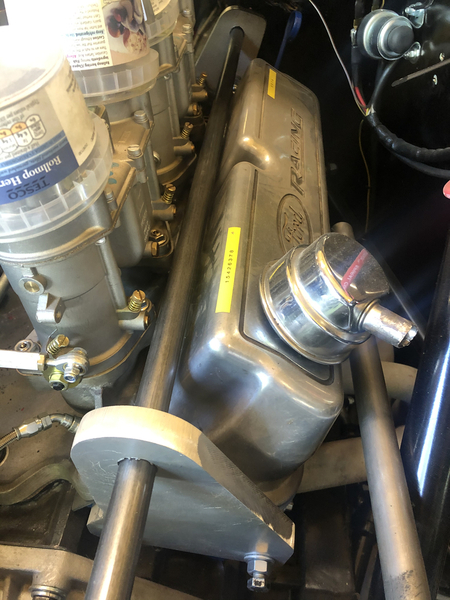
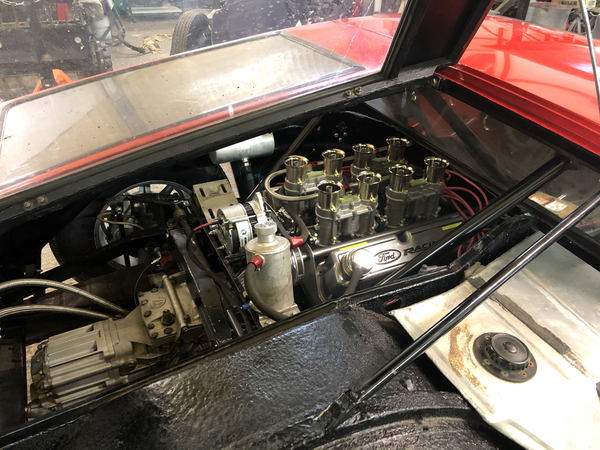
Here are a couple of photos, but I must advise that they are not the best and I was lacking the foresight to take more pic's of the rack deshrouded!!!! Duh!

I added pic's of the frame mounts for this style of rack.    It appears that there is  a needle bearing on the steering shaft.... I don't recall what the shaft rode in, in the housing. Didn't seem like much at all....perhaps right on the aluminium?

There may have been some tensioning wipers under those towers that appear on either side of the cover. Again, my apologies for not using more bits in the camera to catch this stuff!!!!    Someone, please fill in my blanks!

Cheers!     Steve100_0362100_0368100_0371100_0372100_0373renaultdauphine1renaultdauphine2100_0375100_0376100_0378

Attachments

Images (10)
  • 100_0362
  • 100_0368
  • 100_0371
  • 100_0372
  • 100_0373
  • renaultdauphine1
  • renaultdauphine2
  • 100_0375
  • 100_0376
  • 100_0378

Steve I think you are right the inner tie rods are Unibal heim joints and they were available quickly at a resonable price.  What needed to be done was re-thread them as the component had been modified by Ghia. In my case the rack, booties and outer tie rods were all in fine shape.  I remember Dick R posting the booties were still available aftermarket from European but they call them « gaiters »

Rd rebuilding the steering rack, if you want to choose an alternative route and go to a close ratio rack, I had a company in UK that does motorsport steering design and manufacture a closer ratio rack to the same dimensions as original.  I believe they export worldwide. If you or anyone is interested message me and I’ll set you up with the company as I “own” the design but am happy to make it available to any Mangusta owner.  I think it’s 2.5:1 vs 4:1.

cheers

Larry

Larry,

I believe the racks on Panteras and ("most") Mangustas are like comparing apples and carrots.   This discussion has been had in the past....

BUTT, I cannot speak for later versions of the GOose racks.......

Never had a problem driving our Goose with the factory rack.......plenty of problems everywhere else......! 

IMHO, anyone needing a closer ratio rack is starting to think crazy thoughts about they expect to drive their cars.....which will cause problems in every other suspension component on and including the chassis!  Tissue paper.....!

Keep in mind, the Goose is now a rolling 401K plan!!!! 

Ciao!
Steve

I'm guessing at what I did back when I did it, but that's pretty close!   After 30K+ miles as the car came to me...and with a few more.....I was amazed to find that my tie rod ends (outer) were still in really nice shape!    Also amazed at the condition of the modified inner Heim joints, needing only grease and new rubber booties!!!    I was not thrilled with the idea of having to find someone to cut the Heim threads to a smaller metric diameter/thread pattern.   But didn't need to worry as there was no need.

As for the rest of the rack, there really wasn't much one could do!   Lube the steering sector or input shaft..it only goes in one way(!)....so I believe I laid in mass quantities of grease-ish substance....don't recall using any oil of sorts......

I figured that if there was grease on the inside.....it can work itself outside....so I didn't see any need to fill the rubber bellows with something that was gonna end up all over my floor pan, oil pan, and rear suspension!!!

This is a very simple steering rack.......and I guess I was thankful for that!!!   I concentrated on getting the rest of my a-arm heims and ball joints sorted out as they were in TOUGH shape!!!   New ball joints were needed immediately as were a couple of the heims.....the nylon "T" bushings were in good shape.  I replaced them with new....but turns out they weren't good for any positive change....could have left the old ones in place......!  Not a fancy front suspension!

But she sure looked good wearing it!!!
Cheers!
SteveDSCN0631

Attachments

Images (1)
  • DSCN0631

Finally, after 8 yrs and 8 months, should have goose back next week!! Only items missing that shop is having made to give me after the fact are the chrome trims for the rear wing side windows. They lost windows and trim in the process. Since replacements were unobtanium, found replacements in plexi in uk. They look good.

Also, now have all four original rear latches! Paint shop found last one in pass compartment.

Hard work to begin now!

Attachments

Images (1)
  • 1000003796

Lost parts.......ugh!!!!   How the shops miss-manage in order to do this....!   So many stories across the industry...... 

Great progress otherwise!!! Very exciting to have it back in your shop soon!!!!!

The final assembly with my car was always fun....even though I never was doing a full resto.....but just with the engine rebuild, or the ZF, or the brakes as small projects...the last jackstand pulled out and the car lowered to have rubber meet the concrete was a good feeling!!!!

Jump in the car and turn the key.....go for a drive!!! NEVER a bad day when you can do that! 

Cheers!
Steve

Just found this thread… what a great read!!

it’s amazing how projects slowly morph into a decade long endeavor…

Also the hunt for parts is exciting and frustrating at the same time… but, at least for my Pantera - Fiat-Group parts from 1968 seem to be most of the times a winner.. tiny Fiat 850 being a donor included..

beautiful car! Now the tedious work begins for you … 👍👍

Rubber seals in previous input taken care of....

Does the following flow of rebuild make sense?  Any major muscle movements left out?

  • Check all wire continuity
  • Refresh front suspension and refresh steering
  • Brake rebuild/overhaul with new brake lines
  • Clutch lines rebuild
  • Rebuild doors
  • Refresh interior
  • Run rebuilt motor with all cooling and ignition from car on test stand
  • Refresh all hoses
  • Move motor, cooling, ignition from test stand to car
  • Lights/horn/electrics, grate, trim on front end
  • Lights/electrics/remote starter/battery on rear end
  • Install exhaust system (possibly rebuild new exhaust like Dick Ruzzin's over the top bundle of snakes due to width of Boss 302 heads)

Congrats, car & color look fantastic!! Please keep us posted as the re-assembly moves forward!

Hopefully somebody has a solution for that elusive seal - - I've never gotten any handle on what the original version (if any...) looked like.  My car came with a strip of urethane foam, ~3/4" wide, adhered to the body surface, in that small 'valley' just ahead of the pinch weld.  Height varied across the length of this strip, depending on the size of the gap to fill.  (IIRC it was thinnest across the roof area, and significantly thicker along the two sides).  Maybe it served a purpose but it didn't look like an OEM feature.

All I know is that originally there was a faux-chrome plastic edge-bead along the pinch weld flange, where you have the seal installed. The available clearance over the flange is minimal (especially at the top corners of the cabin area), so nothing thicker than edge-bead fits.

So for an original look, faux-chrome beading is a 'yes', gasket/seal is a '?!? '

Last edited by nate

Add Reply

Post
×
×
×
×
Link copied to your clipboard.
×